• Please visit and share your knowledge at our sister communities:
  • If you have not, please join our official Homebrewing Facebook Group!

    Homebrewing Facebook Group

Show us your sculpture or brew rig

Homebrew Talk

Help Support Homebrew Talk:

This site may earn a commission from merchant affiliate links, including eBay, Amazon, and others.
And Done! For Today... The extra computer monitor is hooked up. Now I need to refinish the basement and move everything down there.

2013-12-07 16.14.06-1.jpg
 
Can't remember if I posted this up here or not! So just in case:

1483809_10152517683929968_1044847118_o.jpg


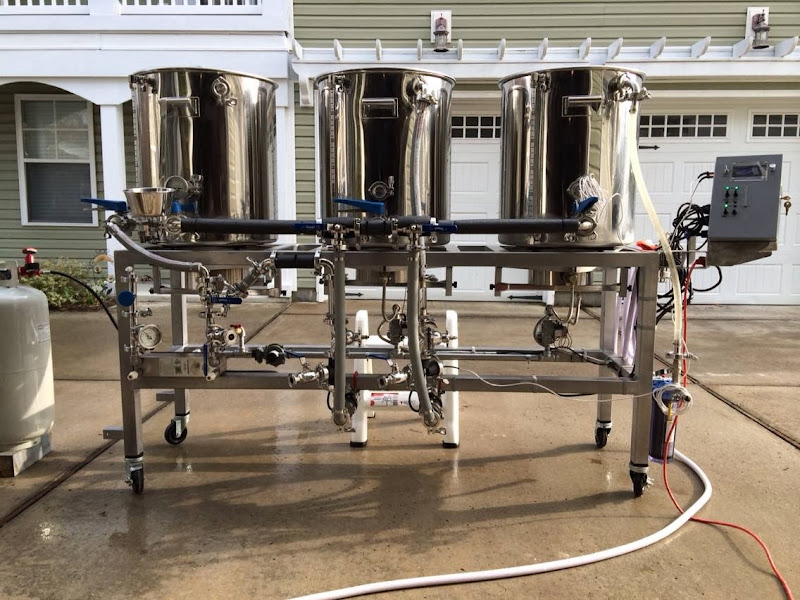
30 gallon direct-fired RIMS with Brewtroller. All kettles interconnected via hard pipe and 3 way valves control the direction of flow. All soft tubing is 3/4" ID chlorobutyl brewery hose. Ceramic coated 1" steel tube stand, combination high and low pressure propane, 30-plate chiller, inline aeration. Last mod will be hard plumbing the water into the end of the main rail instead of direct to the HLT. This also gives me a CIP entry/exit point.
 
jcaudill said:
Can't remember if I posted this up here or not! So just in case: 30 gallon direct-fired RIMS with Brewtroller. All kettles interconnected via hard pipe and 3 way valves control the direction of flow. All soft tubing is 3/4" ID chlorobutyl brewery hose. Ceramic coated 1" steel tube stand, combination high and low pressure propane, 30-plate chiller, inline aeration. Last mod will be hard plumbing the water into the end of the main rail instead of direct to the HLT. This also gives me a CIP entry/exit point.
Wow that is pro. You must have close to 10k in that awesome rig. Do you usually brew two barrels at a time?
 
jcaudill said:
Can't remember if I posted this up here or not! So just in case: 30 gallon direct-fired RIMS with Brewtroller. All kettles interconnected via hard pipe and 3 way valves control the direction of flow. All soft tubing is 3/4" ID chlorobutyl brewery hose. Ceramic coated 1" steel tube stand, combination high and low pressure propane, 30-plate chiller, inline aeration. Last mod will be hard plumbing the water into the end of the main rail instead of direct to the HLT. This also gives me a CIP entry/exit point.

That is a sweet looking rig!!! Like all the shinny stuff to!
 
Wow that is pro. You must have close to 10k in that awesome rig. Do you usually brew two barrels at a time?

No idea how much I have into it and frankly I don't want to know! Once I'm done using this as my home system I'm hoping that it becomes a nice pilot system for me. I brew anywhere from 15-25 gallons normally - so basically a half barrel to just under a barrel (barrel is 31 gallons).

Very impressive! What is the stainless bowl looking thing at the BK?

That is just a stainless dipper I use for taking samples out of the brew kettle. KISS - I say that with a little smirk on my face because there is really nothing simple about this setup lol. But it does work pretty nicely and I have a lot of flexibility with the 3-way valves.
 
here it is for now, Rims tool box below, two chugger pumps and SS table tops with galv shelves below price FREE 99.

will one day be an all Electric Rig with 240V control panel.

-=Jason=-

IMG_20131208_112723[1].jpg
 
Here's the new rendering (it's missing the casters for some reason).

The long vertical bar is for mounting a Pot Filling Faucet on. This faucet will fill the HLT and MT with water.

Each of the burners will have a stainless steel cover with an 11 inch diameter hole cut into it. This will prevent the heat from the burners from washing up the keggle. These covers are removable to wash and access the top of the burner.

The chugger pumps will have splash guards on them to prevent any liquids from dripping on the pumps. The pumps can be moved forward or backward to accommodate a horizontal or vertical pump head installation.

The control box will be mounted on the left side. This will control the HLT temperature for the HERMS and also turn on/off pumps and accessories.

So here's the best things. All the stainless steel will be purchased at cost from my buddy's company. We will pay one of his builders to laser cut all the parts and press all the angles (he takes cash and beer as payment). I'll be posting images of the build progress as it's made.

brew stand 2.0 - view 1.jpg


brew stand 2.0 - view 2.jpg


Burner Heat Wash Cover - On.JPG


Burner Heat Wash Cover - Off.JPG


Bottom View - Burner Heat Wash Cover - On.JPG
 
Here's the Hot Liquor Tank with HERMS installed. I also installed a weldless fitting 2000 watt heating element that's connected to a Johnson A419 temperature controller.

20131227_191857.jpg


20131227_191906.jpg


20131227_192706.jpg


1388097950720.jpg
 
Can't remember if I posted this up here or not! So just in case:

1483809_10152517683929968_1044847118_o.jpg


30 gallon direct-fired RIMS with Brewtroller. All kettles interconnected via hard pipe and 3 way valves control the direction of flow. All soft tubing is 3/4" ID chlorobutyl brewery hose. Ceramic coated 1" steel tube stand, combination high and low pressure propane, 30-plate chiller, inline aeration. Last mod will be hard plumbing the water into the end of the main rail instead of direct to the HLT. This also gives me a CIP entry/exit point.

I'm in the process of designing my brew stand, which is similar to yours. My mechanical engineer friend and I could benefit by seeing some more images of your brew stand. Did you design/build it yourself?

Mike
 
I'm in the process of designing my brew stand, which is similar to yours. My mechanical engineer friend and I could benefit by seeing some more images of your brew stand. Did you design/build it yourself?

Mike

Yep sure did - contact me via PM and I'll help however I can.
 
Here's the new rendering (it's missing the casters for some reason).

The long vertical bar is for mounting a Pot Filling Faucet on. This faucet will fill the HLT and MT with water.

Each of the burners will have a stainless steel cover with an 11 inch diameter hole cut into it. This will prevent the heat from the burners from washing up the keggle. These covers are removable to wash and access the top of the burner.

The chugger pumps will have splash guards on them to prevent any liquids from dripping on the pumps. The pumps can be moved forward or backward to accommodate a horizontal or vertical pump head installation.

The control box will be mounted on the left side. This will control the HLT temperature for the HERMS and also turn on/off pumps and accessories.

So here's the best things. All the stainless steel will be purchased at cost from my buddy's company. We will pay one of his builders to laser cut all the parts and press all the angles (he takes cash and beer as payment). I'll be posting images of the build progress as it's made.

Two quick comments for you:

1) You may want to consider making the burner height adjustable. I designed this into my stand and have taken advantage of it several times. You just don't know for sure where those burners need to be and it gives you no flexibility if you need to make a change later that involves where the kettles will be.

2) I'd recommend elevating the kettles off your stand somehow. You don't want to trap that heat and it'll stop the stand from getting super-heated. Those burners need room to breath.

Good luck!

2)

I like your idea about the adjustable burners. I'll engineer some slots for the burner to adjust up or down. My original measurements of the distance between the burner and the kettle was based upon my blichmann burner. The burner is at 2 3/4 inches away from the kettle.

I'm torn about elevating the kettles off the stand, per your suggestion. I'm really trying to keep the heat from the burner washing up on all my valves and element cable. With my burner covers that I've designed, the heat will dissipate around and outside the brewstand. I understand this may heat up the stand...
 
I'm torn about elevating the kettles off the stand, per your suggestion. I'm really trying to keep the heat from the burner washing up on all my valves and element cable. With my burner covers that I've designed, the heat will dissipate around and outside the brewstand. I understand this may heat up the stand...

I was concerned about the effects of heat wash in my setup as well, and initially tried to build my stand similar to yours with a closed connection to the kettles, but found that the flame wouldn't behave (would wash way outside of the burner) and the kettles wouldn't heat effectively. I ended up elevating the kettles using 3/4" square stainless bar stock and now the burners work as intended. I added a 16ga stainless windscreen to direct the heat up to the kettle, then allow it to wash out the 3/4 gap created by the bar stock. This works well, and the heat flowing up the sides of the kettles is minimal (I could hold my hand in the heat wash without issue).

Nice thing about your design is that you can add some spacers to elevate your kettles pretty easily, so no stress there. I would encourage you to consider incorporating a windscreen into your design, though, to focus all that heat right where you want it.

Is the purpose of the windshield simply to block any wind, thus directing the heat/flame up? I brew in my garage where there is no wind, so do I really need a windshield?
 
Is the purpose of the windshield simply to block any wind, thus directing the heat/flame up? I brew in my garage where there is no wind, so do I really need a windshield?


No, I just call it a windscreen because that seems to be the accepted nomenclature. Wind is rarely actually an issue as I'm a garage brewer as well. The main purpose of this feature on my setup is to direct the heat to the bottom of the kettle and prevent it from washing out around the kettle rather than heat it. There's still enough of a gap for the burner to "breath", but the windscreen ensures more heat ends up where I want it. It has the side benefit of keeping the heat wash from being excessive, which could damage cables, etc.
 
No, I just call it a windscreen because that seems to be the accepted nomenclature. Wind is rarely actually an issue as I'm a garage brewer as well. The main purpose of this feature on my setup is to direct the heat to the bottom of the kettle and prevent it from washing out around the kettle rather than heat it. There's still enough of a gap for the burner to "breath", but the windscreen ensures more heat ends up where I want it. It has the side benefit of keeping the heat wash from being excessive, which could damage cables, etc.

Thank you for your input,wilconrad and others. I have ran the suggestions through my head and I'm now convinced I should add a "Windshield". I'll add this to my design model as a removable part. That way I have the option to use it or not.

Designing the part to fit the burner and my brackets, as well as laser cutting and rolling it, won't be that difficult either.

I'll post my new design as soon as I've modeled it. Also, my plan is to have this entire brew stand built by the end of January. I'll post the final version once it's done.


Cheers!
 
Back
Top