You are using an out of date browser. It may not display this or other websites correctly.
You should upgrade or use an alternative browser.
You should upgrade or use an alternative browser.
Show Me Your Wood Brew Sculpture/Rig
- Thread starter twst1up
- Start date

Help Support Homebrew Talk:
This site may earn a commission from merchant affiliate
links, including eBay, Amazon, and others.

The temperature you recorded was the temperature of your wort in kettle or of the wort exiting your CFC? I have a thermometer built into the exit of my CFC and plate chiller (whichever i choose to use), and i have had occasions in January where I can pump into the fermenter at 60 degrees with almost no initial re-circulation back into the kettle. This will be the first winter coming up using the CFC so i hope to have similar performance.
Have you used your CFC with very cold tap water, where you didn't have to re-circulate ice water or wait 40 minutes?
Also, were you brewing a lager?
The temperature of the wort in the kettle. I was recirculating.
I started using this system in June, so I have not had a chance to to try it with very cold water.
I was brewing a lager, Rauchbier! I had to brew one again after I returned from Bamberg earlier this month.
RoguePixels
"This, my friend, is a pint."
View media item 70535View media item 70536
It's about 95% complete. I picked up a second hand Brew-boss a few months back and finally got the range hood and 240v outlet installed for it. Finished up the bench and sealed it last weekend. I think all that's left is mounting the cooler and pump. Just in time for winter.
It's about 95% complete. I picked up a second hand Brew-boss a few months back and finally got the range hood and 240v outlet installed for it. Finished up the bench and sealed it last weekend. I think all that's left is mounting the cooler and pump. Just in time for winter.
Phil Allen
New Member
- Joined
- Jul 4, 2019
- Messages
- 3
- Reaction score
- 0
Managed to get them from amazon.comThanks folks. Hard to find in UK.
neonsandbox
Member


TwoHeadsBrewing
Well-Known Member
That is a beautiful brew stand and really interesting CFC. How is the performance on that vs. say a typical 25' rubber hose and copper CFC?


$53.24
1pc Hose Barb/MFL 1.5" Tri Clamp to Ball Lock Post Liquid Gas Homebrew Kegging Fermentation Parts Brewer Hardware SUS304(Gas MFL)
Guangshui Weilu You Trading Co., Ltd


$22.00 ($623.23 / Ounce)
AMZLMPKNTW Ball Lock Sample Faucet 30cm Reinforced Silicone Hose Secondary Fermentation Homebrew Kegging joyful
无为中南商贸有限公司


$10.99 ($31.16 / Ounce)
Hornindal Kveik Yeast for Homebrewing - Mead, Cider, Wine, Beer - 10g Packet - Saccharomyces Cerevisiae - Sold by Shadowhive.com
Shadowhive


$176.97
1pc Commercial Keg Manifold 2" Tri Clamp,Ball Lock Tapping Head,Pressure Gauge/Adjustable PRV for Kegging,Fermentation Control
hanhanbaihuoxiaoshoudian


![Craft A Brew - Safale S-04 Dry Yeast - Fermentis - English Ale Dry Yeast - For English and American Ales and Hard Apple Ciders - Ingredients for Home Brewing - Beer Making Supplies - [1 Pack]](https://m.media-amazon.com/images/I/41fVGNh6JfL._SL500_.jpg)
$6.95 ($17.38 / Ounce)
$7.47 ($18.68 / Ounce)
Craft A Brew - Safale S-04 Dry Yeast - Fermentis - English Ale Dry Yeast - For English and American Ales and Hard Apple Ciders - Ingredients for Home Brewing - Beer Making Supplies - [1 Pack]
Hobby Homebrew

$53.24
1pc Hose Barb/MFL 1.5" Tri Clamp to Ball Lock Post Liquid Gas Homebrew Kegging Fermentation Parts Brewer Hardware SUS304(Liquid Hose Barb)
yunchengshiyanhuqucuichendianzishangwuyouxiangongsi


$7.79 ($7.79 / Count)
Craft A Brew - LalBrew Voss™ - Kveik Ale Yeast - For Craft Lagers - Ingredients for Home Brewing - Beer Making Supplies - (1 Pack)
Craft a Brew

$58.16
HUIZHUGS Brewing Equipment Keg Ball Lock Faucet 30cm Reinforced Silicone Hose Secondary Fermentation Homebrew Kegging Brewing Equipment
xiangshuizhenzhanglingfengshop

$172.35
2 Inch Tri Clamp Keg Manifold With Ball Lock Posts, Pressure Gauge, PRV (0-30 PSI) – Homebrew, Fermentation, Kegging System
wuhanshijiayangzhiyimaoyiyouxiangongsi


$33.99 ($17.00 / Count)
$41.99 ($21.00 / Count)
2 Pack 1 Gallon Large Fermentation Jars with 3 Airlocks and 2 SCREW Lids(100% Airtight Heavy Duty Lid w Silicone) - Wide Mouth Glass Jars w Scale Mark - Pickle Jars for Sauerkraut, Sourdough Starter
Qianfenie Direct


$479.00
$559.00
EdgeStar KC1000SS Craft Brew Kegerator for 1/6 Barrel and Cornelius Kegs
Amazon.com


$20.94
$29.99
The Brew Your Own Big Book of Clone Recipes: Featuring 300 Homebrew Recipes from Your Favorite Breweries
Amazon.com

Probably at least as good - the outside material matters not, it's the inside tube that matters.
Plus, the "trombone" tubes can be cleaned")
@passedpawn has/built one of those, I think it's a brilliant idea...
Cheers!
Plus, the "trombone" tubes can be cleaned
@passedpawn has/built one of those, I think it's a brilliant idea...
Cheers!
neonsandbox
Member
Thanks!That is a beautiful brew stand and really interesting CFC. How is the performance on that vs. say a typical 25' rubber hose and copper CFC?
The CFC works great. It brings down the Wort temperature quickly.
As far as comparing it to a spiral CFC, all I can say is that it is much easier to clean. The pipes are straight and the silicon hoses on the ends are easily removed (no hose clamps needed). I just use a 1/2 inch cleaning brush with a long handle.
Here’s a (crude) video I made a while back when I tested it with water.
Other videos will be uploaded soon.
Last edited:
Blazinlow86
Well-Known Member
- Joined
- Oct 19, 2016
- Messages
- 1,687
- Reaction score
- 743
I have one also. I built mine twice as long to avoid soldering so many connections as my brew stand is longer. It works excellent and my main reason for building it was the larger 1/2inch inner pipe allows me to whirlpool chill quickly and creates a very tight whirlpool cone. CheersThanks!
The CFC works great. It brings down the Wort temperature quickly.
As far as comparing it to a spiral CFC, all I can say is that it is much easier to clean. The pipes are straight and the silicon hoses on the ends are easily removed (no hose clamps needed). I just use a 1/2 inch cleaning brush with a long handle.
Here’s a (crude) video I made a while back when I tested it with water.
Other videos will be uploaded soon.
jason.strominger
New Member
- Joined
- Jan 30, 2020
- Messages
- 1
- Reaction score
- 0
Does anyone have the instructions for the reverse chiller in the picture above? (the one that spans the length of the brewing table)
UncleD
Well-Known Member
- Joined
- Dec 1, 2018
- Messages
- 192
- Reaction score
- 193
Just built this recently, all gravity right now. Definitely considering adding automation, valves, pumps, and counter flow chilling eventually. Also considering developing a "self clean" system, because I literally hate doing dishes...
jonestrada
Well-Known Member
- Joined
- Jan 11, 2017
- Messages
- 76
- Reaction score
- 17
.jpg")
jonestrada
Well-Known Member
- Joined
- Jan 11, 2017
- Messages
- 76
- Reaction score
- 17
1/2 barrel, 1/2 electric, 1/2 propane, 2 kettle system
Bailey_Brew
Well-Known Member
- Joined
- Mar 22, 2015
- Messages
- 59
- Reaction score
- 6
I haven't brewed in a while, but since all the tap rooms are shutting down I thought it was timely to crank the eBIAB back up. Since I last brewed I put the basic Concord kettle system onto a "new" wooden structure. It's a table my dad built, probably in the late 60's or early 70's, for his Craftsman table saw. The saw had to go when he developed Parkinson's. The table sat in the carport for decades and I brought it home when my Mom passed last year.
I pressure washed years of dust and grime, and finished it with polymerized linseed oil, leaving a lot of what the antique folks call "patina." The lift for the bag is in black iron. (No machine shop - no welder.)
The closed cycle chiller uses a pump from Harbor Freight and it is cooled with frozen Gatorade(r) bottles. The grain mill stand is a pure scrap wood build.
Not a feat of biochemical engineering, but I brewed a batch of ordinary English pale ale today that came out close to the planned gravity. I hope it will be ready to drink about when the six packs run out.
Stay safe, be kind, and wash your hands a lot.
Basement rig, on wheels so I can roll it over to a sink on the opposite wall.

luizartur
Active Member
Congratulations, it's a beautiful stand!
duckredbeard
Well-Known Member

PumaGreenBear
Member
- Joined
- Jun 6, 2020
- Messages
- 7
- Reaction score
- 9
I got a lot of inspiration from this forum. I found some ceramic tiles in my garage and built this rig around those.


burntgraphite
Well-Known Member
I bought some old stainless perforated lab tables that'd been in a farmhouse for a while, removed the old rusty table bases and built some new ones out of yellow pine, then finished said yellow pine in the shou sugi ban style, and coated that in danish oil, because why not overkill. It's 80% finished. My conical and the hot liquor tun are cleaning right now, I'll post some photos of the whole thing looking prettier presently. The only downside of the shou sugi ban is that it hides the clavos I used for trim, but subtle is nice, too. Stainless deck screws to attach the table tops to the bases, and also to fasten all the members. All boring ol' butt joints. Not my finest piece of woodwork, but it looks appropriately Texas-y.
I have a big garage and my wife is also a brewer, so I don't have to make it compact.
.jpg")

I have a big garage and my wife is also a brewer, so I don't have to make it compact.
Attachments

neonsandbox
Member
I posted pictures of my stand a couple of months ago. Here's a video walk-through.
Last edited:
I posted pictures of my stand a couple of months ago. Here's a video walk-through.
Off topic a bit, but how do you like the 2 vessel system? Have you used 3 vessel? My original plan was to do a 2 vessel, but recently acquired a 3 vessel and control panel for a decent price. Still contemplating going 2 vessel and selling one and the control panel as it would be much more than needed (50 amp ebrewsupply back to back version)
Brewer_Dad
Well-Known Member
Simple ten gallon electric heatstick basement brewery. 44 and 60 quart kettles not shown. Stand was
a wooden bunk bed that was cut up and repurposed into a brew stand. Window fan keeps humidity in
check during brewing, I do run the fan for a couple hours after the boil to air out the basement.Skateboard
aids in wheeling heavy kettles and kegs about the brewery.
I'd REALLY like if you shared the plans / blueprints.
svthomas72
Active Member
- Joined
- Feb 16, 2018
- Messages
- 33
- Reaction score
- 12
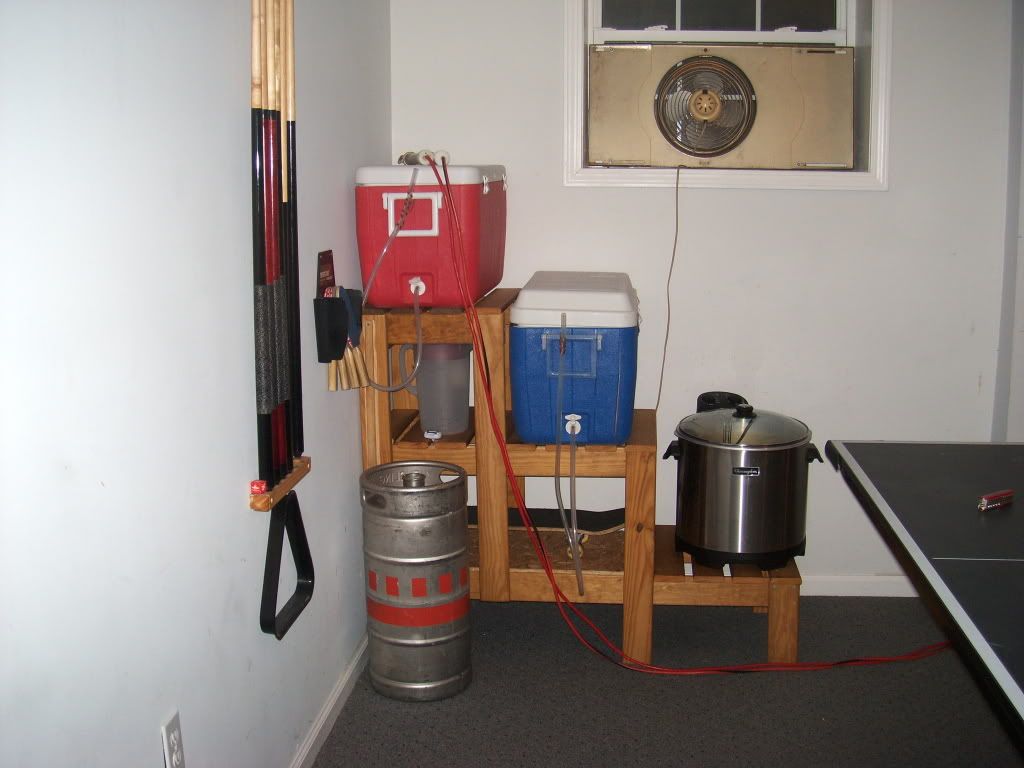
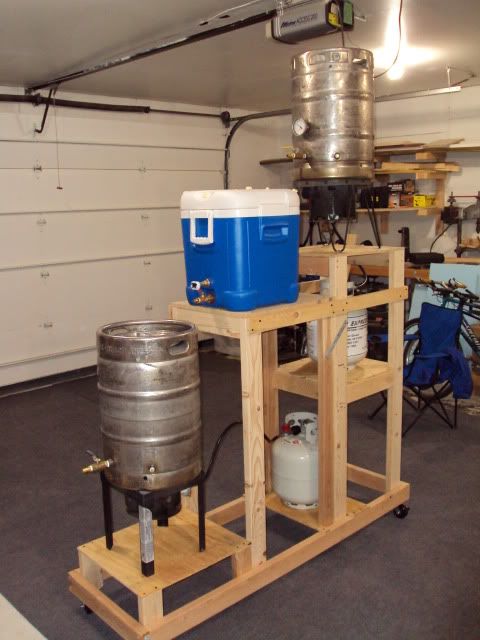
Any chance you have measurements? This looks like exactly what I have in mind to build for myself. I have just completed my HLT and Brew Keggle, and I have an Igloo Cube for a mash tun. I especially like your propane bottle shelves. I had been thinking about a similar solution.here's mine:
nothin' special, but gets the job done.
Soulshine2
Well-Known Member
upgraded my strike water element Friday. Our kitchen stove was replaced so i salvaged the large element and transferred it to my rig . cut a 1/3 off my heat time.
BigOrangeBike
New Member
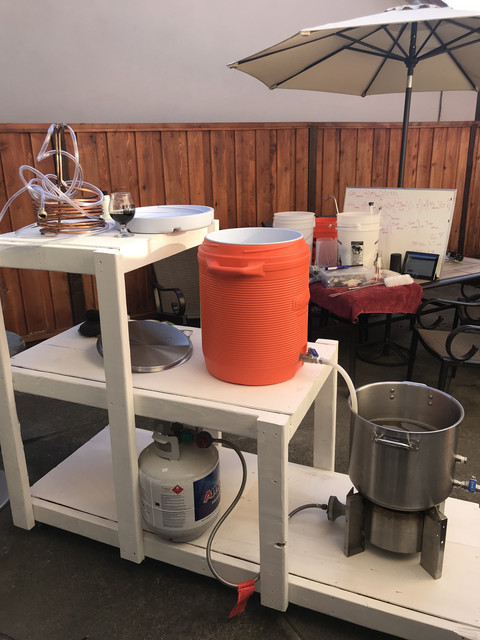
Hi there. I'm a new member/long time lurker. Put this up in the metal sculpture intially, by mistake. I think this pic is most appropriate in this thread.
 Here's a shot of my brewstand. I built it from repurposed wood from a buddies old deck. It doubles as an outdoor workbench, quite nicely. My favorite thing about this stand is that the burner platform is on wheels and stows nicely below the main bench, when not in use.
BigOrangeBike
New Member
Thanks, UncleD
Shermwormbrew
Well-Known Member
- Joined
- Aug 21, 2020
- Messages
- 46
- Reaction score
- 42
Nothing fancy but gets the job done. I use a grainfather controller on my DIY HTL and my boil kettle sits on the ground during brew day. I also use the burner on my mash then after collecting my runnings I move the burner to the boil kettle. Will eventually get a second burner and another pump.
Attachments


mp.shannon
Member
- Joined
- Jan 19, 2020
- Messages
- 5
- Reaction score
- 4
Mobile Brew House & Storage Closet. A lot of crap can fit into a 2'x4' box.


very impressiveMobile Brew House & Storage Closet. A lot of crap can fit into a 2'x4' box.
View attachment 719689
View attachment 719688
Similar threads
- Replies
- 7
- Views
- 2K
- Replies
- 13
- Views
- 4K
