Setting up fridge for Carbing a keg and Pouring

Homebrew Talk - Beer, Wine, Mead, & Cider Brewing Discussion Forum

Help Support Homebrew Talk - Beer, Wine, Mead, & Cider Brewing Discussion Forum:

This site may earn a commission from merchant affiliate links, including eBay, Amazon, and others.

Happyhammer

Active Member
Joined
Nov 8, 2017
Messages
41
Reaction score
8
Location
Australia
Hi,

I've attached a couple of pictures my five year old drew for me, ahem, ok that I drew, that hopefully explain what I'm attempting to do which is setup my fridge so that I can either carb up to four kegs at a time or pour from four kegs at a time or a combination of the two as in picture 2. I don't know much about regulators so feedback very welcome and appreciated.

Picture 1 shows a simple setup I'll be starting with so that I can carb four kegs at a time.

Picture 2 shows a modification where I've added an additional manifold, an additional regulator? and an additional gas line into the fridge.

My question is do I need 2 regs to run different pressures and are they in the right order? ie does the lower pressure need to be the outside reg? Or is there an easier way to achieve the same outcome?
Fridge setup for carbing.png

Fridge setup for carbing & Pouring.png
 
[...]My question is do I need 2 regs to run different pressures and are they in the right order? ie does the lower pressure need to be the outside reg?[...]

Yes, you need two regulators to provide two different pressures, there's no easier way.
No, the order doesn't matter, both bodies have high pressure bypass ports to connect to each other and then to the high pressure gauge, and their respective settings are totally independent of each other.

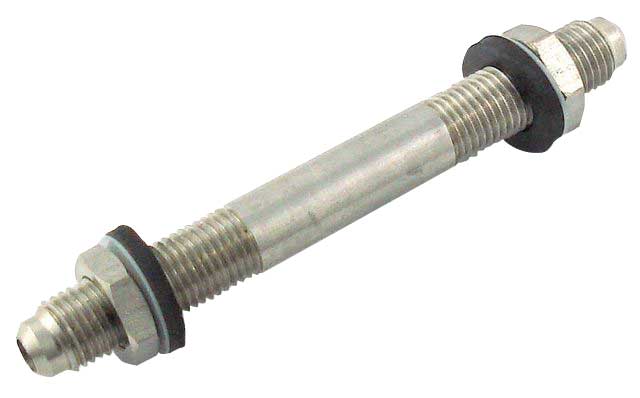
btw, to pass your gas lines through the fridge wall, consider installing a pair of these bulkheads. I use these all over the brewery...

04C03287.jpg


Cheers!
 
And your gonna have foamy beer at Tap.... Beer will be Carbonated and served at Same Temperature...Simply Venting the Keg and serving is not gonna change the PSI absorbed in the Beer until you have drank or repeatedly vented the Kegs until Equilibrium has been achieved...Why I use the set it and forget it Method when kegging and also use a Carbonation stone..CO2 into the Bottom of the Keg and Bubbles up through the beer. PSI is set to the Level I want in the Kegs. I walk away and leave it to absorb. If I am in a hurry to drink I drink it or get Commercial Beers to enjoy while I wait.
 
Hi @John Paul Stoddard ,

Can't I switch the valves at the manifold for the taps to off to prevent CO2 absorption when not in use? I'm assuming the kegs I'll be drinking through the tap will already be carbonated and the CO2 is simply to push it out of the keg to the tap when required?

Apologies if I've got this wrong, first time force carbonating.
 
lol - I totally missed what was the apparent point of the dual regulators.

Sir Stoddard is correct, if you carb to one pressure and dispense at a lower one you're begging for CO2 breakout and flattened beer in the glass.

you should run your "serving" gas pressure at the level dictated by your dispensing temperature and desired carbonation level (where 2.4 "volumes of CO2" is about middle of the road for ales). Reference our favorite carbonation table, find your beer temperature, scan across that row to your desired carbonation level, then run up that column to find the pressure you should use to achieve and maintain that carbonation level at that temperature.

And once you find that CO2 pressure, refer to the only beer line length calculator worth using to determine the proper line length to provide a good pour. Comes complete with an education :)

Now, you can use higher pressure to get to a carbonation level quicker (at some risk of overshooting) and to that end a second regulator would be useful. That said, if you can fit four kegs in a dispensing system with only two on tap, you'll likely have enough time to allow the standby kegs to carb up using the same pressure as the serving kegs (it takes about two weeks) and can get away with one regulator and a 1:4 manifold...

Cheers!
 
Thanks @day_trippr so if my temp is 39F (4C) and I want the 2.4 you mentioned I need 11psi to the keg for carbonation over a 2 week period.

At the same time using the calculator, see below, I need 9.3 feet (2.8m) of hose to the tap to dispense from kegs already carbonated, that's a lot of hose coiled up in the fridge!
Screen Shot 2018-02-16 at 6.20.05 pm.png
 
And your gonna have foamy beer at Tap.... Beer will be Carbonated and served at Same Temperature...Simply Venting the Keg and serving is not gonna change the PSI absorbed in the Beer until you have drank or repeatedly vented the Kegs until Equilibrium has been achieved...Why I use the set it and forget it Method when kegging and also use a Carbonation stone..CO2 into the Bottom of the Keg and Bubbles up through the beer. PSI is set to the Level I want in the Kegs. I walk away and leave it to absorb. If I am in a hurry to drink I drink it or get Commercial Beers to enjoy while I wait.

Thanks John, I should have explained the kegs that are being carved are to be used for bottling, does that make a difference to using a stone. I've looked into large capacity SS fermenters and they use stones. Still not sure what the difference is between using a stone and not using a stone, sorry for being a bit slow.
 
btw, to pass your gas lines through the fridge wall, consider installing a pair of these bulkheads. I use these all over the brewery...

04C03287.jpg


Cheers!
I'd love to get one of those but I'm finding MFT fittings hard to get in Australia but that's exactly what I need with the 1/4" MFT swivel nut and barbs on either end.
 
fwiw, lines can be coiled up. I have 12' lines for five of my faucets and a 15 footer for one that serves higher carbed brews. They all coil up atop each keg quite neatly...

Cheers!
 
Thanks John, I should have explained the kegs that are being carved are to be used for bottling, does that make a difference to using a stone. I've looked into large capacity SS fermenters and they use stones. Still not sure what the difference is between using a stone and not using a stone, sorry for being a bit slow.
The Stones create Microbubbles which is easier to be absorbed..faster absorbtion
 
Hi @John Paul Stoddard ,

Can't I switch the valves at the manifold for the taps to off to prevent CO2 absorption when not in use? I'm assuming the kegs I'll be drinking through the tap will already be carbonated and the CO2 is simply to push it out of the keg to the tap when required?

Apologies if I've got this wrong, first time force carbonating.
The Kegs will be pressurized at 12 PSI until you have dispensed or warmed up the beer for it to start to degas. Yes you can turn of the Gas to Dispense because the Keg is pressurized..But what will happen is your first beers will still be foamy...and then they will start to go flat because the gas will disperse into the Keg Headspace and pour will slow down and then stop..at will point you will need to turn CO2 back on and it will need to reabsorb the CO2.
 
The Kegs will be pressurized at 12 PSI until you have dispensed or warmed up the beer for it to start to degas. Yes you can turn of the Gas to Dispense because the Keg is pressurized..But what will happen is your first beers will still be foamy...and then they will start to go flat because the gas will disperse into the Keg Headspace and pour will slow down and then stop..at will point you will need to turn CO2 back on and it will need to reabsorb the CO2.
I think hes saying The kegs are carbed to the correct level already and he just wants to shut the valve off and store them until ready to drink which is perfectly fine as long as the keg doesn't leak. And in that case yes he can busrt carb serve other kegs at whatever psi he wants on the other kegs until hes ready for the keg in question
 
And once you find that CO2 pressure, refer to the only beer line length calculator worth using to determine the proper line length to provide a good pour. Comes complete with an education :)
:off:I love this calculator! I never would have figured out that if I want to pour my extra-fizzy beer (without changing lines), I just need to hold my glass and picnic tap over my head! :ban:
 
I think hes saying The kegs are carbed to the correct level already and he just wants to shut the valve off and store them until ready to drink which is perfectly fine as long as the keg doesn't leak. And in that case yes he can busrt carb serve other kegs at whatever psi he wants on the other kegs until hes ready for the keg in question
Exactly! :yes:
 
The Stones create Microbubbles which is easier to be absorbed..faster absorbtion
How do you connect the stone to the gas inside the keg? Could this method be used to then fill bottles from the keg?

Also if it takes roughly two weeks to carb normally how long would the stone take?
 
I'm going to say I've never heard of addng a co2 stone to a keg to carb....overthinking a simple process to the max..

Connect the keg,,,carb it at whatever level you want and be done with it...its not that difficult
 
Corny keg carbonation lids mimic commercial bright tanks which often have a ring of stones at the bottom.
7c300.jpg


In the end, the value of such a hack is weighed against patience...

Cheers!
 
The reg is the brain of the system.Theres no way of having different pressures at the same time with One reg. You can shut off as many keg valves as you want and youll still have the same pressure to the kegs that are open.
The pressure doesn't get halfed with 2 kegs or double with one....its the same pressure once it leaves the reg reguardless of how may splitters you have.. shutting off a keg valve is just by passing the keg like its not there. If you want different pressures to serve the beer you need more regs
 
Thanks guys, I like the idea of finer bubbles and cutting down the time to less than a day, so win win.

One of the reviews mentioned switching lids but I’m assuming that’s unnecessary and loses CO2 and you would simply vent down to dispensing pressure at the keg and the reg and move the line from the inlet on the lid to the inlet on the keg. This would mean you have to leave the stone in the cider.

Would you lose much gas in the 30 seconds it takes to switch the lids so that you can use it on another keg?
 
The reg is the brain of the system.Theres no way of having different pressures at the same time with One reg. You can shut off as many keg valves as you want and youll still have the same pressure to the kegs that are open.
The pressure doesn't get halfed with 2 kegs or double with one....its the same pressure once it leaves the reg reguardless of how may splitters you have.. shutting off a keg valve is just by passing the keg like its not there. If you want different pressures to serve the beer you need more regs
Gotcha, I’ll be OK with one reg for now for carbing but once I want to dispense as well from the same bottle I’ll need the extra reg like the example in my second drawing at the top of this thread. Thanks for clarifying.
 
Gotcha, I’ll be OK with one reg for now for carbing but once I want to dispense as well from the same bottle I’ll need the extra reg like the example in my second drawing at the top of this thread. Thanks for clarifying.
NO LOL. You can carb and serve as many kegs as you want with one tank and one reg. You just cant have them at different pressures.
You can carb a keg at 30 psi while the ones at serving pressure is closed and vise versa...and any other combination your want..you just cant do EVERYTHING at the same time.
 
An update on the fridge.

I couldn't find a bulkhead but I did eventually pluck up the courage to drill a hole in the fridge, pictures below. My fridge is an upright, shown below, and probably between 15 and 20 years old so couldn't find a manual or schematic anywhere.

I felt the side of the fridge and it was mostly warm so I took that to mean there were lots of refrigeration lines there so started to pucker up regarding drilling the hole. I notice that it was cooler the nearer I got to the door and decided to go for it there. I made sure that I accounted for any draws on the inside of the door and the door itself that went past these when closing, photo below. This took me closer to the warm spots but it was that or nothing.

I went slowly only putting a little weight behind the drill and once through the metal I poked a screw through until I touched the plastic on the inside. Again I pushed lightly on the drill and it pushed through the plastic on the inside easily and cleanly. Phew!!

The drill bit I used was just wider than the gas line so it finished looking OK, I'll use some silicon to stop any cool air escaping once I've installed the four way manifold on the inside.

On the very remote chance someone has the same fridge as me I'll include the make and model for google.
Fisher and Paykel N510T Fridge Freezer
fullsizeoutput_1d89.jpeg

Drilled the whole towards the door
IMG_1569.JPG

Making sure to avoid things inside the fridge including the door trays and the door inset.
IMG_1574.JPG

In with the gas line
IMG_1570.JPG

Some measurements from the front edge of the fridge with door open and to the floor and top of fridge.
IMG_1577.JPG

All done for now.... next the manifold.
IMG_1578.JPG
 
High drama! :D

In the future, a less hair-raising way to go about this is to start from the inside.
Drill a small hole just through the liner, use a thin probe to poke around to see if there's anything hiding behind the hole, and if all seems clear, drill through the outer skin...

Cheers!
 
Yeah I read that approach and decided I had more control of the drill going in from the outside and although it was slow I managed to stop it running through before I'd poked around with the screw.
 

Latest posts

Back
Top