• Please visit and share your knowledge at our sister communities:
  • If you have not, please join our official Homebrewing Facebook Group!

    Homebrewing Facebook Group

Separate HERMS HEX Build

Homebrew Talk

Help Support Homebrew Talk:

This site may earn a commission from merchant affiliate links, including eBay, Amazon, and others.
So out of curiosity, why are you doing a coil of ss? I mean if your going to weld the tubing in place why not just do vertical tubes with u joints linking them in a chain?

Copper would work and that's what some people use. I have it in my HLT now. I'm using ss for the durability, chemical resistance and cool factor. I think the ss makes it look a little more professional and I wouldn't really want to weld the copper to the ss keg anyway.

I'm using a coil in and out the sides for drainability and to not make a bubble trap. If you believe in HSA or not, why not try to avoid it. As for the linked up sticks with street elbows, it would trap more liquid and I believe somebody here tried it for a chiller in PVC and reported back it didn't work well at all.

I dont think you can weld SS to copper anyways. You could always go with a shell and tube design too.
 
Yep, that half coupling will work just fine. I bought one last week for my new HLT. I am considering replacing the black rubber seal that came with the element with a high-temp silicone o-ring though.

Did you ever end up replacing the black rubber seal that came with the element with a high-temp silicone o-ring? I'm looking to do the same thing but the ones I've seen are round and usually intended for the weldless locknuts. Let me know if you find one that works.

As for an update, I received all my components and now all I need to do is get together with the machine shop to start the build.

I'm placing an order with McMaster in the next couple of days for a bunch of little stuff I need to finish off my build. I'll let you know if I succeed :).
 
Yes you can weld SS to Copper. You want to use the SS filler for the job.

I asked that question over 3 years ago on the miller welds forum and a NASA looking photo was posted with copper tube with a copper end cap.

Check this below Miller thread of a person looking for a Tig welder, check "egbob" reply number 5 with his 3 photos you'll understand his work as well why I like this Miller forum.

http://www.millerwelds.com/resources/communities/mboard/showthread.php?t=20819
 
After many weeks of anticipation, I got the completed heat exchanger back from the welder. I think it is one of the coolest things I’ve seen.

Some things that ended up different than my design are: Coil Diameter is smaller and therefore takes up more height in the chamber and make a taller chamber necessary, RTD port is on the side to not be too close to the element.

I hope to do some leak and maybe some ramp testing on it this weekend. I probably won’t brew with it until I can get the set points and RTD positioning figured out though.

For all non-believers that said it couldn’t be built, here are some shiny picts.

4728968817_2ce0a3ee4c_b.jpg


4729615014_cdc1e5554d_b.jpg


4728977711_16557da998_b.jpg


Here you can see the tip of the RDT sticking out:
4729624192_17779a4894_b.jpg


Here is the lid:
4729616142_d0f761cefa_b.jpg


Element:
4729629954_a6d381b00b_b.jpg


RTD Port:
4729624810_c3f14836bf_b.jpg


Lower coil enry point:
4729625328_62dc18a587_b.jpg


So my question now is, do I configure the out flow vertical like this:
4728980449_0204bef11a_b.jpg


Or horizontal like this:
4729626820_2c548a291a_b.jpg


I think I need a way to ensure all air is purged and there is no bubble trap while still being able to completely drain the line for storage.
 
Way to go Bigscience,
So I'm in the process of doing a similar HEX.
Where you able to get the 1/2 inch stainless in a coil or did you go with 3/8?
I've been looking for a 1/2 inch stainless chiller but have not found one yet.

Thanks, Kevin
 
Thanks
How did you get it coiled that tight?

Kevin

One way is to use a wood plug 1/2" smaller than the coils ID in a lathe with the back gear at 15-20 rpm's, a second person feeds you the tubing. You use gloves under pressure pulling hard against the plug pulling the tubing tight to the plug resulting in a professional and tight looking coils. Works for me.
 
Thanks
How did you get it coiled that tight?

Kevin

So I asked my guy who fabs WFI water systems for biotechs and he said he used a tubing bender and just slowly bent it around a little at a time. He tried to do the whole form thing but the coil was too small and the tube wall was too thin. He said the whole project took him about 3 hours. I guess that's what a pro can do. He likes craft beers, especially IPAs. I gave him a couple L swing tops of my latest batch and told him to stop by whenever he's in the area for refills. You make me somthing that nice you get beer for life.
 
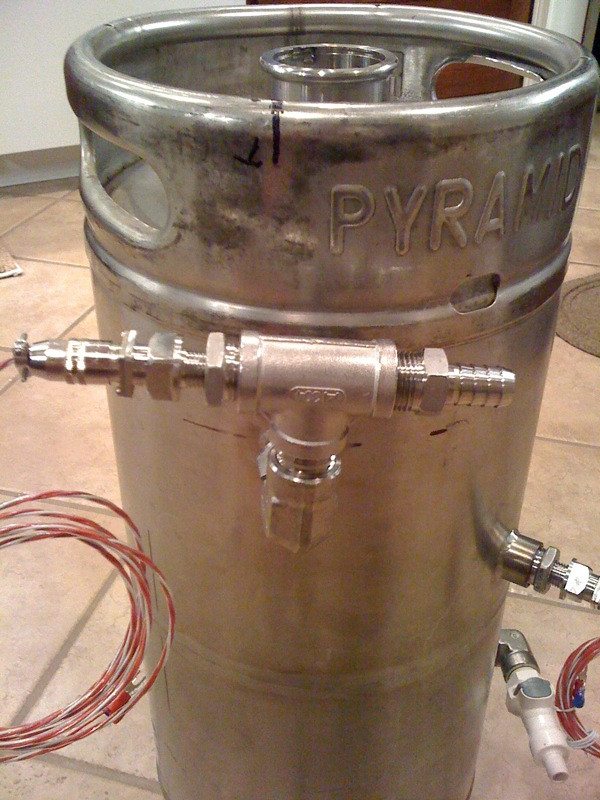
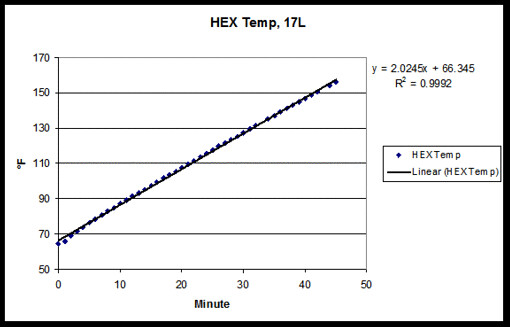
After having some time to try out the new HEX a few times, I thought I'd post some data. Here is how the HEX heats itself up with 17L (enough to cover the top of the coil) of water. Lesson learned, add hot tap water to jump start the process. With room temp at 64F, no stirring and no insulation I get 2F/min.

5081485301_7869f579be.jpg


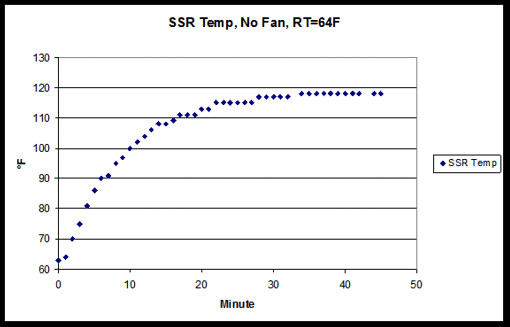
Right now I don't have the SSR heat sinc outside of the control box or have a fan on it so I wanted to know how hot the sinc would get. (and to not burn it up either) I put a probe underneath the SSR on the first fin of the sinc to monitor the temp rise. Under full, constant load of a 1500 watt element, temp flattened out at 119F.
5081485337_0e0a822c41.jpg


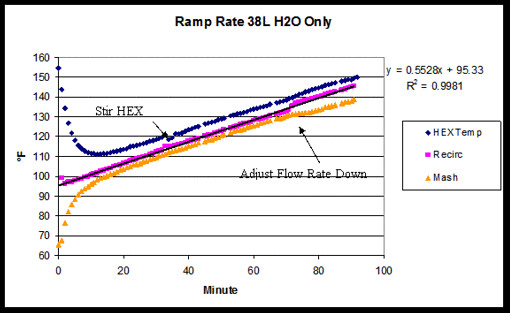
To somewhat simulate mash conditions, I put 38L of water in the MLT and tried to heat it up. The water in the HEX was at 155F and the MLT was at 64F, flow rate was 9.3L/min (faster than a mash and due to no grains, more mixing). As you can see there was a quick bump in mash temp and a quick drop in HEX temp. Lesson learned, heating strike water to temp this way will take a long time. You can also see that the HEX temp dropped and the Recirc temp jumped up when the chamber water was stirred. There was also more heat transfer when the ball valve was set to about 1/2 flow. Sorry I didn't actually measure the flow rate.

5082079254_b810de20e9.jpg


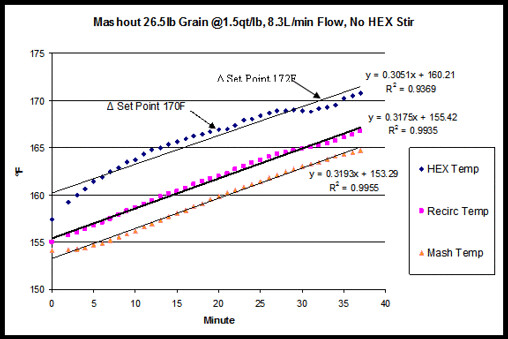
The latest test was on an actual mash-out with 26.5lb of grain at a 1.5qt/lb ratio. You can see the delay in application of heat, the mash temp is measured at the exit. Residence time is 4.1 minutes at a flow rate of 8.3L/min. A few things to note, I had the PID set point at 168F initially but as the HEX approached the SP, it started to back off heating. I adjusted it to 170F and then 172F. Lesson learned, keep the HEX SP about 8F hotter on ramps and Start to heat up before you start the mash-out/ramp. This will save about 10-15 minutes.

5081485363_b2832475be.jpg


All in all, I think things worked out very well for maintaining mash temps with little to no effort. The ramp rate was about 0.32F/min without stirring. For the next brew, I'll start with the HEX at a higher temp and try to implement some chamber water mixing to see if the recirc temp and HEX temp can be closer.
 
Back
Top