Robobrew/Brewzilla Discussion

Homebrew Talk - Beer, Wine, Mead, & Cider Brewing Discussion Forum

Help Support Homebrew Talk - Beer, Wine, Mead, & Cider Brewing Discussion Forum:

This site may earn a commission from merchant affiliate links, including eBay, Amazon, and others.
From all your posts, it sounds like you really need one of the 65L units. I'm normally doing 12lb or so grain bills, and the 35L unit handles it fine. I did do the Russian Imperial Stout recently, and that was 20lbs. Won't do that often.

65L isn't available in Canada. I also haven't ventured into large grain bills yet, so the 65L really wouldn't be of any use to me. I also have no need to brew more than 5gal batches. I may be making it sound like I'm having issues with my unit, but I'm really not. I'm just trying to optimize it and get the most out of it as I can. I'm going to incorporate a few extra steps into my brew day to improve things.
 
65L isn't available in Canada. I also haven't ventured into large grain bills yet, so the 65L really wouldn't be of any use to me. I also have no need to brew more than 5gal batches. I may be making it sound like I'm having issues with my unit, but I'm really not. I'm just trying to optimize it and get the most out of it as I can. I'm going to incorporate a few extra steps into my brew day to improve things.
I was really replying to @rjhoff . He seems to do large grain bills, and therefore need more capacity.
 
From all your posts, it sounds like you really need one of the 65L units. I'm normally doing 12lb or so grain bills, and the 35L unit handles it fine. I did do the Russian Imperial Stout recently, and that was 20lbs. Won't do that often.
I really could use a larger vessel but I'm pretty OK with my brew sessions in the 35L, save losing a little efficiency - no big deal the beer tastes good (to me anyway). I'll get as much as I can out of the 35L...
 
Last edited:
and I did see an improvement when I started stirring the mash but also when I tighten up my mill gap.

I've been doing some research and seems like the mash and boil and digi boil both recommend stirring the mash during the rest...I'm going to give it go next time out and see what happens.
 
I've been doing some research and seems like the mash and boil and digi boil both recommend stirring the mash during the rest...I'm going to give it go next time out and see what happens.
That’s one thing about using the top screen. It presents a barrier to stirring.
 
That’s one thing about using the top screen. It presents a barrier to stirring.

From what I've seen online I.e. YouTube many Aussie brewers don't use the top screen at all...I'm also thinking of making this switch and switching to This inside with top on...taking a page out of the Claw Hammer book.

We'll see I've got a bunch of crazy ideas for the next run of wort.
 
Do you guys do any step mashing? I normally use manual mode, set a mash temp, and then just bump it up when it comes time to boil. I have only used the automatic mode a few times. But now I’m starting to get into doing lagers, and want to use it more.
It seems to me like the real power of these units is to be able to step mash by just programming it into the timer. I’ve tried it a couple times, and it has seemed to work, but haven’t done the exact same recipe. So, it’s hard to zero in on what exactly the effect is. I need to use a simple, basic recipe, and then experiment so as to isolate the variables.

I used it for my regular infusion mash and then to ramp up to mash out...it took my machine about 7 minutes to ramp from 152-168 so I added that into the time.

My next brew is going to be a Helles so I'm gonna try some step mashes using the programming and see what happens.
 
I used it for my regular infusion mash and then to ramp up to mash out...it took my machine about 7 minutes to ramp from 152-168 so I added that into the time.

My next brew is going to be a Helles so I'm gonna try some step mashes using the programming and see what happens.
I have done the same. But unless there are multiple steps, I find it just as easy to do it manually.
 
I set temps manually but have not done any step mashes. There's a lot of thermal mass in that mash though. The water in the bottom of the kettle will reach 168 a lot faster than the mash temp itself. I extended my 20 minute mash-out yesterday by a good 15 mins to get it up to 168.
 
Most recipes call for single infusion mash, and the raise to 170* at mashout. I assume it is because most brewers have setups which aren't programmable, it's easier, and it works. But we have this capability, and so I want to explore the possibilities.
 
Question for the group, I'm planning my next brew and was wondering if anyone double crushes the grain? I always use rice hulls so not worried there just wondering if anyone has tried it. Let me know!
 
Question for the group, I'm planning my next brew and was wondering if anyone double crushes the grain? I always use rice hulls so not worried there just wondering if anyone has tried it. Let me know!
I’ve double crushed once or twice but now I prefer to adjust my mill gap. My LHBS double crushes certain grains. I think it’ll help your efficiency for sure. I’m using a barley crusher and milled at the factory setting 0.039 for years and recently started tightening it up. At 0.037 and definitely going to tighten it further. I have a couple recipes that use locally malted barley that recommend gaps of 0.034 and less.
 
Let me know if you try it out...interested to see if it makes a difference

I went to Home Depot, could not confirm the diameter and thread. Assuming it’s an English thread, looks to be 1/2”, fine thread (HD only had coarse thread) - if memory serves me it could be 1/2”-32, but was not able to confirm. Instead I bought a stainless 3/8“ bolt, 2 washers, and nut. It fits OK so next brew I’ll try it out.
 
I went to Home Depot, could not confirm the diameter and thread. Assuming it’s an English thread, looks to be 1/2”, fine thread (HD only had coarse thread) - if memory serves me it could be 1/2”-32, but was not able to confirm. Instead I bought a stainless 3/8“ bolt, 2 washers, and nut. It fits OK so next brew I’ll try it out.

Keep me posted!
 
Hey all,

I've brewed on a BrewZilla 3.1 65L for a year. As a small homebrew club/brewery in planning (we are definitely on hiatus due to COVID), I selected it due to its size, price, consistency, and ease of cleanup. For the most part, I really enjoy working with this device. I've brewed on it roughly every two weeks for a year, making by my count 28 batches and at least 250 gallons of wort. Combining them with the FermZilla 7-gallon fermenters was a low-cost way of permitting pressure transfers, experimenting with different dry hops (by splitting a ten-gallon batch), and very easy clean-up.

Here's a few gripes about it. Again, I'd call myself a BrewZilla expert as I can imagine few have brewed this many times on the platform.
Luckily, most of these can be overcome with simple changes. My hope is that this post can be the start of a one-pager in HBT for brewers starting out on the BrewZilla. While I know that the 65L has a few distinct differences over the 35L, I imagine that either of these devices exhibit the following issues.
  • Temperature accuracy- I noticed quite early on that many of my brews were finishing quite dry, despite setting a higher mash temp. This was cited in an earlier post--there is a few degrees' difference between the temperature of the liquid at the bottom of the BrewZilla, where the thermometer/heating elements are situated, and the grain bed, which is located an inch or two directly above. What I've found is that the thicker the mash/larger grain bill, the wider the temperature offset can be. Once time, I set the controller to 148 degrees and measured 141 degrees in the center of the grain bed using a probe.
    • How to address this: It's all about correcting an "offset". For a 10-gallon batch of NEIPA, in which sweeter finishes are often desired, I have set it to 162 and concluded that this gets me to about 154-156--right in between the criss-cross of alpha & beta amylase conversions.
  • Capacity - BrewZilla 65L definitely yields 10-gallons of pretty much any beer that's under 1.060/15 Plato. Any bigger, you're going to be overflowing, the mash will be at the brim.
    • How to address this: Definitely, don't assume you can get 10 gallons from it without sparging--a full wort mash will have the device at overflow for a brew as low as 10.55/13.5 Plato. Not sure how else to handle this without sparging, except to perhaps start with a lower post-mash SG and boil it down more? Add some malt extract?
  • Efficiency - I've had mash efficiency ranging from 60% to 72%. Some of this is due to the aforementioned temperature issues, likely problems with filtration in the bottom of the mash, and perhaps other unforeseen issues.
    • How to address this:
      • Double-crush the malt, and use rice hulls when working with high-protein adjunct malts
      • Watch the mash temps as described above--this also means that mashing out should offset to 174 instead of 168. Big difference here.
  • Weep holes/overflow tube - The overflow tube and weep holes on the sides of the malt pipe can fill with grain during a large mash. These grains can flow straight down into the space between the malt pipe and the heating elements, resulting in scorched grain, or [much] worse, a jammed pump. Un-jamming a pump is a solid hour of taking the bottom apart, carefully unscrewing several parts, unwiring the entire device, and cleaning out the pump. Oh, then re-wiring and putting it all back together before testing the pump again. So the best way to solve this problem is to avoid it.
    • How to address this:
      • Use the rubber cap on the malt pipe cap to cover the overflow tube--yes, this means the mash liquid could overflow, but where are you going? Watch your mash! At least for a good 20 minutes to make sure the flow is stable.
      • Duct tape the weep holes on the sides of the malt pipe. This is essential for larger mashes. Then simply yank the tape off when mash out is complete so you can lift the pipe out using the handy steel bar.
  • Hop utilization - recently, I've noticed that the hop spider is getting a bit jammed up during whirlpool/hop stands. It also seems to be doing worse with age--no doubt 30 uses can clog up the steel mesh, despite heavy-duty cleaners.
    • How to address this: I moved back to using a large BIAB bag for the hops--this permitted me to easily and safely lift the bag out, slosh it around the wort, and replace it, several times in the whirlpool. I have no doubt that this permitted the hops a more comprehensive contact time with the wort.
Do these tips help? Are some stating the obvious? Are others up for debate? Please let me know.
Again, this BrewZilla is a great device! I moved from a three-vessel keggle setup with propane and have no doubt this is resulting in more consistent recipe execution. Also, a smaller footprint makes it easier to place in most any indoor space (mine is in the garage). For the 65L, an electrician added a new 20A breaker and the 220V outlet in less than an hour. It may seem odd that someone trying to go pro would select a single-vessel system, but being able to have shorter brew days means I can brew more often. Focusing on recipes is way more fun than fussing with equipment!

Cheers!
 
Although my experience is on the 35L, everything you summarize and suggest makes sense. I don't approach my mash temp management the same way as you, but that could be due to the different capacity vessels. I feel the temp sensor in my unit is accurate, just not placed where it can accurately measure the mash temp.

Good luck going pro! I previously brewed with my buddy on a 26 gallon 3 vessel system with hope to eventually open a brewery. He dropped out for various reasons (life) so I sold the bigger pilot system and opted for the Robobrew - love it!

Thanks for the rundown. Eventually I may move to a unit like you have. The 220v version of 35L at least. I have no designs on going pro, and enjoy being able brew often, so the 35L suits me fine. I just upgraded the circuit board. It seemed like it may have heated faster, although I didn't time it.

As far as the temperature offsets. Have you tried measuring the temperature down by the probe? After installing the new circuit boards, I did this. There was a 4*F difference between the Robobrew display and the thermometer. So I calibrated the display to -4*. I just wondered if you have calibrated your unit?

It does seem like these units are not designed for big beers. They do great with beers under 1.060 OG, as you say. And I have the same issues with my hop basket that you do.
 
I did a thermometer calibration today while I was flushing my Robobrew at 150 F - the Robobrew sensor was dead nuts same as my Thermapen, no offset. There could be a lot of variation from unit to unit though...
 
I did a thermometer calibration today while I was flushing my Robobrew at 150 F - the Robobrew sensor was dead nuts same as my Thermapen, no offset. There could be a lot of variation from unit to unit though...

Same here, mine has been spot on no differential at all.
 
Same here, mine has been spot on no differential at all.
I assume the new circuit boards have something to do with it. I will check it again.
I had recalibrated once with the original boards by 2*, but then ended up setting it back to default.
 
So yesterday was brewday and I tried a few different things to improve my efficiency. I stirred the mash 3 times total, and fly sparged by removing the top screen above the mash and slowly pouring my sparge water evenly across the grain bed. At the end of the day my efficiency was 74%, up 10% from last time. I was also within .002 of all my gravity numbers, and within .1gal on my volumes. Big efficiency improvements that hopefully I can replicate!

I think fly sparging was a big win here, but doing it manually with the pitcher was a bit of a pain. I'm thinking of drilling small holes in the bottom of a bucket, suspending it over the malt pipe and pouring my sparge water into it. That way I can still get slow and even water distribution across the grain, and I can walk away and do other things.
 
Last edited:
I think fly sparging was a big win here, but doing it manually with the pitcher was a bit of a pain. I'm thinking of drilling small holes in the bottom of a bucket, suspending it over the malt pipe and pouring my sparge water into it. That way I can still get slow and even water distribution across the grain, and I can walk away and do other things.

What temp did you sparge with? Congrats on the number in efficiency! I'm looking forward to my next brew!
 
Thanks! I heated my sparge water to about 172F, knowing it would cool off by the time it hit the grain bed. I aim for 168F.

Nice, I'm selling off my old system to hopefully fund a DigiBoil purchase so I can heat the sparge water. Brewing in the garage doesn't provide many options otherwise.
 
Nice, I'm selling off my old system to hopefully fund a DigiBoil purchase so I can heat the sparge water. Brewing in the garage doesn't provide many options otherwise.

I feel your pain. During winter I brew in the kitchen, and in the warmer months I brew in my garage. I heat up my sparge water in a stock pot on the stove in my kitchen, then bring the whole pot out to the garage and pour from a pitcher. Not ideal. I'd eventually like to warm my sparge water with a sous vide in the same stock pot, and install a ball valve with a silicone hose. This way I don't have to shuttle a pot of 170F water to the garage, and I can throttle the flow of sparge water with the ball valve.
 
I feel your pain. During winter I brew in the kitchen, and in the warmer months I brew in my garage. I heat up my sparge water in a stock pot on the stove in my kitchen, then bring the whole pot out to the garage and pour from a pitcher. Not ideal. I'd eventually like to warm my sparge water with a sous vide in the same stock pot, and install a ball valve with a silicone hose. This way I don't have to shuttle a pot of 170F water to the garage, and I can throttle the flow of sparge water with the ball valve.

Last brew day I heated the Sparge water in the Brewzilla then transferred it to my Cooler mash tun which I'm sure it lost a few degrees throughout the hour mash. But oh well nothing else I can do until I get my DigiBoil
 
I feel your pain. During winter I brew in the kitchen, and in the warmer months I brew in my garage. I heat up my sparge water in a stock pot on the stove in my kitchen, then bring the whole pot out to the garage and pour from a pitcher. Not ideal. I'd eventually like to warm my sparge water with a sous vide in the same stock pot, and install a ball valve with a silicone hose. This way I don't have to shuttle a pot of 170F water to the garage, and I can throttle the flow of sparge water with the ball valve.
I use a sous vide unit to heat my sparge water now. It works well. Previously I would bring 8 gallons to a boil, then draw off 5 into a cooler. It would usually have dropped to almost 170 by the time I needed to sparge. I would add 1 gallon or 2 of cool water to bring the remaining water in the kettle down to mashing temperature prior to adding grain.
 
I think fly sparging was a big win here, but doing it manually with the pitcher was a bit of a pain. I'm thinking of drilling small holes in the bottom of a bucket, suspending it over the malt pipe and pouring my sparge water into it. That way I can still get slow and even water distribution across the grain, and I can walk away and do other things.

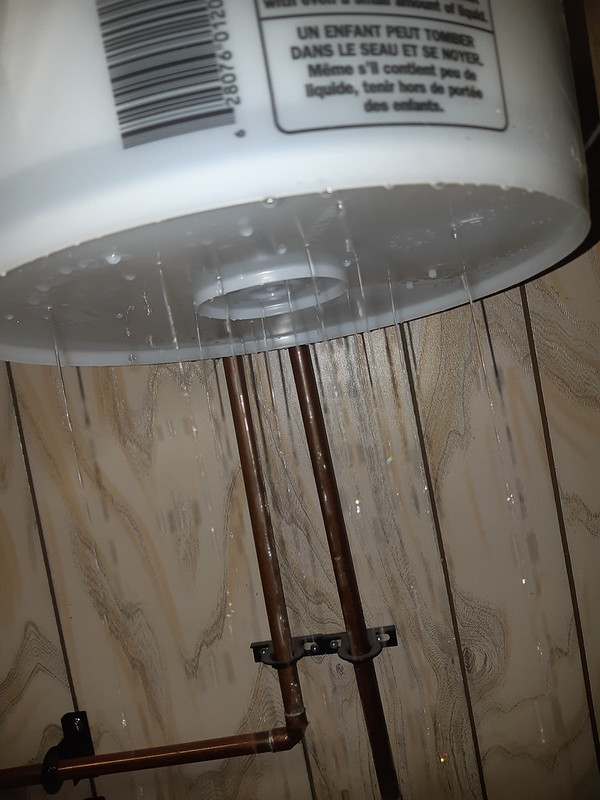
So, I picked up a 3 gallon measuring bucket from home depot today. It has the same base diameter as the 5 gallon buckets, and fits snug inside the mash pipe. Drilled some 1/16 holes in the bottom. Behold the fly sparge bucket...

 
So, usually when I sparge with the Robobrew, the top screen is still in. The water usually drains really slow. I just keep a pool of water on top, let it go down, add more. I don’t know if it proper to can this batch sparging, fly sparging, or something else. It’s just a constant puddle of water sitting on top of the grain and slowly draining.
 
So, usually when I sparge with the Robobrew, the top screen is still in. The water usually drains really slow. I just keep a pool of water on top, let it go down, add more. I don’t know if it proper to can this batch sparging, fly sparging, or something else. It’s just a constant puddle of water sitting on top of the grain and slowly draining.

As I was doing research I found that Marshall at Brulosophy did a review of the 35L...he did a full batch sparge so its possible to do...I don't think it's very practical on the 65L but might be something worth trying on the 35L
 
As I was doing research I found that Marshall at Brulosophy did a review of the 35L...he did a full batch sparge so its possible to do...I don't think it's very practical on the 65L but might be something worth trying on the 35L
Probably depends on the grain bill.
 
Hey Robobrew people, I‘m done with the center pipe, it totally messed up my brew day today and I realized that I never use the overflow. Does anyone know of a stainless threaded bolt or some other solution that can be used to plug the hole in the mash pipe bottom?
I use a BIAB in mine, I started doing this when I noticed the amount of grain that would slip in when mashing the normal way then just graduated to just taking the pipe plain out
 
I use a BIAB in mine, I started doing this when I noticed the amount of grain that would slip in when mashing the normal way then just graduated to just taking the pipe plain out
I’ve always managed the recirculation to avoid overflow and realized last session when the extension separated that I never use the overflow pipe and it just gets in the way.
 
I’ve always fly sparged and never thought about an alternative. I read the Brulosophy review and it seems to me that batch sparging is extra work and time. What am I missing?
 
Just completed my first batch on a Digiboil kettle with DigiMash upgrade. I used to use a 3 tier propane setup, and moving to the Digiboil I have never felt more in control of the brew day. I hit all the expected numbers using Brewfather software. I am excited to taste the results!

It did leave me with a question though. I used the default mash thickness in Brewfather of about 1.4 qts/lb which is thinner than I have ever used on my old setup. However, the mash was thicker than I have ever seen. Essentially the consistency of oatmeal with no flowing liquid. Is that correct? Should I work toward recirculating the mash as some water may be settled in the bottom below the false bottom? What mash thickness is everyone using?

Also, I saw some talk about thread types on the fittings. I wanted to add cam locks to my kettles, but the standard 1/2" NPT that was advertised wasn't a perfect fit. Through some research I found that the threads on the DigiBoil are actually 1/2" BSP threads, and this adapter helped immensely:

https://www.amazon.com/gp/product/B07FMS82LQ/ref=ppx_yo_dt_b_asin_title_o01_s00?ie=UTF8&psc=1
I always use the recirculation pump. Does the Digiboil have one?
 
Back
Top