• Please visit and share your knowledge at our sister communities:
  • If you have not, please join our official Homebrewing Facebook Group!

    Homebrewing Facebook Group

Pump In (Inside) a Toolbox - Stainless

Homebrew Talk

Help Support Homebrew Talk:

This site may earn a commission from merchant affiliate links, including eBay, Amazon, and others.
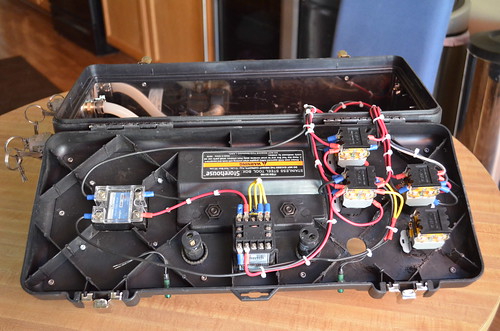
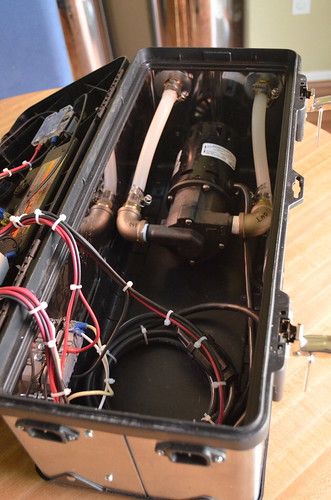
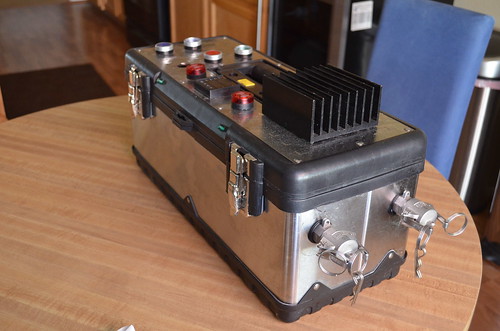
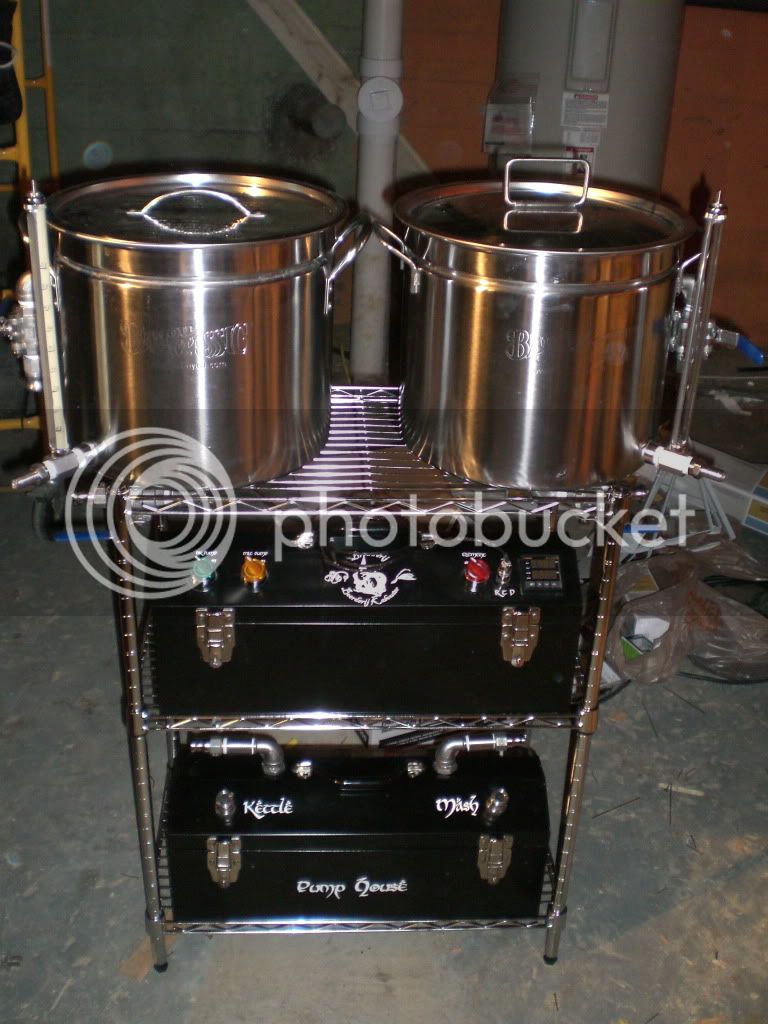
Well, here she is! I didn't integrate a GFCI since all the outlets I use are GFCI protected & all the parts I used were from my parts bin in the garage. The receptacle and switch are from an old EMC UPS, the plumbing parts I had lying around in my plumbing box. I picked up the toolbox with a 20% off coupon and used an old extension cord instead of the small power strip. I put washers on either side of the camlocks for some stability, no issues yet with the ball valve getting torqued too much.

sdc12801.jpg


sdc12805a.jpg


sdc12806p.jpg


sdc12807.jpg


sdc12808.jpg


sdc12809okd.jpg
 
I took a 1/2" SS Ball Valve and put a type B on one end and a type F on the other. I store it inside the toolbox and attach it to the outflow of the pump when I'm brewing.

I am planning a build MUCH like this one but I have to wonder if the ball valve is even needed? I have a valve on my pump now that has never been set to anything other than wide open... with a valve on the BK/MLT/HLT I just do not know if there is really a need for the one on the pump side?
 
This is a 1/12HP pump, the March by comparison is 1/25HP. It's actually very rarely that I run it wide open, to recirculate my mash I have to throttle it down at least halfway. Then when running it through my Plate chiller I again have to throttle it down. I've got no real basis for comparison since I've never owned a March Pump, but this thing is a beast!
 
I do not use a ball valve on the pump outlet. Only one ball valve is needed in series to restrict the flow.

CIMG7119.jpg


My pump box is on the bottom. I use the ball valves on the kettle returns to throttle the flow. Less parts, simpler layout. During hose changes, I just pinch the tubing while making the change to maintain my prime. Both ways work just fine.
 
Very cool Wyzazz! I'm glad that others think that this is a good idea too - it really looks clean and keeps the pump head safe.

I agree with needing the washers to get some solid surface to crank on the disconnects, as the stainless shell of the toolbox is pretty thin... I ended up cutting a 1/4" piece of hardwood hobby board that I had lying around and drilling two holes in it to use as a 'backing plate' for my two disconnects. That really gives them some stability. I think you can see it if you look at the first post with the photos.

Thanks for sharing!
 
I ended up cutting a 1/4" piece of hardwood hobby board that I had lying around and drilling two holes in it to use as a 'backing plate' for my two disconnects. That really gives them some stability.
I didn't even notice that. That would've actually been easier since I had a couple scrap pieces of board I could've used. Instead I had to take an extra trip to Lowes to get a couple of washers.

I noticed that both you and wyzazz used wood boards to mount your pumps on. I just mounted mine directly to the base of the toolbox.

I had the washers on hand so I didn't even think twice about it. I used wood for the base because I felt it would be a little more sturdy than the plastic bottom of the toolbox. I mounted the pump to the wood, then mounted the wood to the toolbox with 6 screws from the underside.
 
I can't wait to build one of these!!!! I'm sure I will be posting some more questions once I start to wire everything up.
 
You won't be disappointed! I don't think I would change anything. Just make sure you make enough hoses for what you need - originally I only made two, but if you are using a plate chiller you will need at least three: one from BK to pump, one from pump to chiller and one from chiller to fermenter.

Ask away with the questions too - there are a few things that will make the build a bit easier.

I see that you've made the lemon-lime hefe - how did you like it? I have that up after my next Wit to satisfy SWMBO (loves Wits and wheats...)
 
Wow, very cool - way to take it to the next level!

Honestly, I think the hardest part of the whole build was removing that big-ass sticker from the front. Its like they used the strongest adhesive available to put it on.
 
Wow, very cool - way to take it to the next level!

Honestly, I think the hardest part of the whole build was removing that big-ass sticker from the front. Its like they used the strongest adhesive available to put it on.

yeah, seriously! You peel off the plastic layer and then there's still the paper layer, and then the adhesive!

What did you use to cut though the stainless?

I use a dremel disc for the square-ish part and a step-bit for the round parts.

Awesome A4J! I love the toolbox control panel. You will love using it.
I love using it! I also use it for sous-vide. :D
 
Wow, very cool - way to take it to the next level!

Honestly, I think the hardest part of the whole build was removing that big-ass sticker from the front. Its like they used the strongest adhesive available to put it on.

My sticker is still on. :cross:
 
Those look very nice. I built something similar last summer. Pump, PID, and SSR all integrated to control a RIMS (which I've since gotten rid of) or a HERMS (what I currently use)

IMG_2392.jpg
 
do you have any problems getting the pump to prime?

Nope, but I think that priming a pump has to do with technique. open the valves and flood the system (using gravity) with your strike water. After that you shouldn't ever really need to break the prime in the pump until you are finished brewing. JMO, YMMV
 
Finally did this. Kinda had to use a lot of stuff I had in the garage. The wiring from the terminal block to the switches is braided because it needs to be flexible. The wire from pump to TB is solid. I actually prepared for the second pump as well. It's coming soon.

6686-weatherproof-switches.jpg


6683-pump-mount.jpg


6685-qds-threaded-side.jpg


6687-switch-wiring.jpg


6684-cut-extension-cord-grommet.jpg


6680-gfci.jpg
 
Very cool, "Basturd". I'm so happy that this idea has caught on and people have run with it. when I first posted it I didn't think that is really gonna be that great of a thing to do, but it looks like you guys have embraced it, thanks for the great ideas and variations! Cheap and useful - that's what home brewing is all about, right?
 
Very cool, "Basturd". I'm so happy that this idea has caught on and people have run with it. when I first posted it I didn't think that is really gonna be that great of a thing to do, but it looks like you guys have embraced it, thanks for the great ideas and variations! Cheap and useful - that's what home brewing is all about, right?

I think that what kind of sets it apart is the fact that the whole pump is contained in the toolbox. Most of the builds I've seen have the pump head exposed. Protecting the pump head is the biggest reason I've done this, well that and the toolbox is pretty spiffy looking! :mug:
 
Back
Top