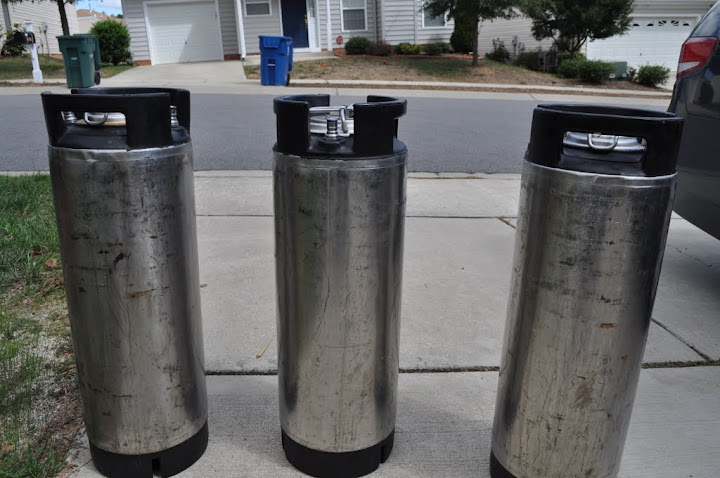
• Please visit and share your knowledge at our sister communities:
  • If you have not, please join our official Homebrewing Facebook Group!

    Homebrewing Facebook Group

"polishing your keg" is more than a clever euphemism

Homebrew Talk

Help Support Homebrew Talk:

This site may earn a commission from merchant affiliate links, including eBay, Amazon, and others.
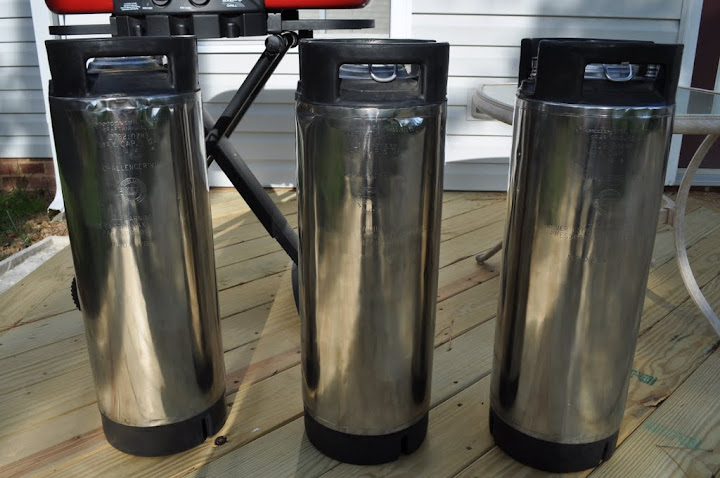
Honestly, I've never tried using the abrasive "scrubby" pads with any compound on them. I assume that it would work OK once the pad wears out. In other words, you wouldn't want to put a finer compound onto a pad that was already a coarser grit.

I've only used the compounds on the polishing pad which is soft and white.

Even kegs that are in relatively good shape could use a light touch with the burgandy "fine" finishing pad. Then go to the white buffing pad with #2 compound. Then change to a new white pad with #5 compound, push hard for this step at first, then back off for the buff.

As you're working with the burgandy pad, if you can still see deep scratches that are NOT being made by the pad, you have to keep working until that scratch is gone. A good way to figure this out is to hold the pad perpendicular to the scratch.
 
wanted to give you guys an update and a cheap backing alert.

While at Harbor Freight i found a 4 1/2" angle grinder backer pad for 2.99. cant beat that!!!!

That is 10 bucks off the lowes one!!

Now on to my update. I was using a 4" angle grinder with a 4" backer pad and 4.5 inch discs. It seemed to work okay but i was getting that black stuff. I also tried to throw the polishing disk on this angle grinder and it widened the whole too much and ruined a brand new pad :)

I decided to hit Harbor Freight for the 20 angle grinder and give it a shot again. The keg i had issues with is now excellent as well as my other two kegs. I have now used the fine on all three kegs and the polishing pad with number 2 on 2 of the 3.

They are looking MUCH better.

Thanks everyone

I'm thick. I don't understand what exactly was the problem the first time. Was it the original angle grinder?
 
oh trust me i dont either LOL. I dont know if the smaller angle grinder with the larger pad meant that move of the pad was being used up (since it had no backing on the last .5 inch).

I am clueless.. trust me :(

All i know is that it is working. I needed the 4.5 inch anyway to use the polishing pads so it was a needed purchase. At harbor freight a 2.99 backing pad and 18 dollar angle grinder, who cares. It was cheap and gets the job done.
 
man i spent hours out there in the GA humid ass heat to finish these damn things. I kinda rushed it and said screw the mirror finish. I hit them with the polishing pad and number 5 stick, they looked good. I then hit them with the 2 and a different polishing pad and the first one looks pretty good, but they are not what I was hoping for.

The bottom line is they look great anyway, and im over it LOL.

I am going to get my sight glass in my boil kettle, ball valve and thermometer in my mash tun and my ball valve, sight glass, and thermometer in my hlt.

Hoping to brew on Saturday or Sunday, so hoping that i can get all of this completed before then... or i will be pushing my brew day back ha ha
 
here are the pics... could my keg be aluminum?

http://picasaweb.google.com/NNatic/KegPolishing#5505024358426300418

I just picked up and cut open two miller kegs. they look very different from each other as you can see.

Could it be aluminum? if not likely, how the heck can i get rid of that black.. tried paint thinner again with no luck at all.

I had the same thing on my keg. just use the medium pad and go over everything. then switch to the blue pad (fine). the black junk is some coating I think was on the keg. Also make sure you're using the right side of the pad.
 
I can give some insight now that I actually started polishing my first keg. The black stuff is contamination on the keg. In my case glue from stickers and glue from tape that was used in packaging during shipping. I used mineral spirits to take off the glue before the first go around with the medium grit pad. Still some black. I again wiped off with mineral spirits and on the fine pad it was completely clean. Bobby had it right when he said to keep the pad flat. Don't use the edge. If you do the black stuff comes back. I suspect that the pad gets hot and melts. If you keep it flat no problems. I will post some pictures of the finished product. Hopefully tomorrow I will start with the #2 grit. Cheers!!
 
FYI, sometimes the metal will get hot while buffing if you stay in one area too long and the compounds can gum up and stick to the hot metal. This gummy residue can be difficult to remove, but if you let that area cool down and come back to it a few minutes later it will come off without too much trouble. I've found through trial and error experimentation that it's best to keep moving forward, then backtrack some and buff some more. This helps avoid the overheating problems and produces faster results.
 
I just got my hands on three kegs for a single tier setup and I'd like to polish them up before I get the whole thing put together. If I just put a 4" stainless steel cup on my angle grinder would that do the trick or would I still have to polish after that? I'm sure it's been mentioned in here somewhere but 310 posts is alot to read through. I understand that normally people wouldn't go this route because of the expense of the SS cup but I figure it might be quicker than 4 hrs of pads. Thanks guys.
 
I just want to throw up some pics of my kegs in this thread pre-polishing then post-polishing.


Pre-polish:

Bought%201.JPG


Kegs post-polish:

Stick%205-1.JPG


If you want to see the kegs after each step take a look at this thread - Polishing my kegs Thanks again Bobby for this thread!!! :mug:
 
Is there a parts/order list that someone can post up for when I go to Lowes?
The tool is a 4.5" angle grinder yes? Or something else?

Thanks!
 
Look at my post #262 for a pic of what I bought from Lowes. Also, yes it is a 4.5" angle grinder used. I got mine from Harbor Freight as it was way cheaper than the cheapest av available at Lowes or Home Depot.
 
Got the equipment over weekend, did the fine pad first with #2 compound.
Then did polishing pad with #5 compound.

Did get a decent shine, but it seems like there is so much residue from compound that it's just making a mess and thickening/building up... maybe I'm using too much compound? When I wipe the kegs there is a lot of black residue. I think I just need a good cleaner or degreaser and then try it again. Anyone else experience this?

When I my 3 gallon keg it was very easy... and shined up quick. I'm thinking the sanke keg has compound build up...

Again, the shine is good, but nothing mirror like... which is what I was hoping for! :)
 
I think I may have to make another video clearly explaining the steps I take to get a mirror. The only time I get a build up of black junk is when the something starts melting, whether its the edge of the backing pad or the edge of a gator pad. It will come off with a wiping of acetone or lacquer thinner.
 
For my initial polish, I got a paint stripping pad, those plastic scotch brite ones, and put it on my palm sander. Did a nice job taking the paint off and cleaning it up. Going to hit it with the polish wheel tomorrow.
 
I didn't realize it was a contest, but since Lehr and/or Pat aren't making polishing videos, the HBT masses will have to settle for my chopped liver methods resulting in sub-par mirror finishes like this:

hltshine1.jpg
 
I didn't realize it was a contest, but since Lehr and/or Pat aren't making polishing videos, the HBT masses will have to settle for my chopped liver methods resulting in sub-par mirror finishes like this:

hltshine1.jpg

I thought I saw some sarcasm in that post, but I had to look away before my corneas melted...
 
Must have been all of the bling in here that attracted the gold monger.
 
I can't find the polishing compound at Lowes or at lowes.com

It is made by "Task Force" and is in the tool section?
 
Reads like he's (IT?) is not on bier but snorting too much lunar dust.

Zap Poof! i'm turned into a golf ball by him or (IT?).

I've used liquid buffing compound with a wool pad on a
9" body buffer, a dirty operation flinging compound everywhere.
 
I can't find the polishing compound at Lowes or at lowes.com

It is made by "Task Force" and is in the tool section?

The compound is in the tool section. The compound that I purchased was Porter Cable brand. I have been to two different Lowes recently and it was in a different portions of the tool section. Neither Lowes kept it near the gator-grit product line.

Keep looking and you'll run across it. They don't list it at lowes.com for some odd reason.
 
I would like to see a video of how it's done especially to see how messy it is. I am tempted to undertake this when I get my kegs but I am not sure I am up to it.
 
It's not horribly messy but as your polishing pad wears away, it does end up on the floor. This is a job best saved for spring weather so you're not cleaning up the garage.
 

Latest posts

Back
Top