So I went to Lowes today to grab some of those Gator Grit pads and the blue pads y'all are talking about were labeled "medium", not "fine" and the burgundy pads labeled "course". They were out of the "fine" pads. So did I get a medium pad or a fine pad being that it was blue? After finishing the keg it looks alot better but definitely has swirl marks on it that I'm hoping the polishing will take care of........or do I need to tangle a** with it again with a fine pad as what I bought was labeled medium? Any thoughts? Thx!
You are using an out of date browser. It may not display this or other websites correctly.
You should upgrade or use an alternative browser.
You should upgrade or use an alternative browser.
"polishing your keg" is more than a clever euphemism
- Thread starter Bobby_M
- Start date

Help Support Homebrew Talk:
This site may earn a commission from merchant affiliate
links, including eBay, Amazon, and others.
sourmash
Well-Known Member
I started to polish one of my 3 kegs a couple of weeks ago. I started with the Gator Grit pads and got an OK finish. To me the steps from one grit to the next were to big. While I was at Rockler woodworking I found a pack of 5" sanding discs for a random orbital sander that start at 1500 grit and then goes to 1800, 2400, 3200, 3500, 4000, 6000, 8000 and 12000. Seems like alot of steps but I did one this past Saturday and took me about 3 hours. I will post a photo later this week. It turned out like chrome. I still need to take a buffing pad to it to give it the final shine. Here is the link to the discs...
Details for Micro-Mesh™ Cushioned Abrasives - Rockler Woodworking Tools
The directions do say you can use them wet or dry. I used all of them dry.
Details for Micro-Mesh™ Cushioned Abrasives - Rockler Woodworking Tools
The directions do say you can use them wet or dry. I used all of them dry.
Elfmaze
Well-Known Member
turtle wax white polishing compound. It sais good for chrome, steel, aluminum. no reason why i can't use it with my gator polishing pads right?
Big10Seaner
Well-Known Member
Is there anywhere online I can order the gator grit pads? I've called/searched everywhere around me and I can't find them.
Elfmaze
Well-Known Member
OK i don't get it. I used the gator grit fine pad and i ended up with this
The swrls are so deep the polishing compound did nothing for it.... am i suposed to flip the finishing pad to the other side?
The swrls are so deep the polishing compound did nothing for it.... am i suposed to flip the finishing pad to the other side?
OP
OP
You can see in this pic that the fine pad should get you to the finish on the right.

The #2 polishing compound does quite a bit of smoothing from that point.
The #2 polishing compound does quite a bit of smoothing from that point.
![Craft A Brew - Safale S-04 Dry Yeast - Fermentis - English Ale Dry Yeast - For English and American Ales and Hard Apple Ciders - Ingredients for Home Brewing - Beer Making Supplies - [1 Pack]](https://m.media-amazon.com/images/I/41fVGNh6JfL._SL500_.jpg)
$6.95 ($17.38 / Ounce)
$7.47 ($18.68 / Ounce)
Craft A Brew - Safale S-04 Dry Yeast - Fermentis - English Ale Dry Yeast - For English and American Ales and Hard Apple Ciders - Ingredients for Home Brewing - Beer Making Supplies - [1 Pack]
Hobby Homebrew


$20.94
$29.99
The Brew Your Own Big Book of Clone Recipes: Featuring 300 Homebrew Recipes from Your Favorite Breweries
Amazon.com


$76.92 ($2,179.04 / Ounce)
Brewing accessories 1.5" Tri Clamp to Ball Lock Post Liquid Gas Homebrew Kegging Fermentation Parts Brewer Hardware SUS304 Brewing accessories(Gas Hose Barb)
chuhanhandianzishangwu


$58.16
HUIZHUGS Brewing Equipment Keg Ball Lock Faucet 30cm Reinforced Silicone Hose Secondary Fermentation Homebrew Kegging Brewing Equipment
xiangshuizhenzhanglingfengshop


$159.50 ($26.58 / Count)
3M High Flow Series System BREW120-MS, 5616001, For Brewed Coffee and Hot Tea, Valve-in-Head Design
Amazon.com


$44.99
$49.95
Craft A Brew - Mead Making Kit – Reusable Make Your Own Mead Kit – Yields 1 Gallon of Mead
Craft a Brew


$176.97
1pc Commercial Keg Manifold 2" Tri Clamp,Ball Lock Tapping Head,Pressure Gauge/Adjustable PRV for Kegging,Fermentation Control
hanhanbaihuoxiaoshoudian


$10.99 ($31.16 / Ounce)
Hornindal Kveik Yeast for Homebrewing - Mead, Cider, Wine, Beer - 10g Packet - Saccharomyces Cerevisiae - Sold by Shadowhive.com
Shadowhive

$33.99 ($17.00 / Count)
$41.99 ($21.00 / Count)
2 Pack 1 Gallon Large Fermentation Jars with 3 Airlocks and 2 SCREW Lids(100% Airtight Heavy Duty Lid w Silicone) - Wide Mouth Glass Jars w Scale Mark - Pickle Jars for Sauerkraut, Sourdough Starter
Qianfenie Direct


$479.00
$559.00
EdgeStar KC1000SS Craft Brew Kegerator for 1/6 Barrel and Cornelius Kegs
Amazon.com

$719.00
$799.00
EdgeStar KC2000TWIN Full Size Dual Tap Kegerator & Draft Beer Dispenser - Black
Amazon.com


$22.00 ($623.23 / Ounce)
AMZLMPKNTW Ball Lock Sample Faucet 30cm Reinforced Silicone Hose Secondary Fermentation Homebrew Kegging joyful
无为中南商贸有限公司

$53.24
1pc Hose Barb/MFL 1.5" Tri Clamp to Ball Lock Post Liquid Gas Homebrew Kegging Fermentation Parts Brewer Hardware SUS304(Liquid Hose Barb)
Guangshui Weilu You Trading Co., Ltd


$7.79 ($7.79 / Count)
Craft A Brew - LalBrew Voss™ - Kveik Ale Yeast - For Craft Lagers - Ingredients for Home Brewing - Beer Making Supplies - (1 Pack)
Craft a Brew
$53.24
1pc Hose Barb/MFL 1.5" Tri Clamp to Ball Lock Post Liquid Gas Homebrew Kegging Fermentation Parts Brewer Hardware SUS304(Liquid Hose Barb)
yunchengshiyanhuqucuichendianzishangwuyouxiangongsi


Hmmm......I have the same problem as Elfmaze in that after using the fine gator grit pad I have those wavy swirl marks as well. I haven't made it to the #2 and #5 polish compunds yet but it sounds like that made no difference in removing the swirls for Elfmaze
OP
OP
You might want to finish up with the fine pads with a lighter touch. I don't think I had many deep scratches at that point.
So I began polishing my kegs today and what a workout. Unfortunately it took me 3 fine grit pads and 3 polishing pads. I was having serious problems leaving blackmarks ( yes I used the backing and would shut it down to cool ") ). The area where the lettering is a pain and so is anywhere else its not flat. I kept trying to get snug on the two thick bands that are 1/4 and 3/4 of the way up. What a pain in the back! I kept using the edges too much and the pad would wear out way too quick.
). The area where the lettering is a pain and so is anywhere else its not flat. I kept trying to get snug on the two thick bands that are 1/4 and 3/4 of the way up. What a pain in the back! I kept using the edges too much and the pad would wear out way too quick.
At any rate, thanks for this thread Bobby! I got one keg done today and it took me all day. Not quite the three hours as advertised but good things come to those who wait.
). The area where the lettering is a pain and so is anywhere else its not flat. I kept trying to get snug on the two thick bands that are 1/4 and 3/4 of the way up. What a pain in the back! I kept using the edges too much and the pad would wear out way too quick.At any rate, thanks for this thread Bobby! I got one keg done today and it took me all day. Not quite the three hours as advertised but good things come to those who wait.
Elfmaze
Well-Known Member
It doesn't help that its a balance between hitting the center metal ring and burning the sides. But i finally have the right polishing compounds so i'm going to try getting all my rubber off and go to town with the polish.
Side note, My kegs have a few small rust points on them.... BKF them? and BKF is just the cooktop cleaner they sell at grocery stores correct?
Side note, My kegs have a few small rust points on them.... BKF them? and BKF is just the cooktop cleaner they sell at grocery stores correct?
CodeRage
Death by Magumba!
Schweaty,
The grinder is running too fast, using too much pressure, or a combination of both. If you have one near by, get a router speed controller from harborfreight, if not order it. This way you can dial in the speed about on the grinder saving you some pads. I bought one for a port and polish job on some heads and have used it for all kinds of odd jobs like keg polishing. Useful thing to have.
That aside, try not to work on the same spot for too long, the metal does get pretty hot quickly. Try to keep the pad moving and working your way around the keg. Several light passes will work better than one concentrated one.
Good luck on the next one.
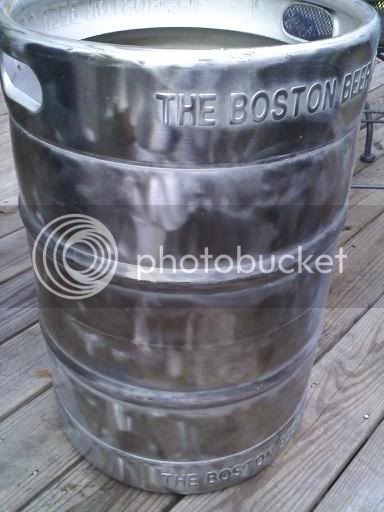
Worked like a charm. I used the "fine" pad, then #2 and #5 polishing compounds on two different polishing pads.
LOL, is it just me.....
or is there a woman in a bikini reflecting off that surface?
What kind of pad can I use with a drill to polish my corny kegs?
--
Kevin
Creekwood Brewing Project (The Creekwood Brewing Project)
--
Kevin
Creekwood Brewing Project (The Creekwood Brewing Project)
Elfmaze
Well-Known Member
Coming along now. I had the wrong polishing compounds. plus a thousand to the Harbor Freight throttle. Didn't have any burning issues at medium power untill i cranked it to deal with a particular tough spot. Also works great with the polishing pads on half power.
Well <blush> thanks for the compliment I guess
Sorry, hope I didn't offend!
LOL, I guess it was just "wishful" thinking by me!

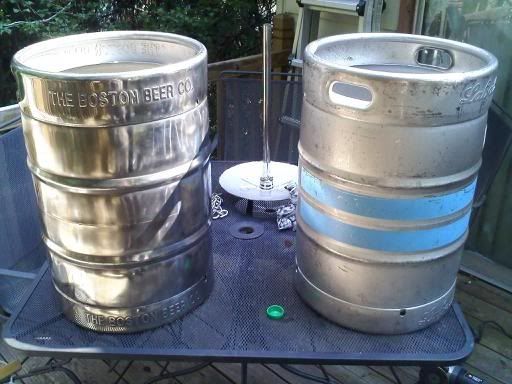
Here are my kegs after polishing. I'm not going to lie the one on the left was rushed because I wanted to brew on Labor Day.
I've decided that I'm going to have to put some sort of a sealant or gloss on the outside because these things get water marks very easy. And lets not forget PBW or wort that kills the shine if left on for too long.
I'm pretty happy with the results but I have a feeling they won't stay like this for long!
OP
OP
I actually noticed that the shiny keg cleans up really easy. If I get a little wort burnt to the side, it wipes off. On the dull kegs, it takes a ton of scrubbing.
roverlandpark
Member
This is an awesome thread. I just finished converting my keg into a keggle tonight. Looks like I've got a new excuse to go to the hardware store! Thanks for sharing. I'll be sure to post pics when I've had a go at this. Thanks again!
OP
OP
Note, this is also a high quality upload so watching directly on youtube will look better.
[ame=http://www.youtube.com/watch?v=9Ln-plGzVc4]YouTube - Brewing with Bobby_M - Polishing Stainless[/ame]
[ame=http://www.youtube.com/watch?v=9Ln-plGzVc4]YouTube - Brewing with Bobby_M - Polishing Stainless[/ame]
TwoHeadsBrewing
Well-Known Member
Just started in on this myself. However, I've started out with the medium pad because a couple of my kegs are deeply scratched. I tried it out last night for about 5-10 minutes and it actually looks pretty nice with just a quick pass. Looking forward to a homebrew, and some more work on the kegs. Thanks for the guide!
OP
OP
Good call on the medium. After cutting the video, I opened my pack of coarse pads and I'll say that I think it's a great place to start for any keg just to make quick work on any scratches or dings. Coarse will put fine scratches in the surface if you push hard, but lightening up the pressure buffs them out too. Gatorgrit FTW.
Kauai_Kahuna
Well-Known Member
Bobby, great video as always, and sorry for ribbing you.
It just looked so strange having one super looking one and the other two just dull.
It just looked so strange having one super looking one and the other two just dull.
OP
OP
It all comes down to time to brew or time to polish. Like right now I have my HLT apart and half polished and my Saturday brewday is knocking at my door. Need to finish.... Of course the goal is to make this one so shiny and flawless that my BK is sickly jealous.
OP
OP
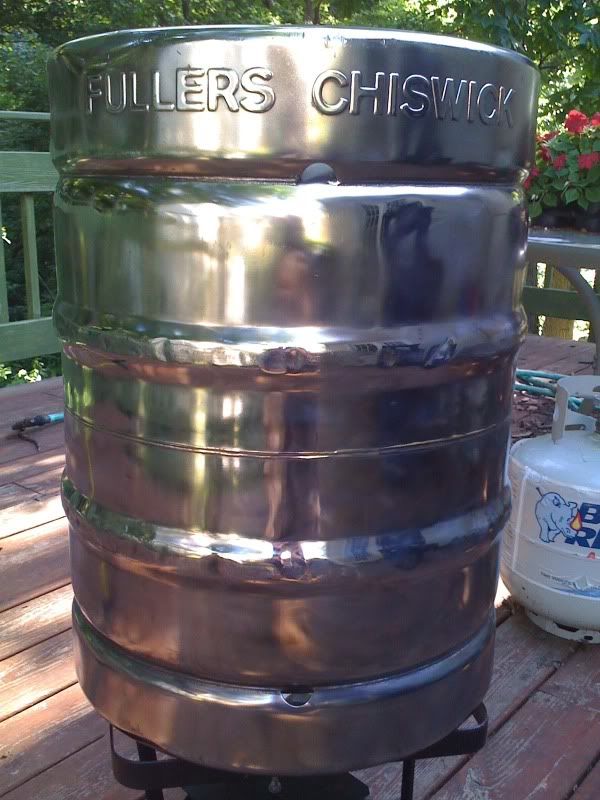
Dang, overshined this one, now I gotta go back and hit the original again. I suppose it's not so bad for a year old finish.


Here's what the kettle looked like last year....

I'm going to say nevermind the Caswell stuff. If your keg is relatively smooth with no deep scratches or pits, start with the medium gator grit with a light touch, then the fine pad. It's hard to know when you're done with the fine pad but methodically do the entire surface with it otherwise you'll see scratches beneath the shine in the next steps. Nothing sucks worse than spending 15 minutes polishing and realizing you have to back out to a coarser grit.
After you have an even smooth finish, put the gatorgrit polishing discs on and apply the coarse polishing stick, something like #2 or 3 and get the surface a bit shiny. It's not going to get like a mirror in this step and don't try. Do the whole keg with this and you'll probably wear out a whole pad in the process.
Next change out the pad and wipe the whole keg down really well to remove any remaining coarse polish. Then start with the #5 stick. I noticed the real work is done here by applying a pretty decent pressure to the point where the grinder slows down to about half speed. I know it sounds bad but it's what takes the orange peel surface down to a mirror. Keep applying more polish often. After some time, lighten the pressure and buff. Each step took me about an hour.
Here's what the kettle looked like last year....
I'm going to say nevermind the Caswell stuff. If your keg is relatively smooth with no deep scratches or pits, start with the medium gator grit with a light touch, then the fine pad. It's hard to know when you're done with the fine pad but methodically do the entire surface with it otherwise you'll see scratches beneath the shine in the next steps. Nothing sucks worse than spending 15 minutes polishing and realizing you have to back out to a coarser grit.
After you have an even smooth finish, put the gatorgrit polishing discs on and apply the coarse polishing stick, something like #2 or 3 and get the surface a bit shiny. It's not going to get like a mirror in this step and don't try. Do the whole keg with this and you'll probably wear out a whole pad in the process.
Next change out the pad and wipe the whole keg down really well to remove any remaining coarse polish. Then start with the #5 stick. I noticed the real work is done here by applying a pretty decent pressure to the point where the grinder slows down to about half speed. I know it sounds bad but it's what takes the orange peel surface down to a mirror. Keep applying more polish often. After some time, lighten the pressure and buff. Each step took me about an hour.
Kauai_Kahuna
Well-Known Member
Wow, I think I need sun glasses to look at those pictures.
That looks really nice..
That looks really nice..
Cold_Steel
Well-Known Member
- Joined
- Apr 14, 2009
- Messages
- 558
- Reaction score
- 1
Should I polish the inside as well?
Similar threads
- Replies
- 32
- Views
- 2K
- Replies
- 8
- Views
- 3K
- Replies
- 106
- Views
- 14K
