By chance is the orifice in the flare fitting screwed in or is it just pressed in, might be able to pop orifice out of brass fitting and insert in a 1/4" nipple or fitting. Have done this with the 1/8" pipe by 1/4" flare fitting for the 4" cast burner, used a 1/4"-28 tap on the inside of a swagelok fitting to reinstall orifice for the burner. Might be worth the effort to check with the local propane supplier to see if they have burner adapter fittings that would work for your application. If all else fails you could use a 1/4" X 1/8" bushing with the 1/8" pipe orifice to fit 1/4" burner opening.
You are using an out of date browser. It may not display this or other websites correctly.
You should upgrade or use an alternative browser.
You should upgrade or use an alternative browser.
My Three Tier Build Project
- Thread starter TerapinChef
- Start date

Help Support Homebrew Talk:
This site may earn a commission from merchant affiliate
links, including eBay, Amazon, and others.
OP
OP
TerapinChef
Well-Known Member
Didn't think of try that, maybe I can give it a shot. I feel like many people have come across this problem, somebody must have a solution to it...
OP
OP
TerapinChef
Well-Known Member
Why does everything have to be 1/8"? Why can't it just be 1/4" fittings that I find everywhere. This is going to make me loco. I'm just going to the hardware store and not leaving until it works, if I have to go in the back and make my own damn fittings.
OP
OP
TerapinChef
Well-Known Member
So after a terribly frustrating trip to the hardware store trying to find make my orifice go from 3/8 male flare to anything with NPT so I can thread it into my propane manifold, I have decided that such a thing doesn't exist. The guy at the hardware store said I should go soft copper. I think I'm going to order the 1/8" fitting from morebeer. As I wandered around with my orifice, I stuck it in the little "what size is your fitting" thing. The side that goes into the burner fit the 1/4" compression and flare side, but in the actual pipe side it is 1/8". What's up with that? So I think the 1/8"x1" orifice from morebeer is going to be my salvation. And cost about 1/3 of the whole job. Oh well. I just wish I didn't have these two fittings from bayouclassicdepot.com that I don't need, it's not going to be worth returning them. Now I just hope I can go 1/2" x 1/8".
Should be able to find a 1/2" pipe coupling and a 1/2" X 1/8" bushing at Lowes or Home Depot.


$33.99 ($17.00 / Count)
$41.99 ($21.00 / Count)
2 Pack 1 Gallon Large Fermentation Jars with 3 Airlocks and 2 SCREW Lids(100% Airtight Heavy Duty Lid w Silicone) - Wide Mouth Glass Jars w Scale Mark - Pickle Jars for Sauerkraut, Sourdough Starter
Qianfenie Direct


$39.22 ($39.22 / Count)
Brewer's Best Home Brew Beer Ingredient Kit - 5 Gallon (Mexican Cerveza)
Amazon.com


$172.35
2 Inch Tri Clamp Keg Manifold With Ball Lock Posts, Pressure Gauge, PRV (0-30 PSI) – Homebrew, Fermentation, Kegging System
wuhanshijiayangzhiyimaoyiyouxiangongsi


$58.16
HUIZHUGS Brewing Equipment Keg Ball Lock Faucet 30cm Reinforced Silicone Hose Secondary Fermentation Homebrew Kegging Brewing Equipment
xiangshuizhenzhanglingfengshop


$53.24
1pc Hose Barb/MFL 1.5" Tri Clamp to Ball Lock Post Liquid Gas Homebrew Kegging Fermentation Parts Brewer Hardware SUS304(Gas MFL)
Guangshui Weilu You Trading Co., Ltd


$10.99 ($31.16 / Ounce)
Hornindal Kveik Yeast for Homebrewing - Mead, Cider, Wine, Beer - 10g Packet - Saccharomyces Cerevisiae - Sold by Shadowhive.com
Shadowhive


$7.79 ($7.79 / Count)
Craft A Brew - LalBrew Voss™ - Kveik Ale Yeast - For Craft Lagers - Ingredients for Home Brewing - Beer Making Supplies - (1 Pack)
Craft a Brew

$22.00 ($623.23 / Ounce)
AMZLMPKNTW Ball Lock Sample Faucet 30cm Reinforced Silicone Hose Secondary Fermentation Homebrew Kegging joyful
无为中南商贸有限公司


![Craft A Brew - Safale S-04 Dry Yeast - Fermentis - English Ale Dry Yeast - For English and American Ales and Hard Apple Ciders - Ingredients for Home Brewing - Beer Making Supplies - [1 Pack]](https://m.media-amazon.com/images/I/41fVGNh6JfL._SL500_.jpg)
$6.95 ($17.38 / Ounce)
$7.47 ($18.68 / Ounce)
Craft A Brew - Safale S-04 Dry Yeast - Fermentis - English Ale Dry Yeast - For English and American Ales and Hard Apple Ciders - Ingredients for Home Brewing - Beer Making Supplies - [1 Pack]
Hobby Homebrew


$53.24
1pc Hose Barb/MFL 1.5" Tri Clamp to Ball Lock Post Liquid Gas Homebrew Kegging Fermentation Parts Brewer Hardware SUS304(Liquid Hose Barb)
yunchengshiyanhuqucuichendianzishangwuyouxiangongsi


$33.95
Five Star - 6022b_ - Star San - 32 Ounce - High Foaming Sanitizer
Bridgeview Beer and Wine Supply


$176.97
1pc Commercial Keg Manifold 2" Tri Clamp,Ball Lock Tapping Head,Pressure Gauge/Adjustable PRV for Kegging,Fermentation Control
hanhanbaihuoxiaoshoudian


If you can't find 1/8 inch black pipe and need some let me know. I found some but I had to purchase 20 feet so I have PLENTY left!
Lil' Sparky
Cowboys EAC
I use those 1/8" jets from morebeer on my stand with 1/2" plumbing and they really are the way to go. HD/Lowes will have the bushing you need, and if your burner isn't 1/8", you can find a bushing for that, too. We had to do that on another stand I helped another guy build.
I did the same thing you did looking everywhere for the NPT-flare adapter fitting, and I also concluded that they just don't make it. Go figure.
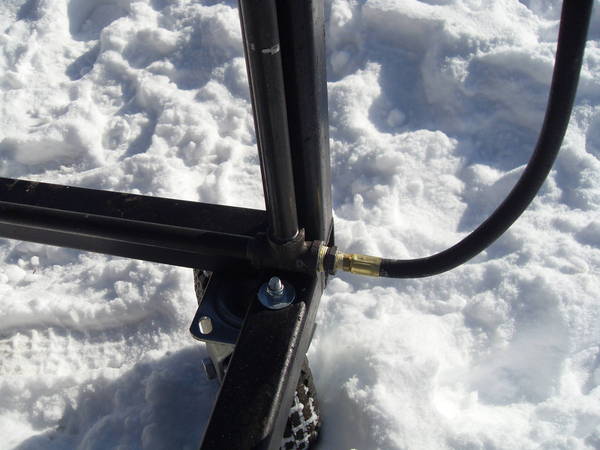
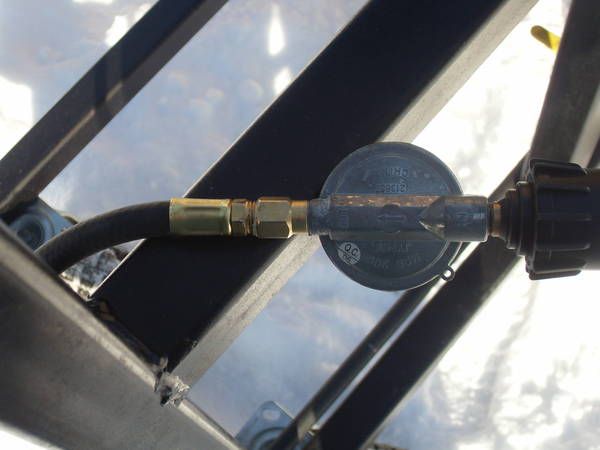
I don't have a closeup of how everything fits together, but you can tell what I'm talking about in this one.

And this is the other one we did. This burner's got a larger fitting, so there's a bushing threaded into the burner. The jet threads into the bushing. Little hard to see.

I did the same thing you did looking everywhere for the NPT-flare adapter fitting, and I also concluded that they just don't make it. Go figure.
I don't have a closeup of how everything fits together, but you can tell what I'm talking about in this one.
And this is the other one we did. This burner's got a larger fitting, so there's a bushing threaded into the burner. The jet threads into the bushing. Little hard to see.
OP
OP
TerapinChef
Well-Known Member
Thanks for the offer! I think I'm just going to buy morebeer's 4" orifice, so I can just reduce at my last 90 with a bushing and go right to the burner from there. Now I just need to figure out how to support the weight of the burners...
Lil Sparky, are you using the 1" jet and holding the burner up with that?
Lil Sparky, are you using the 1" jet and holding the burner up with that?
Lil' Sparky
Cowboys EAC
Those actually look like they're better quality than the ones I got from morebeer. One was a little dorked up and I had to order a replacement.
Lil' Sparky
Cowboys EAC
Thanks for the offer! I think I'm just going to buy morebeer's 4" orifice, so I can just reduce at my last 90 with a bushing and go right to the burner from there. Now I just need to figure out how to support the weight of the burners...
Lil Sparky, are you using the 1" jet and holding the burner up with that?
Yes. It's plenty strong enough to support the burner. No worries there.
I took my parts in and with the little jet orifice (which I knew fit the burner), I just searched until I found enough adapters. It's 4 parts from burner to wardflex (I ran wardflex from the main blackpipe supply). It was a pain, but I could not find a single-piece solution at Lowes or Home Depot.
OP
OP
TerapinChef
Well-Known Member
With the hard piping I don't have to weld anything to my already painted stand. I can use the piping to support the burners rather than have someone else fabricate a bracket, grind off the paint, weld it on, repaint, and adjust the burner height. Plus it matches my stand and looks pretty badass.
I like the looks of the fitting from the cajun shoppe more than the one from Morebeer as well. I'd rather go directly to 1/4" as it will be a bit sturdier to run 90 to 1/2" to 1/2"x1/4" coupling to F-RAWOM than it would be to go 90" to 1/8" bushing to 1/8" orifice to burner. Good stuff, now I don't have to ship from CA to MI!
I like the looks of the fitting from the cajun shoppe more than the one from Morebeer as well. I'd rather go directly to 1/4" as it will be a bit sturdier to run 90 to 1/2" to 1/2"x1/4" coupling to F-RAWOM than it would be to go 90" to 1/8" bushing to 1/8" orifice to burner. Good stuff, now I don't have to ship from CA to MI!
Lil' Sparky
Cowboys EAC
Take some pics and post them whenever you get it put together. I promise you won't be the only one with this question!
OP
OP
TerapinChef
Well-Known Member
Oh I plan on doing a complete write up and parts list. The actual manifold was easy, my first time working with the pipe. Fittings into the burners is the tough one! This was a much longer project than I expected and added a whole 'nother page to my brewstand thread though!
Yes, I learned alot from this thread as well. I was going to run the line directly to the burner without an orifice. Then I realized the orifice Bayou makes goes from 1/8 to 3/8 and I was planning to run 1/8" pipe. I came back to this post and found the 1/8" morebeer jet that was threaded on both sides, it srsly saved the day. So many thanks to you and your thread!
OP
OP
TerapinChef
Well-Known Member
Not only does that orifice go to 3/8", but it's 3/8" Flare, and I'm glad that I could help somebody out!
OP
OP
TerapinChef
Well-Known Member
Allright, I'm learning how to use googlesketchup so I can do a pretty picture for you guys.
*edit* Yeah I don't think so. Google Sketch 1 - Terapinchef 0
I'll just post pictures and parts list.
*edit* Yeah I don't think so. Google Sketch 1 - Terapinchef 0
I'll just post pictures and parts list.
OP
OP
TerapinChef
Well-Known Member
So I'm still waiting on a few parts but here's my manifold, nearly completed, and the parts list that goes with it.
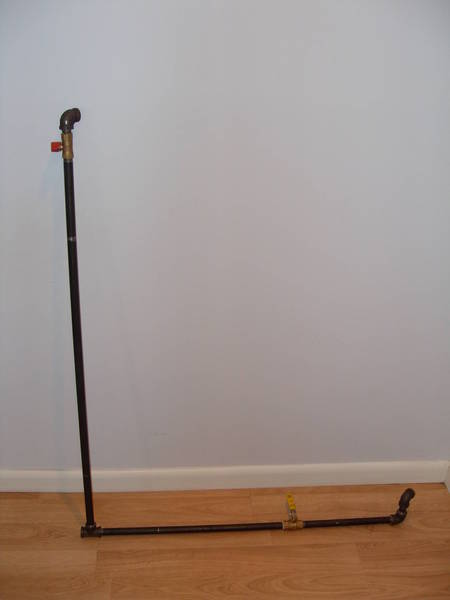
Everything here was purchased from a hardware store. I think that my current running total is somewhere around $22.00 for just the plumbing.
So here's my parts list for what you see pictured.
All pipe listed is 1/2" unless otherwise specified.
From the top left to the bottom right...
90*
1" threaded nipple
Gas shutoff valve (about $7)
42" pipe (custom cut at hardware store)
1/2"x1/2"x1/2" T
22" pipe (custom)
Gas Ball Valve
12" pipe (stock)
90*
2" pipe
90*
Also 1 roll of YELLOW GAS RATED teflon tape and a tube of pipe dope. I used both. I needed a set of channel locks and an old rag to tighten everything up, and that's about it.
*NOTE*
I have two different ball valves currently installed in my system to see if there is any difference between the $7 "shutoff" type and the $13 "ball valve" type. They both appear to have the same insides, so I thought I would check it out.
Still to come...
-I ordered a hose from THE CAJUN SHOPPE Part # Hose-S5 that I had shortened from 5' to 3' and instead of a flare fitting on the end they are going to just attach a 1/4" MPT fitting on both ends. This will go from my regulator to my manifold without too much extra.
-I also ordered orifices from the same place. (Part #F-RAWOM) I went with the male fitting on both end, 1/8"x1/4". These will go into my burner then into a reducing coupling from the main manifold.
-My two burners came from Bayouclassicdepot.com. They look like this

and cost $12.99
- I need to pick up (3) 1/2"x1/8" couplings, one for each burner and one for the propane input.
-When I have my orifices and above couplings, I will measure to see how much pipe I need to go from the 90's to the burners so they sit in the middle of my platforms.
-----------------------------------------------------------------
Aside from that, I need to mount the whole contraption to my stand, check for leaks, and I should be good to go. I'm thinking of using zip ties in the beginning. I know it's a bit trashy, but I'd like to get a feel for the whole thing before I go drilling holes in my stand. Also, does anybody know if this pipe can be painted so it matches my stand? I'm a bit concerned about it rusting as well...
Everything here was purchased from a hardware store. I think that my current running total is somewhere around $22.00 for just the plumbing.
So here's my parts list for what you see pictured.
All pipe listed is 1/2" unless otherwise specified.
From the top left to the bottom right...
90*
1" threaded nipple
Gas shutoff valve (about $7)
42" pipe (custom cut at hardware store)
1/2"x1/2"x1/2" T
22" pipe (custom)
Gas Ball Valve
12" pipe (stock)
90*
2" pipe
90*
Also 1 roll of YELLOW GAS RATED teflon tape and a tube of pipe dope. I used both. I needed a set of channel locks and an old rag to tighten everything up, and that's about it.
*NOTE*
I have two different ball valves currently installed in my system to see if there is any difference between the $7 "shutoff" type and the $13 "ball valve" type. They both appear to have the same insides, so I thought I would check it out.
Still to come...
-I ordered a hose from THE CAJUN SHOPPE Part # Hose-S5 that I had shortened from 5' to 3' and instead of a flare fitting on the end they are going to just attach a 1/4" MPT fitting on both ends. This will go from my regulator to my manifold without too much extra.
-I also ordered orifices from the same place. (Part #F-RAWOM) I went with the male fitting on both end, 1/8"x1/4". These will go into my burner then into a reducing coupling from the main manifold.
-My two burners came from Bayouclassicdepot.com. They look like this
and cost $12.99
- I need to pick up (3) 1/2"x1/8" couplings, one for each burner and one for the propane input.
-When I have my orifices and above couplings, I will measure to see how much pipe I need to go from the 90's to the burners so they sit in the middle of my platforms.
-----------------------------------------------------------------
Aside from that, I need to mount the whole contraption to my stand, check for leaks, and I should be good to go. I'm thinking of using zip ties in the beginning. I know it's a bit trashy, but I'd like to get a feel for the whole thing before I go drilling holes in my stand. Also, does anybody know if this pipe can be painted so it matches my stand? I'm a bit concerned about it rusting as well...
Lil' Sparky
Cowboys EAC
Those actually look like they're better quality than the ones I got from morebeer. One was a little dorked up and I had to order a replacement.
I needed to post a follow-up on this. I got the replacement I ordered yesterday, and they're built differently now than they used to, so I can fully recommend the ones from morebeer.
The first ones I got looked like they had one end of the nipple filled with liquid nails with a hole drilled in it. The new ones are all stainless with a nice clean hole drilled through the SS on the end. MUCH better than before, and the flame from my burner is 100% better. FWIW - two of the first ones I got worked fine, so I didn't replace those.
OP
OP
TerapinChef
Well-Known Member
Oh well. I might have gone for the stainless option. I'm just waiting for some confirmation or something from thecajunshoppe.com those damn LA people expect everyone to work on their pace, which is b a r e l y m o v i n g
I'm just excited and want my parts, no fault of their own.
I'm just excited and want my parts, no fault of their own.
OP
OP
TerapinChef
Well-Known Member
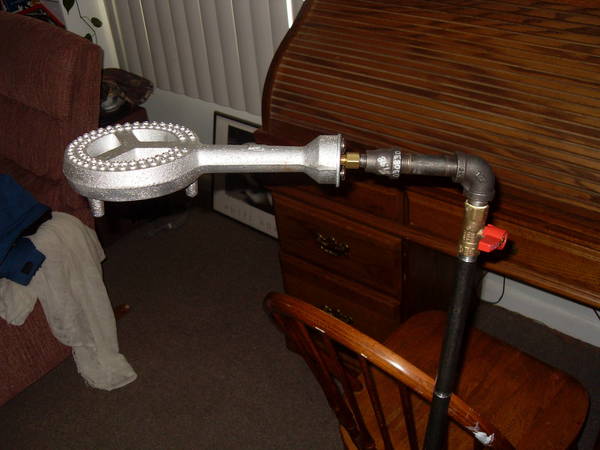
So I think it is done. I haven't finished taping up and assembling the new parts, but here she is all mocked together.
Additional Parts listing:
(2) 1/2" x 1/4" reducing coupling
(2) 1/4" x 1" nipples
(1) 1/2" x 1/4" bushing
(1) 1/8" MPT x 1/4" FPT brass coupling
(1) 1/4" brass nipple
Note:
I ordered my propane hose wrong from the cajunshoppe. I told them to put 1/4" MPT fittings on both ends. It should have been 1/4" on one end and 1/8" on the other. I just had to put an extra fitting or two coming off of my regulator to get the new hose attached. Also, I recieved the female version of the propane orifice instead of the male version. Again, just a fitting or two to fix. But I think it's done, now I just need to fine tune the length of the 1/2" leads to the burners to get them centered in my platform and check for leaks and I should be good to go.
BrewBeemer
Well-Known Member
That looks like your house central heating system don't tell me this is true?
OP
OP
TerapinChef
Well-Known Member
Yeah it's like 9 outside, so I wasn't really looking forward to walking through the yard (snow) to the shed to my stand. I may get out there to day to test fit the whole thing. As a note, I need to retap one of the burners. The threads are just off by bit, but my orifice won't thread in more than a twist or two.
OP
OP
TerapinChef
Well-Known Member
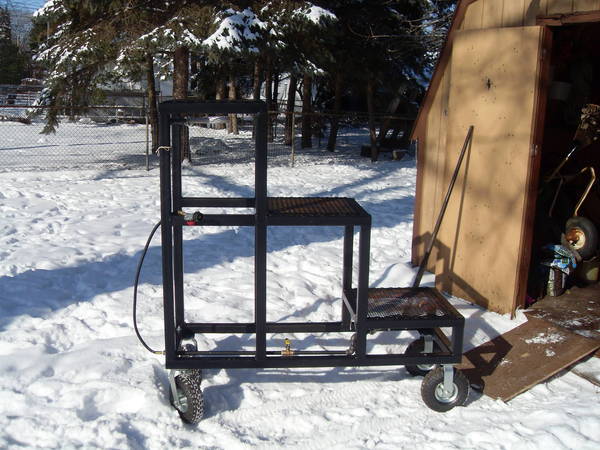
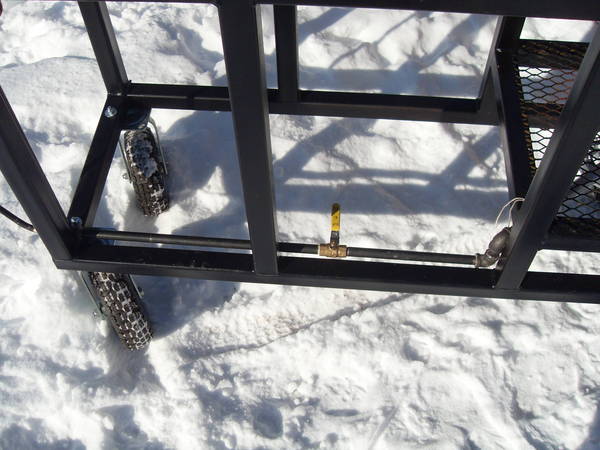
So I got my burner re-tapped and everything doped up and put together. Houston, initial burner firing is a positive. I found already that the ball valve seems to work better than the shut-off valve but I think it's just because the longer handle makes fine tuning a bit easier. The only thing left to do is shorten the burner lead on the top tier and leak test the whole thing. Here's the pics, I hope you guys appreciate the fact that I went out to take these in 9 degree weather.


OP
OP
TerapinChef
Well-Known Member

BooneDocks
Well-Known Member
I saw this thing on Detroit Craislist before you had purchased it. I never could have expected you could transform it so well. Job being very well done!!!!
- Joined
- Nov 6, 2007
- Messages
- 62,016
- Reaction score
- 6,923
I'm assuming the zip ties holding the piping on are temproary?
Similar threads
- Replies
- 4
- Views
- 2K
- Replies
- 0
- Views
- 535
- Replies
- 26
- Views
- 5K
- Replies
- 16
- Views
- 8K

Latest posts
-
Canned wort: concentrate vs non-concentrate; hot break material
- Latest: EscapeArtistBrewing
-

-
-

-
-
