The thermaltake fan is the way to go. Beyond the ~$12 for the fan, I purchased some rare earth magnets and a plastic project sheet at HD along with multiple sized stirbars from Amazon. Cheap, and the only wiring was plugging it in! Works like a champ.
You are using an out of date browser. It may not display this or other websites correctly.
You should upgrade or use an alternative browser.
You should upgrade or use an alternative browser.
My Stirplate... Cheap and Easy Build...
- Thread starter Anthony_Lopez
- Start date

Help Support Homebrew Talk:
This site may earn a commission from merchant affiliate
links, including eBay, Amazon, and others.
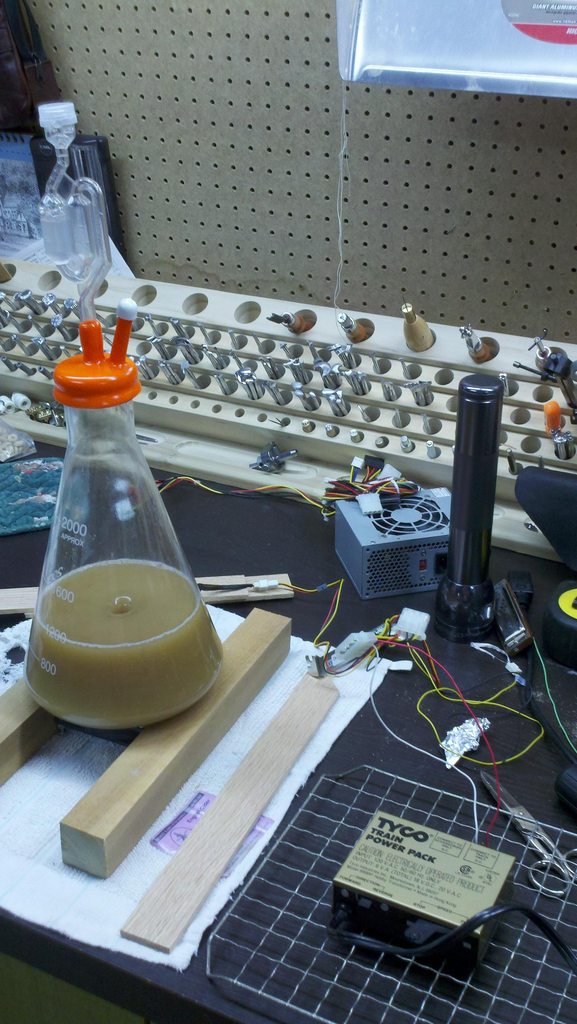
I have been using a little piecemeal stir plate formed out of a computer fan and an old model train controller:
I wanted something that is:
(1) stable
(2) decent looking
(3) capable of do two six liter starters simultaneously.
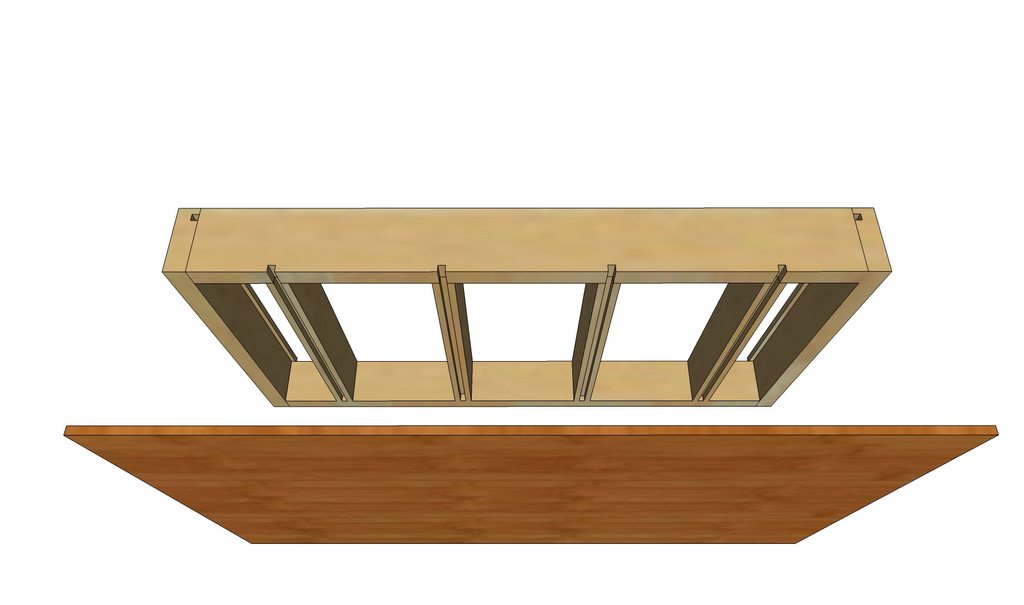
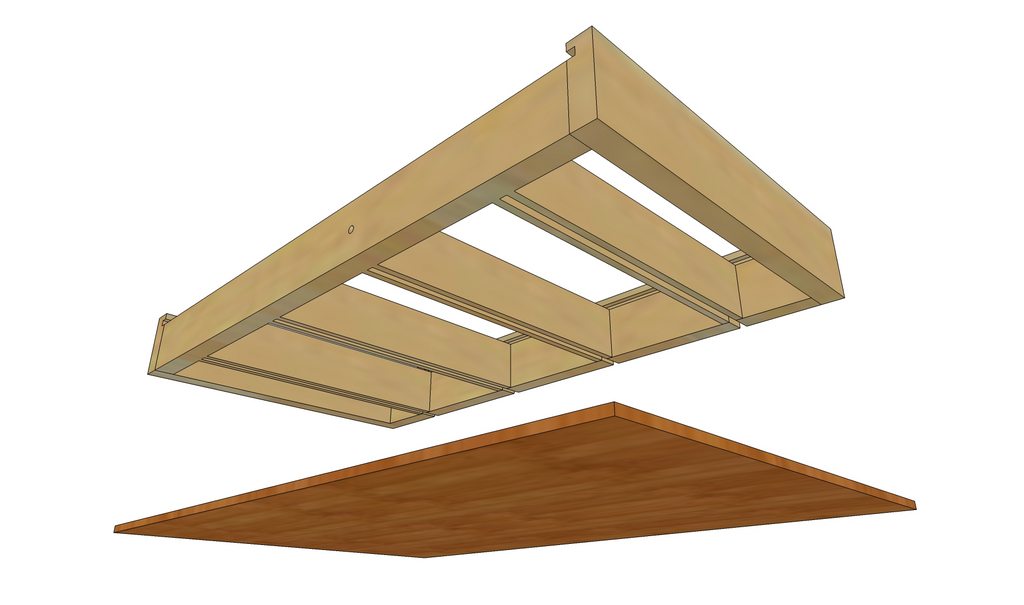
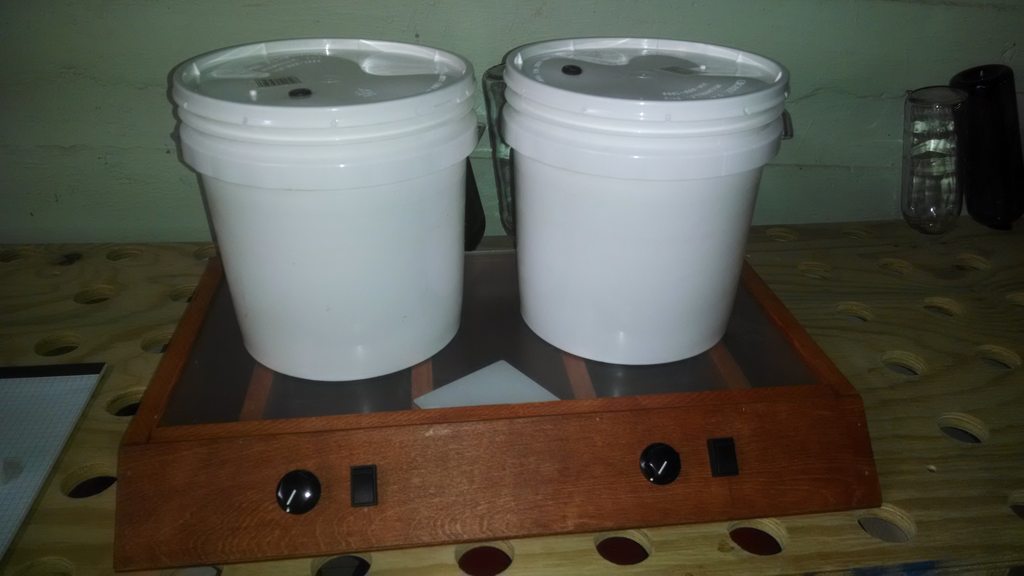
Here is what I came up with:
Sketchup pictures:


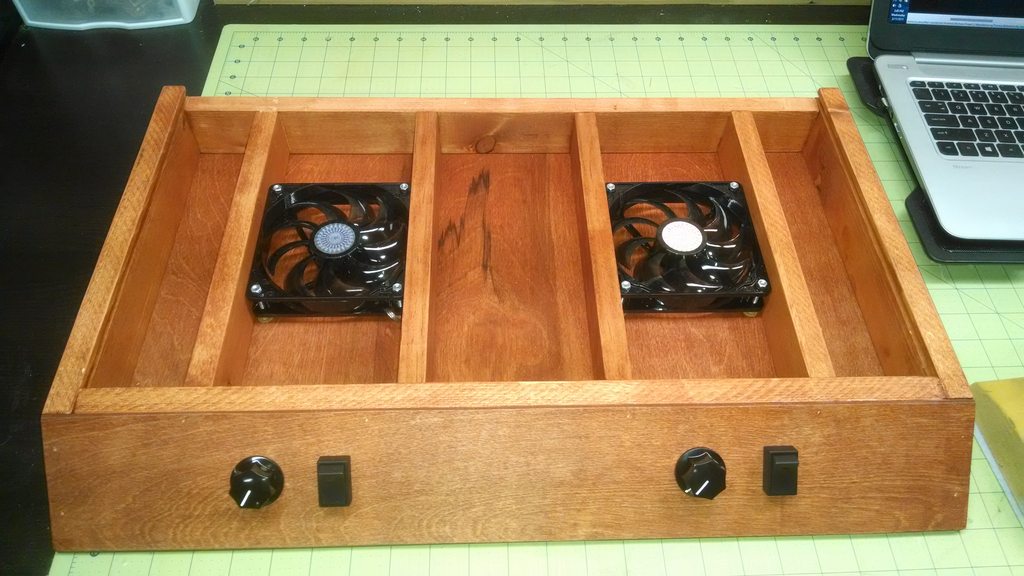
Mocking up the electronic portions:

Basic assembly and stain:
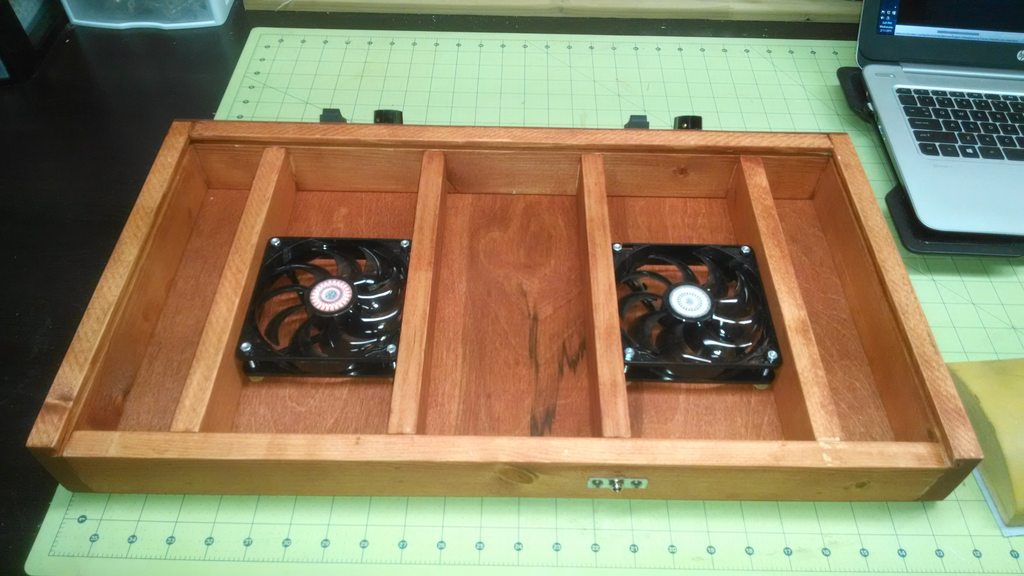
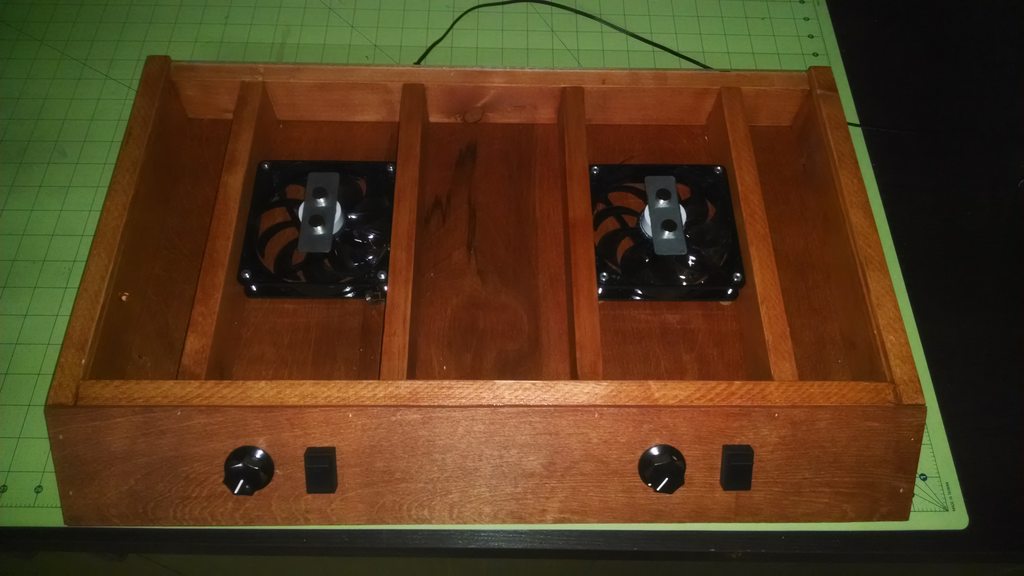
Front:
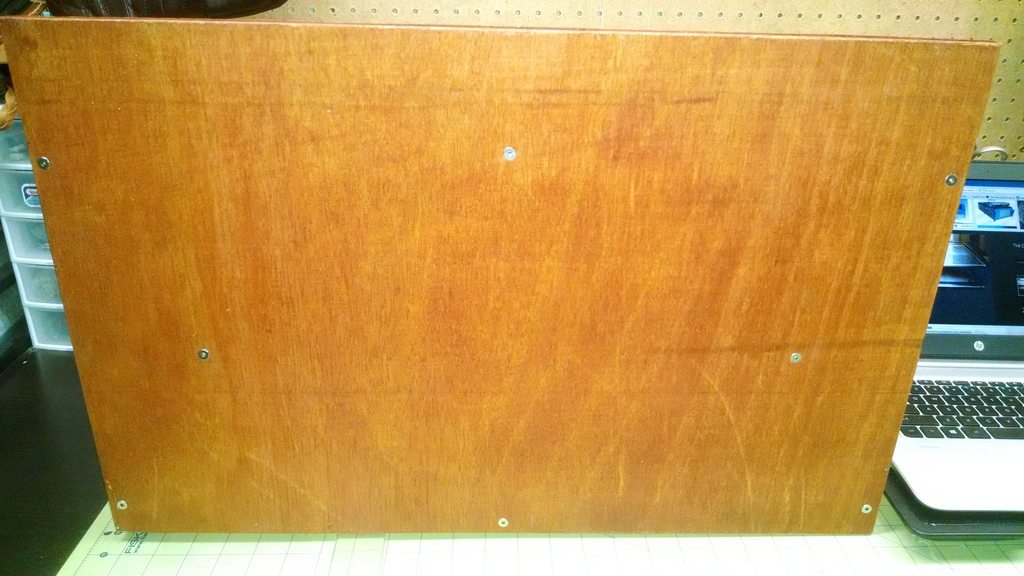
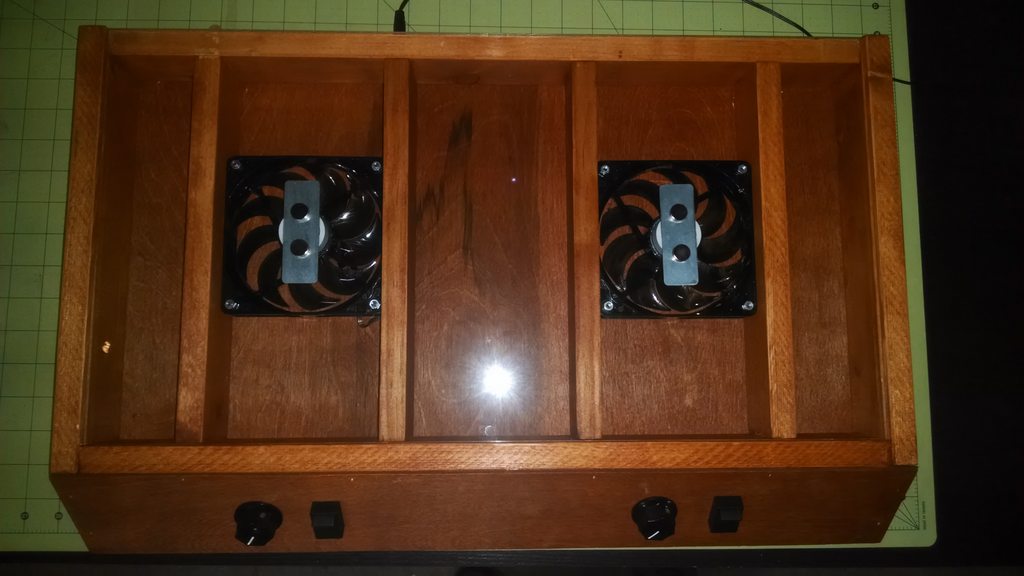
Back:
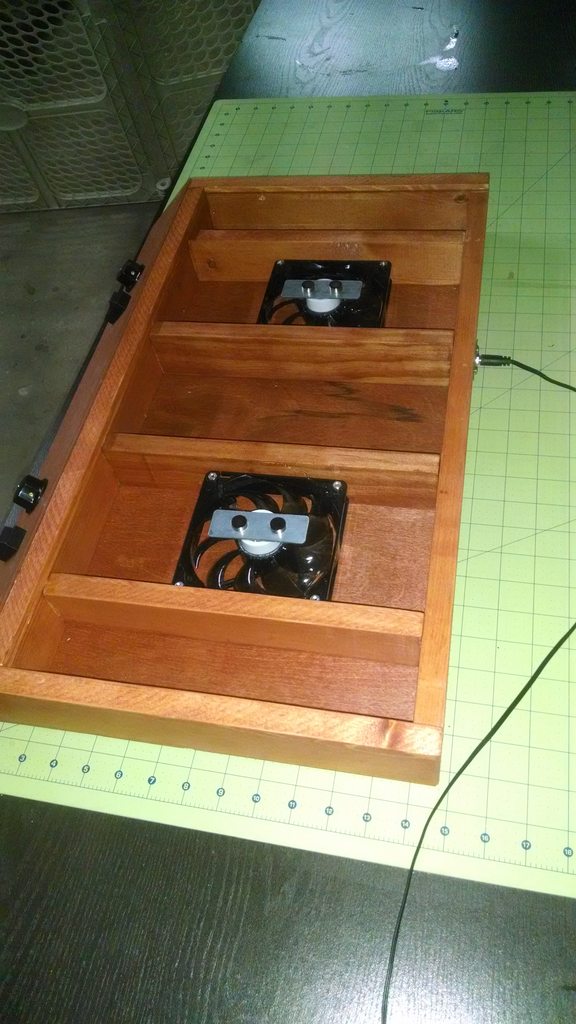
Base:
Testing the acrylic fit:
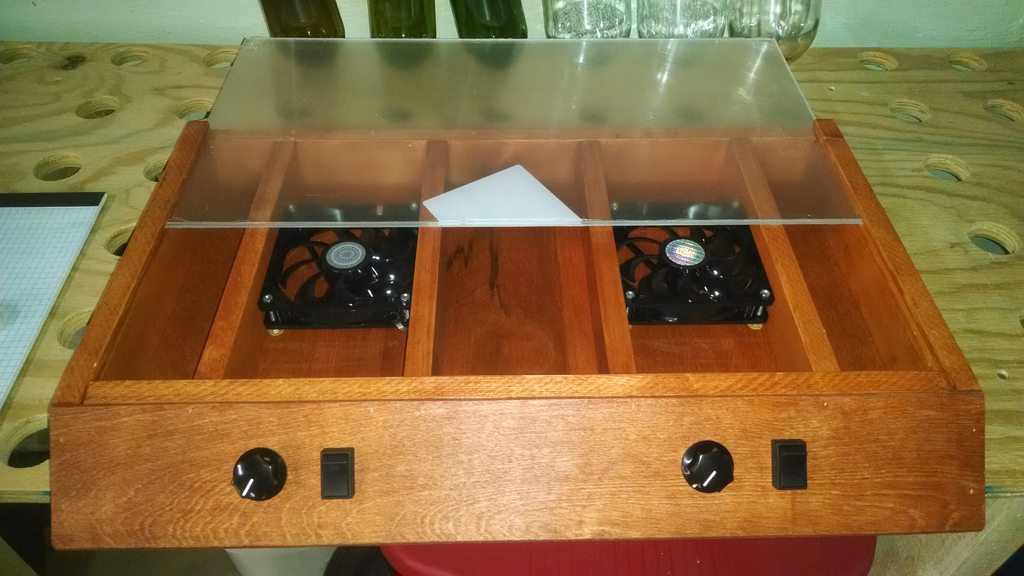
Spacers and bars attached:
Magnets set and acrylic installed:
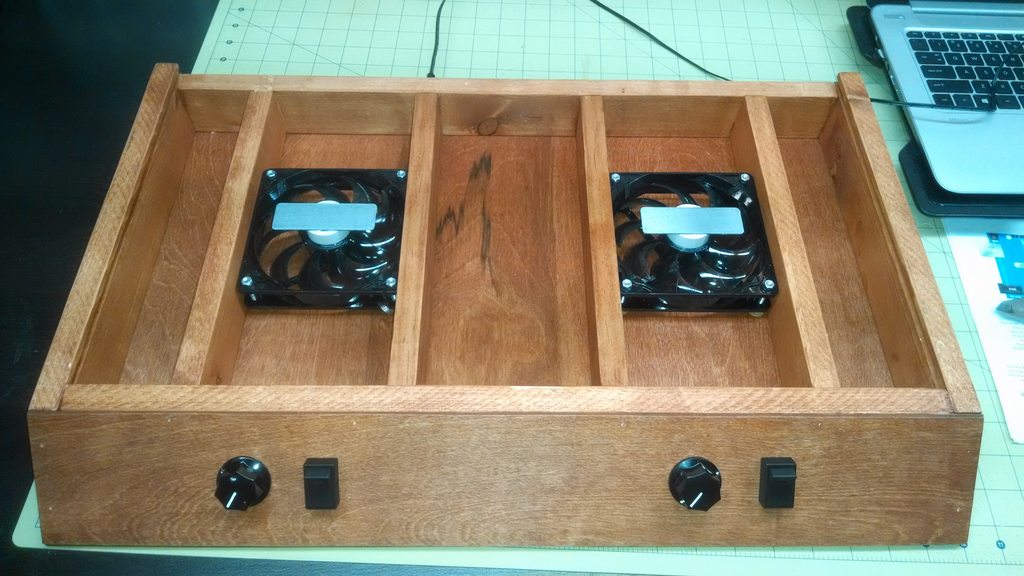
Front:
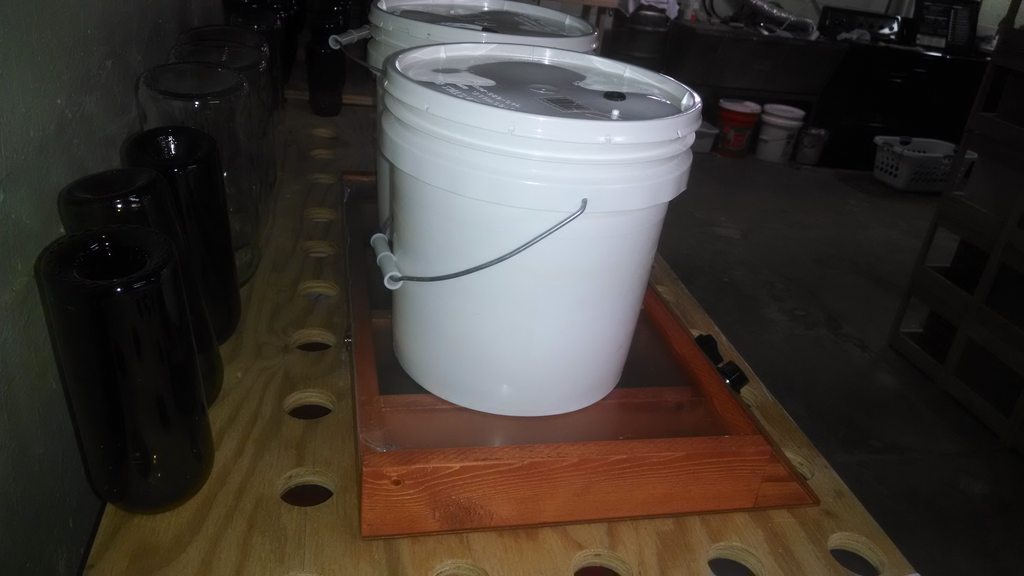
Top:
Side:

Back:
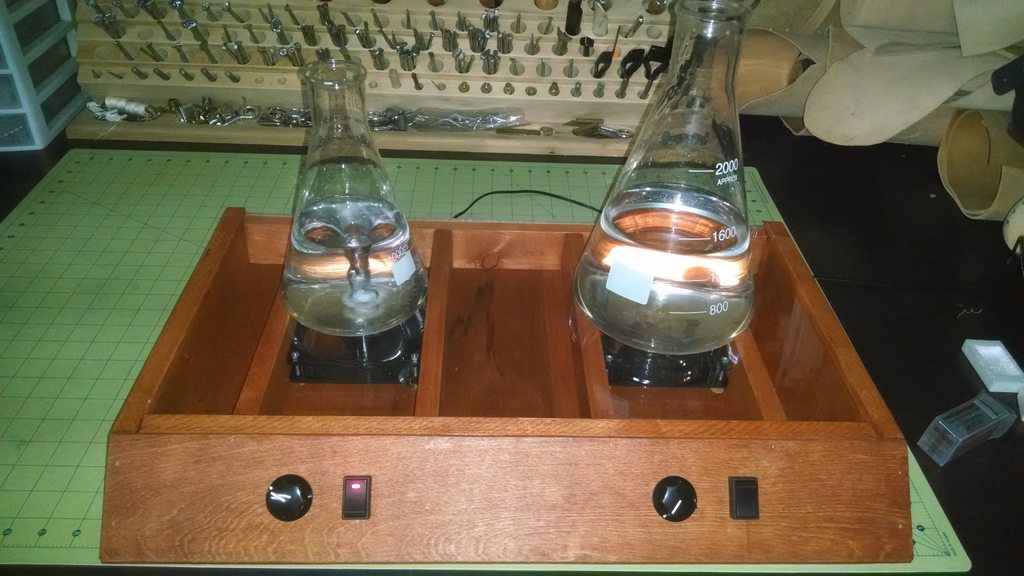
Test run:
Theoretical maximum usage:
Front:
Side:
I still need to disassemble and put a varnish coat on the wood parts, but it is up and running. If I were doing the project again, I would increase the height from 2.5" to 6". This would give me more opportunity for adjustment.
I wanted something that is:
(1) stable
(2) decent looking
(3) capable of do two six liter starters simultaneously.
Here is what I came up with:
Sketchup pictures:
Mocking up the electronic portions:
Basic assembly and stain:
Front:
Back:
Base:
Testing the acrylic fit:
Spacers and bars attached:
Magnets set and acrylic installed:
Front:
Top:
Side:
Back:
Test run:
Theoretical maximum usage:
Front:
Side:
I still need to disassemble and put a varnish coat on the wood parts, but it is up and running. If I were doing the project again, I would increase the height from 2.5" to 6". This would give me more opportunity for adjustment.
JMathie77
Well-Known Member
What program did u use for the sketchup pictures?
- Joined
- Aug 26, 2009
- Messages
- 285
- Reaction score
- 25
I have been using a little piecemeal stir plate formed out of a computer fan and an old model train controller:
How much leather working are you doing now that you have found Home Brewing?
What program did u use for the sketchup pictures?
Sketchup - http://www.sketchup.com/
Fast, easy to learn, and a pile of pre-build models (like the fans in my drawing - I just downloaded and inserted them into the sketch). My brother is an architect and while he says the professional options are better, I still catch him using SketchUp for little projects he does around his house.
")


$176.97
1pc Commercial Keg Manifold 2" Tri Clamp,Ball Lock Tapping Head,Pressure Gauge/Adjustable PRV for Kegging,Fermentation Control
hanhanbaihuoxiaoshoudian

$53.24
1pc Hose Barb/MFL 1.5" Tri Clamp to Ball Lock Post Liquid Gas Homebrew Kegging Fermentation Parts Brewer Hardware SUS304(Liquid Hose Barb)
yunchengshiyanhuqucuichendianzishangwuyouxiangongsi


$10.99 ($31.16 / Ounce)
Hornindal Kveik Yeast for Homebrewing - Mead, Cider, Wine, Beer - 10g Packet - Saccharomyces Cerevisiae - Sold by Shadowhive.com
Shadowhive


$479.00
$559.00
EdgeStar KC1000SS Craft Brew Kegerator for 1/6 Barrel and Cornelius Kegs
Amazon.com


$7.79 ($7.79 / Count)
Craft A Brew - LalBrew Voss™ - Kveik Ale Yeast - For Craft Lagers - Ingredients for Home Brewing - Beer Making Supplies - (1 Pack)
Craft a Brew


$33.99 ($17.00 / Count)
$41.99 ($21.00 / Count)
2 Pack 1 Gallon Large Fermentation Jars with 3 Airlocks and 2 SCREW Lids(100% Airtight Heavy Duty Lid w Silicone) - Wide Mouth Glass Jars w Scale Mark - Pickle Jars for Sauerkraut, Sourdough Starter
Qianfenie Direct


$22.00 ($623.23 / Ounce)
AMZLMPKNTW Ball Lock Sample Faucet 30cm Reinforced Silicone Hose Secondary Fermentation Homebrew Kegging joyful
无为中南商贸有限公司


$20.94
$29.99
The Brew Your Own Big Book of Clone Recipes: Featuring 300 Homebrew Recipes from Your Favorite Breweries
Amazon.com


$58.16
HUIZHUGS Brewing Equipment Keg Ball Lock Faucet 30cm Reinforced Silicone Hose Secondary Fermentation Homebrew Kegging Brewing Equipment
xiangshuizhenzhanglingfengshop


$53.24
1pc Hose Barb/MFL 1.5" Tri Clamp to Ball Lock Post Liquid Gas Homebrew Kegging Fermentation Parts Brewer Hardware SUS304(Liquid Hose Barb)
Guangshui Weilu You Trading Co., Ltd


![Craft A Brew - Safale BE-256 Yeast - Fermentis - Belgian Ale Dry Yeast - For Belgian & Strong Ales - Ingredients for Home Brewing - Beer Making Supplies - [3 Pack]](https://m.media-amazon.com/images/I/51bcKEwQmWL._SL500_.jpg)

How much leather working are you doing now that you have found Home Brewing?
Between school, family, work, and other responsibilities there has been very little leather work or brewing recently.
Hoping to change part of that with the e-BIAB system I am finishing up now. Just need to build my CFC and I will be ready to brew again.
Last edited:
OK. That's pretty nice.
Thank you - I am hoping it works really well!
jrowland74
Well-Known Member
First off, thanks to everyone who took the time on this thread to share so much information. I put one of these together using this thread, but I don't seem to have much speed range. I am also planning to make another, but want to get this one right first. I was trying to troubleshoot this on my own with my zero electrical knowledge, and am thinking it may be related to the rheostat. Could someone please explain in layman terms why we are using a 25 Ohm 3 Watt rheostat? I went looking for different sizes, but really can't figure out what the numbers mean in relation to their use...
Do you want to go faster or slower? I made the same build and it can go so fast it throws the stirbar and can also send voltage so low it won't power the fan on. Realistically you don't need a whole lot more than a good medium pace swirl if you're just using it for yeast starters.
If you want more control over speed, I've heard you have to add a voltage regulator lm317.
If you want more control over speed, I've heard you have to add a voltage regulator lm317.
jrowland74
Well-Known Member
I keep reading how people are able to slow it down to almost a stop, as you said. That's what I was anticipating, but can't even come close. I have not yet made a starter, but I was able to get somewhat of a vortex with water. I have a 2L flask and am waiting for my stir bar to arrive. For now I am using a divided shelf peg, which I believe is 3/4". It may work just fine, but like I said, I was anticipating the results I have been seeing here. I do have a lm317; Maybe I'll try to figure out how to add it...
I keep reading how people are able to slow it down to almost a stop, as you said. That's what I was anticipating, but can't even come close. I have not yet made a starter, but I was able to get somewhat of a vortex with water. I have a 2L flask and am waiting for my stir bar to arrive. For now I am using a divided shelf peg, which I believe is 3/4". It may work just fine, but like I said, I was anticipating the results I have been seeing here. I do have a lm317; Maybe I'll try to figure out how to add it...
This post has a wiring diagram with a LM317:
https://www.homebrewtalk.com/f255/my-stirplate-cheap-easy-build-86252/index106.html#post3899452
jrowland74
Well-Known Member
That link just brings me to this same page. Is it somewhere in this thread? If so, I'll dig through and find it. To be clear, we are talking about this right?

Yes, it is on this thread - post 1059.
Here is the quote:
Yes, that is an LM317.
Good Luck!
Here is the quote:
This is a fool proof wiring diagram. All parts is obtainable from your local Radio Shack.
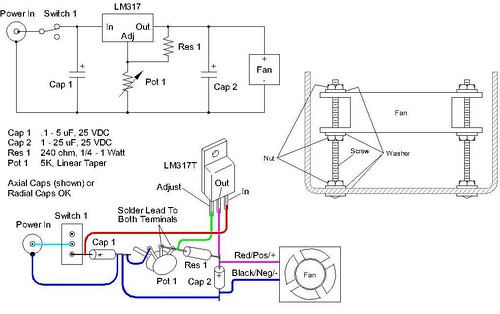
This will allow for perfect speed control. Using just a potentiometer will work at first but wont last and last. You wont get good speed control and using lower volt DC adapters for speed control is silly. Don't do it, build it right.
Also checkout this handy link: http://www.stirstarters.com/instructions.html
If you like DIY then build one if not just order one from here, it is much easier and only marginally more expensive than parting and building it yourself.
Cheers to happy yeasty beasties!
Yes, that is an LM317.
Good Luck!
jrowland74
Well-Known Member
Yes, it is on this thread - post 1059.
Here is the quote:
Yes, that is an LM317.
Good Luck!
Perfect, Thanks!!!!!!
Perfect, Thanks!!!!!!
What do they mean that the potentiometer won't last?
What do they mean that the potentiometer won't last?
Mellow52 does not clarify his statement, but I think he means that the potentiometer will last longer if it is paired with the voltage regulator. The potentiometer's load is smaller if it is controlling a voltage regulator rather than the voltage itself. Think of it like using a shovel as a prybar. It will work as long as the load is very small. If the load gets too big - or the load is right at the limit of what a part will handle - something will break - eventually. There are a lot of people using the original design (without the LM317) with no problems, so I would say adding the regulator is at your discretion. I put it on mine, but I don't know if it is absolutely necessary.
Good Luck,
Cody
jrowland74
Well-Known Member
If I use a 25 Ohm 3 Watt rheostat with a LM317, do I need to use the resistor and capacitors?
mikerunsmountains
Active Member
First off, thanks to everyone who took the time on this thread to share so much information. I put one of these together using this thread, but I don't seem to have much speed range. I am also planning to make another, but want to get this one right first. I was trying to troubleshoot this on my own with my zero electrical knowledge, and am thinking it may be related to the rheostat. Could someone please explain in layman terms why we are using a 25 Ohm 3 Watt rheostat? I went looking for different sizes, but really can't figure out what the numbers mean in relation to their use...
I'm having the same problem with my build (6v power source, 25ohm POT, and 12v fan). Went back to RadioShack and got a 5K ohm (had read multiple places that it would allow for more adjustment of the speed) and that did basically the opposite of what I wanted and I ended up having basically an on/off switch and when the fan is on it's like hyper speed.
I think I'll go back to RadioShack and try to throw a resistor in the loop and drop the voltage before it gets to the POT.
Edit: The issue I'm having with speed is that my lowest speed seems to be a little too fast still, so hopefully dropping the voltage will give me some more control.
mikerunsmountains
Active Member
UPDATE: I think I've gotten my stir plate set up just how I want it. I have no way to measure the RPMs or anything, so I'm really just eyeballing the speed.
The problem I was having earlier with not being able to lower the speed anymore using just the pot were solved by adding in a resistor to the system before the pot. Now I've got the ability to lower the speed down to a near stop and then up to faster than I think would be needed for my purpose (1-1.5L starters).
Here's a couple pictures of the finished project with details on the parts.
jrowland74
Well-Known Member
UPDATE: I think I've gotten my stir plate set up just how I want it. I have no way to measure the RPMs or anything, so I'm really just eyeballing the speed.
The problem I was having earlier with not being able to lower the speed anymore using just the pot were solved by adding in a resistor to the system before the pot. Now I've got the ability to lower the speed down to a near stop and then up to faster than I think would be needed for my purpose (1-1.5L starters).
Here's a couple pictures of the finished project with details on the parts.
Nice! I'll have to try that with mine. I built another one with a different fan to see if that was the problem, but it seems to be the same.
CascadeRob
New Member
- Joined
- Mar 5, 2015
- Messages
- 1
- Reaction score
- 0
Took a while but I've read through all the posts and am inspired to build one myself. Great builds to everyone who has posted pics! Just waiting for a few more supplies before I start. BTW, with RS going bankrupt, got some amazing deals on supplies while the few remaining brick/mortor stores try to liquidate what's left.
Question, for those of you who have done it or otherwise know, if you had a choice to build/use a pwm vs lm317 voltage regulator, which is best in this setup? I'm considering both at the moment and not sure which way to go.
PS, thanks to the OP for starting this thread, it's going on how many years now and influences hundreds more I'm sure!
IDoBleedBrew
Well-Known Member
- Joined
- Dec 26, 2014
- Messages
- 116
- Reaction score
- 17
Built mine today. I had everything I needed for the plate lying around the house except for a potentiometer, but I got 6 of them (with hardware and knobs) for $7 shipped.
[ame]https://www.youtube.com/watch?v=dbKTOIg4WUw[/ame]
I used an old external HD enclosure. I mounted the fan on the bottom so I would have a nice, smooth surface on top for the flask. So far... it seems to be running great. It is surprisingly nice and quiet compared to the ones I've used in chem lab which could get pretty loud with the rattling. It could definitely be improved... I'll add an on/off switch eventually.
I have been using a little piecemeal stir plate formed out of a computer fan and an old model train controller:
I wanted something that is:
(1) stable
(2) decent looking
(3) capable of do two six liter starters simultaneously.
Here is what I came up with:
Sketchup pictures:
Mocking up the electronic portions:
Basic assembly and stain:
Front:
Back:
Base:
Testing the acrylic fit:
Spacers and bars attached:
Magnets set and acrylic installed:
Front:
Top:
Side:
Back:
Test run:
Theoretical maximum usage:
Front:
Side:
I still need to disassemble and put a varnish coat on the wood parts, but it is up and running. If I were doing the project again, I would increase the height from 2.5" to 6". This would give me more opportunity for adjustment.
I like this design a lot. Where did you hide the wires? I couldn't see any. I think I would like to copy this design for my next one. I usually do a mead or a cider during my mash so it'd be nice to have two starters going at once.
Where did you hide the wires? I couldn't see any.
It looks like he is routing his wires through the dados in the bottom of his cross members and the space behind the beveled switch plate.
I like this design a lot. Where did you hide the wires? I couldn't see any. I think I would like to copy this design for my next one. I usually do a mead or a cider during my mash so it'd be nice to have two starters going at once.
It looks like he is routing his wires through the dados in the bottom of his cross members and the space behind the beveled switch plate.
Yes, the wires are routed in under the support pieces and behind the faceplate. Also, unlike my sketchup drawing, you only need to create a groove on the bottom of the two inside support pieces. This can be done with a dado, a router, a very careful hand with a skil saw, or even by hand. The bottom plate of the unit is attached with Brass Standard Wood Insert Lock Nuts so it can be removed and the wiring accessed. I used the wiring diagram from post 1059 on this thread. If I built it again, I would increase the height from 2 3/4" to about 6". The added height would give me some adjustment room for my magnets and fans. Mine works, but I think a little more room would allow the fans and magnets to get a little farther apart. I think this would translate into a little more power.
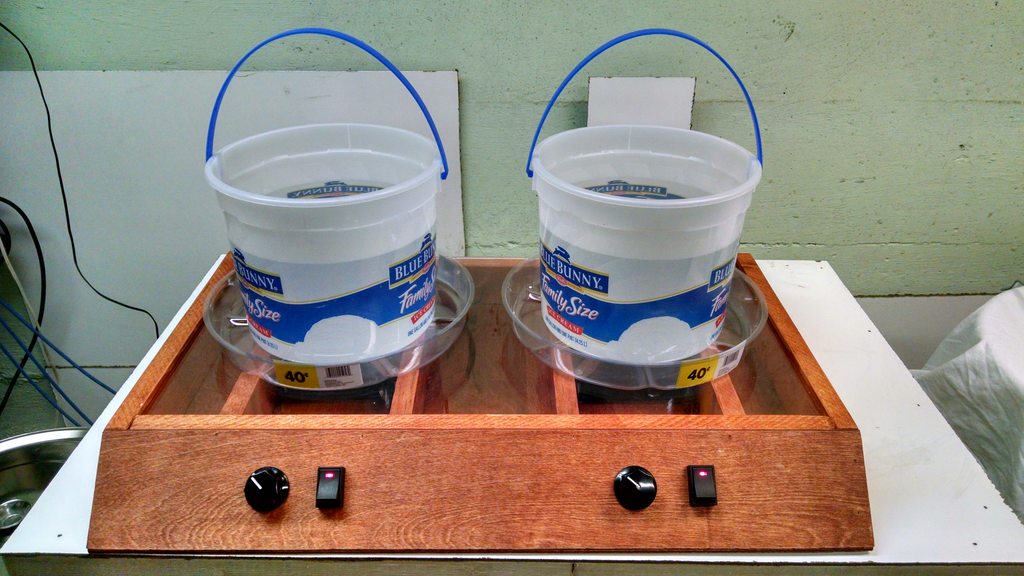
I also picked up a couple overflow catchers in the garden department of the dollar store (they are plant watering bases):

tnorman93638
Well-Known Member
Just finished mine today and it's working. Not sure I'm getting enough of a vortex. Doesn't pull all the way down at max speed. Got the Cigar box free at the local Gas Station that I go to all the time. Just asked if he had any empties and he happened to have one right there at the counter. Got the fan off of e-bay 12V was going to build a box with a clear top. Magnets are rare earth magnets that we have at work. Rest of the parts are from Radio Shack but they didn't have the exact parts. 2L Pyrex Flask off of Amazon is worth the few extra bucks (just feels solid).
Do I need to add holes to the board the fan is attached to??? It has bolts sticking out the bottom to raise it up so everything tucks up nicely under.
Should I use a different kind of spacer to raise the magnets off the fan. Right now there on about a 1/2" nylon washer?


Do I need to add holes to the board the fan is attached to??? It has bolts sticking out the bottom to raise it up so everything tucks up nicely under.
Should I use a different kind of spacer to raise the magnets off the fan. Right now there on about a 1/2" nylon washer?
mikerunsmountains
Active Member
Just finished mine today and it's working. Not sure I'm getting enough of a vortex. Doesn't pull all the way down at max speed. Got the Cigar box free at the local Gas Station that I go to all the time. Just asked if he had any empties and he happened to have one right there at the counter. Got the fan off of e-bay 12V was going to build a box with a clear top. Magnets are rare earth magnets that we have at work. Rest of the parts are from Radio Shack but they didn't have the exact parts. 2L Pyrex Flask off of Amazon is worth the few extra bucks (just feels solid).
Do I need to add holes to the board the fan is attached to??? It has bolts sticking out the bottom to raise it up so everything tucks up nicely under.
Should I use a different kind of spacer to raise the magnets off the fan. Right now there on about a 1/2" nylon washer?
-From what I've learned, you don't need this huge gnarly vortex to get the effects. I've been told you simply need enough force to make a small divot in the surface to get the yeasties enough aeration. From your picture, you could probably even back the speed down a bit.
-Definitely go with the Pyrex flask. I got the cheap one initially and immediately returned it. It felt really cheap and there was no way I was going to attempt to put it over an open flame. The Pyrex replacement was worth the few extra dollars.
-I wouldn't worry about putting holes in the box. I'm sure it's fine how it is.
-It's best to get the magnets as close to the surface that the flask will be sitting on so that you get the best "bond" between magnets and stir bar and you'll have less chance of throwing your bar.
Similar threads
- Replies
- 1
- Views
- 959
- Replies
- 1
- Views
- 899
