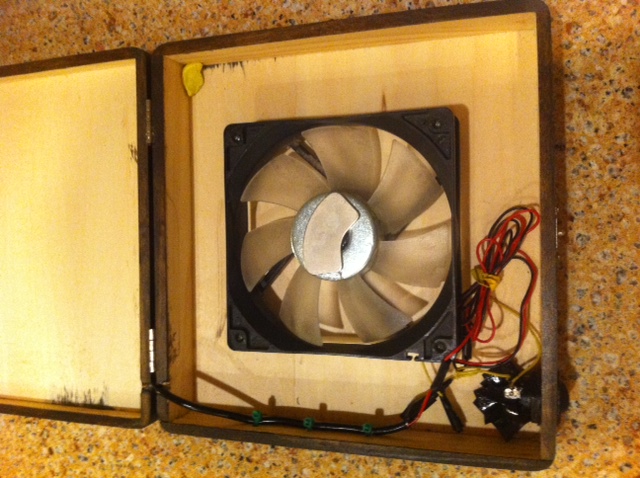
My Stirplate... Cheap and Easy Build...

Homebrew Talk - Beer, Wine, Mead, & Cider Brewing Discussion Forum

Help Support Homebrew Talk - Beer, Wine, Mead, & Cider Brewing Discussion Forum:

This site may earn a commission from merchant affiliate links, including eBay, Amazon, and others.
That's not the magnet, but the actual disc that holds the data. The magnet should be under that arm that comes out to write on the disc if im not mistaken.

So many beers... so little time.
 
That's not the magnet, but the actual disc that holds the data. The magnet should be under that arm that comes out to write on the disc if im not mistaken.

So many beers... so little time.

Lol, ok I knew what the disk was, but I thought the magnet was the smaller center part. Somehow I thought those was attached to the disk themselves.

Well, now the next question is, since these appear to be just as brittle as everyone said they would be, could I break off the larger unbroken magnet to match the other one I broke, or keep searching for another hard drive to destroy. lol Crap sake I barely put the needle nose pliers to them and it broke like glass.

i-vkLCZNj-L.jpg
 
Lol, ok I knew what the disk was, but I thought the magnet was the smaller center part. Somehow I thought those was attached to the disk themselves.

Well, now the next question is, since these appear to be just as brittle as everyone said they would be, could I break off the larger unbroken magnet to match the other one I broke, or keep searching for another hard drive to destroy. lol Crap sake I barely put the needle nose pliers to them and it broke like glass.

What I did was stack mine. That way it doesn't matter if one is broken or not. Just try to center the magnet so it's field's center is at the center of your fan or what ever you're going to use to spin the magnet.

The below image is what I'm talking about.

photo (1).JPG
 
Well, now the next question is, since these appear to be just as brittle as everyone said they would be, could I break off the larger unbroken magnet to match the other one I broke, or keep searching for another hard drive to destroy. lol Crap sake I barely put the needle nose pliers to them and it broke like glass.

I only used one on my stirplate and it's plenty strong. Just center it on your fan the best you can to minimize wobble.
 
Two methods to remove those hard-drive magnets that seem to work:

1 - a paint-scraper type putty knife (stiff blade) and a gentle tap with a mallet
2 - bend the metal that it's on - and it will pop off
 
I used some pliers to bend the bracket and get the magnet separated slightly on the twisted end and it popped right off. My magnet seems smaller than some here however and seems to be very strong. Not brittle at all. I got it from the IT department so not sure what kind of drive it came out of.
 
Pot goes from 1.2 ohms - 4.95k ohms. This is very close to the performance of the pot in my working stir plate. Wall wort output is 5.10v. Input side of regulator shows 5.10v
Output shows 1.254vdc when pot closed, only 3.51vdc when is pot open but this is with the fan connected. If I need to desolder it to get a reading I can... let me know. Does this suggest any possible causes?
I checked and the volt regulator seems to be wired correct.


I haven't been on in a while, sorry. If you are still struggling with this, I see a couple of things to look into. If you have a working stir plate with all the same components, it makes it a little harder.
First, you are starting at a max of only 5 volts. Most fans In my experience are designed for 12V. Reducing much below 5V and I think you would experience stalling (off) and then have to open it up to full speed to get it going again.
If you can up the power to 9 or 12V, that alone may be enough to solve your problem.
Also look at the fan itself. When comparing with your working plate, assuming everything else is the same, the fan could have different requirements. It's age and amount of use it has seen could also affect the power draw/requirement.

Another thing would be the relationship between the pot and regulator. To get an accurate reading, you would have to remove the fans so it doesn't add to the voltage drop. Watch the affect on the output voltage while you turn the pot. You might find that with very little movement of the pot, you see large swings in output voltage. You may also get that information from the data sheet for the 317 regulator.

I would try increasing the voltage first and see what happens.

I run mine with 12v. It's easy to turn up the pot to limit current or volts in your case but you can't add volts if you don't have them from the start.


Sent from my iPad using Home Brew
 
I made this a few months ago. I had some parts on hand and It was a fairly easy build.
I used the rare earth magnets from Ace hardware and they work fine. I omitted the led since the switch i had didn't have one.
I made about 4 starters with it and I couldn't be happier.
 
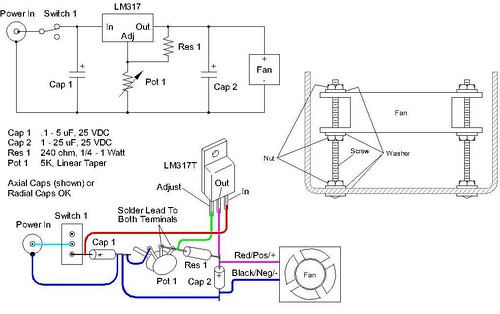
This is a fool proof wiring diagram. All parts is obtainable from your local Radio Shack.

2746854079_cc609a0d77.jpg


This will allow for perfect speed control. Using just a potentiometer will work at first but wont last and last. You wont get good speed control and using lower volt DC adapters for speed control is silly. Don't do it, build it right.

Also checkout this handy link: http://www.stirstarters.com/instructions.html

If you like DIY then build one if not just order one from here, it is much easier and only marginally more expensive than parting and building it yourself.

Cheers to happy yeasty beasties! :mug:

ok, I'm not sure if it's just me but I can't find most of these items at radioshack. I was able to find the 5k potentiometer and the LM317T. However I wasn't able to find the 5 or 25 uf 25vdc capacitors, or the 240 ohm, 1/4 - 1 watt resistor. I ended up getting the 220 ohm, 1/4-watt resistor since it seemed the closest. Any suggestions? I think I did see a 4.7 uf capacitor but it wasn't 25vdc either.
 
ok, I'm not sure if it's just me but I can't find most of these items at radioshack. I was able to find the 5k potentiometer and the LM317T. However I wasn't able to find the 5 or 25 uf 25vdc capacitors, or the 240 ohm, 1/4 - 1 watt resistor. I ended up getting the 220 ohm, 1/4-watt resistor since it seemed the closest. Any suggestions? I think I did see a 4.7 uf capacitor but it wasn't 25vdc either.

Save yourself a lot of effort and buy a fan which comes with the speed control potentiometer already:
http://www.newegg.com/Product/Product.aspx?Item=N82E16835200027

With code SUPSALE033, it's $5 shipped. It's a very easy build.
 
so you're saying I won't need any other components electrically than that fan/pot combo, switch and power supply?
 
Will any size fan work I have a like a two inch it seems to run fast enough. Trying to make it a inexpensive as possible...
 
I'm having trouble finding a Potentiometer/Rheostat. I live in Canada so shipping for everywhere I look bring the price to around $30 and I can't find any local shops that stock them. Any Canadians have a website that won't cost me an arm and a leg for shipping?
 
I'm having trouble finding a Potentiometer/Rheostat. I live in Canada so shipping for everywhere I look bring the price to around $30 and I can't find any local shops that stock them. Any Canadians have a website that won't cost me an arm and a leg for shipping?


There's this really cool website called Amazon.ca.


Sent from my iPad using Home Brew
 
I'm having trouble finding a Potentiometer/Rheostat. I live in Canada so shipping for everywhere I look bring the price to around $30 and I can't find any local shops that stock them. Any Canadians have a website that won't cost me an arm and a leg for shipping?

Newark has a Canada branch.

canada.newark.com

They'll get you something so precisely what you need, you'll probably learn something buying it.

What potentiometer value are you after? (Forgive me if I haven't read the same instructions you read.) If their site is too confusing I'll help you find one, and a knob to go with it.

Edit: Start --> Here <-- for potentiometers. (Passive Components / Potentiometers / Rotary Potentiometers)
 
Just finished mine up today! Great thread! It made the job super easy with the very little electrical knowledge I have! Thanks!ImageUploadedByHome Brew1396139722.476915.jpg


Sent from my iPhone using Home Brew
 
ImageUploadedByHome Brew1396390998.442535.jpg so, collecting parts for my stir plate while I fabricate my housing and need to know, one hard drive magnet or 2 button magnets? Happen to have both, in my mind a single one would be easier to center but the dual button may create a better polarity difference. I've got a variety of stir bars on the way in the mail so I should be set with different options. What's the general consensus?


Sent from my iPhone using Home Brew
 
View attachment 190162 so, collecting parts for my stir plate while I fabricate my housing and need to know, one hard drive magnet or 2 button magnets? Happen to have both, in my mind a single one would be easier to center but the dual button may create a better polarity difference. I've got a variety of stir bars on the way in the mail so I should be set with different options. What's the general consensus?


Sent from my iPhone using Home Brew


I recently asked the same question in a different thread. One hard drive magnet seemed to be the most frequent answer I got. It worked well for me.


Sent from my iPhone using Home Brew
 
So many threads with so many posts, the search doesn't seem to narrow things down much! I appreciate the quick feedback. I'm not partial to either, just whatever's easiest and does the job.


Sent from my iPhone using Home Brew
 
View attachment 190162 so, collecting parts for my stir plate while I fabricate my housing and need to know, one hard drive magnet or 2 button magnets? Happen to have both, in my mind a single one would be easier to center but the dual button may create a better polarity difference. I've got a variety of stir bars on the way in the mail so I should be set with different options. What's the general consensus?


Sent from my iPhone using Home Brew

I use 2 button magnets, but many people have good luck with the HD magnet. I think the success depends on the length of the stir bar compared to the distance between poles of the magnet. If you use a hard drive magnet, you will need to select a stir bar that is comparable in length to that. OTOH, with button magnets, you can pick the stir bar you want, then position the button magnets to match it.
 
Thank you OP for including Radio Shack part numbers. We couldn't find the bin for the one of the parts and we used the part number to track one to the back room.


Sent from my iPhone using Home Brew
 
Thrown bar over and over and over again....help.

Did all of this to spec. Using one HD magnet, a 2 inch stir bar, a 12v fan and a 7.5v power supply. I have the magnet very close to the bottom of the flask. It's all in a cigar box.

The potentiometer can't turn on at a low speed. I have to turn it up over half way to get the fan to move. Then I can slow it down to a lower speed. Otherwise it kinda rocks in idle.

help

Since you can't change the distance between the poles of the HD magnet, you might need to try a few stir bars of different lengths. Go on Amazon--they sell every size you can imagine.

The other solution would be to remove the HD magnet, get two rare earth "button" magnets and place them at the right distance from one another on the fan in order to keep the stir bar in place. It takes a little experimentation to get it right.

BTW, I have the same issue with my potentiometer. The motor won't start turning until the input voltage reaches a certain point. From that point upward, the speed control works fine.

I have the two magnets from the HD. Should I go with the large washer and try to space the magnets further apart?
 
I have the two magnets from the HD. Should I go with the large washer and try to space the magnets further apart?

OK, my bad. I assumed that your HD magnet was one piece.

Yes, you could experiment with placement of the 2 magnets. It's kind of a hit-and-miss process. Try to set them such that they don't cause the fan to go out of balance (place same distance from center and 180 degrees separated in the circle).
 
The potentiometer can't turn on at a low speed. I have to turn it up over half way to get the fan to move. Then I can slow it down to a lower speed. Otherwise it kinda rocks in idle.
help

You're using the design where the potentiometer connects directly to the fan, right? That's just a limitation of that kind of circuit. That behavior is solved by a PWM circuit, but building one is much more complicated than putting a pot in series with the fan leads.

So, don't worry, I'm sure the circuit is built fine. That's just how that kind of circuit behaves.
 
I just finished my build of this. Works great! I did realize that I have to use a small stir bar to make sure it doesn't spin off. Doesn't help that I am using a 1 gallon jug as the container, doesn't have a completely flat bottom like a flask does. Seems to work fine though as long as I keep the speed down.
 
You're using the design where the potentiometer connects directly to the fan, right? That's just a limitation of that kind of circuit. That behavior is solved by a PWM circuit, but building one is much more complicated than putting a pot in series with the fan leads.

So, don't worry, I'm sure the circuit is built fine. That's just how that kind of circuit behaves.

I've done minimal mods with circuit boards in microphones. Can a pwm circuit like you say be made on the cheap?
 
I've done minimal mods with circuit boards in microphones. Can a pwm circuit like you say be made on the cheap?

Absolutely. There are lots of ways to build it. The last one I built used:


  • 74221 'dual monostable multivibrator' ($0.62)
  • Three capacitors ($0.15 each, TOPS)
  • Six or so resistors ($0.02 each)
  • Potentiometer (About $0.70)
  • Transistor (Anywhere from $0.05 to $1.50 depending how beefy)
  • Wire (Free, if you already have some.)
  • PCB (About $2.00)
  • Potentiometer Knob (Maybe $2.00. Or make one out of wood.)
  • (Assuming you already have enclosure, flask, fan, magnet, stir bar etc.)

The trick will be building it with stuff that you can find locally, because shipping $6 worth of parts probably costs another $6.

It's highly likely there are modules you can buy that do it for you, or easier / better ways than using the 74221. (In fact I'm almost certain there's an easier part, I just already knew how to use the 74221.)

The 74221 essentially plays 'ping-pong' with itself. When you turn on the power, side A triggers as soon as the reset signal turns off, and stays on for a duration specified by pins 1 and 2 of the potentiometer. When it turns off, that triggers side B to turn on for a duration specified by pins 2 and 3 of the potentiometer. When side B turns off, it triggers side A, repeat until you power it off. So turning the potentiometer clockwise makes side A stay on longer, and side B stay on shorter. When you listen to the output on side A, you get a PWM signal, so you send that signal to your transistor.

Here's the one I built. Describing it makes it sound more complicated than it is in real life.

I used 3-pin fan headers to connect the board to the motor it was driving, for portability. (It was driving a high-powered screwdriver motor for hours at a time, hence the heatsink, which actually turned out to be unnecessary.) The connector on the top left is where the potentiometer plugged in. The one on the right is where the power plugged in. There's another behind the heatsink where you can't see it, where the motor plugged in.

Interesting side note: 4-pin fans have a built-in transistor for use with a PWM signal. That's how the computer controls the fan speed. It has some specific requirements though, like a 25mhz frequency on the PWM signal, which could make things tricky with off-the-shelf stuff.
 
Finished mine today. I'll add a green LED and a POT to it later.
Yeast test will be done in few days re revive the yeast that arrived today.
I need it in few days for my next brew and one bottle is not enough.

IMG_3102_v2.JPG
 
Yes! I just finished my build according to your wiring diagram, Mellow52! Thank you for not cutting corners, I hope this will last awhile! Should be easy to replace the fan if it ever goes out!

IMG_7045.jpg
 
Back
Top