• Please visit and share your knowledge at our sister communities:
  • If you have not, please join our official Homebrewing Facebook Group!

    Homebrewing Facebook Group

My shamelessly cheap $12 DIY stir plate

Homebrew Talk

Help Support Homebrew Talk:

This site may earn a commission from merchant affiliate links, including eBay, Amazon, and others.
This is how mine came out using these magnets (two of 'em) and a 1 inch stir bar. That's a two liter flask. It gets a pretty nice vortex going at full bore.

Thank you to everyone posting instructions for this!

stir.jpg
 
Last edited by a moderator:
Anyone have any tips on gluing the magnets? Mine keep sliding all over the place before I can get them clamped down. I guess they are resisting each other too much.
 
Nice box, looks great. I got a good deal on a 1" stir bar, $3 delivered.

http://amzn.to/148ywup

Thanks! Just an el-cheapo box from a local cigar shop. That is a good deal on the stir bar. Nice find!

Anyone have any tips on gluing the magnets? Mine keep sliding all over the place before I can get them clamped down. I guess they are resisting each other too much.

Hi 00p, I used Goop. No, seriously. It worked really well. Goop is really strong contact adhesive. You can get it at pretty much any big box store. Just apply some to both the washer and the magnets, give it two minutes or so to set up and then stick them together after that, making sure you have one magnet in one orientation and the other in the opposite (N - S).
 
Anyone have any tips on gluing the magnets? Mine keep sliding all over the place before I can get them clamped down. I guess they are resisting each other too much.


Make a spacer to go between then, something that the glue won't stick to, ( some types of plastic), or better yet, test your fan balance with the spacer installed, and glue it all on there, ( magnets and spacer).

The latter is what I did, after first gluing a thin piece of ferrous metal,( about .012-.015 thick), to the top of my fans, stick the magnets to that , ( with the spacer), and check you balance before gluing it all up.
 
Thanks to PistolsAtDawn and Stealthcruiser! I had some Goop on hand and used a toothpick as a spacer. I got everything in place, and will check it all out at lunch. You guys rock.
 
Anyone have any tips on gluing the magnets? Mine keep sliding all over the place before I can get them clamped down. I guess they are resisting each other too much.

I glued a wide penny washer to the fan with epoxy resin. Then I moved the magnets around on the washer until the balance and spacing looked right, and fixed them in place with more epoxy.
 
IMG_05861_zps5c791162.jpg


IMG_05851_zpsbd991d6b.jpg


Here's mine in work, a triple muffin fan setup removed from some equipment being scrapped at work.
The fans have a metal disc glued to the center...........This pretty much does not affect balance, ( but check any way,before you glue!).
Then, the spacers are made from plastic, with the slots cut to give the magnet some clearance, so you can re-position radially whilst dialing in the balance.
The metal disc keeps the magnets positioned, yet separated while dialing in the balance..............( positioned, yet separated.......kind of like a bra......).
When I find the sweet spot, I use some semi-runny 5 minute epoxy to secure them in place.

I would have had all 3 finished, but I busted one of the magnets crewing around with it, and have to fetch another.
 
A couple things I've learned about my stir plate build now that I've made a starter:

The thickness of the wort is sufficiently different from straight water that the 1 in stir bar gets thrown at full bore, so I had to turn the speed back a little. I set it as high as it would go while being stable.

As the yeast grew in numbers and fermentation started, it got thrown again. I'm guessing because the solution was even thicker at that point and the fluid dynamics changed. I had to reset the stir bar at a slightly lesser speed again.

The 1 in stir bar makes a good amount of noise, enough so that it's actually annoying. I'm going to try to the suggestions in this thread and see what either a piece of vinyl tubing or some old keg o-rings will do for that. Hopefully they won't increase the resistance so much that it further affects the size of the vortex I can get.

The total diameter of the magnets on my fan is just over 2 inches (two, one inch magnets), so I'm guessing that if I got a larger stir bar that might keep it from getting thrown as easily as the wort composition changes and may also help with the size of the vortex I can get.

1800 mL in a 2 liter flask is really pushing it. I have krausen foaming over the top and pushing off the foil cap. Next time I'll stick to 1500 mL or less and step it up.
 
A couple things I've learned about my stir plate build now that I've made a starter:

The thickness of the wort is sufficiently different from straight water that the 1 in stir bar gets thrown at full bore, so I had to turn the speed back a little. I set it as high as it would go while being stable.

As the yeast grew in numbers and fermentation started, it got thrown again. I'm guessing because the solution was even thicker at that point and the fluid dynamics changed. I had to reset the stir bar at a slightly lesser speed again.

The 1 in stir bar makes a good amount of noise, enough so that it's actually annoying. I'm going to try to the suggestions in this thread and see what either a piece of vinyl tubing or some old keg o-rings will do for that. Hopefully they won't increase the resistance so much that it further affects the size of the vortex I can get.

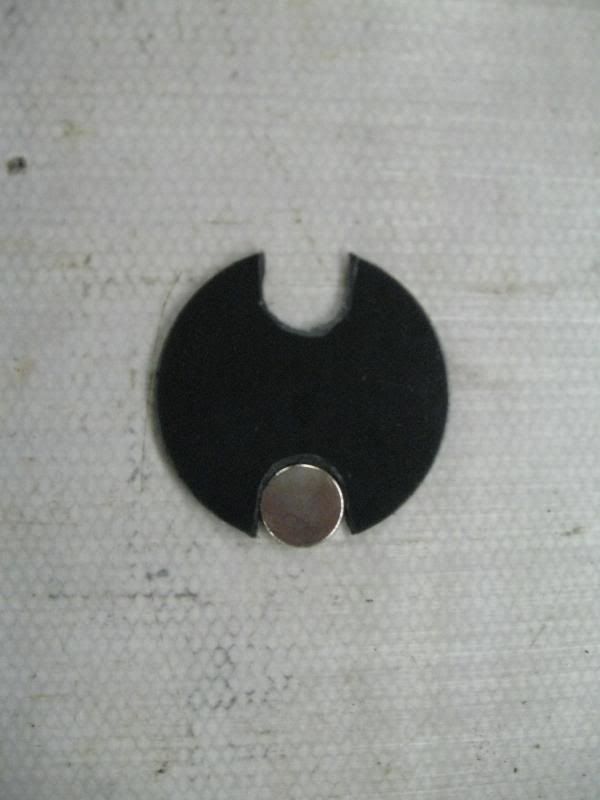
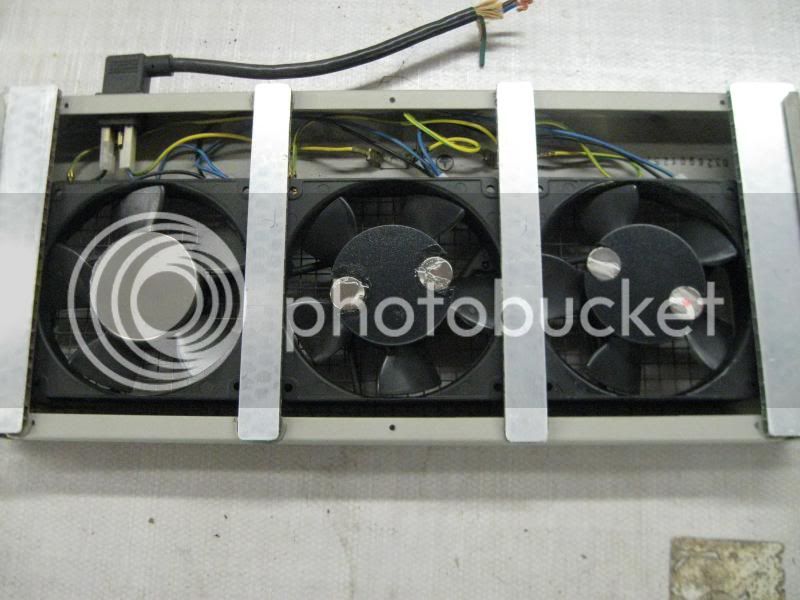
The total diameter of the magnets on my fan is just over 2 in (two, one inch magnets), so I'm guessing that if I got a larger stir bar that might keep it from getting thrown as easily as the wort composition changes and may also help with the size of the vortex I can get.

1800 mL in a 2 liter flask is really pushing it. I have krausen foaming over the top and pushing off the foil cap. Next time I'll stick to 1500 mL or less and step it up.

My findings were very similar to yours. I found that by rotating my flask and moving it around the plate very slightly, I was able to find a sweet spot where my bar didn't make a huge racket and is actually pretty quiet. I also doubled up on magnets (one on top of the other). This helped amazingly in reducing bar-throwing and noise (not sure if it was just the slight additional height or change to magnetic field that did the trick).

To combat the krausen, add 1 drop of Fermcap while boiling the wort. It'll help avoid a boil over and also keep the krausen from forming during spinning.
 
I like the simplicity of this build. I might have to give it a try.

I'm wondering, since builds like this involve attaching weight to the fan, and moving air isn't a goal, is there any reason not to clip the blades off the fan? Would it help, hurt, or just be a waste of time?
 
I'm wondering, since builds like this involve attaching weight to the fan, and moving air isn't a goal, is there any reason not to clip the blades off the fan? Would it help, hurt, or just be a waste of time?

I can't honestly see why you would need to. I'd suspect that it would throw off the balance of the motor and cause you more headaches than it'd be worth. Or without the extra resistance from the air, the motor might spin at higher RPMs than you'd want and burn out faster.

But I'm just guessing here, I really am not sure.
 
is there any reason not to clip the blades off the fan?

I just built this stir plate from spare parts. Cost me nothing. On the other hand, I'm an electrical engineer so my home lab bench has a *lot* of spare parts.

The air flow from the fan blades keeps the motor cool. Also adds some mechanical resistance in case the stir bar spins into the weeds.
 
i see everyone mentioned harddrive margnets, cant I just glue a regular magnet on that fan?

You can, but be prepared for it to not be strong enough. The reason many people cannibalize old hard drives for their read/write magnets is because they are super strong neodymium magnets. As an added benefit, if you've got an old hard drive lying around, they're practically free. Alternatively, you can purchase neodymium magnets from a novelty store or online at amazon and other vendors. If you're lucky, you may be able to find some at your local hardware store. Good luck.
 
You can, but be prepared for it to not be strong enough. The reason many people cannibalize old hard drives for their read/write magnets is because they are super strong neodymium magnets. As an added benefit, if you've got an old hard drive lying around, they're practically free. Alternatively, you can purchase neodymium magnets from a novelty store or online at amazon and other vendors. If you're lucky, you may be able to find some at your local hardware store. Good luck.

A+ response. thanks
 
A+ response. thanks

Wait a sec, you're in Chicago. Just head over to American Science & Surplus up on Northwest Highway and Foster. They have hard drive magnets and other much prettier circular neodymium magnets for sale on the cheap. They also have cheapo power supplies, fans and dc motors, project boxes and everything else to build a pretty slick looking, fully-functional stirplate.

Here's a picture of my two stirplates because 1 is never enough. The one on the right is rheostat controlled and housed in an old external cd drive case. It's pretty homespun and I had to build a blanking plate for the front and rear out of cannibalized sheet metal from an old PC case. It needed to be hammered flat and then ground down to size on my bench grinder. The one on the right is PWM controlled and housed in a radio shack project box. At $8 it was probably the most expensive piece of the build.

Edit: Total cost for both was probably no more than about $30 for all the parts I didn't find/cannibalize. PM me if you'd like help from a local homebrewer with lots of electrical experience. I design circuits for a living as an engineer for a CEMS manufacturer.

img_20130502_132600-60682.jpg
 
nvm, i went ahead and cancelled the 12 and ordered the 11. If my order didnt get cancelled in time i will have one fan for larger starters and one for smaller :D
 
So it seems getting the magnets in the right spot is crucial for this to work without being off balance.......but what about the washer people are gluing to the fan hub? I would assume if its glued slightly off center that would also create wobble. How does one find the sweet spot to glue that? Once its glued, its on there and if its off by a fraction......roasted
 
So it seems getting the magnets in the right spot is crucial for this to work without being off balance.......but what about the washer people are gluing to the fan hub? I would assume if its glued slightly off center that would also create wobble. How does one find the sweet spot to glue that? Once its glued, its on there and if its off by a fraction......roasted

The OP said that they manually spun the fan to eyeball center on the fan for the washer.
 
Built and in use in less than a week. Going to be making a Chimay Blue Clone and I needed to get my yeast started.

It's hard to make it any simpler for a stirplate build.


I will try and post another picture later of how it looks up close, I did include a hole in the box to turn the knob. I plan on moving to a wooden box when I can find a decent one, but this will work for now. Also, I didn't use a washer, I just cut off the front circular grate of the fan and glued it to the fan then glued on the magnets. It has been running all night at this point.

photo.jpg
 
ordered the fan last tuesday on amazon, with 2 day shipping it got here thursday. finally got around to glueing the washer on yesterday, magnet is just held on by itself with no problems. The fan is just sitting on some cut up cardboard to keep it closer to the lid of the tupperware, no hole in the lid and it spins very fast! I made a 2-gal IPA yesterday so i only pitched half a smack pack of 1056, this is the other half with 4 cups h2o and 1 cup light DME. been spinning all night with no problems! How do you guys keep ranched yeast, not washed but new yeast that i may not use for a few months???

2013-08-11 19.29.43.jpg
 
How do you guys keep ranched yeast, not washed but new yeast that i may not use for a few months???

Slightly off-topic. I bought a case of 12 half-pint jars at Walmart. Pour off any wort and replace with boiled (oxygen-free) water. Keep refrigerated. Blue masking tape works well for labels.

(Back on-topic.)

Currently building a 1.5L starter with the spare-parts DIY stir plate. Started with harvested 1084 that has been patiently waiting for 3 months. It has been spinning for two days, and is now at full krausen.

thanks for the advice, glad to hear you got yours up and running,, mine will have been on for 48 hours this afternoon, is it alright to jar right after full krausen?
 
I ran my starter for 24 hours and put in the fridge and was wondering why it seemed like so little yeast was in there. I then realized I underpitched my DME and used 2.3 oz for 2.3 liters, it should have been 230 grams or roughly 8.1 oz of DME. I did an incorrect ratio.

Anyways, tonight I will decant off the liquid and make 2 liters of starter and pitch it on top of my decanted yeast. Then 24-48 more hours on the stirplate cold crash and hopefully make my beer in 3-4 days.

It sounds like this is an easy but time consuming fix.

No issues whatsoever using the stirplate though. It did not throw the bar at any setting while in use.
 
Thanks for this DIY. I'm gonna give it shot. I was given a cheap stir plate for the birthday awhile back and it broke way to fast.
 
Back
Top