You are using an out of date browser. It may not display this or other websites correctly.
You should upgrade or use an alternative browser.
You should upgrade or use an alternative browser.
My new electric build....in progress
- Thread starter HossTheGreat
- Start date

Help Support Homebrew Talk:
This site may earn a commission from merchant affiliate
links, including eBay, Amazon, and others.
certaut
Well-Known Member
I use this to set my boil temps
http://www.hi-tm.com/Documents/Calib-boil.html#tables
http://www.hi-tm.com/Documents/Calib-boil.html#tables
That's awesome. Thanks for sharing it with us.
OP
OP
HossTheGreat
Well-Known Member
- Joined
- Mar 28, 2009
- Messages
- 523
- Reaction score
- 5
Thanks everyone. No way could I have ever done this without the help of everyone on here. I used to do the batch sparge/cooler method, but BIAB is so much easier. The addition of electric makes it even that much easier and quicker. I honestly don't see any reason for me to ever do it another way.
android
Well-Known Member
well done!
OP
OP
HossTheGreat
Well-Known Member
- Joined
- Mar 28, 2009
- Messages
- 523
- Reaction score
- 5
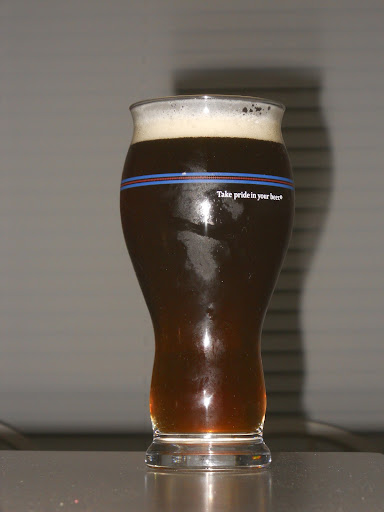
And finally, a pic of the inaugural brew


$22.00 ($623.23 / Ounce)
AMZLMPKNTW Ball Lock Sample Faucet 30cm Reinforced Silicone Hose Secondary Fermentation Homebrew Kegging joyful
无为中南商贸有限公司


$58.16
HUIZHUGS Brewing Equipment Keg Ball Lock Faucet 30cm Reinforced Silicone Hose Secondary Fermentation Homebrew Kegging Brewing Equipment
xiangshuizhenzhanglingfengshop


$176.97
1pc Commercial Keg Manifold 2" Tri Clamp,Ball Lock Tapping Head,Pressure Gauge/Adjustable PRV for Kegging,Fermentation Control
hanhanbaihuoxiaoshoudian


$20.94
$29.99
The Brew Your Own Big Book of Clone Recipes: Featuring 300 Homebrew Recipes from Your Favorite Breweries
Amazon.com


$719.00
$799.00
EdgeStar KC2000TWIN Full Size Dual Tap Kegerator & Draft Beer Dispenser - Black
Amazon.com


$10.99 ($31.16 / Ounce)
Hornindal Kveik Yeast for Homebrewing - Mead, Cider, Wine, Beer - 10g Packet - Saccharomyces Cerevisiae - Sold by Shadowhive.com
Shadowhive


$53.24
1pc Hose Barb/MFL 1.5" Tri Clamp to Ball Lock Post Liquid Gas Homebrew Kegging Fermentation Parts Brewer Hardware SUS304(Liquid Hose Barb)
yunchengshiyanhuqucuichendianzishangwuyouxiangongsi


$53.24
1pc Hose Barb/MFL 1.5" Tri Clamp to Ball Lock Post Liquid Gas Homebrew Kegging Fermentation Parts Brewer Hardware SUS304(Liquid Hose Barb)
Guangshui Weilu You Trading Co., Ltd


$7.79 ($7.79 / Count)
Craft A Brew - LalBrew Voss™ - Kveik Ale Yeast - For Craft Lagers - Ingredients for Home Brewing - Beer Making Supplies - (1 Pack)
Craft a Brew


$27.29 ($13.64 / Count)
$41.99 ($21.00 / Count)
2 Pack 1 Gallon Large Fermentation Jars with 3 Airlocks and 2 SCREW Lids(100% Airtight Heavy Duty Lid w Silicone) - Wide Mouth Glass Jars w Scale Mark - Pickle Jars for Sauerkraut, Sourdough Starter
Qianfenie Direct


OP
OP
HossTheGreat
Well-Known Member
- Joined
- Mar 28, 2009
- Messages
- 523
- Reaction score
- 5
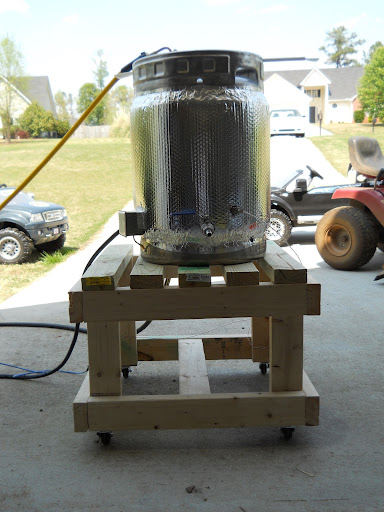
Another update....I hit up the Home Depot the other day. In the back of the store is their discount pile consisting of damaged, bowed, or scrap pieces of lumber. I built the following with about $3 worth of wood and put it in use today. Worked pretty well.
worstbrewing
Well-Known Member
Another update....I hit up the Home Depot the other day. In the back of the store is their discount pile consisting of damaged, bowed, or scrap pieces of lumber. I built the following with about $3 worth of wood and put it in use today. Worked pretty well.

Wow, that is too weird! I am literally planning out a similar electric rig at the moment and am working on a similar wooden stand, one for each vessel. The room I'm putting everything into is a bit limited for space so it's the only way I can make a stand that is removable for cleaning, etc. later. I imagine mine may end up a little bit smaller (door I'm working with is 2ft), but it definitely gives me some ideas. What are the dimensions of that?
OP
OP
HossTheGreat
Well-Known Member
- Joined
- Mar 28, 2009
- Messages
- 523
- Reaction score
- 5
Wow, that is too weird! I am literally planning out a similar electric rig at the moment and am working on a similar wooden stand, one for each vessel. The room I'm putting everything into is a bit limited for space so it's the only way I can make a stand that is removable for cleaning, etc. later. I imagine mine may end up a little bit smaller (door I'm working with is 2ft), but it definitely gives me some ideas. What are the dimensions of that?
It's exactly 2'x2'. I too have pretty limited storage space, so it fits exactly in between a couple of work benches and underneith some shelves in my garage. The thing I like best is that I can just wheel it over to my utility sink, where my water filter is to fill it up then roll it out of the garage to brew.
rsklhm10
Well-Known Member
Build looks really good, but I have a quick question. I noticed you ran a ground wire from your element box to the keg skirt. Maybe I missed something, but what was the specific reason for this? I don't recall seeing this before, specifically in Kal's build.
OP
OP
HossTheGreat
Well-Known Member
- Joined
- Mar 28, 2009
- Messages
- 523
- Reaction score
- 5
Build looks really good, but I have a quick question. I noticed you ran a ground wire from your element box to the keg skirt. Maybe I missed something, but what was the specific reason for this? I don't recall seeing this before, specifically in Kal's build.
I just wanted to ensure that the kettle was grounded. The metal box only makes contact to the element base, not the kettle directly. While it's true that the element base is in direct contact with the kettle, it is fastened to the box using JB Stick. I didn't know how conductive the JB is, so I wanted to make sure there was a ground in direct contact with the kettle. May not have been necessary, but better safe than sorry.
rsklhm10
Well-Known Member
Completely understandable and really good thinking. I might actually steal that idea from you.
OP
OP
HossTheGreat
Well-Known Member
- Joined
- Mar 28, 2009
- Messages
- 523
- Reaction score
- 5
Seems that the transition to Google+ caused the URLs for the images in the thread to change. Doesn't look like I can go back and edit the original posts to fix the broken images. Anyone know if it's possible?
mazultav
Well-Known Member
Why not just a link to your album, it might not be as good as a play by play but better than nothing.
OP
OP
HossTheGreat
Well-Known Member
- Joined
- Mar 28, 2009
- Messages
- 523
- Reaction score
- 5
First of all, big thanks to Yooper. She took the time to go back and update all of my previous posts with the updated image URLs. Thanks Yooper!
Second, I'd like to let everyone know that after about 6 or 7 batches the JB Stik connecting the element to the electrical box ended up failing. I ended up noticing it while getting ready for a brew session. I always give everything a once-over and noticed that the electrical box was a little loose. Upon closer inspection, the JB Stik had separated from the box. This is why I purposely ended up using silicone caulking to seal off the connections. To fix it, I ended up removing all of the old JB Stik (just had to chip it away) and the silicone caulk around the base. I then sanded down the back of the box some more and used original JB Weld to bond the base of the element to the box. Once cured, I then went over top of that with the silicone caulk to ensure a watertight seal. It seems quite a bit more solid, and hopefully it'll hold up this time. Sorry, I didn't snap any pics of this.
Finally, I have some pictures of some recent additions/modifications that I've made over the past few days.
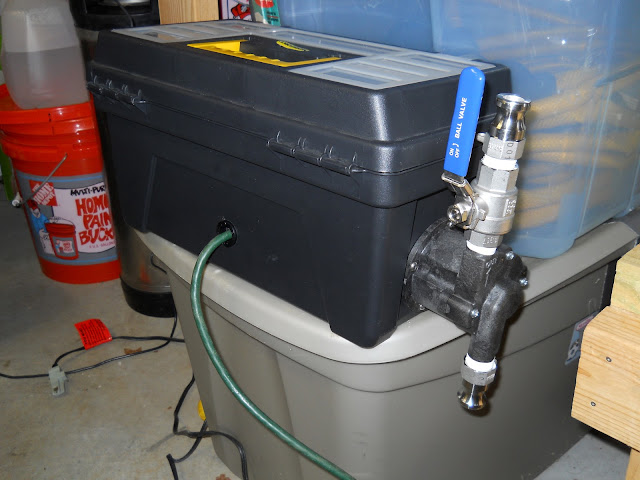
I finally ended up picking up a March Pump so that I can recirculate during the mash and chilling stages of the brew day. Even with the reflectix insulation, I was experiencing some temp drop off during my mash. When the element would kick on, it would generally then heat up a bit too much and overshoot my mash temp unless I was stirring as it was heating. Since I have a side pickup tube, I'm also hoping that doing a whirlpool while chilling will help me eliminate some of the break/hop particulate from entering the fermenter (and also decrease chilling time).
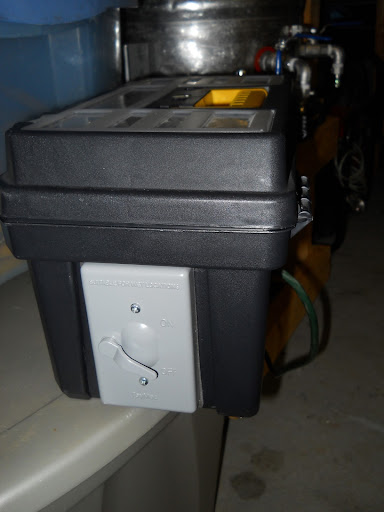
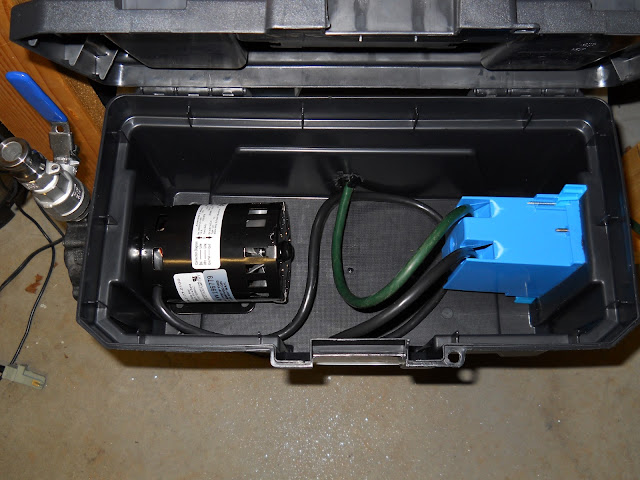
Since I plan on placing my pump directly below my kettle, I ended up going with a simple $6.99 toolbox enclosure.
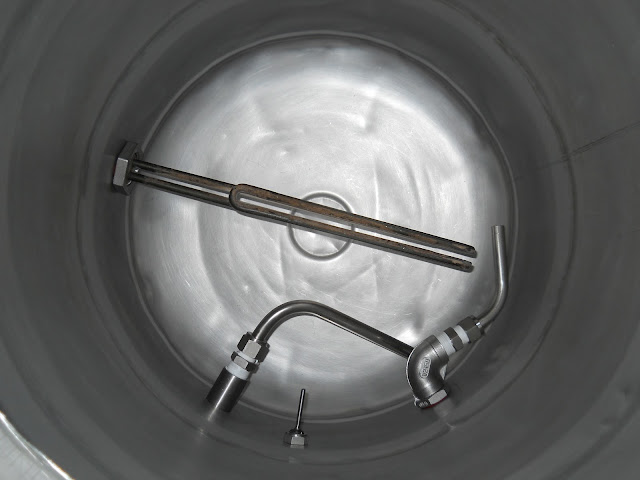
I ended up buying the whirlpool fitting from bargainfittings.com and installing it. A while back I ended up buying this el cheapo low RPM, high torque drill from Harbor Freight. I drilled out the hole with a step bit and I cannot believe how easy it was. Previously I used a cheap single-speed Black and Decker drill (so I didn't burn up my nice Makita cordless) and it was a miserable experience drilling out the holes. What a huge difference! A little bit of cutting oil and it sliced through that keg like butter.
Since I normally only do 5 gallon boils, I ended up mounting the whirlpool/recirculation fitting down low, at the same level as my pickup. I know this should work fine for the whirlpool, and I'm really hoping it will work ok during the mash as well.
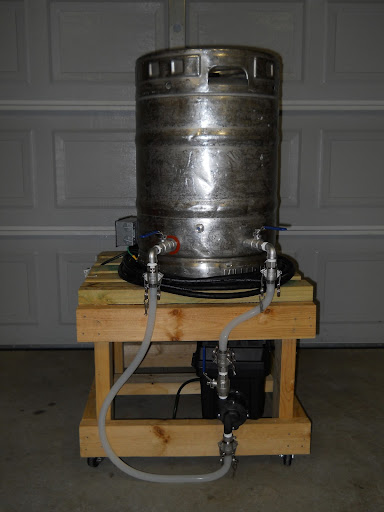
Finally, here's a look at the whole setup. Since I plan on recirculating during the mash, I ditched the refletix for now. It made things a little more difficult to clean, so if it doesn't provide me any benefit I'd just assume leave it off.
Second, I'd like to let everyone know that after about 6 or 7 batches the JB Stik connecting the element to the electrical box ended up failing. I ended up noticing it while getting ready for a brew session. I always give everything a once-over and noticed that the electrical box was a little loose. Upon closer inspection, the JB Stik had separated from the box. This is why I purposely ended up using silicone caulking to seal off the connections. To fix it, I ended up removing all of the old JB Stik (just had to chip it away) and the silicone caulk around the base. I then sanded down the back of the box some more and used original JB Weld to bond the base of the element to the box. Once cured, I then went over top of that with the silicone caulk to ensure a watertight seal. It seems quite a bit more solid, and hopefully it'll hold up this time. Sorry, I didn't snap any pics of this.
Finally, I have some pictures of some recent additions/modifications that I've made over the past few days.
I finally ended up picking up a March Pump so that I can recirculate during the mash and chilling stages of the brew day. Even with the reflectix insulation, I was experiencing some temp drop off during my mash. When the element would kick on, it would generally then heat up a bit too much and overshoot my mash temp unless I was stirring as it was heating. Since I have a side pickup tube, I'm also hoping that doing a whirlpool while chilling will help me eliminate some of the break/hop particulate from entering the fermenter (and also decrease chilling time).
Since I plan on placing my pump directly below my kettle, I ended up going with a simple $6.99 toolbox enclosure.
I ended up buying the whirlpool fitting from bargainfittings.com and installing it. A while back I ended up buying this el cheapo low RPM, high torque drill from Harbor Freight. I drilled out the hole with a step bit and I cannot believe how easy it was. Previously I used a cheap single-speed Black and Decker drill (so I didn't burn up my nice Makita cordless) and it was a miserable experience drilling out the holes. What a huge difference! A little bit of cutting oil and it sliced through that keg like butter.
Since I normally only do 5 gallon boils, I ended up mounting the whirlpool/recirculation fitting down low, at the same level as my pickup. I know this should work fine for the whirlpool, and I'm really hoping it will work ok during the mash as well.
Finally, here's a look at the whole setup. Since I plan on recirculating during the mash, I ditched the refletix for now. It made things a little more difficult to clean, so if it doesn't provide me any benefit I'd just assume leave it off.
are you resting the bag directly on the element during heating? I've got a similar BK and have been holding off of BIAB due to concerns of the bag resting on the element.
OP
OP
HossTheGreat
Well-Known Member
- Joined
- Mar 28, 2009
- Messages
- 523
- Reaction score
- 5
are you resting the bag directly on the element during heating? I've got a similar BK and have been holding off of BIAB due to concerns of the bag resting on the element.
I too had the same concerns. After a bit of research, including this thread, it seems the consensus is that the melting point of the nylon bags is much higher than what a ULWD element gets during the boil. I can only speak from my own experience, but I have done all of my BIAB brews with the bag resting directly on the element without any issues at all. In fact on my last brew, I was using a hop sack and it got wedged in between the element and my immersion chiller. That too came out unscathed.
EarthBound
Well-Known Member
In fact on my last brew, I was using a hop sack and it got wedged in between the element and my immersion chiller. That too came out unscathed.
This was my only concern. Thank you.
BTW, very nice rig! Excellent work.
OP
OP
HossTheGreat
Well-Known Member
- Joined
- Mar 28, 2009
- Messages
- 523
- Reaction score
- 5
Ok Hoss,
Give me your thoughts on circulating low opposed to from high and through the mash. Oh and by the way, looking at your rig makes me happy")
Thanks! Glad you like it.
Unfortunately, I've had a busy schedule as of late and haven't been able to do a batch with the new recirc setup yet. I did take it for a little test spin last weekend, just to test out the pump and make sure everything was working as intended....it worked just fine. Hopefully I'll be able to get a batch in soon. I'll take pictures and report back when I do.
SmokingDog
Well-Known Member
Working on a basic eBrew setup as well. Looks great and will probably influence some of my build.
Regarding boiling temps as one of your first concerns though, wouldn't this be expected as wort would boil at a different temp than water?
Regarding boiling temps as one of your first concerns though, wouldn't this be expected as wort would boil at a different temp than water?
wedge421
Well-Known Member
I gave up on trying to slip my IC around the the heating element and went to a plate chiller haha! Glad it works for you though. Super clean and simple setup! Love it
TheFlyingBeer
Well-Known Member
Looks great! Do you continue to have any issues with rusting inside the keg? If not, what did you do to remedy?
OP
OP
HossTheGreat
Well-Known Member
- Joined
- Mar 28, 2009
- Messages
- 523
- Reaction score
- 5
Working on a basic eBrew setup as well. Looks great and will probably influence some of my build.
Regarding boiling temps as one of your first concerns though, wouldn't this be expected as wort would boil at a different temp than water?
Not really sure. I ended up just calibrating the auber PID to the same as my thermapen. Haven't worried about it since.
OP
OP
HossTheGreat
Well-Known Member
- Joined
- Mar 28, 2009
- Messages
- 523
- Reaction score
- 5
I gave up on trying to slip my IC around the the heating element and went to a plate chiller haha! Glad it works for you though. Super clean and simple setup! Love it
Thanks! Yeah, knock on wood I've never really had any issues with it. I considered one of the cheap Keg Cowboy plate chillers but since this works ok I think I'm gonna stick with it for now.
OP
OP
HossTheGreat
Well-Known Member
- Joined
- Mar 28, 2009
- Messages
- 523
- Reaction score
- 5
Looks great! Do you continue to have any issues with rusting inside the keg? If not, what did you do to remedy?
What I do now is I make sure to not leave water in the kettle for any extended period of time. Also, when I get through cleaning it I make sure to thorougly dry everything. Haven't really had an issue since.
smpow said:This is great and pretty much what I have been thinking about doing myself, looks very simple and realistic for a guy like myself with no skills to be able to do.
Thanks for the detailed write up and pics.
Cheers to that. I love HBT but finding a specific thread when I dont know the lingo is quite a challenge. This is exactly what I am trying to do! Save me some space in your inbox so I can pummel you with questions. Haha
Thanks for the well documented thread and especially the idea of using an old computer case!
OP
OP
HossTheGreat
Well-Known Member
- Joined
- Mar 28, 2009
- Messages
- 523
- Reaction score
- 5
Cheers to that. I love HBT but finding a specific thread when I dont know the lingo is quite a challenge. This is exactly what I am trying to do! Save me some space in your inbox so I can pummel you with questions. Haha
Thanks for the well documented thread and especially the idea of using an old computer case!
Glad that you and others are finding this build helpful. I'm more than happy to help with any questions that you might have.
OP
OP
HossTheGreat
Well-Known Member
- Joined
- Mar 28, 2009
- Messages
- 523
- Reaction score
- 5
Well, I thought I'd report on a bit of an issue I experienced while brewing today. I've been trying to troubleshoot a grainy taste in my light beers as of late. Though I use RO water, add 1g of CaCl per gallon, and 2% acidulated malt to the grist, I believe that it's not enough to put the mash into the proper pH range since I'm doing full volume mashes. Before breaking down and spending 100 bucks on a pH meter, I wanted to try and do a mash using approx. 1.7q/lb and then just top off with the remainder of water.
I decided to do a Blonde and added 5 gallons of water for my mash. I double bag my mash. First I line the kettle with a fine voile bag, then inside of that is a pretty coarse mesh bag. After douging in, my mash temp dropped below what I set my PID to, so the element kicked on. Immediately I smelled something burning. I lifted the bag and immediately saw grain in my kettle. Uh oh! Well, after pulling the bags out and inspecting, here's what I found:
This was the outer voile bag:
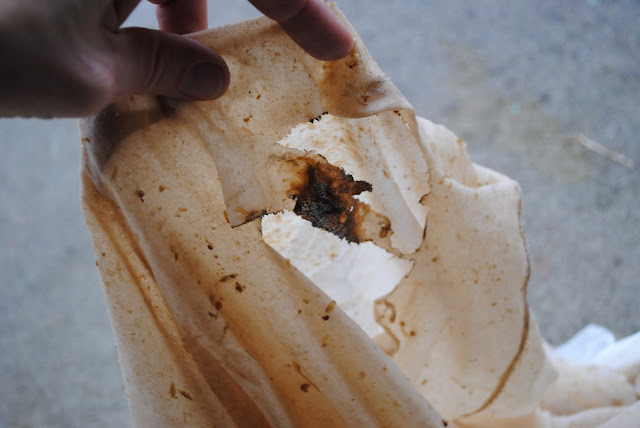
And here's the inner mesh bag:

I've never had any issues doing full volume mashes with the bags directly resting against the kettle. I've also never had issues with hops sacks getting wedged in between the element and my immersion chiller during the last 15 minutes of the boil. Guess without as much water circulating around the element, it got much hotter than usual.
Well, now back to the drawing board I suppose.
I decided to do a Blonde and added 5 gallons of water for my mash. I double bag my mash. First I line the kettle with a fine voile bag, then inside of that is a pretty coarse mesh bag. After douging in, my mash temp dropped below what I set my PID to, so the element kicked on. Immediately I smelled something burning. I lifted the bag and immediately saw grain in my kettle. Uh oh! Well, after pulling the bags out and inspecting, here's what I found:
This was the outer voile bag:
And here's the inner mesh bag:
I've never had any issues doing full volume mashes with the bags directly resting against the kettle. I've also never had issues with hops sacks getting wedged in between the element and my immersion chiller during the last 15 minutes of the boil. Guess without as much water circulating around the element, it got much hotter than usual.
Well, now back to the drawing board I suppose.
Similar threads
- Replies
- 1
- Views
- 2K
- Replies
- 21
- Views
- 3K
