You are using an out of date browser. It may not display this or other websites correctly.
You should upgrade or use an alternative browser.
You should upgrade or use an alternative browser.
My new Control Box...
- Thread starter Dgonza9
- Start date

Help Support Homebrew Talk:
This site may earn a commission from merchant affiliate
links, including eBay, Amazon, and others.
SweetSounds
Well-Known Member
Nice!
Do you have build pics?
What kind of enclosure is that?
Do you have build pics?
What kind of enclosure is that?
OP
OP
Dgonza9
Well-Known Member
Nice!
Do you have build pics?
What kind of enclosure is that?
Unfortunately, work has been kicking my arse so I didn't take too many build pictures. But I'm going to work on a bit of a tutorial as I learned a lot building it and got a fair amount of help (as always) from HBT.
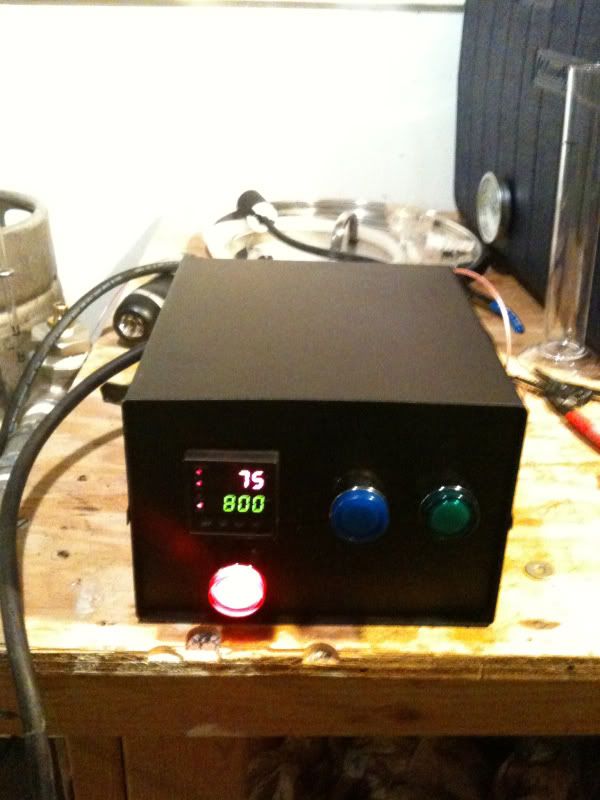
I had originally purchased an enclosure at Home Depot, but I couldn't find a plastic one and wasn't sure how I'd cut a square for the PID. People get it done with milling machines, which I don't have access to or with a variety of drilling, jigsaws, dremels and files. In the end, for about $28 I bought a project enclosure from Auber with a pre-cut square for the PID and returned the HD enclosure.
I got the illuminated switches from automation direct. I hadn't counted on how different industrial switches were to wire, though. Not complicated once you understand it, but I had to get some help here first. I had first wired the red switch between the PID and the SSR, but I had bought a 120v switch, so it barely lit up. I wound up wiring it before the PID so I could have an on/off switch for the element.
Of course, the SSR could fail closed leaving my element on, but I can always unplug it from the control box and the control box itself plugs into a switched GFCI outlet.
The hardest thing to do for me was to cut holes for three outlets in the back of the box, one for the element, one for my pump, and one for the exhaust system. I only had a 1 1/8" step bit and needed about a 1 1/2" hole. I wound up using a kind of rotary rasp attachment on my drill. Many have said that a 1 3/8" Step bit is the right size, so that's something to consider if you're doing a similar project.
Then I spent a good 2-3 hours trying to auto tune the PID. My RTD was way off. Turned out I had to tell the PID I was using an RTD and not the default type K thermocouple. Once I had that auto tune worked great.
Anyway, I'm going to work on a detailed guide for anyone attempting this with a similar level of expertise to mine. I'm an English teacher so a number of things became obstacles to get around. Although most of what I needed to know was in the PID manual, I didn't really read it all because so much of it was over my head. Hysteresis band, etc. Wound up skipping the part that told me the default thermocouple settings.
Anyway, I'm looking forward to inaugurating this puppy this weekend. And, humiliating as it will be, writing a detailed step by step for us non engineering types.
Cheers guys!

cinderbike
Well-Known Member
- Joined
- Sep 10, 2010
- Messages
- 262
- Reaction score
- 5
Nice build. What did the total cost end up being, if you remember?
Big Black Beer Box. Nice.
OP
OP
Dgonza9
Well-Known Member
Here's a parts list on the control box:
Auberins PID Controller $41.95
RTD Thermocouple $23.95
Project Box with pre-cut square $28.97
Illuminated 120v switches $23.95 each
40 amp SSR $19.00
40 amp heat sink $19.00
I bought two terminal blocks and some terminal spades at Home depot. I used velcro to stick the SSR and terminal blocks down in the box.
I used the parts list from this thread for my RIMS TUBE: Murray equipment was a great tip on Stainless pipe fittings on the cheap.
Grand total: $280 for control box and RIMS TUBE. You could probably get it down to $250 or less without the fancy illuminated switches.
I don't know that I'd spend the extra money on expensive switches if I was doing this again. They are pretty cool to look at, but they were pricey.
I got great advice on wiring my switches from THIS THREAD.
More to come. I hope this helps someone with their project!


$7.79 ($7.79 / Count)
Craft A Brew - LalBrew Voss™ - Kveik Ale Yeast - For Craft Lagers - Ingredients for Home Brewing - Beer Making Supplies - (1 Pack)
Craft a Brew


$719.00
$799.00
EdgeStar KC2000TWIN Full Size Dual Tap Kegerator & Draft Beer Dispenser - Black
Amazon.com


$176.97
1pc Commercial Keg Manifold 2" Tri Clamp,Ball Lock Tapping Head,Pressure Gauge/Adjustable PRV for Kegging,Fermentation Control
hanhanbaihuoxiaoshoudian


$22.00 ($623.23 / Ounce)
AMZLMPKNTW Ball Lock Sample Faucet 30cm Reinforced Silicone Hose Secondary Fermentation Homebrew Kegging joyful
无为中南商贸有限公司


$10.99 ($31.16 / Ounce)
Hornindal Kveik Yeast for Homebrewing - Mead, Cider, Wine, Beer - 10g Packet - Saccharomyces Cerevisiae - Sold by Shadowhive.com
Shadowhive


$20.94
$29.99
The Brew Your Own Big Book of Clone Recipes: Featuring 300 Homebrew Recipes from Your Favorite Breweries
Amazon.com


$58.16
HUIZHUGS Brewing Equipment Keg Ball Lock Faucet 30cm Reinforced Silicone Hose Secondary Fermentation Homebrew Kegging Brewing Equipment
xiangshuizhenzhanglingfengshop


$53.24
1pc Hose Barb/MFL 1.5" Tri Clamp to Ball Lock Post Liquid Gas Homebrew Kegging Fermentation Parts Brewer Hardware SUS304(Liquid Hose Barb)
Guangshui Weilu You Trading Co., Ltd


$27.29 ($13.64 / Count)
$41.99 ($21.00 / Count)
2 Pack 1 Gallon Large Fermentation Jars with 3 Airlocks and 2 SCREW Lids(100% Airtight Heavy Duty Lid w Silicone) - Wide Mouth Glass Jars w Scale Mark - Pickle Jars for Sauerkraut, Sourdough Starter
Qianfenie Direct

$53.24
1pc Hose Barb/MFL 1.5" Tri Clamp to Ball Lock Post Liquid Gas Homebrew Kegging Fermentation Parts Brewer Hardware SUS304(Liquid Hose Barb)
yunchengshiyanhuqucuichendianzishangwuyouxiangongsi


Sawdustguy
Well-Known Member
I used velcro to stick the SSR and terminal blocks down in the box.
No, No, No! That is a real hazard. Get the velcro off the SSR/Heatsink and Terminal Blocks and MECHANICALLY affix them to your enclosure.
OP
OP
Dgonza9
Well-Known Member
Thanks, Sawdustguy. I will mechanically affix them. The SSR is attached mechanically to the heat sink and has thermal grease. But I did stick it down to the project enclosure with the velcro. I figure at most I'll have 12.5 amps going thru a 40 amp SSR and 40 amp Heat Sink.
Can you explain what causes a hazard? I had used the velcro at first to try to get things in positions I thought I wanted them in. I was going to go back and screw them down, but then decided to leave it as is. Does the velcro need to be removed or do you just advocate more permanently fixing things down?
Can you explain what causes a hazard? I had used the velcro at first to try to get things in positions I thought I wanted them in. I was going to go back and screw them down, but then decided to leave it as is. Does the velcro need to be removed or do you just advocate more permanently fixing things down?
samc
Well-Known Member
You don't want the SSR to move around and possibly short against the box or other metal inside. I assume that's what Sawdust was talkin' about.
I plan on building a second beer set up and was planning to use almost the same equipment you chose minus the switches and Velcro!
I plan on building a second beer set up and was planning to use almost the same equipment you chose minus the switches and Velcro!
Sawdustguy
Well-Known Member
You don't want the SSR to move around and possibly short against the box or other metal inside. I assume that's what Sawdust was talkin' about.
I plan on building a second beer set up and was planning to use almost the same equipment you chose minus the switches and Velcro!
Exactly!! The SSR and Heat Sink are going to get hot no matter what they are rated at. The SSR with the help of the heatsink can take the heat that is dissipated, but if it is mounted inside of your control panel and there are no vent holes, the heat has nowhere to go and the velcro adhesive could soften and the SSR and the heatsink could move and short out. I would also permanently affix the terminal block also. I just don't want to see anything happen. You took your time and built a nice control panel, I want to see it give you good service for many years to come without incident. Actually the velcro was a good idea during layout but now you have everything where you want it it needs to be mechanically affixed to your chassis.
Anyway, I'm going to work on a detailed guide for anyone attempting this with a similar level of expertise to mine. I'm an English teacher so a number of things became obstacles to get around. Although most of what I needed to know was in the PID manual, I didn't really read it all because so much of it was over my head. Hysteresis band, etc. Wound up skipping the part that told me the default thermocouple settings.
Anyway, I'm looking forward to inaugurating this puppy this weekend. And, humiliating as it will be, writing a detailed step by step for us non engineering types.
Cheers guys!
Please do...I am also an English teacher with a brewing problem...and a lack of electrical know-how problem...
Anyway, I'm going to work on a detailed guide for anyone attempting this with a similar level of expertise to mine. I'm an English teacher so a number of things became obstacles to get around. Although most of what I needed to know was in the PID manual, I didn't really read it all because so much of it was over my head. Hysteresis band, etc. Wound up skipping the part that told me the default thermocouple settings.
Just wondering if you ever got that tutorial done?
I read you thought the switches were high and was wondering if these would work. SP ST
Also wondered if that was three switches you had in your box and what the purpose of each was?
Also wondered if these Sockets would work and be easier to mount in the project box?
Thanks for any help you may provide!
I would be interested also. I just placed my order for the same project box and PID from Aubern for a single element BK build.
I plan on converting my 15 gallon kettle to an electric vessel that will heat strike, sparge and also boil. I will use my 10 gallon MT cooler and another cooler to hold the sparge water while transferring back into the BK.
Just need a simple step by step on rigging my box. Since I am only using one element, I will just use a simple E-stop for my power on and off, the PID and the RTD.
Thanks.
OP
OP
Dgonza9
Well-Known Member
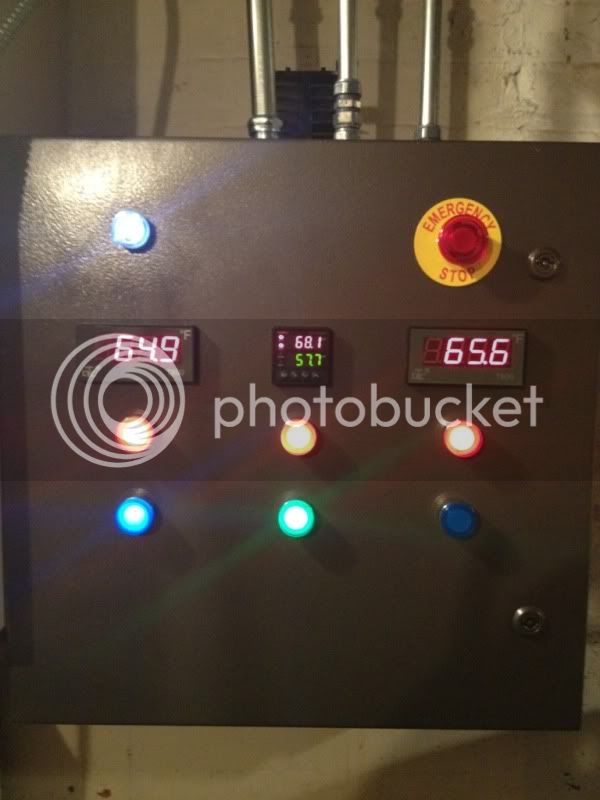
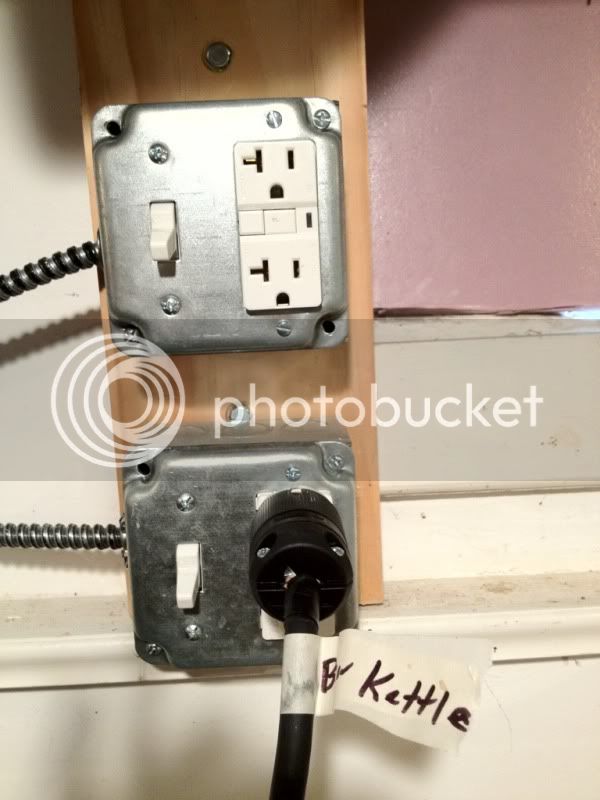
I'm sorry, but I never got the tutorial done. I wound up graduating from this....
to this...
I might be able to help, though. I take it by your batch size and single element you are using 220V. Is the PID used with a RIMS or do you just want to dial down the boil? Is your brew area already set with a 220V, gfci protected outlet? Give us a bit more info.
I bought my switches from automationdirect.com, but they are functionally the same as the ones you posted. Like mine, the ones you posted have a 10 amp limit. So I only used them to power on the PID, the pump, and the exhaust fan.
If you aren't using a RIMS tube, another simple way to go is to size your element for your batches. I think about 4000W is about perfect for 10 gallon batches. If you'd like digital temperature readings, you can get a digital temp display like I have. Pretty cheap. I want to say less than $20 shipped, but they take a few weeks on the slow boat from china. You can replace the PID and SSR with a contactor. It'd be a lot easier and cheaper. Plus, those boxes are pretty small. It got crowded fast with the receptacles, PID, SSR, heat sink, etc.
I guess the most helpful thing I can say is to think through what you ultimately want now. I know I found that I wanted a separate HLT at some point. More so, that I wanted a bottom drain BK with a dump valve for easy clean in place. One I added another powered vessel I had more switches. Since I was using 120V at the time I had two elements in each keggle. I was flipping switches like a banshee, hence the updated control panel
At the time I made the box I felt that it was at my limit of what I could realistically do. Having done it, it became more feasible to upgrade to a panel. You may find the same thing. The box was a very good learning experience and if that's all you want, so be it. But think it through a bit. Ultimately, the panel was not much different, just more switches and the use of contactors and some fuses.
I personally found that I never liked mounting receptacles in a panel, nor do I like hanging wires. So I wound up running the power to my panel using conduit. Of course, for a portable box this isn't optimal.
Kal's tutorial pretty much covers it all. But let me know if I can help. After all the advice I received it's the least I can do.
Thanks Dgonza9
I'm a newbie Brewer and I'm not sure how far I'm going to go in this hobby. I don't have any limits yet but they may happen as I usually take everything to the Nth Degree and the retirement funds can get limited. My garage is a full blown wood shop and as such it has 2 separate 120v 20A circuit lines and two separate 240v circuits a 20A and a 30A. So far I've sprung for a SS Stout Tanks Short" 7.3 Gallon Conical Fermenter with Thermowell. I don't figure I'll ever need to brew 10 gal batches. I just built a 10 gal Rubbermaid MLT and fly sparge setup from Midwest my brew kettle is a 9 gal SS.
You're absolutely correct and this is my biggest concern "Direction". I want to build the RIMS tube and have so far procured the tube from here also have two elements from Plumbers Supply 120v 1500w LD and a large supply of Cam Lock fittings from Brewers Hardware. And my 815PL pump will be here tomorrow.
I've always been a jack of all trades and a master of none. I research until I'm satisfied I'm competent. I once about 25 years ago was in college for an electrical engineer degree but had to relocate for a job and never finished. But I've got plenty of friends to check my work.
So for now I'm planning a simple RIMS Tube to help my mash temps. several of my questions include do you still mash at a rate of 1.1 qt per pound of grain. and then fly sparge from a HLT to get wort volume. does it hurt to circulate the mash continuously for 60 min mashing? then go into sparging? or do you mash with enough volume to meet the wort goal volume? (which would be thin) this question has been sticking in the back of my head. I need to go read more on the Contactors. What service do they provide to the element and switching. what Contactor would I need This or This one?
BTW went to Kal's Tutorial, really cool lots of info. Need to sort through that and conclude my direction.
Thanks for your help
Clare
OP
OP
Dgonza9
Well-Known Member
Thanks Dgonza9
I'm a newbie Brewer and I'm not sure how far I'm going to go in this hobby. I don't have any limits yet but they may happen as I usually take everything to the Nth Degree and the retirement funds can get limited. My garage is a full blown wood shop and as such it has 2 separate 120v 20A circuit lines and two separate 240v circuits a 20A and a 30A. So far I've sprung for a SS Stout Tanks Short" 7.3 Gallon Conical Fermenter with Thermowell. I don't figure I'll ever need to brew 10 gal batches. I just built a 10 gal Rubbermaid MLT and fly sparge setup from Midwest my brew kettle is a 9 gal SS.
You're absolutely correct and this is my biggest concern "Direction". I want to build the RIMS tube and have so far procured the tube from here also have two elements from Plumbers Supply 120v 1500w LD and a large supply of Cam Lock fittings from Brewers Hardware. And my 815PL pump will be here tomorrow.
I've always been a jack of all trades and a master of none. I research until I'm satisfied I'm competent. I once about 25 years ago was in college for an electrical engineer degree but had to relocate for a job and never finished. But I've got plenty of friends to check my work.
So for now I'm planning a simple RIMS Tube to help my mash temps. several of my questions include do you still mash at a rate of 1.1 qt per pound of grain. and then fly sparge from a HLT to get wort volume. does it hurt to circulate the mash continuously for 60 min mashing? then go into sparging? or do you mash with enough volume to meet the wort goal volume? (which would be thin) this question has been sticking in the back of my head. I need to go read more on the Contactors. What service do they provide to the element and switching. what Contactor would I need This or This one?
BTW went to Kal's Tutorial, really cool lots of info. Need to sort through that and conclude my direction.
Thanks for your help
Clare
You could do a Brutus 20 style system. I did this for over a year and I thought I made many terrific beers this way. You mash using the the typical 1.25qt/lb ratio, then recirculate with your sparge water. You never drain the mash tun of its first runnings. You just recirculate for about 40 minutes putting all of the water "in play" until the HLT and mash tun essentially achieve equilibrium. It's not as efficient batch sparging, but it works fine. I regularly got 70% that way.
As for the Rims tube, it's fun to have. You would generally mash in with the typical water volume, then recirculate through the RIMS tube and the PID will use the element in the tube to maintain whatever mash temp you set. You can recirculate cleaning fluids through the tube after brewing, but I found that the element was not effectively cleaned this way. You may consider a tri-clamp fitting for the element. Brewershardware makes a very nice one.
You'll need a separate switch for the boil kettle and HLT elements. The simplest thing to do is to plug in your elements to switchable outlets, then just turn them on and off as needed.
As for the contactors, they are just mechanical relays that use a magnetic coil to close a switch. You can use the illuminated, 10 amp switches to signal the coil to close. Thus, you can now switch the higher amp lines using a cheap, cool illuminated switch.
Of course, you'll need another switch for the pump. And if you are using an exhaust fan, another switch for that. So you're already started to add up a fair amount of switches. Not a problem, but it could get cumbersome.
If you're only doing 5 gallon batches, 2000W will be about perfect for a nice boil. So if you mount a 2000W element in your BK, no temperature regulation is needed. Of course, you may want some dial thermometers to read the temp in the HLT. Or else use a floating thermometer or other kind of portable temp probe. I found the dial thermometers to be sticky and got tired of bending down to see them so I moved to a digital temp reader.
I can't think of much else to consider. If you don't have a particularly large vision, go with the box. If you do decide to upgrade you'll be able to cannibalize just about everything from the box.
Cheers!
Thanks Dgonza9, I've been acquiring parts hence the delay getting back. I've decided to keep it simple for now and if the vision expands I can cannibalize as you suggest. So for now I'll just be building the RIMS tube to control my MASH temps. Got a question about the terminal blocks. I bought two 8 circuit TB's from Menards. I know I've got a lot of wiring to still layout but I'm just trying to go as fast as my knowledge base goes. Is this the proper way to feed power to my devices? 
Don't worry I'm not ready to slap stuff together and send power to anything until I'm going in the right direction.
Thanks for helping an old noob.

Don't worry I'm not ready to slap stuff together and send power to anything until I'm going in the right direction.
Thanks for helping an old noob.
Garyr2973
Well-Known Member
Yep that's how you wire the terminal block (you don't need that last jumper since you have nothing to attach it to.
BadNewsBrewery
Well-Known Member
One big issue - you want power to the element to come from the SSR / contactor, not from the terminal block. If you run it from the TB you have no control and it runs 100% duty cycle. I'd suggest running TB --> SSR --> CONTACTOR --> ELEMENT
Thanks BadNewsBrewery and Garyr2973. Ya i simply threw some items on there to illustrate my train of thought of using the right side as all common going to various items. Believe me when I get close i'll present it for review.
Thanks again!
Thanks again!
Similar threads
- Replies
- 11
- Views
- 968

Latest posts
-

-

-

-
 Factors affecting Water Chemistry Calculations (Oh no, not again!)
- Latest: BrewnWKopperKat
-

-
