My HERMS with 'bottom drain' MLT

Homebrew Talk - Beer, Wine, Mead, & Cider Brewing Discussion Forum

Help Support Homebrew Talk - Beer, Wine, Mead, & Cider Brewing Discussion Forum:

This site may earn a commission from merchant affiliate links, including eBay, Amazon, and others.

bhambrew

Supporting Member
HBT Supporter
Joined
Sep 30, 2009
Messages
116
Reaction score
11
Location
Bellingham, WA
Better late than never, I actually started brewing on this rig almost two years ago, but didn't want to post anything until all the little details were finished. Well, a couple hundred gallons of beer later, this rig works great, and I realized it may never be "finished". So here's is how it looks today...

DIY Single-Tier, Natural Gas Fired, HERMS with bottom-drain Mash Tun.

the-rig-62634.jpg


With the exception of a few welded fittings on the kettles, I made everything myself, and I couldn't be happier with the results. This rig represents the knowledge and experience I have gained in eight years of home brewing. Like many here, I started with a single pot on the stove top making extract brews. Most, if not all of the ideas that went into this build came from countless hours studying the forums, and as always my sincere thanks to those members who take the time to post here.

Specifically, the bottom-drain MLT idea was inspired by Ryan_PA's HERMS build thread.. The brew stand itself is like many others on here, but is basically a copy of drkwoods stand, although I welded mine together a little differently...
 
The brew stand is made from 1.5" tube steel, purchased new from a supplier in town. Total cost of the steel was approx. $160.

welding-1-62635.jpg


I was fortunate in that we had both stick and MIG welders at my work, and I was able to teach myself how to weld in my free time. After watching many helpful youtube videos, and reading a couple books I picked up at the library, I started to get the hang of it. My boss was an expert welder, and kept saying that he would help me weld the stand together, but when it finally came time to start building, he couldn't be bothered. So, I had to figure it out on my own, and the end result is a heavy-duty stand that will last a lifetime of brewing!

welding-finished-62636.jpg


Nothing fancy, but does the job. The whole thing was welded together using a Miller-matic 170 MIG welder, 220V. I had to swap out my dryer plug with a different receptacle to work with the welder. I welded the whole thing together outside, so I had to use the flux core wire.

My only regret is that I used some cheap, plastic Harbor Freight casters for the wheels. It rolls fine enough on hard surfaces, but does not like being dragged through the yard. Not that I move it around that often, but occasionally I take it on the road for a big brew event, and in the future I think I will swap out those wheels for some pneumatic or soft rubber wheels.
 
I suppose the most unique part of the system is the bottom-drain Mash Tun. Inspired by other members here who had built one, I did some thinking and came to the conclusion that was the way to go. Removing the spent grains was (and still is) my least favorite part of the brew day. I didn't want to mess around with trying to fabricate some sort of tippy-dump system, so this seemed like the next best thing.

Having the bottom drain essentially makes the Mash Tun clean-in-place. No more heavy lifting, and that was the biggest attraction to this setup. In fact, I don't have to lift any of my kettles, they can all be cleaned on the stand. Obviously, I have to scoop the majority of the spent grains out of the MLT after the mash, but I can rinse everything else out after that. After the sparge is complete, and the Mash Tun has cooled off a little, I scoop the grains out with a salad bowl. Then I remove the drain from the bottom of the kettle, and wash / rinse the MLT into a bucket placed under it. Easy cheesy.

Using a bottom-drain on the Mash Tun means that it can't be direct fired. My previous rig had three burners, this new rig only has two. The strike water is heated in my Boil Kettle, and any increases in mash temperature are achieved using a HERMS coil in the Hot Liquor Tank. Works like a charm, and no worries about scorching my mash.
 
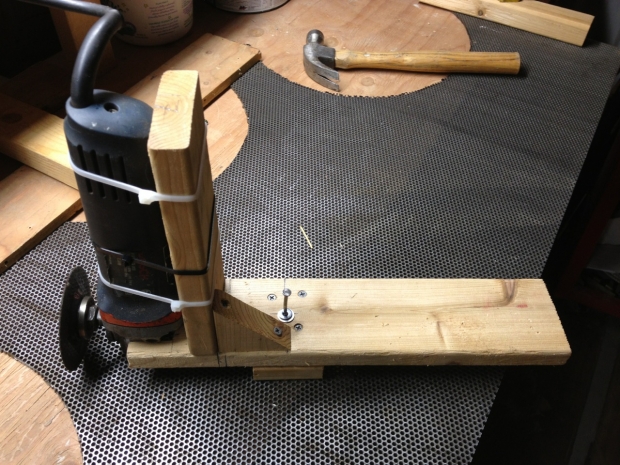
I made the false bottom for this rig myself. This is the third, and best false bottom that I have attempted. I have another thread on here somewhere detailing my previous false bottom build, which was "freehand". For this build, I decided to make a jig for cutting out the material, and the results are far superior to my previous attempts.

thumb2_false-bottom-jig-cu-62625.jpg


As you can see, the material was cut using an angle grinder and cutoff wheel. the jig is made from some scrap cedar boards that I had in the shop. I very carefully measured and tweaked the jig until it was just right. The end result was a beautiful, clean edge (after some further grinding).

thumb2_false-bottom-jig-62626.jpg


You can see from the image in my previous attempts I cut out two half-circles and then put them together to make one unit. For this build, I decided to cut out one whole circle, and then cut it in half, which made for a much better result. I don't have a photo right now, but the two halves of the finished product are held together with a length of stainless steel piano hinge and some stainless nuts and bolts. The false bottom material was found at my local scrap yard. If you are not lucky enough to live near a huge scrap yard, you can pick up the perforated stainless material from McMaster Carr.
 
I have a picture of the false bottom inside the MLT somewhere, I'll try to post it later. Because the Mash Tun is bottom drain, I didn't need to worry about drilling any big holes in my false bottom for a pickup tube.

The build for this type of mash tun is really simple. I freehand cut the bottom out of a Sanke keg using the angle grinder. Then, I attached a tri-clamp fitting with 1/2" threaded FPT adaptor and valve to the top, which is now the bottom.

thumb2_bottom-drain-on-stand-62618.jpg


The image shows the Mash Tun sitting on the stand (remember, no burner under this one), with tri-clap adaptor, 1/2" nipple, 1/2" street 90, and 1/2" ball valve attached.

The valve and adaptor are used during the mash and sparge, and then removed to clean and rinse the MLT. I used a standard 2.5" tri-clamp gasket originally, but now I use a special silicone gasket specially made for adapting to kegs, available from Brewers Hardware.

thumb2_mlt-insulation-62629.jpg


Because the Mash Tun is not direct fired, I used the inexpensive Reflectix type insulation from your local big box store. I wrapped four layers of the insulation around the MLT, and it holds my mash temperature within 5 degrees over a one-hour mash. Still need to cover the insulation with some sort of "skin" to protect it and make it look better. I was originally panning on using some wood, similar to Ryan_PA's post, but haven't got around to it yet.

The thermometer and sight glass are attached with weld-less bulkhead fittings, holes drilled using a step bit.
 
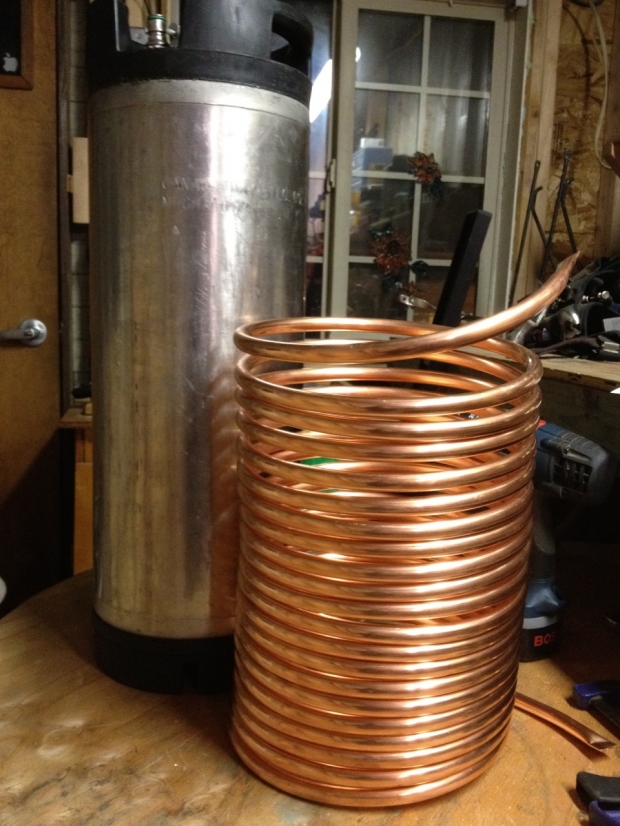
The HERMS coil was made from about 40' of 3/8 ID soft copper tube, also found at the local scrap yard. I used an empty corney keg as a simple jig to bend the copper.

thumb2_coil-around-keg-62619.jpg


thumb2_coil-next-to-keg-62621.jpg


The coil is installed in the Hot Liquor Tank using some simple flare fittings.

thumb2_coil-in-hlt-62620.jpg
 
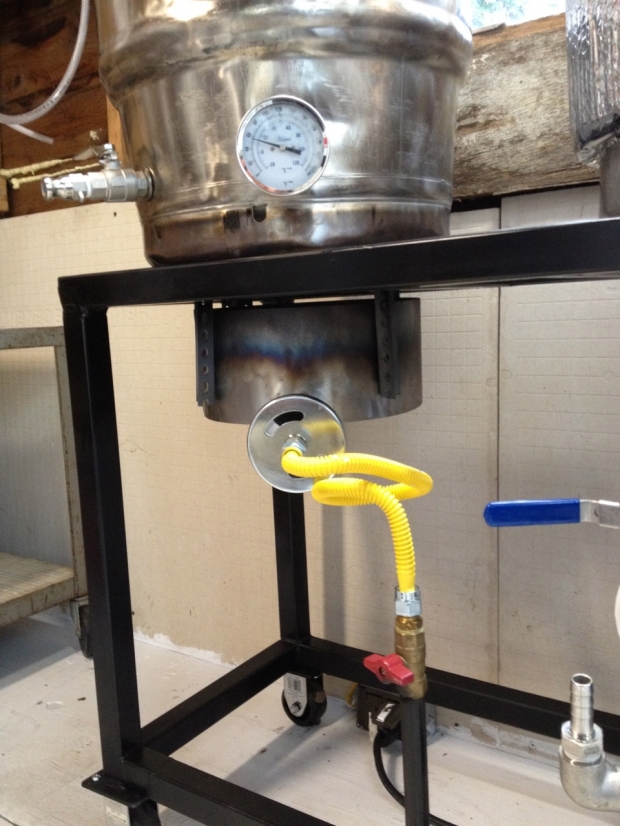
In this photo of the Hot Liquor Tank below you can see all the fittings. The valve under the thermometer is the drain. The valve off to the side is the inlet for the HERMS coil, and the fitting on top is the outlet for the HERMS coil. The outlet of the HERMS coil doesn't need a valve since I can throttle it using the inlet, or at the pump. The HERMS coil drains by gravity out the inlet when finished brewing.

The insulation is identical to what I used to have on the Mash Tun on my previous rig, which is to say a clone of BobbyM's idea. Only difference is that I used a piece of copper as the skin as opposed to the sheet of aluminum I had of the old rig.

thumb2_hlt-copper-front-62628.jpg
 
I found the copper sheet at the metal recycling place. I was looking for a nice sheet of stainless or aluminum, but they didn't have any that would work a the time. Then I stumbled on to this tarnished sheet of copper selling for a scrap value of only $35 bucks and figured, what the heck? A little bling on the new rig would be ok!

thumb2_copper-sheet-62624.jpg


I have no idea what the sheet was originally used for, but figured since it wasn't going to come in contact with the beer I would try and polish it up as a cosmetic piece...which also serves the purpose of holding the mineral wool insulation on the HLT.
 
First I cut the sheet down to size, and then tried a few different acids to see if I could get it to clean up a bit. Nothing worked very well, so I had to resort to a series of increasingly fine abrasives to do the job. Started with a "scotch pad" attachment for the trusty angle grinder, and then gradually worked my way up to wet sanding with 1000 grit paper. I lost patients before I got the copper really shining, and decided to give it the swirl-look by using the scotch pad wheels on the drill press.

thumb2_copper-sheet-polished-62623.jpg


The end result is acceptable, but for a really pimp finish I would need a larger supply of patients.

thumb2_hlt-copper-back-62627.jpg


The copper skin is attached snugly using three latches sourced from McMaster Carr for $15. I intend to cover the MLT with the same stuff when I get around to it.
 
Before I started building this HERMS, I was originally planning on building another 2-tier stand. Even spent hours learning markup and designing from scratch. Then, I had the great fortune to stumble on a used March pump at a second-hand store for $75. After a thorough cleaning and inspection of the pump, I decided to build the single tier.

thumb2_control-box-and-pumps-62622.jpg


The two pumps are mounted on small plates that I welded to the front of the stand, and hard wired to a splash proof switch box. This is all located under the MLT which has no burner, so I didn't have to worry about protecting them from high heat. I used two plastic yogurt containers, cut to fit around the pumps, as splash guards.
 
thumb2_cu-of-burner-from-front-62630.jpg


The rig has two burners, one on each end mounted under the Boil Kettle and Hot Liquor Tank. They are "banjo" style burners, plumbed to the natural gas supply from the house. I made windscreens for each burner using a piece of sheet metal radiused to fit around the burner. Generally I brew inside my little brew shack, but wanted to be able to take my setup outside for group brewing events.
 
The first image in this thread shows the setup with my original barrel sided boil kettle, which served me well for many many brews. Since then, I got my hands on another straight sided keg, and decided to spend a little time polishing her up for a new boil kettle.

polished-bk-62631.jpg


As described in many polishing threads, it was a lot of work, and doesn't make the beer taste any better- but, it makes the brewer feel a little better after working so hard to make a smooth operating and good looking brew setup.
 
The Brew Day

Start by filling the Hot Liquor Tank all the way up, and light a fire under that bad boy. Even with the impressive heat from those burners, it still takes a fair bit of time to get our 50 deg F water up around 200 deg F, and I want to make sure that my sparge water is at temp before the mash is over...

After the HLT is heating, I fill the Boil Kettle with the strike water and start heating. While the strike water is heating, I mill the grains. As the strike water approaches temperature, I start to circulate it through the pump and Mash Tun to heat everything up. When strike temp is reached, I transfer the water to the Mash Tun and mash in. For single rest mashes, I might have to recirc the mash through the HERMS coil once for a few minutes towards the end if the weather is unusually cold, otherwise the insulation keeps things close enough to the rest temp.

When the mash is complete, I begin to recirculate the wort through the HERMS coil until the temp reaches 168 deg F. The wort is returned to the mash tun via a little "H" shaped copper manifold I made, attached to the inside of the lid. When the wort has reached mash out temp, I disconnect the return manifold, and move the hose over to the boil kettle. During the sparge I continue to pump the wort through the HERMS coil.

After the sparge is complete, I will have more than enough water remaining in the HLT to clean and rinse out the MLT. I usually wait about 30-45 minutes for the grains to cool off a little, then scoop most of them out using a little salad bowl. Once I can get to the false bottom, I pull it out, place a bucket under the MLT, remove the tri-clamp adaptor and then pump water from the HLT to rinse the remaining grains from the MLT. A little scrub removes any stubborn grain, and the MLT is clean. My favorite part of this setup. The false bottom and tri-clamp adaptor are cleaned and returned to the MLT, and it is ready to receive hot water from the chiller...
 
I use an immersion chiller in the boil kettle, dropped in for the last 15 minutes. I have a manifold on the wall for raw water supply. Water can be directed through filters (for filling the kettles), or unfiltered (for chilling). The outlet of the chiller can be directed to a hose and then used to fill the MLT or HLT, or directed to a pipe taking it outside to another storage barrel for use in the garden (I'll post some pics next time I brew).

Generally, I collect the first 15 gallons of really hot outlet water from the chiller into the clean MLT, which ends up around 140 deg F. This water is used for cleaning and rinsing the Boil Kettle and other equipment. the rest of the cooling water is diverted to a rain barrel and used in the garden.

After the wort is drained from the boil kettle into the fermenter(s), some of the hot water from the MLT is used to rinse, clean, and then rinse the boil kettle. Unless there has been a boil over or other unfortunate accident, I can clean the boil kettle in place.

More than a hundred gallons of beer brewed up using this rig, and I love it! Couldn't imagine using anything else. I have simplified the whole process from build to brew, but just wanted to get it out there in case anyone was researching a similar build. Happy to answer questions or share ideas anytime. Thanks again to all those on the forums who inspired and helped me get here. Cheers.
 
:mug: Ran across this while researching for my own HERMS...glad to know a fellow 'Hamster might be around for me to run some ideas by. Your system looks great.

JER
 
The copper insulation jacket is such incredible bling. What size did you cut it to? How much insulation is there inside? Is it very snug on the kettle, or does it have some "wiggle-room" to it?
 
The copper insulation jacket is such incredible bling. What size did you cut it to? How much insulation is there inside? Is it very snug on the kettle, or does it have some "wiggle-room" to it?

I cut the copper sheet to the circumference of the keg (including the thickness of the insulation) plus about an inch of overlap. The insulation is 1" thick mineral wool, which I used because it is fire proof and can stay on the kettle with the flame going. The insulation was ordered from McMaster Carr, and was only $7 for a small sheet of the stuff...the shipping cost more than the material. I glued the insulation to the copper sheet using some spray adhesive and then cut out the holes for the valve and thermometer using a razor knife. With the insulation glued to the sheet it was easy to wrap around the keg and secure with the three latches on the back.
 
Do you think if you did this same system using electric that you could make ever pot have the bottom drain like your MLT? I mean I wouldn't see why not.

What size Tri-fittings to match the keg top opening did you use?

I really like this set up, but I will be switching to electric at some point. I have nothing against gas, just preference is all. I do like that you were able to use Natural gas versus propane. Talk about ease of use!!

Yes, I think that with an electric system there is no reason that you couldn't have a bottom drain on each of your kettles, and that would be awesome in my opinion!

The Tri-Clamp for the Sankey neck is 2", and works especially well with a special silicone gasket sold by Brewer's Hardware which only has a "ridge" on one side (made for their Sanke Fermenter kits).

Cheers!
 
BHam, great rig. I currently have a Brutus 10 style, very similar to Lonnie's, with direct fired MLT. Has been great, but one my last beer (a 10 gallon partially batch of Maibock/Helles) I did a 3 step mash and even though I was recirculating hard the whole time I had the burner on the MLT, it scorched BAD. Can't even scrub the scorch off, going to try boiling vinegar with some baking soda. My wort tasted good but the beers are still fermenting so I'm praying they won't be dumpers from the scorch...

This has got me thinking I need to do a HERMS coil. Any specific advice on building that aspect and how it operates, vs. a direct fired method? How fast does the wort rise for steps? Do you keep the water in the HLT during the mash (while using the coil) at a certain temp or just higher than where you want to go and monitor it?

Sounds like you prefer the HERMS coil to direct fire, any pros of the direct fire over coil?

thanks!!!

Bd2xu I had the same thing happen to me, which is why I decided to go with the HERMS system. Compared to the Direct-Fire MLT, I think the HERMS is superior in ease of operation, and control, hands down.

With regards to operation, the HERMS is very simple. The first thing I do on brew day is fill up my Hot Liquor Tank to the top, completely covering the HERMS coil and start heating the water. Ideally, my Hot Liquor Tank water is around 180 deg F or hotter when I mash in. How fast the temperature of the Mash rises when circulating through the HERMS depends on a number of factors, most importantly in my opinion: the size and length of the coil, and the differential in water temperatures between the mash and the Hot Liquor Tank.

In my case I am using about 40 feet of 1/2-inch soft copper coil in my Hot Liquor Tank. If I have a mash resting at 150 deg F, and I start circulating through my HERMS with the hot liquor at around 190 deg F, I can raise the temp of my mash to 168 deg to 'mash out' in less than five minutes. Obviously, the bigger the difference in temperatures between your mash and hot liquor, the faster you will see the temperature rise. In my experience, the HERMS can raise the mash temperature more quickly, or at least as quick as using direct fire (considering the factors mentioned above). I usually don't let my hot liquor temperature get much above 190 because I am using that water to sparge and I don't want it too hot.

When circulating thru the HERMS coil, I give the mash a little stir every now and then just to make sure that the temperature of the whole mash is rising evenly, and I use a cheap little probe thermometer to check near the top and bottom.

Works great for me, and no more scorched mashes! Relatively simple and easy to build, and if you all ready have a Brutus style system all you need is to wrap some soft copper around a corney keg and drop it in your HLT.

Cheers :rockin:
 
Back
Top