My Beer line chiller build

Homebrew Talk - Beer, Wine, Mead, & Cider Brewing Discussion Forum

Help Support Homebrew Talk - Beer, Wine, Mead, & Cider Brewing Discussion Forum:

This site may earn a commission from merchant affiliate links, including eBay, Amazon, and others.

SweetSounds

Well-Known Member
Joined
Jan 18, 2010
Messages
1,424
Reaction score
22
Location
Des Moines, Iowa
I'm starting a new thread in DIY because I have progress and pictures now... Original discussion thread is here.

Just a quick overview of my bar and towers...
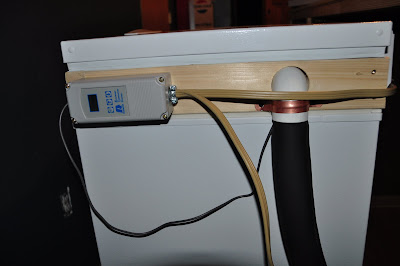
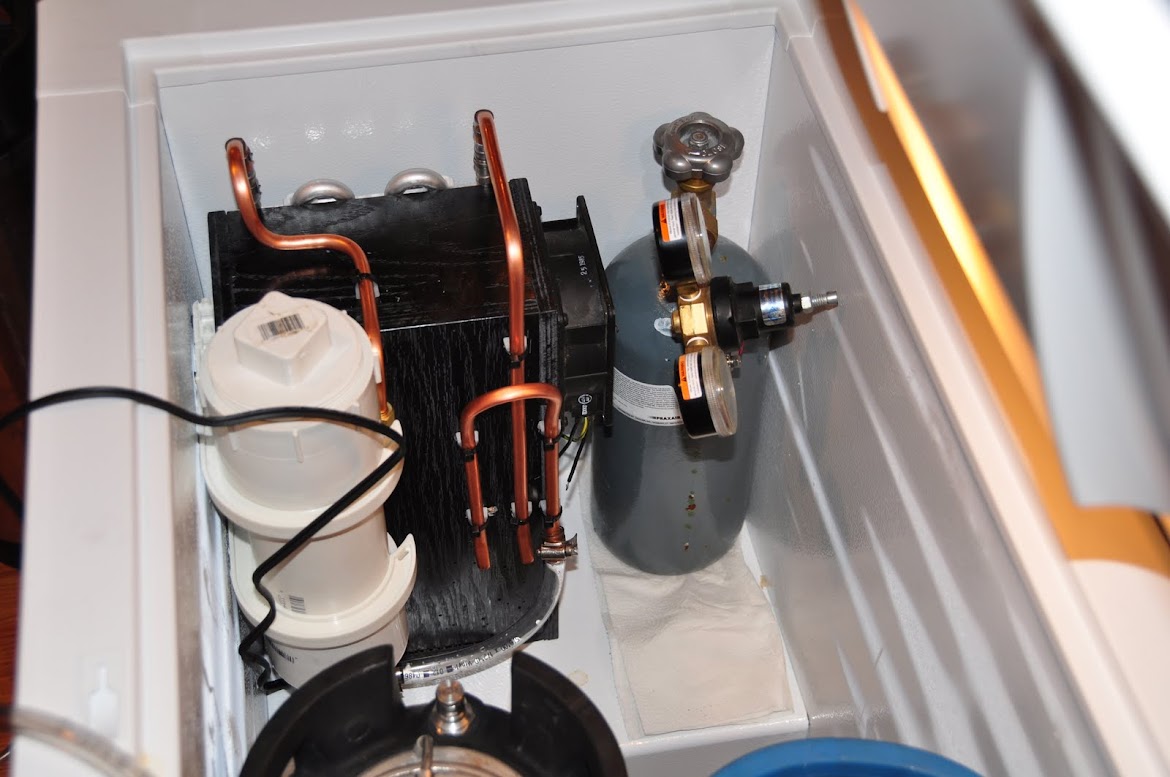
My keezer is a Kenmore 8.8cf with a 2x4 collar. It lives under the bar, about 3' left of where my tap towers are going. I have to be able to slide the keezer out from under the bar for loading because I don't want to hinge the bar top. Because of that, the trunk line must be flexible, and about 11' long. 7' of that line are going to be outside of the keezer, so I needed a way to chill the lines!
I'll state now that it's not complete yet, and I don't know how well it will work, but I like to build stuff! And that alone was worth the effort and $$ so far (About $60).

So...
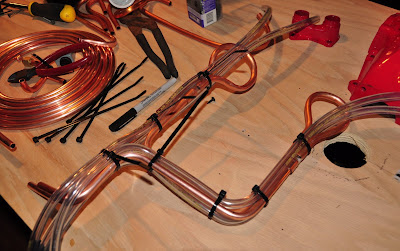
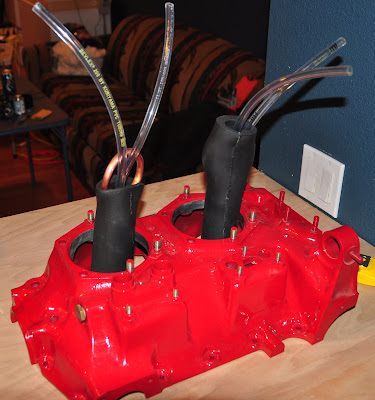
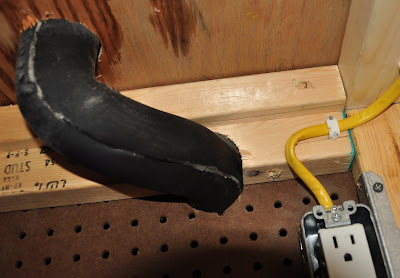
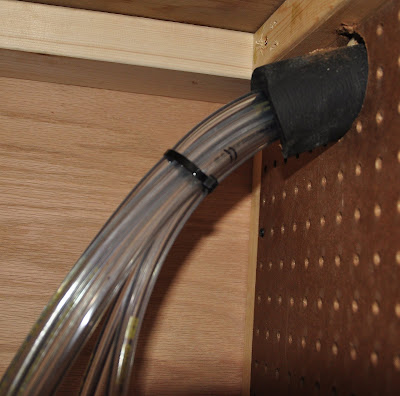
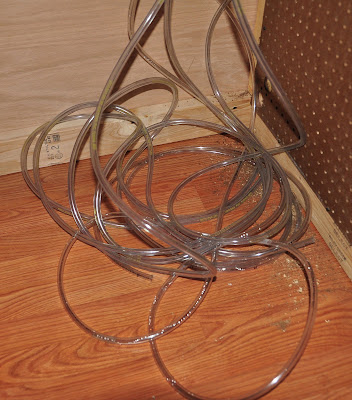
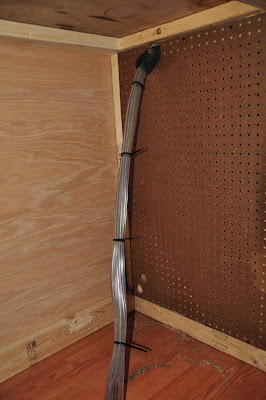
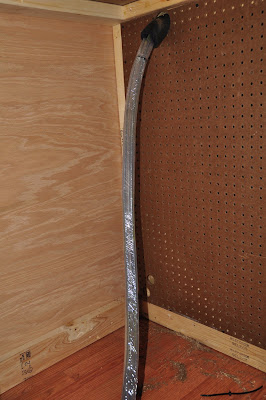
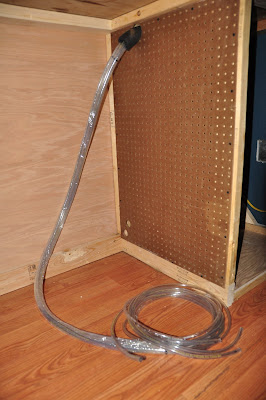
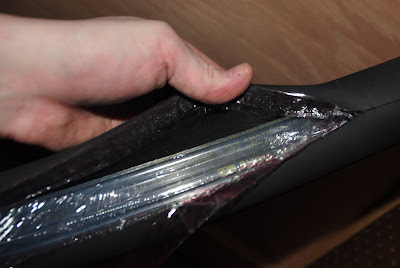
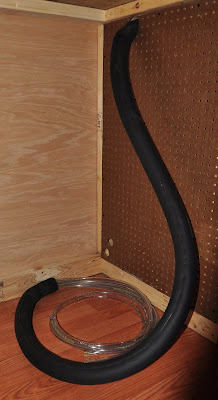
Here we go. I could buy beer trunk line at MicroMatic, but that would be too easy. I'm building mine out of 4 11' chunks of 3/16 beer line, and 2 7/16 cooling lines. These will be wrapped in stretch wrap, and enclosed in foam rubber insulation. I am concerned that the thick wall 3/16 beer line won't transfer heat as well as the poly lines in trunk line, but I got what I got and I'm gonna give it a try!

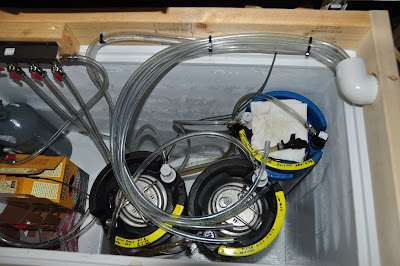
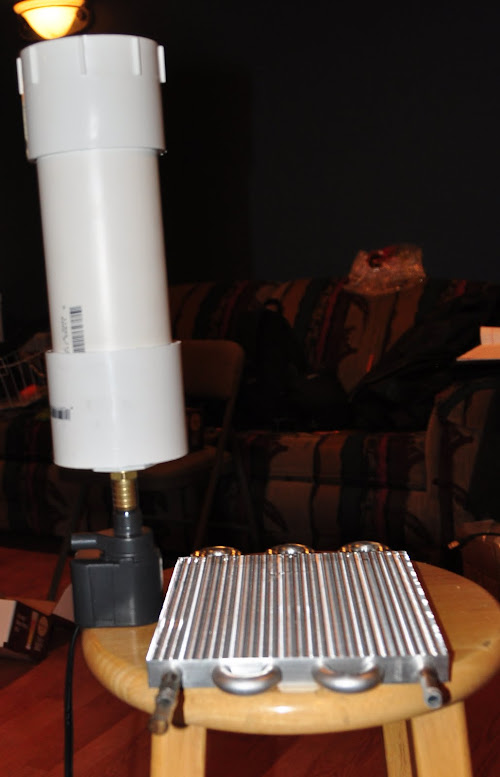
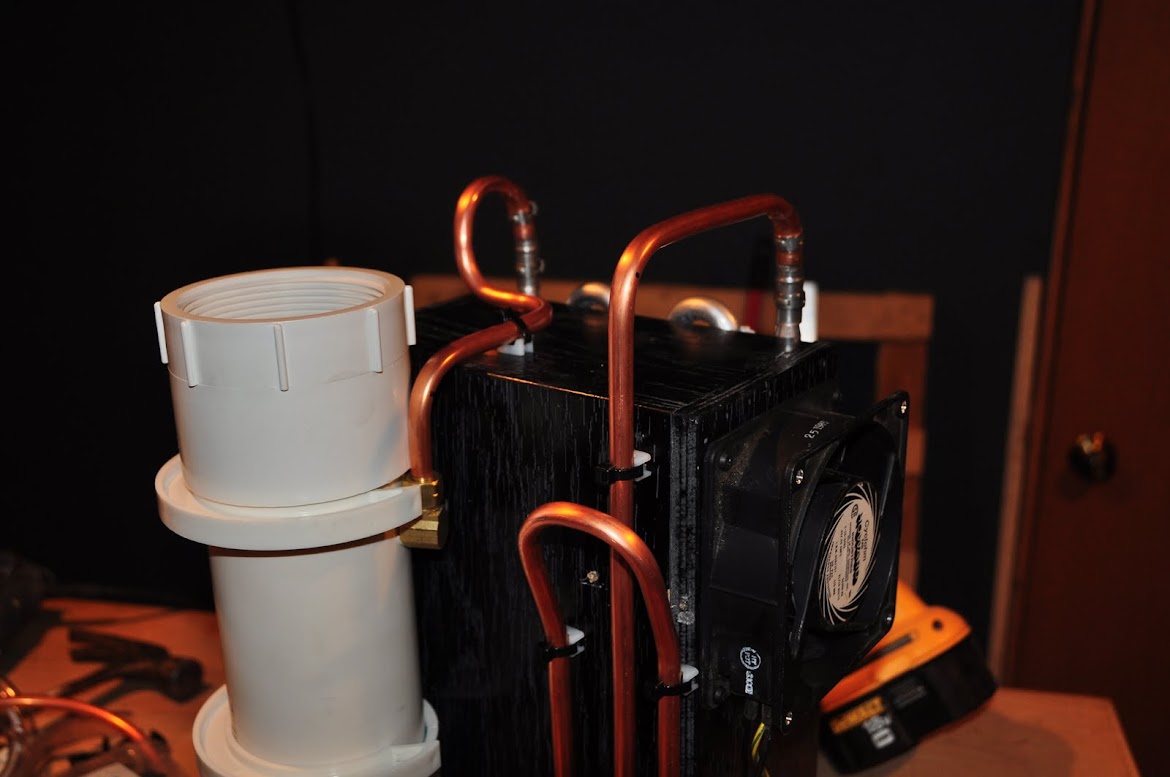
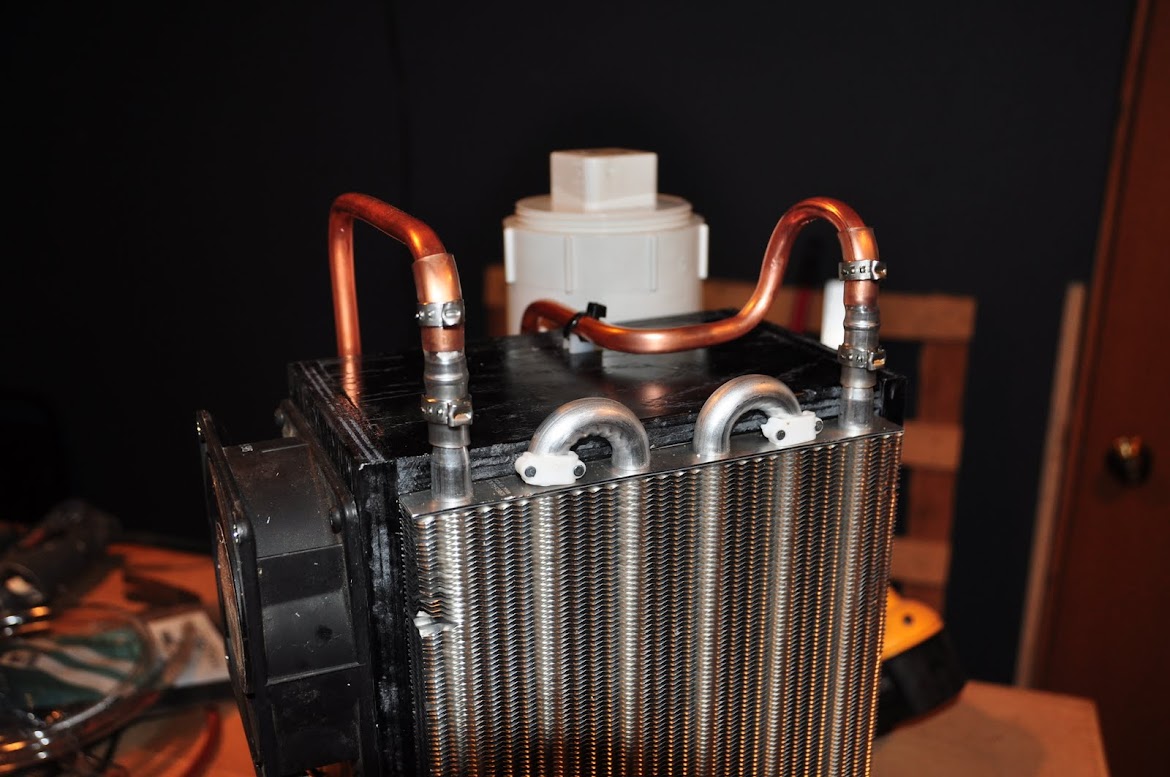
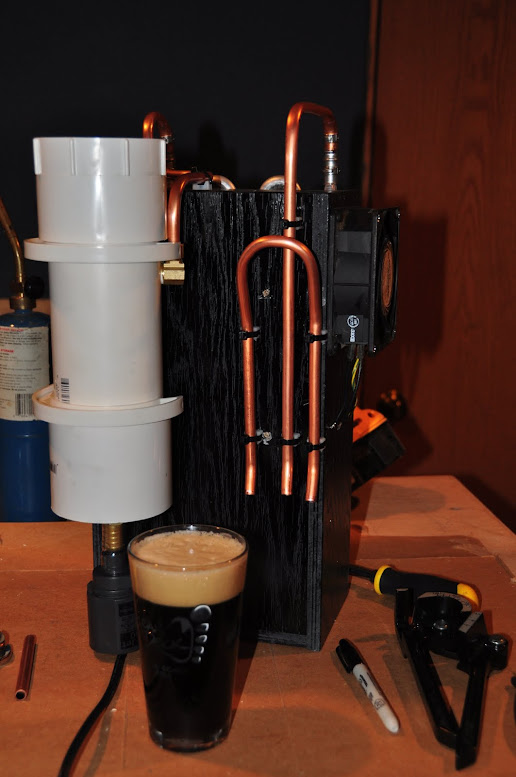
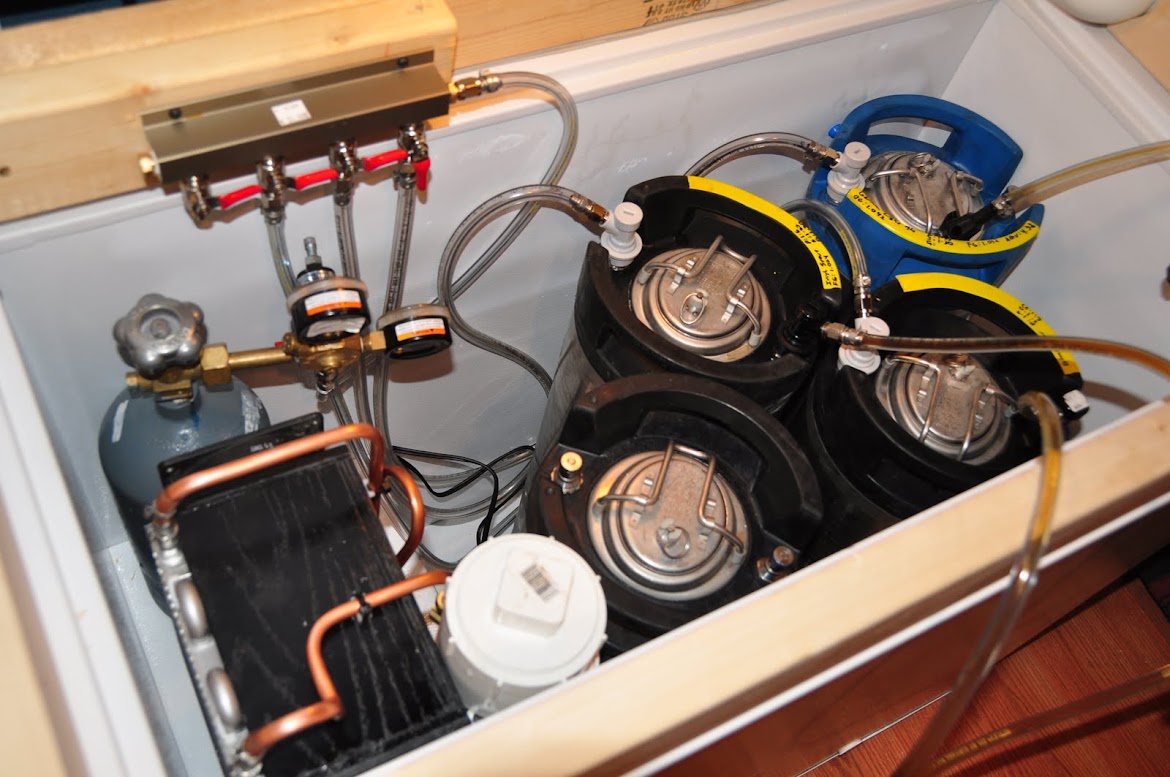
The chiller will have a reservoir, heat exchanger, circulation pump, and a fan. I wanted to keep the volume of coolant small, and make the heat exchange in the keezer fast. I think this will work better than a big pool of coolant being passively cooled in a bucket because more surface area is exposed to the cold at any given time. (We'll see if this works!)

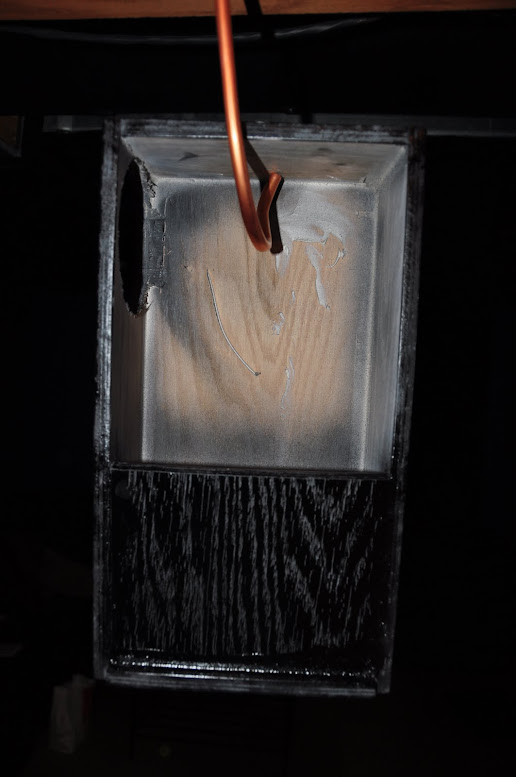
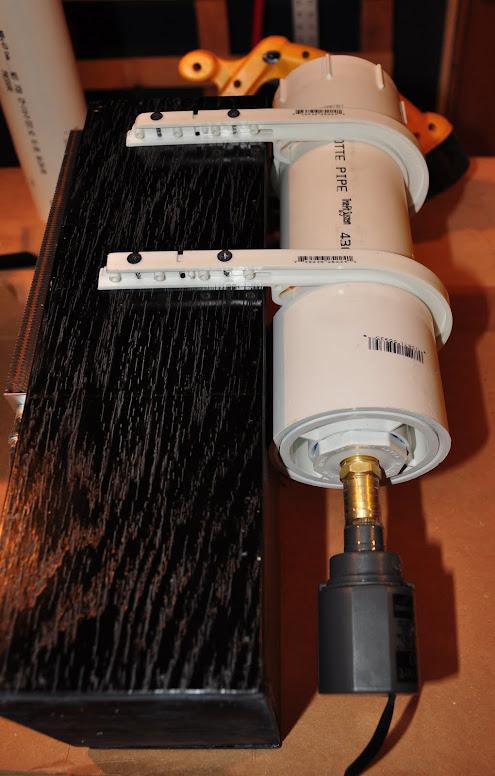
I wanted to force cold air through the heat exchanger, so I built a shroud with a place for a fan. This also gives me room to mount the reservoir, pump, and tubing.
DSC_5768.JPG

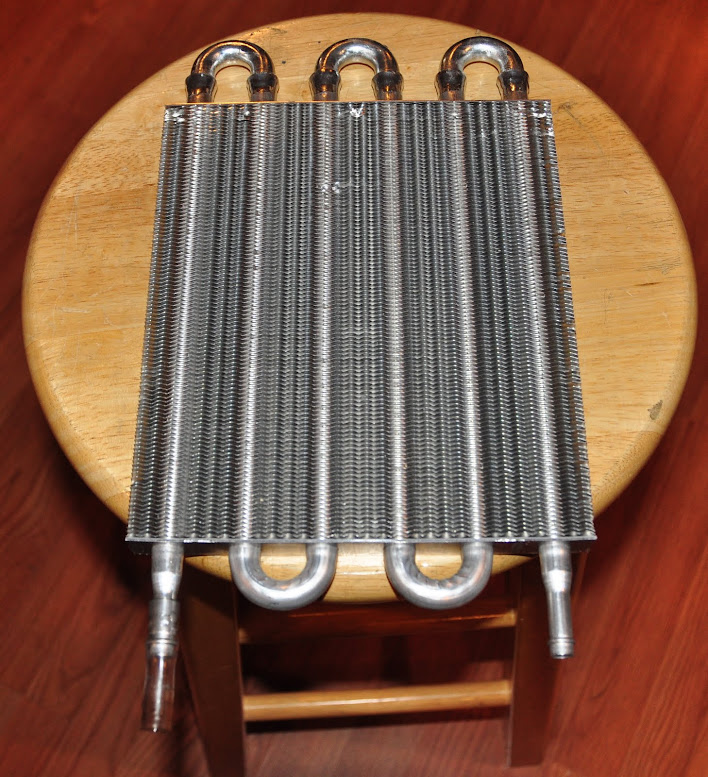
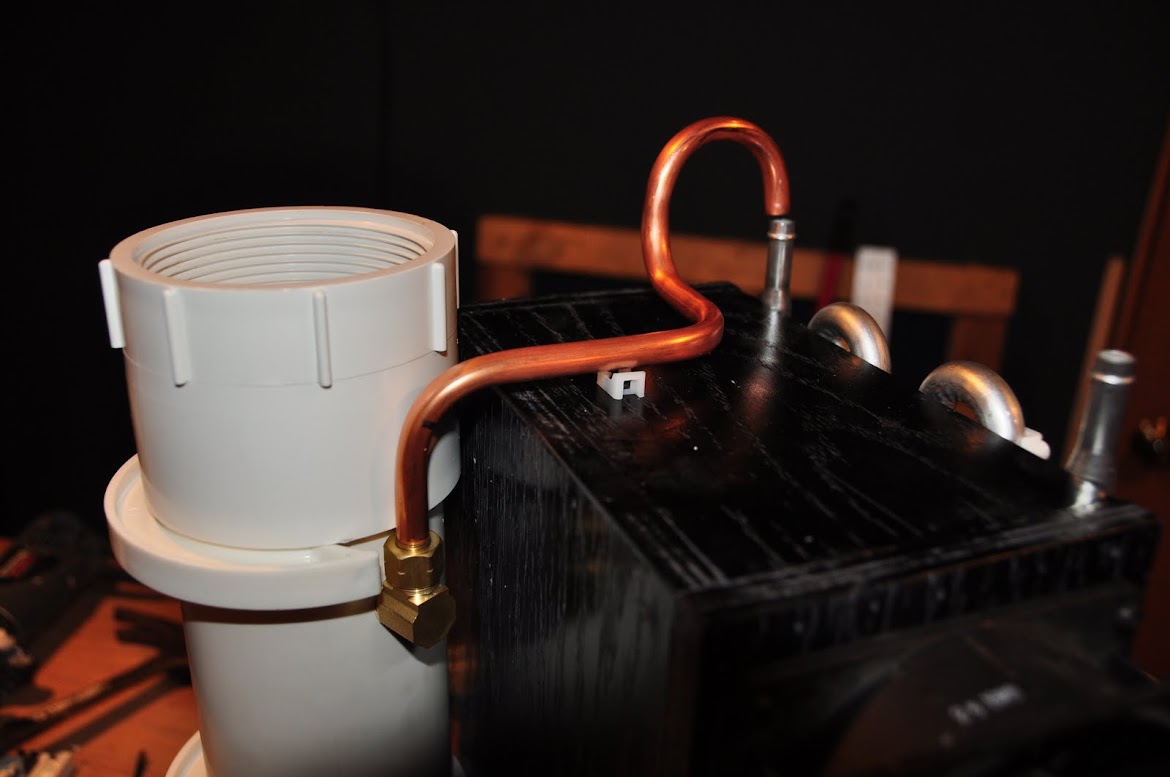
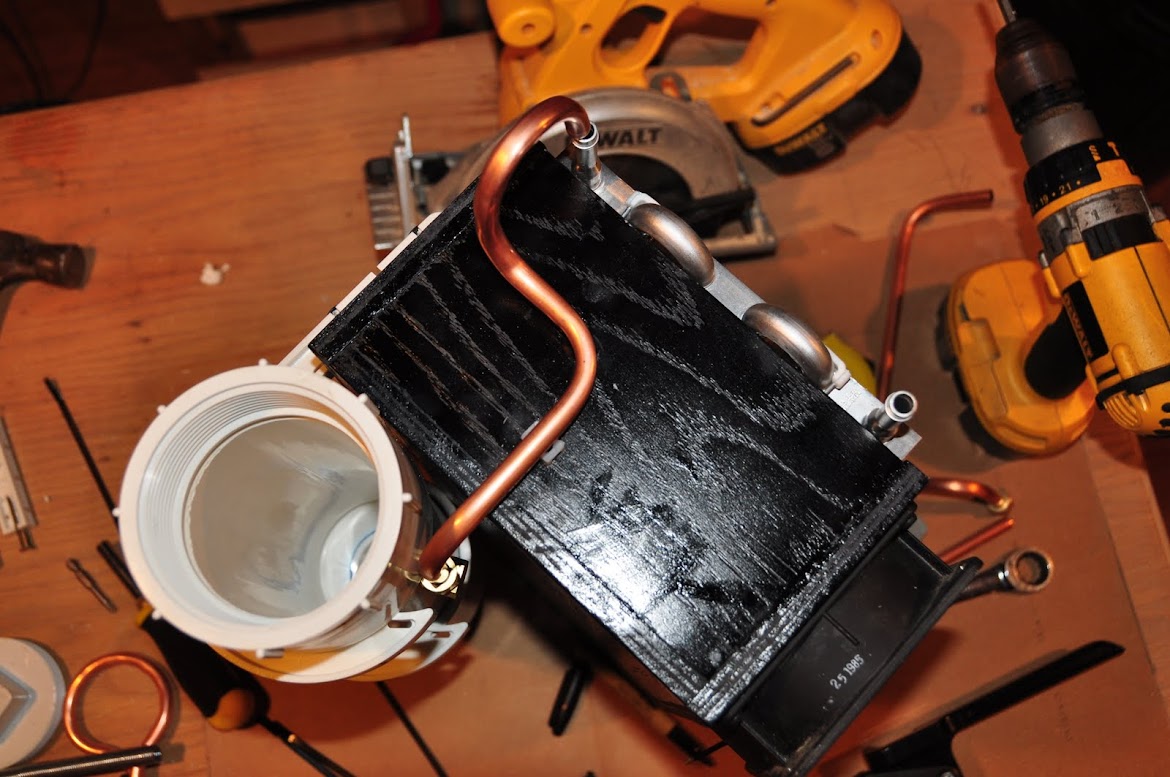
The heat exchanger is just an aftermarket transmission cooler. It's fastened to the box with romex staples. (This actually worked out really well! I was wondering how I was going to mount it when this started)
DSC_5773.JPG

DSC_5777.JPG

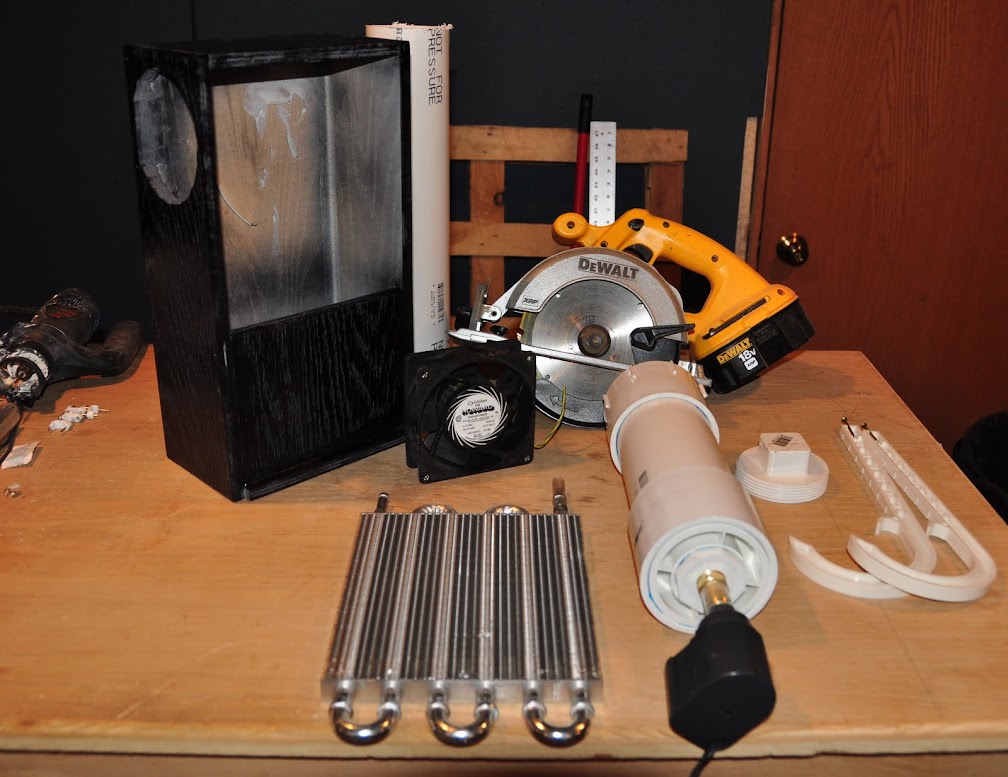
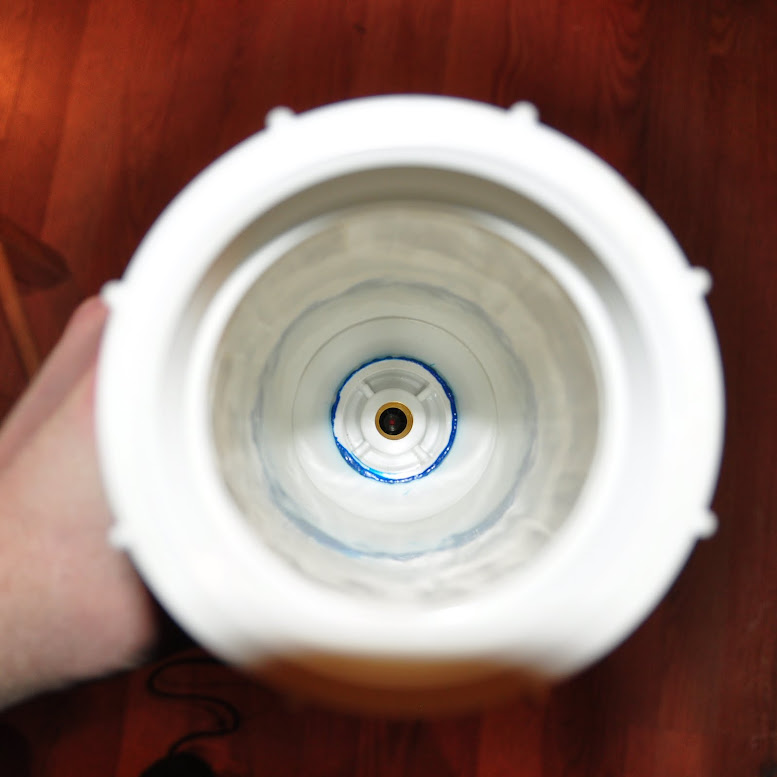
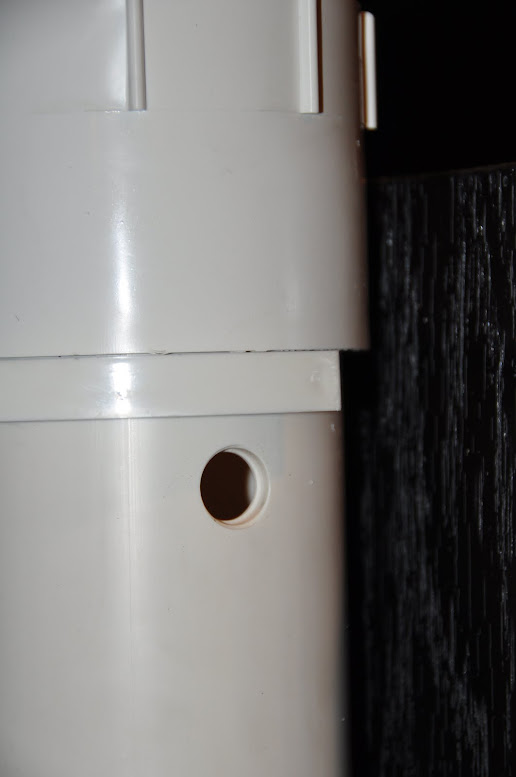
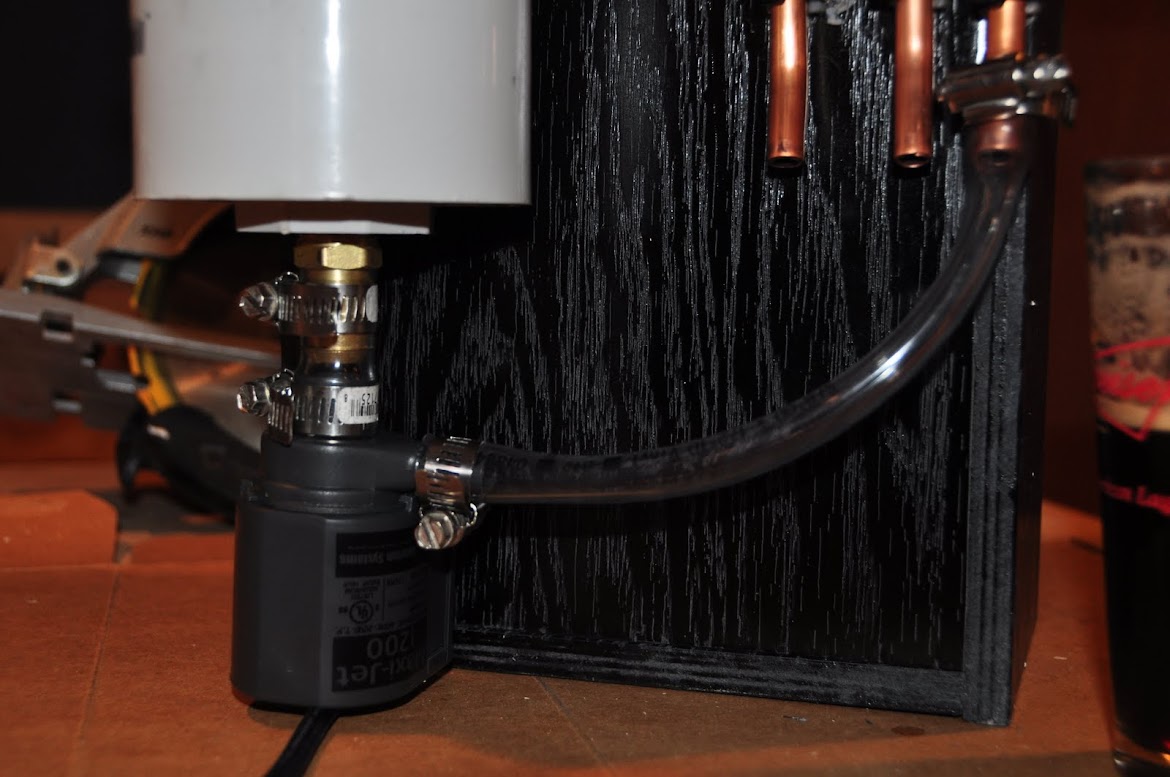
Next is the reservoir. It's built from 3" PVC pipe. The bottom is reduced to pipe thread, with a hose barb attached to feed the pump. The top is a simple cap for filling coolant.
DSC_5776.JPG

DSC_5775.JPG
 
I attached the reservoir to the box with 3" PVC hangers, trimmed to fit.
DSC_5792.JPG

The return line feeds back to the reservoir through a compression to MPT elbow, just screwed into the side. I used a step drill to make the hole. (After testing, it's quite water tight)
DSC_5798.JPG

DSC_5799.JPG

DSC_5800.JPG

Here it is with the rest of the copper...
DSC_5802.JPG

And a closeup of the exchanger mounting and plumbing...
DSC_5808.JPG

Pump detail - It's a Maxi-Jet 1200 aquarium power head. It's the only one I could find that actually said it doesn't have to be submerged to keep from burning up. Add to that that it lives in the cooler, and I think it'll be fine. Oh! And it's $20! It's rated at 295GPH, but that's with 0' head and no plumbing. The total volume of my system, with the lines filled is just under 1/2 gallon (.489 by my calculations). If I do spring a leak, I won't have a huge mess. Just 1/2 gallon, hopefully in the bottom of the keezer!
DSC_5804.JPG

So here it is, with the gratuitous beer photo
The output of the pump will connect to the right most tube in this photo. The "U" is simply to make the input and the output of this contraption face the same direction, in the same place. The left tube is the output to the trunk. The middle one is the return. From the pump, the coolant goes through the "U", out the trunk to the taps, back through the trunk, and up the middle tube to the tranny cooler. The tranny cooler then empties back into the reservoir, feeding the pump. This takes about 15 seconds.
DSC_5801.JPG

DSC_5807.JPG

I tested it with water, and I have a couple leaks to take care of. I expected that. Just for grins, I filled it up with hot water to see what it would do. Well, it got hot! So I filled it with cold water, and the lines got cold! Obviously, since the chiller is sitting at the same temperature as the beer, and it's not 100% efficient, the lines will never be exactly serving temp. Buy hopefully they will be close.
 
I haven't built out the trunk line to the tappers yet. That comes next weekend I think.
I built this to fit on the step in my keezer, and still leave room for the CO2 tank. Success!
DSC_5812.JPG

The fan is set up to draw air across the freezer wall, and through the radiator. (IOW, suck)
I may have to deflect the fan air out into the keezer a little.. I don't want it recirculating the same air. I'll have to see when it's up and running.
DSC_5814.JPG


The lines will exit the keezer through he PVC elbows on the right, make a "U" shape for slack to slide the keezer out, and then go across the underside of the bar to the tower.
DSC_5816.JPG


More to come...
 
Any update on this line chiller project? I am looking at building somthing very simliar and hoping you can confirm success with you design. Thanks.
 
Not yet. I'm hoping to get the trunk line built in the bar this weekend. I have to weld up some custom flanges to mount the shanks to the intake and exhaust ports of the engine cylinders. Until those are done, I won't be able to actually push beer through the lines and see if it stays cold.
So the next update will be the trunk line construction. At that point I can see if it properly chills the empty trunk, but not beer. Actual beer to the taps will probably be a while. I think I'm getting shipped to Denmark for a while :drunk:
 
Thanks!
I'm looking forward to Denmark. Just wish I knew how long it was going to be for!
Anyone have recommendations for good Danish micros? Or pubs for that matter? :drunk:

The tap towers are built from 1/2 of a Continental O-200 airplane engine. They are made in Mobile, Alabama. I think it came off of an Aeronca Champ. 4 taps - one on each intake and exhaust port. The case is cracked and the cylinders aren't certifiable anymore = Free! Had a friend powder coat it. I've had that part done for about 4 years. I just recently got into home brewing... Seemed like a good reason to dust it off! :D
There is more detail on the build in my original thread in Bottling/Kegging
Better pic of the tower:
DSC_5763.JPG

More to come!
 
Ok,
Progress... The trunk is built, insulated, and installed. The towers are assembled, but I'm still waiting on flanges. It's tough to find 7/8" ID steel tubing in Oskaloosa IA :(
Maybe I'll get them started next weekend.

So! Here are some progress pics of the trunk build.

Like I said earlier in the thread, the towers are 1/2 of a Continental airplane engine. Here's the crank case, in it's final place, without the juggs...
DSC_5840.JPG


This is the inside of one cylinder. When it's mated to the case, I have 10" of clearance for the coolant loopback.
DSC_5843.JPG

This is the start of the coolant line assembly.
3 lessons learned:
1) I bought more tubing because I decided to make the fixed part out of copper. The heat transfer is MUCH more efficient than vinyl. Unfortunately, I bought the thin wall "Utility Grade" tubing, instead of the thicker wall stuff I built the chiller out of. It's much easier to bend, but a royal PAIN to keep from collapsing. Even with a good bender, it wanted to kink if I went past a 90 degree bend. Oh well. I had enough spare loops from when I was practicing building the turnarounds to finish the build. Buy the thicker tubing! It's harder to bend, but at least it's workable.
2) Buy a good bender! The black one (You can see it in some of the earlier pics) is the best one of the 4 I bought. I used a spring bender for tweaking.
3) Zip ties are your friend. I use them to hold things in place during assembly. Cut them off, add a tube, install another one. They are cheap and kept me from going insane when I started routing hoses.
DSC_5846.JPG

DSC_5850.JPG

This is with the beer lines added. The coolant hoses will attach to the ends of the copper pipe. The cylinders (towers) will drop over the loops, and the lines will attach to shanks fitted to the intake and exhaust ports.
DSC_5851.JPG

Assembled, installed, and insulated.
DSC_5861.JPG

The trunk comes through the top, hangs a left through the partition between the mini fridge (Which is directly under the tower) and the keezer compartment.
DSC_5863.JPG

DSC_5864.JPG
 
Now for the main trunk...
It's a pain to keep the lines arranged in the way I wanted them. Time to bust out the zip ties again...
DSC_5865.JPG

DSC_5866.JPG

Then I wrapped the lines in stretch wrap, removing the ties as I went.
DSC_5867.JPG

I left a zip tie at each end of the trunk whip so the insulation and stretch wrap didn't have to handle the load of the line trying to separate.
DSC_5868.JPG

The finished product
DSC_5870.JPG

And insulated
DSC_5871.JPG

DSC_5874.JPG

The trunk comes into the keezer through 2 90 degree PVC elbows connected through the collar. (One is a street-L)
DSC_5876.JPG

DSC_5879.JPG
 
Any update on the beer line cooler build? I have been trying to track your thread closely as I am planning to copy your build if all works well. Thanks.

BTW, tried to PM you but your mail box is full.

:mug:
 
I just got back from the other side of the pond yesterday.
I got in on the Perlick group buy. So assuming they are at my house, and I can get to the LHBS for shanks, I'll have more information this weekend when I get home.
I'll update soon, I promise :drunk:
 
Absolutely amazing and inspirational. I am working on a bar and keezer design and your post has provided some fresh ideas.
 
Well, it works!*
Of course we had to take a few glasses from the first tap to christen the thing. Then I let the beer sit in the line for about 30 minutes. I pulled about 4 oz from the tap and measured the temp. The keezer was 44 and the beer was 45 at the tap after 9' of trunk. I was really shocked. I was expecting a 3-5 degree differential. Maybe 30 minutes wasn't enough for insulated, marginally cooled lines to warm up, but it's a little promising. The loop of trunk from the keezer to the bar rests against the hot side when the compressor is running.
I also haven't figured out control of the pump and fan yet. I'm leaning towards an AMX controller and touch panel with temp sensors on the analog inputs. That's next. But for now, the chiller pump and fan will run with the compressor.

Now the *
There's a leak. I think it's still in the same place as before, near the pump. +1 to whoever it was in the beginning of this that told me chasing leaks sucks. It really does.
This thing puts one HELL of a load on the keezer, I think. I had the lid open for probably 30 minutes installing everything. And then I added 2 room temp kegs to chill and carb. Maybe that was it... The Ranco said it was 52 degrees after all that, and it took 2 hours to pull back down to 44, with the chiller running.
On the up side, with 13' of line, the head is perfect!

So basically, I'm optimistic this is practical. I'll need to see how it does with beer sitting in the line for a day or more, and measure the temperature of the draw. And I need to find and fix the (very slow) leak.

More updates in a week or so. I have to bottle in the morning, and then the rest of my weekend is shot.
 
The warm kegs are what put the load on. Once they are cold they will help regulate the temp with their thermal mass. Cool build I am looking forward to how your faucets look on the heads.
 
Exactly. The only way to tell what kind of a load the coolant loop puts on the system is to wait until all temps have equalized over two days, put a "kill a watt" or other usage measuring device on the freezer and run two tests. For one 24 hour period, don't let the pump run. For another 24 hours, run the pump continuously. Running the pump only with the compressor run won't work too well because the lines can get really warm in between cycles.
 
Yea, after the kegs got cold the keezer wasn't running nearly as hard as before. I should have waited to put them in so I'd have a better idea of how the chiller loads the compressor. Oh well.
I'm not really going to have time this weekend to work on it - Going to NE with SWIMBO for Easter.

The next steps:
Fix that damned leak! :(
Find some RV antifreeze for coolant (It's just water right now, for testing)

Then automation:
AMX Netlinx controller
5" or 10" touch panel
Relay control of the keezer compressor, keezer light, chiller fan, and coolant pump, and mini fridge (Right under the towers)
LM35 temperature sensors - Keezer, coolant reservoir, trunk line, tap tower sensors, and mini fridge sensor.

This will free up the Ranco for my other chest freezer! Lagering cooler maybe? :D
 
You know, I'm pretty handy and can do a lot of different things. But we have some of the most industrious people I know of on here. With our differences in backgrounds/education/income levels, this board exemplifies the idea that the greatest strength in America is diversity. Just thought I'd throw that out there. - Dwain

P.S. fine build
 
Updated pics of taps mounted?

You know - They are mounted, but I haven't taken any pics! Maybe I'll get around to that this weekend :D

Unfortunately, when I built that I was brewing in Osky (Which is where that bar is) Now I barely ever go back there, and my homebrew stays in DesMoines.
I'm torn now weather to move it to DSM, and integrate it into the bar build this winter, or scrap the whole thing and part it out...

Tragic, I know...
 
The trunk build is awe inspiring. well freeking done!

In the future, go with vodka as a coolant. If it leaks, it is no big deal to clean up. It won't freeze at normal freezer temps. you are dealing with temps well below its evap temp, so vapor lock is not a concern.
 
Not a terrible idea in my system - But many others use much bigger capacity. Could get spendy then!

Unfortunately, the whole build is in a pile in storage now - I sold the house i had the bar in...

Someday I'll stand it back up. Till then it's the kegerator for me :drunk:
 
granted, if you are using barrels of coolant, then maybe vodka is too pricey.
for smaller systems though, a few PLASTIC bottles of cheap vodka will do the trick. grey goose and absolut need not apply!

shame that the anaconda/trunk is in storage. helluva build.
 
Several reasons, actually.
In a nutshell, it's to get beer to my tower, and keep it cold on its way there.

In more detail, it's because I was using a chest freezer converted to a beer cooler, and stored under my bar. You can't cut the front off of a chest freezer to make it front loading, and I didn't want to hinge the 8' bar top to get to the lid. So I was left with a requirement that the freezer be able to slide out from under the bar. Since the tower was to the right of, and higher than the chest freezer, I had to engineer a flexible trunk line. This is to deliver the beer to the tower, and allow enough slack for the freezer to slide out. The obvious problem with this is that there is 7' of line outside the cooler getting warm! I could have bought trunk line from MicroMatic, but I didn't want to spend $7+ per foot for it. So I decided to build my own. The chiller build was for the same reason. I could have bought a proper glycol chiller, but they are expensive, loud, and big.

The last reason is just because I like to build stuff! And it was fun ;)
 
Hey SweetSounds, it's been about two years since your last post on this. I'm building a clone of your chiller. Curious if you are still using yours, and any updates, mods, or lessons learned I could use. Thanks
 
Back
Top