moving to a plate chiller

Homebrew Talk - Beer, Wine, Mead, & Cider Brewing Discussion Forum

Help Support Homebrew Talk - Beer, Wine, Mead, & Cider Brewing Discussion Forum:

This site may earn a commission from merchant affiliate links, including eBay, Amazon, and others.

walker111

Well-Known Member
Joined
Oct 6, 2016
Messages
239
Reaction score
58
Location
Calgary
Hi all. Read some great info here on the topic. I brew all double batches and currently chill with a 50 foot copper IC in the kettle and a 25 foot SS IC in a bucket of ice with a sub pump in cooler of ice. A bit of a process but ok. It still takes minimum 40 minutes to get 220 down to 80. In summer it is worse.
I know this is very dependent on water source and mine is city.

Thinking of making the leap to the plate chiller and leaning towards a duda diesel 30 plate around 14" long.
I know I need to deal with clean up but it seems reversing for flush and the fact I use a hop basket in the kettle clogging risk should be minimal.

For those that changed are you happy?
Thoughts

thanks
 
i went to a plate chiller and am now going back to IC. (gonna have a whirlpool during chill now and will be pumping ice water through it)
plate chiller wasn't as effective as I'd hoped and they get plugged up pretty easily.
I'd rather not deal with the hassle anymore
 
Plate Chiller Rule #1: Keep hops out of the chiller.

Whirlpooling may help to keep most out, more or less, but some will go through. It can create blockages that are very difficult and time consuming to remove, and you're never sure you did. Use a hop spider, hop basket, or large, roomy fine mesh hop bags.

After trying various ways over 8 years, 2 years ago I finally resorted to the latter option (9" x 22" bags, 2 or 3 of them), and now get 0 hops in my chiller, and can whirlpool/chill at full 1/2" bore, at full pump speed. No more pump starvation either. Brewing became finally a real joy!

Plate Chiller Rule #2: Go back to Rule #1.

nice!!!!
I use a 300 micron basket for the hops and not much in kettle at the end. I know that the chiller will have the drawback of cleanliness but I am ok with this. Will backflow it right away.
 
I use a plate chiller and at first I would recirculate to lower the temperature which takes some time but I found many users saying they could get the fermenter filled with pitch-temp water in one pass through the chiller. Sure enough if you dial in the water/wort flows I have been getting 65F water into the fermenter at a slow but steady rate in around 15-20 minutes (5.5 - 6 gallons). My kettle has a bazooka filter in the bottom and I add hops in a hop tube as well so there is no worry of debris getting into the chiller. I had never used an immersion chiller but with the system I use I would never want to do anything but the plate chiller. Not ideal for every system however.
 
I used a name brand plate chiller for a few years, and I'll never go back-- clogs, cleaning, lingering uncertainty of sanitation, and too much cold break for my liking in the fermenter. I'm glad PC's work for some folks, but I got tired of them. You might consider searching here and the interwebs for 'recirculating wort chilling' ideas to incorporate w/ an IC or plate chiller. You'll see a variety of ideas using submersible aquarium pumps and the like...

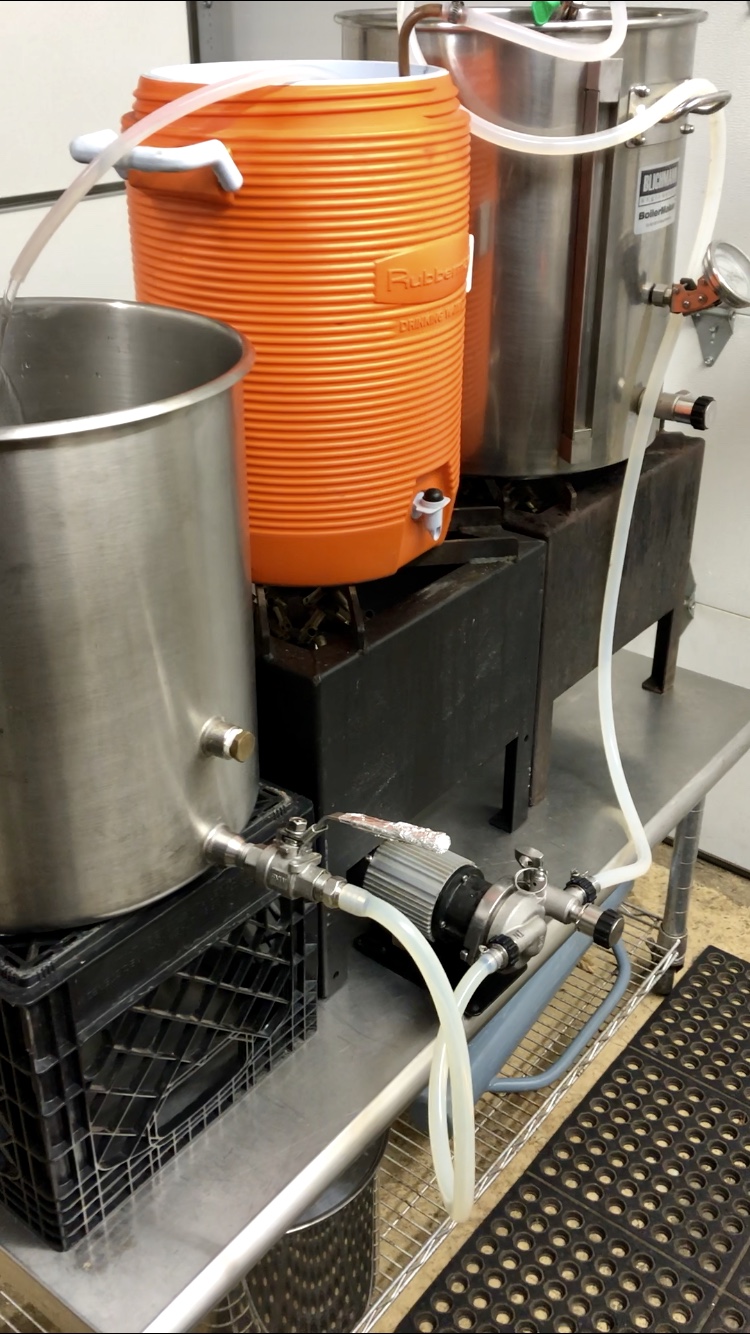
This might give you some ideas. I cobbled this system together last summer for brewing when my groundwater runs 75+. I plan to clean up the connections and fittings before spring/summer brewing. I brew mostly lagers and prefer to chill the wort to at least the low 50's before pitching.

#1 Top Right: Boil kettle w/ 50' ss immersion chiller that initially gets fed by water from utility sink
#2 Middle: Orange cooler w/ ancient 25' copper chiller and cold water. This could easily be a bucket. It takes the 'edge' off the initial kettle runoff heat.
#3 Left: Reservoir w/ 5g water and/or ice, depending on time of year. Also doubles as my HLT
Pump pushes from #3 back to #1 when recirculating

For the first 8-9 HOT gallons of water, I divert the hose going from #2 to #3 to a few buckets and use for PBW solution, watering plants, etc. Once the runoff from #2 to #3 is luke warm, the hose exiting #2 immersion chiller simply feeds #3 from the top, and I add 5 gallons cool water to #3, and recirculate for 15 mins until the wort is in the low 100's or 90's. Then dump a 20# bag of ice into #3 and keep the system running for another 30 mins or so.

Boil to 50* in about 45 mins in the summer, and all water gets used for something besides chilling. In the winter, I don't need to buy ice and it chills in 30-35 mins. I don't really need the rig in the winter, but it does save a lot of water.

IMG_0548.jpg
 
Last edited:
[...]It still takes minimum 40 minutes to get 220 down to 80. [...]
How do you get to 220. Inquiring minds want to know...
elevation and ambient

What planet are you on, exactly? And how far below sea level? :D

Anyway...you have a huge thermal transfer mismatch between your 50 foot copper IC in the kettle and the 25 foot SS IC in the ice bucket. Not only does copper tubing have a far lower thermal resistance than SS, your Cu coil is twice the length of the SS coil. I'll take a swag that the system is around 25% efficient vs twin 50 foot cu coils - and swapping the coil positions is unlikely to help.

I have a DD B3-23A "long 30" plate chiller and while the performance is hella impressive with my well water (50-something °F year round) you had better be using a fine mesh spider or you'll be spending inordinate amounts of time cleaning it out. I have a 400 micron ss spider and without that I'd be using my 50' 1/2" SS IC just to avoid the cleaning...

Cheers!
 
I have started with a plate chiller and have no desire to switch to an IC.

I use a hop basket and a false bottom in my brew kettle which traps the cold break and any hops caused from having my hop basket tip over. I also have a ball valve to regulate the hot wort and one to regulate the water to the plate chiller which I adjust depending on how cold the ground water is. I can chill down to 65 - 68 Deg. F in one pass.

I also use my pump to pump hot PBW thru the plate chiller immediate after to keep it clean.
 
I use a 300 micron basket for the hops and not much in kettle at the end. I know that the chiller will have the drawback of cleanliness but I am ok with this. Will backflow it right away.
That basket will certainly contain the hop matter. It should be roomy (full kettle depth, 6" diameter at least), while wort should be drained often to refresh, or your hop extraction will suffer.

300 micron is susceptible to plugging up from what I've read, so keep an eye on that. 400 (or even 500) micron seems to fare better in that regard for hop baskets. I haven't gotten one yet, still using large nylon 'hop' bags that get drained and massaged every few minutes. I brew lots of NEIPAs, so lots of whirlpool hops, 6 oz minimum in those bags.

I have a fairly large home-made screen/filter inside the kettle over the exit port to keep anything larger than 1/16-3/32" inside the kettle, such as a stray hop leaf or flower, Irish Moss flakes etc. At the moment I recirculate/whirlpool through my plate chiller which sanitizes it. I'd need a 3-way valve or 2 regular valves and quite a few other pieces of hardware to be able to temporarily bypass the chiller in the recirculation/whirlpool loop. Not a priority, I like to keep it simple for now.

Cleaning plug ups by backwashing ('backflowing') plate chillers is not as simple as said. The plates are parallel, so any (partial) blockages get bypassed, water flows around them and through the other channels. It doesn't create extra pressure at clog sites, to blow them out. If your outdoor spigot has enough pressure you may be able to flush them out going back and forth.

Oven baking sterilizes the interior, and will dry out clog sites, which may or may not help in subsequent clog removals. But it doesn't turn them to ash; hop particles turn merely black. I've seen them come out like that.

So Rule #1 still prevails. Keep hops out! Everything else is a shoddy attempt at correcting a real problem, not a remedy.
 
I used an immersion chiller...then i used 2 immersion chillers where 1 was a pre-chiller in an ice bath. I now use a Blichmann therminator plate chiller.

Each had there own advantages and disadvantages.

Your OP suggests that you’re trying to cool faster. The process you described sounds solid. You’re either not keeping your ice bath cold or you’re not bouncing the IC in the boil kettle. Getting down to 180F in less than 40min with what you describe should be a piece of cake.

Wuz up wit u?
 
I don't know why people use pre-chillers.

I had one. I very quickly abandoned the practice, recoiled it and looped it in to the existing IC effectively doubling the length of the chiller, and use a pond pump.

Use straight city water until your wort is maybe 100F. Even with 80F+ summer ground water that should be quick. Then use the pump to pump ice water directly through the chiller. I replenish with city water and dump the output water until the wort temp is colder than city water, at which point I just recirculate the ice water.

Can chill 5-10 gals from boiling to upper 40s lager pitching temps fast. Like 15 mins fast. Ale pitching temps in 5-10 mins. With 85F ground water.

There is minimal benefit to a plate chiller at homebrew scale. Especially since many hombrew scale options are easier to clog and cannot be taken apart.

If you insist, use a counter flow instead.

But even then, for 5-10 gals an immersion is easier to clean and sani, with el zilcho clog risk.
 
Sold my plate chiller, bought a Jaded King Cobra. Ditched my pump and simplified my life with BIAB after building an overly complicated 2 vessel setup and I don't plan on going back. PC was a PITA!
 
I don't own a plate chiller but I don't like the idea of cleaning the inside of something I can't see. Plan on getting a jaded chiller eventually
 
I've been using a plate chiller in a whirlpool configuration in conjunction with an inline dairy filter and hop spider for years. I didn't originally use the hop spider, but added it after the inline filter clogged on a highly hopped batch. The setup works great, but it can be temperamental.

If you have have decent groundwater temps, the plate chiller can be super effective, especially in a whirlpool setup. That said, I ended up going back to an IC for when I brew super hoppy beers like IPAs. When I use the IC, I whirlpool as well. It works well, but definitely takes a bit longer to chill compared to the PC.

If I were to do it all over again now, I'd go with a counterflow chiller and whirlpool. Similar benefits of plate chiller, but with much lower risk of clogging... probably zero risk if you're not pumping whole cone hops. Factoring in the cost of the PC, hop spider, and dairy filter, it would have been cheaper and more worry free to go with a good counterflow chiller.
 
I don't understand how it can take that long with the setup you have. I have a 50' copper chiller, and it works great for me. Usually 10-15 minutes .

I don't have the copper coil going into an ice bath either. I just use groundwater until I get down to around 110 and then I swap to a cooler full of ice and pump the ice water through. I live in NC and it works just fine.

Honestly I was buying 20# of ice, and it was overkill, so I am going to start freezing water bottles and using that instead.

I run my chugger pump the entire time to my whirlpool to keep things moving. The heat will stratify if you don't move things around.

Are you agitating? Just moving coil makes a big difference.
 
The temperature guage on my kettle has been swapped out. When boiling with hop additions it always reads north of 200. Why is this hard to believe? I do agitate the copper coiler and only lately have started whirlpooling and using a hop basket.
 
The temperature guage on my kettle has been swapped out. When boiling with hop additions it always reads north of 200. Why is this hard to believe? I do agitate the copper coiler and only lately have started whirlpooling and using a hop basket.
Well. It’s not hard to believe, but it’s easy not to believe. Water boils at 212 f at sea level. It turns into vapor at that point. It can’t get any hotter than that. Adding more temp only increases the rate of vaporization not the temperature at which it happens. Higher elevation has lower atmospheric pressure and thus the temperature that the water will vaporize is lower. (a lower boiling temp at higher elevations.)

Also ambient temperature has no impact on the physical properties of water. . Gl.
 
I have seen the kettle guage on videos researching this topic showing 220 and people in the videos talking about getting from 220 to 68 in minutes in short time while looking into the purchase of a new chiller. I know they can be off by a few degrees and recently changed one out that read 25 degrees high.
 
Wort does boil at slightly higher temp than water, and the higher the gravity the bigger the increase. But it's not a huge difference.

Without doing any actual math, I figure to reach a 220F boil you'd have to be doing a very high gravity partial boil (say, an extract Imperial Stout). Or be significantly below sea level (hence the Atlantis comment).

When I make invert sugar, a pound of sugar to a pint of water only seems to elevate the boiling temp to maybe 218 (based on where the temp rise stops and stays for a bit whilst the water presumably boils off enough to again raise the boiling temp further). But that's an observation, not a calculation so possibly something else.
 
I went from IC to plate... there are drawbacks to each i guess. But I wouldnt go back to IC unless I was only doing 5 gal or so. 10 took forever. I use a SS filter so im not worried about anything going in, I blast it with hot water IMMEDIATELY after using it, so far no worries. In winter its TOO efficient and I have to be careful not to get too slow with the pump...it will cool just above whatever your ground water is...
 
I have seen the kettle guage on videos researching this topic showing 220 and people in the videos talking about getting from 220 to 68 in minutes in short time while looking into the purchase of a new chiller. I know they can be off by a few degrees and recently changed one out that read 25 degrees high.
F#ck science. If it’s on the internet it must be true.
 
like mentioned above by almost everybody that uses a PC. Use a screen and clean RIGHT AFTER you use it and it wont give you a problem. So many nightmare stories of plate chillers but they're all common since solutions. Of course it going to clog if you don't use something to contain the hops and of course its going to gunk up if you don't clean it.
 
elevation and ambient

Yeah bro, I literally lived and brewed in Death Valley for 3 years. Elevation was below sea level and ambient temps did reach 120+ (127 was the high). Boil ain't going any higher than 212, maybe a decimal place or two.
 
I have a DD B3-36A 18” that I use with a MK-II pump. Probably overboard for my application. My ground water now is around 46F. I chill 5 gal from full boil to 66°F (lower than 50°F if I want to) in less than 4min. Cools so fast that sometimes I have very little time to control the water flow to get the temp I want. Love that thing. I always clean it about 10-15 min after use. I spend 10-15 min to do a good cleaning with PBW and 132°F hot tap water in both directions. I use a coarse screen at outlet of my M&B kettle just to make cleaning easier. Have done 6 brews with it. I doubt any other tube chiller type would be as efficient with the same water. But yes these need special care. Not for the lazy. If you constantly have a lot of hop/whatever residue yes maybe you should stick with the other type or better yet have both.
 
Last edited:
I have a DD B3-36A 18” that I use with a MK-II pump. Probably overboard for my application. My ground water now is around 46F. I chill 5 gal from full boil to 66°F (lower than 50°F if I want to) in less than 4min. Cools so fast that sometimes I have very little time to control the water flow to get the temp I want. Love that thing. I always clean it about 10-15 min after use. I spend 10-15 min to do a good cleaning with PBW and 132°F hot tap water in both directions. I use a coarse screen at outlet of my M&B kettle just to make cleaning easier. Have done 6 brews with it. I doubt any other tube chiller type would be as efficient with the same water. But yes these need special care. Not for the lazy. If you constantly have a lot of hop/whatever residue yes maybe you should stick with the other type or better yet have both.

I bought the DD you have. Landed yesterday. Hope to brew tomorrow and will give it a go. Don't have all my proper fittings but will make due.
I will be cleaning right away and pump water through in both directions to get a good flush. I use a large hop basket but there are 14 oz of hops in this recipe for 90 min boil.
Some trial and error tomorrow!!!
Thanks
Appreciated
 
P
I bought the DD you have. Landed yesterday. Hope to brew tomorrow and will give it a go. Don't have all my proper fittings but will make due.
I will be cleaning right away and pump water through in both directions to get a good flush. I use a large hop basket but there are 14 oz of hops in this recipe for 90 min boil.
Some trial and error tomorrow!!!
Thanks
Appre
I bought the DD you have. Landed yesterday. Hope to brew tomorrow and will give it a go. Don't have all my proper fittings but will make due.
I will be cleaning right away and pump water through in both directions to get a good flush. I use a large hop basket but there are 14 oz of hops in this recipe for 90 min boil.
Some trial and error tomorrow!!!
Thanks
Appreciated

Be sure to connect the water hoses with correct orientation. When connected backwards the cooling is highly impacted.
 
Back
Top