• Please visit and share your knowledge at our sister communities:
  • If you have not, please join our official Homebrewing Facebook Group!

    Homebrewing Facebook Group

Making Traditional rice Wine. Cheap, Fun, and Different

Homebrew Talk

Help Support Homebrew Talk:

This site may earn a commission from merchant affiliate links, including eBay, Amazon, and others.
Darn. Next batch I'll just add more. I'll try and get a photo up in a few days when I see significant changes.
 
I would like to find some Onto yeast in the USA. Its over $18 just in shipping if i order directly. Chinese made yeast balls are cheap around here. About $1.60 for 4ozs. I think used 1 ball per 2 cups of rice and they work fine with a little RYR added.
 
I've been using 1 ball per 1 uncooked cup of rice. Been working good for me.

Yea, mine seems to be doing pretty good too. There is a nice sweet smell coming from the cheese cloth. No liquid yet, but I've read that it can take a week to start seeing any.

I would like to find some Onto yeast in the USA. Its over $18 just in shipping if i order directly. Chinese made yeast balls are cheap around here. About $1.60 for 4ozs. I think used 1 ball per 2 cups of rice and they work fine with a little RYR added.

It costs about the same for me. The closest Asian market is a 45 minute drive to another town so I just ordered mine online. Next time I'm close by I plan on checking it out. I payed almost $40 total for a bag from Onto yeast. Go figure, they charge up the ass for shipping and it only took two days to get here regular mail.

I think the best thing to do concerning Onto Yeast is to order multiple bags and just make a lot of wine! :mug:
 
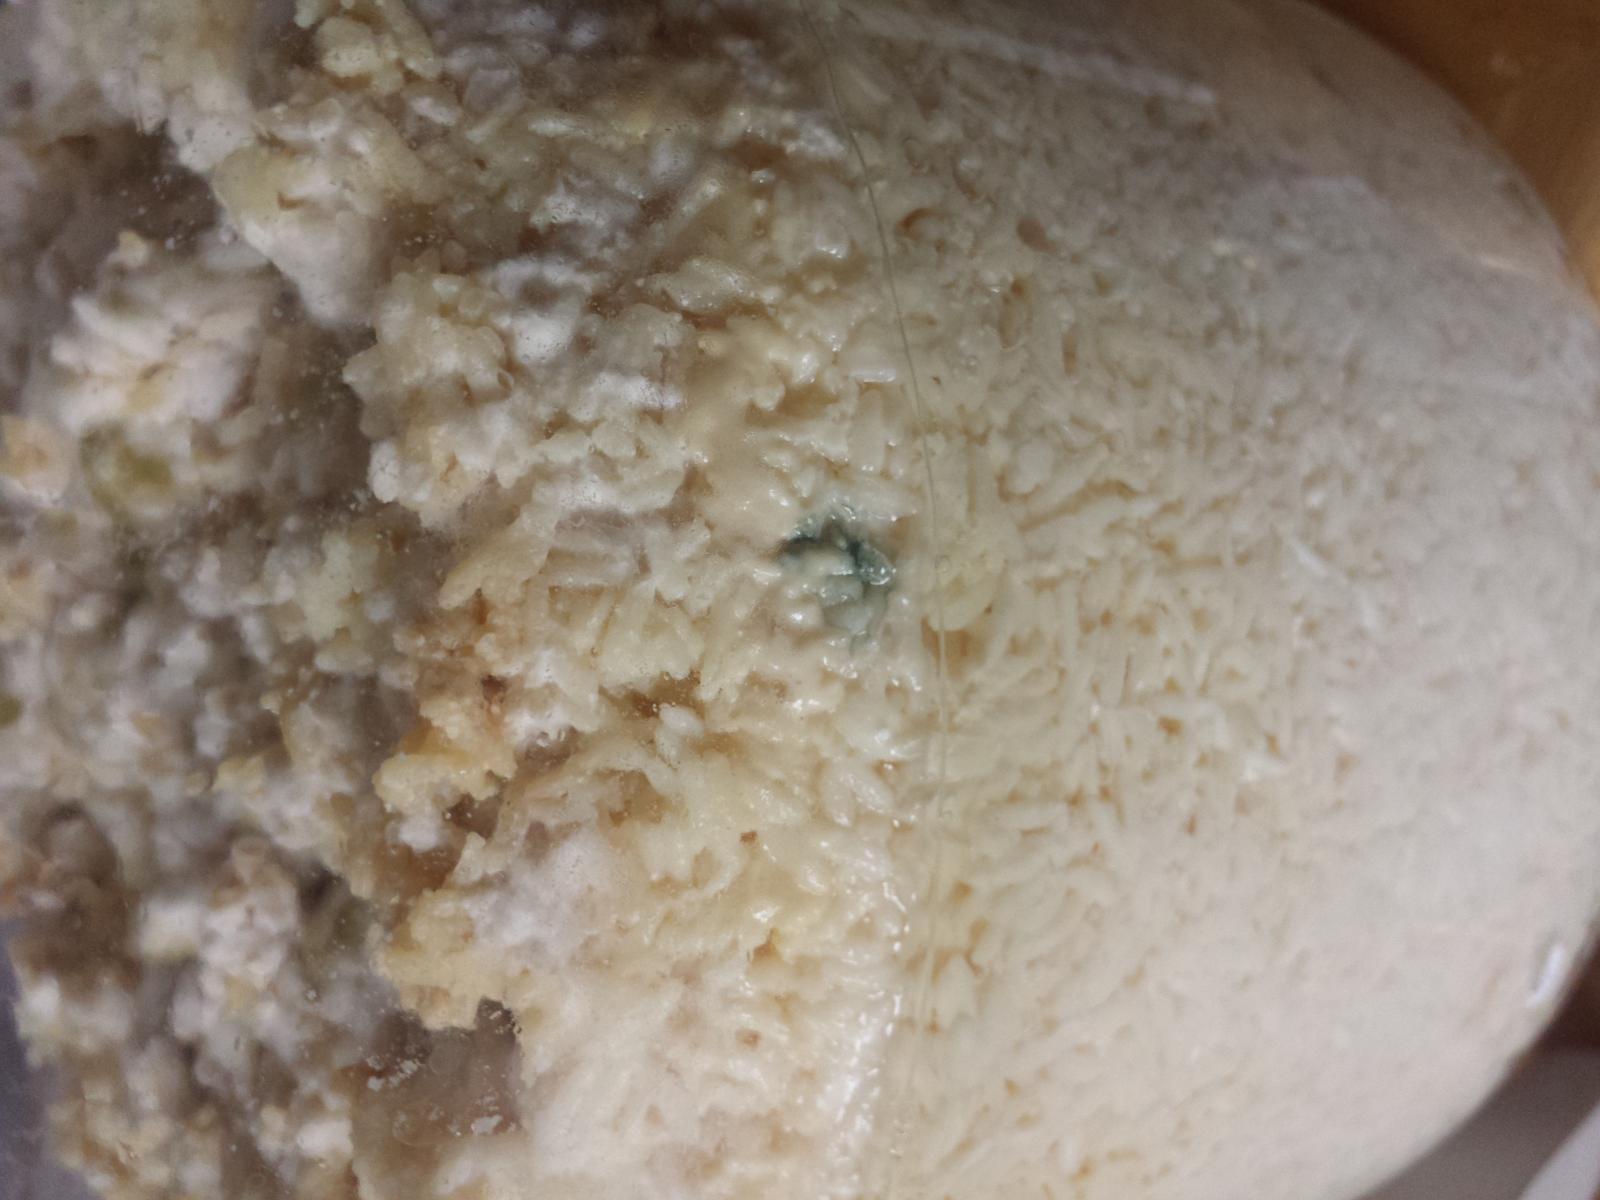
So I'm on my 5th batch or so and I think I may have gotten my first infection. I wasn't terribly anal about sanitation like previous batches or with my beer brewing. I don't think I sanitized my hands when I was mixing the yeast ball dust into the rice. I'm leaning towards tossing this batch. Just thought I'd post and ask your opinions. It smells like it normally does, just with some added color. Also, I made this batch in a large glass jar with cheese cloth over it that just has a glass lid sitting on top. Is it possible that could be the source of the infection as well? I also didn't mix in the top portion of rice once fermentation had made a good amount of liquid to do so.

20160226_111138.jpg


20160226_111211.jpg


20160226_111226.jpg
 
I would toss it. From what I read here and my own single batch, the only mold you should see is white. Rice and yeast balls aren't expensive.

The taste is a lot more sour than I was anticipating, kind of like alcoholic yogurt. Otherwise it's actually not too sweet, but also doesn't have any sort of subtlety, it's just thick, tangy alcohol.

This has aged for just a little over a week and the solids have almost entirely settled to the bottom, leaving a murky yellow liquid on top. I poured some of it WITHOUT shaking things up and the taste has already improved a lot. I get a strong hit of sake flavour with a tangy-sweet-buttery flavour as a side note. It's certainly not too sweet, but the tangy-buttery part still bothers me a bit. There is a bit of fusel character still that needs to age out, I got a minor headache from the taste. Good news is that's it's been upgraded from "do I have to drink this?" to "I would make this again." I will try it again after shaking up the solids but I don't think I'm going to like it as much.
 
Couldn't you pasteurize it then ferment it again using a wine yeast if you really want dry rice wine? I made one batch using a Lalvin yeast with nuruk and it came out dry. I still need to try it with some rice koji instead of nuruk but im sure it would work.

I didn't pasteurize but did combine a small high abv yeast to the mix later in the process previously. I didn't like the results but YMMV. It was a bit "hot" if that makes sense. It also had noticeable lacto which may have been my fault and was a bit sour.
 
Update, (sorry no pics yet) : Day 11.

One jar has about an inch of liquid around the bottom, the rice isn't floating on it, not enough liquid yet I think. Seems to be doing alright, but I expected liquefaction to happen a fair bit earlier. It definitely smells like good wine.

Jar two has some 'sweat' coming off a fair bit of the rice, but no liquid buildup to be seen yet. From the way it looks, I expect to see some within a few days. This jar smells 'sweet' no wine/alcohol smell to be noticed yet.

From the progress that I see, I expect to harvest on day 25-30 unless I see some exponential liquefaction. I'm thinking that I probably under cooked my rice seeing as how it wasn't all that soft when I ate some after I steamed it. I don't know yet whether or not 1 ball Onto yeast / 1 cup rice was insufficient or not. I'll report my findings regarding that after I harvest.

My next batch which I plan to do in some 1.5L pickle jars that I have accumulated will be boiled in bottled spring water (1.25water:1rice). I purchased some sweet rice especially for that batch.
 
Hello everyone! Having gleaned some basics from earlier posts in this thread & the brief "rice beer" section in Sandor Katz's Art of Fermentation, I've begun my foray into making rice wine.

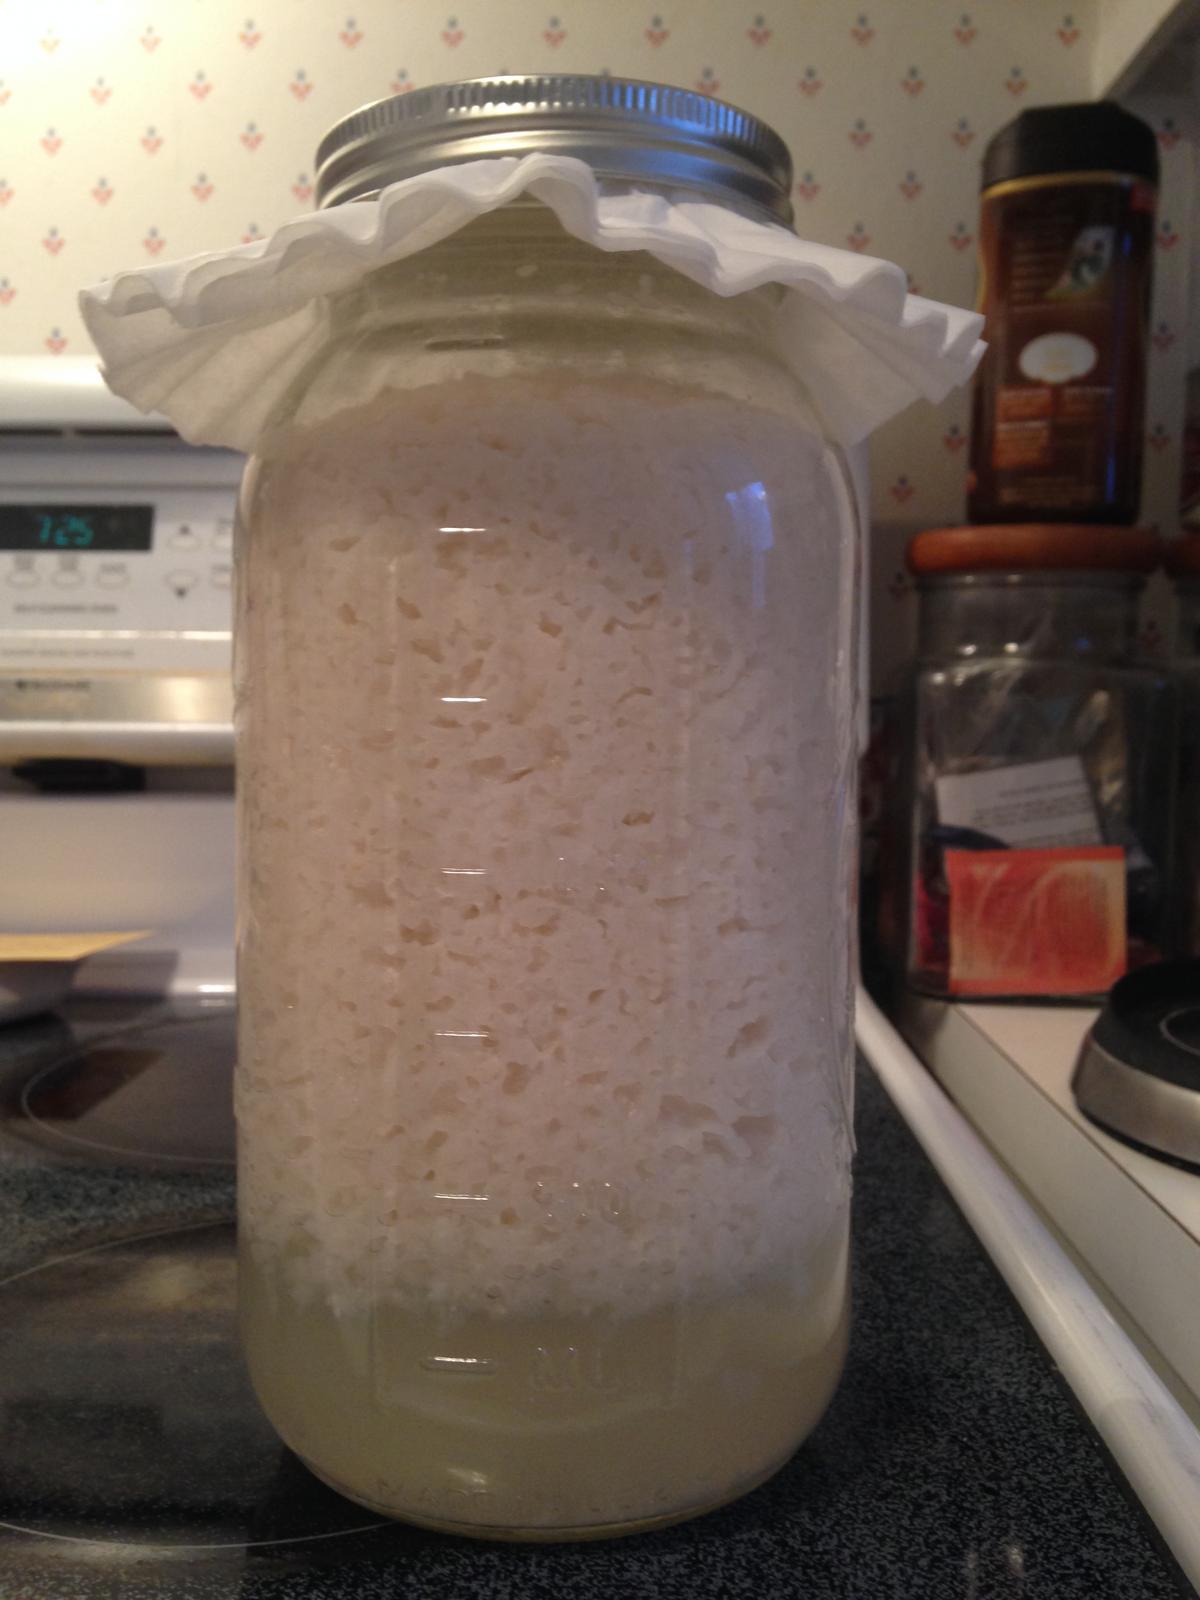
Four cups of sweet, short grain rice were soaked for an hour, rinsed, and summarily prepared in a rice cooker. (One mistake was made, however; a overly gratuitous amount of water [8 cups] was used, and some 3 cups of excess water were removed after the rice had been cooking for 30 minutes.) After cooling, the rice was thoroughly mixed with six finely pulverized qu balls, scooped into a mason jar, and left to incubate in an oven with the interior light on.

---

Within 6 hours, the scent had started to change quite markedly-- floral, earthy, slightly sweet.

By the 20 hour mark, a great deal of liquefaction had occurred.

Now, approaching the 72 hour mark, the liquefaction has proceeded a great deal further; it's a slurry, really. Smelling quite sweet and boozy, too. I have stirred it a couple times (not sure how necessary/beneficial this was).

---

How typical is this? As quickly as this has proceeded, how long will I let it continue to ferment? I'd really appreciate any insights into what I'm experiencing. Thanks.

The pictures I've attached are at ~20 and ~72 hours.

IMG_6834.jpg


IMG_6858.jpg
 
Re: "How typical is this?"

This is somewhat typical. But be aware that at this point it will have a very low alcohol content and will be very sweet. It is common in China to harvest only after two 2 to 5 days and consume as a low alcohol food.

It generally takes over 3 weeks to reach a higher alcohol content and much longer for a drier wine.

Regarding the extra water, many of us use more water than is often recommended and ferment for 5 or more weeks to produce a drier wine. But it is not typical do do this when making traditional Chinese rice.
 
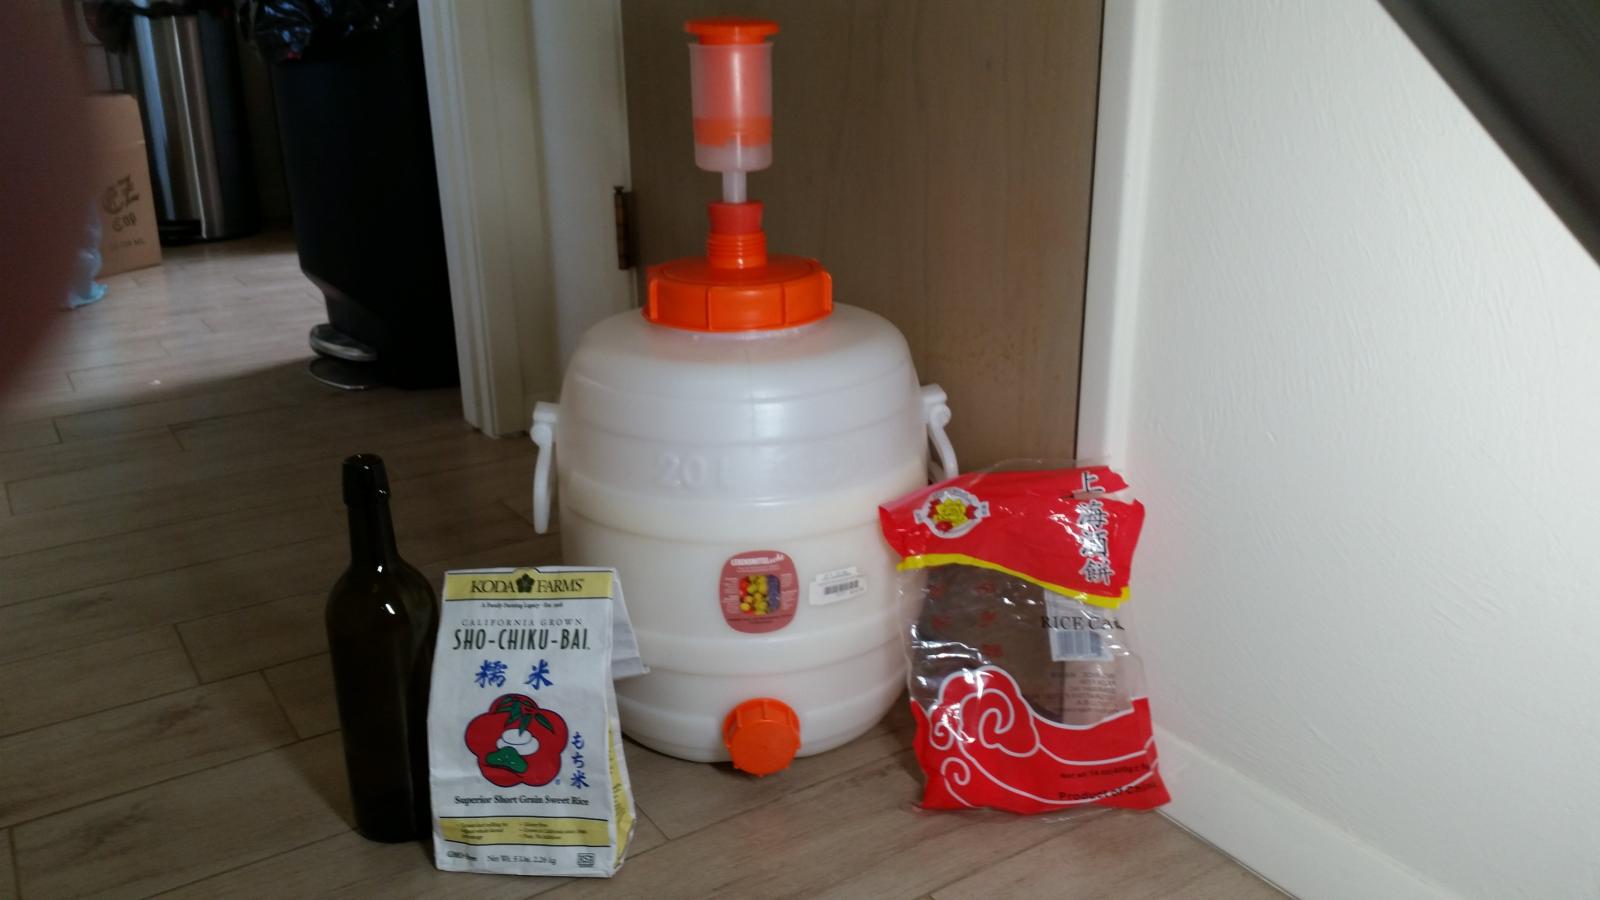
I recently moved to a house that has a closet that I can dedicate to fermenting rice wine. So I moved up to larger scale production. No more cookie jar quantities for me:)

I now have a real 20 liter fermenter and Grolsch cap style wine bottles to store the finished product. This allows for less work and more product.

Attached is a picture showing ten pounds of glutinous(sweet) rice fermenting with examples of the Grolsch style bottles(minus caps), rice and yeast balls used.

The yeast balls were purchased in Brooklyn, NY, before moving to Tucson. They can be found at almost any larger Asian market that I've ever been to.
The rice was purchased at a nearby Asian market in Tucson, AZ and the fermenter and bottles purchased at the local brewers "Brewers Connection" in Tucson, AZ.

new_setup.jpg
 
Day 20: I've decided my first attempt is a failure. Under cooking of the rice is the primary factor. In my first jar there is about 4cm of liquid built up around the rice, nothing is floating. The rice in the top half of the jar looks completely dried out while the bottom remains moist.

The second jar has absolutely zero liquid build up while at the same time does not appear to have dried out in the way the first jar has. I see lots of 'sweat' on the rice towards the bottom of the jar.

I am attempting another batch today, this time I will use 1.5:1 yeast balls to rice and I am going to boil the rice. I am using sweet rice rather than sushi this time as well.

I purchased some StarSan online so I will not be using bleach this time around.

Note: I have also ordered 10 packets of ARL which should arrive towards the end of the month. I have read a lot of conflicting information whether or not I need to add additional yeast when using ARL. I have access to Lalvin ec-1118 as well as baker's yeast. I was told in another post that I need extra yeast but I would still appreciate some more input. From what I have read in this thread (I am on pg 364) it seems that nobody else pitches any additional yeast on top of ARL.
 
I put together a batch using 10 cups water and 8 cups sticky rice. I rinsed the rice and let it soak for 1 hour while I was sanitizing.

Boiled the rice on the stovetop for 15mins and then let it sit and cool for 3 hours in the pots. After that I allowed the rice to cool to room temperature in a baking pan for another 2 hours.

I crushed up 13 Onto Yeast balls (12 + 1 for good luck) with a little yeast energizer and nutrient and mixed it into my rice by hand. (what a sticky frickin' mess). I tried to roll it into balls, but once it made it's way into my jars it seemed to just all clump together anyways.

I will report back once I start to see changes.
 
Keep a faucet lightly running when handling rice. Get you hands wet and then handle the rice. Wet them each time rice starts sticking to your hands too much.

Giving COOKED rice a quick rinse in cold water and a good drain will also help.
 
So I'm on my 5th batch or so and I think I may have gotten my first infection. I wasn't terribly anal about sanitation like previous batches or with my beer brewing. I don't think I sanitized my hands when I was mixing the yeast ball dust into the rice. I'm leaning towards tossing this batch. Just thought I'd post and ask your opinions. It smells like it normally does, just with some added color. Also, I made this batch in a large glass jar with cheese cloth over it that just has a glass lid sitting on top. Is it possible that could be the source of the infection as well? I also didn't mix in the top portion of rice once fermentation had made a good amount of liquid to do so.


So I did start another couple of batches, but I also used a serving spoon to to remove the rice on top that was containing the bad mold and a little more to make sure I got it all. It's been just over two weeks and there's been no sign of return of the bad mold. Part of me wants to sample some of it. Would it be inadvisable to do so? I know it's cheap to make, but if there's not much danger in trying it I figured why not? The pictures didn't repost from the quote but they are on the previous page.
 
So I did start another couple of batches, but I also used a serving spoon to to remove the rice on top that was containing the bad mold .

How did you know it was bad mold?

I would think if it was bad you would have been able to smell something wrong.
 
I don't know for sure. Just going on what I've read that white mold is good. The couple of posts that I've read about green or black mold said they were bad. Also that this is the first time saving this in the 5 batches that I've made.
 
Day 20: I've decided my first attempt is a failure. Under cooking of the rice is the primary factor. In my first jar there is about 4cm of liquid built up around the rice, nothing is floating. The rice in the top half of the jar looks completely dried out while the bottom remains moist.


The second jar has absolutely zero liquid build up while at the same time does not appear to have dried out in the way the first jar has. I see lots of 'sweat' on the rice towards the bottom of the jar.


I am attempting another batch today, this time I will use 1.5:1 yeast balls to rice and I am going to boil the rice. I am using sweet rice rather than sushi this time as well.


I purchased some StarSan online so I will not be using bleach this time around.


Note: I have also ordered 10 packets of ARL which should arrive towards the end of the month. I have read a lot of conflicting information whether or not I need to add additional yeast when using ARL. I have access to Lalvin ec-1118 as well as baker's yeast. I was told in another post that I need extra yeast but I would still appreciate some more input. From what I have read in this thread (I am on pg 364) it seems that nobody else pitches any additional yeast on top of ARL.


Fix up a small batch of rice and add your ARL. Make sure to keep everything sanitized. Make note however before you "pitch" the rice flour and mold mixture,the ingredients on the packet. Cheers.
 
Whew, I finally read my way through the entire thread!

My current batch seems to be going along just fine. My rice is floating on top of two inches of liquid on day 4! It seems the 1.5:1 yeast ball ratio is the ticket for Onto Yeast. I think boiling my rice rather than steaming worked out for me considering my utter lack of steaming experience.
 
I have made several batches and seem pretty good. my latest batch (4 cups rice 2 balls) and one other one had purple splotches on top. the other batch tasted fine, just wondering if I applied the yeast at too high a temp, or some contamination?
at least my friends seem to like the taste so far.
 
Woot! Batch #2 was a success!

8 cups of sweet rice yielded 4 750ml bottles of awesome wine! And this wine really is good stuff. It's great on it's own or mixed with orange juice. Actually, it makes a pretty good screwdriver :)

Slight taste of higher alcohols, but less than my mead when I sampled it on the 2nd racking. From the posts I have read, I was expecting a burn as if I were taking a shot of liquor. I guesstimate it at around 15-16% abv judging by the buzz that I have after 3 small glasses.

I recommend this to anybody looking for a nice easy project resulting in a good drinkable product. :tank:

Good yield, I usually get 8 cups of wine from 8 cups of dry rice, though I haven't used sweet rice for a while and got more from it IIRC.
You must have squeezed the heck out of it too. All the bottles cloudy, or have you let them clear and decanted?
 
Easy Rice Wine (No Straining)

Yield: Approximately 3+ gallons
Time: 10 to 14 days for excellent strength and flavor (or up to 1 month or longer for additional strength and clarity)

Note
I read several hundred comments on this thread before starting my own attempt at home brewing rice wine. Thank you all for sharing your experiences. They really helped me.

My very first brew was successful but it was also messy (all that straining) and time consuming (30 days to potability!). I loved the wine but not the process and the time it took so I tried to simplify the procedure and to make it quicker.

The key, I found, was to first place the cooked rice inside a mesh wort bag, and to then place this bag inside a brewing bucket. By doing so, the wine is filtered while it ferments. The sweet liquid drains through the mesh into the bucket, leaving the dregs behind. This eliminates almost all straining.

The steps below will deliver 3+ gallons of strong, tasty, and fairly clear rice wine within 14 days. If you're willing to wait another 2 weeks, your wine will be even clearer and more potent. This procedure has worked for me several times. I hope it will work for you.

Ingredients

Jasmine Rice 20 cups (or 10 pounds raw rice estimated @ 2 cups/pound)
Chinese Yeast Balls 6 each (generally 2 small packets)
Glutinous Rice Flour* 6 tablespoons
Tap Water 40 cups (2 cups water per cup of raw rice)
Distilled Water 1/2 Gallon (or boiled water at room temperature)

Utensils

1 Large Pot with Lid (5+ gallons)
2 Potholders (make sure they're dry)
1 Wood or Steel Spoon (Strong)
1 Nylon Mesh Wort Bag (Large)
1 12-inch length of butcher's twine (for tying off the wort bag)
1 6-gallon Bucket with Spigot Hole
1 Spigot
1 Bucket Lid with Grommet Hole
1 Airlock
1 Sterilizer (Star-san or bleach)
1 Coffee/Spice Grinder*
1 Rubber Mallet (or rolling pin, etc.)
1 Heavy-duty Plastic Bag
16 22-ounce Beer Bottles, with tops*
1 Rubber Gloves*

* - Optional

Directions

Day 1
1. Remove the oven racks, leaving one at the lower-most position. Make sure your large (5+ gallon) pot will fit in the oven. Otherwise, chose a smaller pot.
2. Pre-heat oven to 300º F.
3. Bring 40 cups of tap water to boil on the stove in the large pot. Rinse the rice under cold running water and allow it to drain. Note: I use jasmine rice since it is cheap. Glutinous (sweet) rice will probably work as well but I can't vouch for it.
4. When the water reaches a rolling boil, add the rice a couple cupfuls at a time. Stir with the spoon, so that the grains don't stick to the bottom of the pot, until all the rice is used up. Adding the rice will lower the temperature of the water below a boil but don't worry. This is OK.
5. Once all the rice is in the pot, turn off the heat. Cover the pot with the lid. Place the pot in the oven. Let it cook for 20 minutes. Then turn off the oven but don't take the rice out for another 30 minutes. It will finish cooking in retained heat.
Note 1: This procedure is an almost foolproof method to prevent scorching the rice.
Note 2: With such a large quantity of rice, some grains will be perfect and some (in the center) will be mushy. It doesn't matter. What's important is that every grain is cooked through without being burnt.
6. Let the rice cool in the covered pot to room temperature overnight. If you're in a hurry, you could scoop out the hot rice and let it cool on trays, but this is painful, messy work. Take it easy. Wait.

Day 2
1. When you're ready to brew, sterilize your equipment, including the wort bag and the butcher's twine. Bleach is probably fine, but I worry about what it might do to the Nylon wort bag, so I use Star-san.
2. Chinese yeast balls (which are sold as “rice cake” at my local Asian market, and which are really a mixture of yeast, mold, and rice) come 3 to a packet, about 10 packets per $5 bag. They are as hard as rock and must be pulverized since the balls are too tough for a grinder to handle whole. To do this, I take 6 balls and place them in a heavy-duty plastic bag (which prevents the bits from flying everywhere). I then crack them carefully (not too hard) with a rubber mallet into smaller pieces. Then I place the smaller pieces in the grinder and grind them into powder. You could just keep pounding them with the mallet but this, too, is hard and messy work. Use the grinder. Most likely you will have to do this in two batches.
3. Optional: Mix the pulverized yeast with the glutinous rice flour. Probably any flour (rice or wheat) would do, but I've only used glutinous rice flour, so that's all I can vouch for. Supposedly, the flour “super-charges” the yeast. Seems to work.
4. Screw the spigot into the hole in the bucket. Place the wort bag in the bucket, stretching the opening around the mouth of the bucket.
5. A handful at a time, scoop the rice into the wort bag. I use rubber surgical gloves but I suspect you could do this without gloves if you washed your hands well. When you realize the Chinese have been brewing rice wine at home for 3,000 years, under less than antiseptic conditions, you have to assume the procedure is essentially idiot-proof.
6. After a couple inches of rice cover the bottom of the bag, sprinkle on a pinch of the yeast/flour powder. Then add another couple inches of rice and then more yeast. Repeat until all the rice and yeast are in the bag.
7. By now the weight of the rice will be pulling the mouth of the wort bag away from the rim of the bucket. Carefully lift the mouth of the bag away from the rim, making sure that no rice spills out. Then draw the mouth closed, and tie it tight with a couple loops of butcher's twine. This will prevent any rice from escaping later on, when you agitate the bucket.
8. Pour a half gallon of room-temperature distilled or boiled water over the rice in the wort bag.
9. Put the lid on the bucket. I pound it tight with the rubber mallet.
10. I use a three-piece airlock since it is easy to clean but I suppose a serpentine airlock would do just as well. I fill mine with vodka and stick it into the grommet in the lid.
11. Put the bucket in an out of the way spot. The temperature should range between 65º and 75º F, although mine has brewed fine at as low as 60º F and as high as 80º F. The rule of thumb seems to be: The higher the temperature, the faster the fermentation. Note: Lighting doesn't seem to matter since my bucket is fairly opaque but to be safe you might want to keep yours in the dark.

Days 3 - 5
1. Forget about your brew for 3 days. Do nothing. The fermentation will begin without help. After the 2nd day, or the 3rd, you should see bubbles forming in the airlock.

Days 6 - 8
1. Help the fermentation along by agitating the bucket once a day. This allows oxygen to get into the rice/yeast/water inside the wort bag (I think! Maybe it's to break up the starch trapping C02 among the rice grains. But gently! agitating the mixture seems integral to the process.) Be gentle because you don't want the rice to come out of the bag. You don't have to open the bucket, either. Leave the lid on. What I do is first remove the airlock so the vodka doesn't spill from it. Next I tilt the bucket back and forth a couple times until I can hear the liquid sloshing inside. Then I replace the airlock and leave the brew alone for another day. During this time the bubbling should increase to about 15 bubbles/minute.

Day 9
1. Open the spigot and pour yourself a taste. Since the rice was trapped inside the wort bag, which automatically filtered the liquid, your wine should be clear and just a little milky. It should also be sweet and have a low alcohol content, about that of weak beer. It will be so delicious that you will want to drink it all but restrain yourself. If you wish, decant a bottle and place it in the refrigerator to drink for dessert that night. Do not cap the bottle. This brew is still very active.

Days 10 - 14
1. It is no longer necessary to agitate the wine. Bubbling in the airlock should peak at about 30 bubbles/minute and then die back to 2 or 4 per minute.
2. Taste the wine. Every day it will get drier and stronger. When it's to your taste, simply decant into bottles, chill, drink, and enjoy.
Note: I cap my bottles and store them in the fridge until I drink them. However, since the wine is still live, to prevent any explosions due to C02 build-up, I poke a hole in each cap with the tap of an awl. Thus, the bottles will remain essentially free from contamination and yet still be inert and not explode.
Note: Do not open the bucket after you've drained off the liquid. There's still more wine trapped inside the wort bag. Let it sit for another couple days. Then try tapping it again. You should get several more bottles of wine. Finally, take the bag out of the bucket and squeeze it gently by hand to wring out the last of the liquid. Then dispose of the rice husks, maybe 10% by volume of the rice that you originally put into the bag.

Days 15 - 28 (Optional)
1. For really strong, really dry, and really clear wine, instead of decanting the liquid into bottles, decant it into another sterilized bucket with a spigot. Cover the new bucket, put an airlock in the lid, and wait 2 weeks. The resulting brew will be so strong you might have to dilute it with water. You shouldn't worry about capping it, either, since no sugar will be left to generate C02.
 
Good yield, I usually get 8 cups of wine from 8 cups of dry rice, though I haven't used sweet rice for a while and got more from it IIRC.
You must have squeezed the heck out of it too. All the bottles cloudy, or have you let them clear and decanted?

The bottles cleared nicely and pretty quick too. Today there's about an inch of sediment at the bottom of the bottles and the rest is slightly yellowish clear liquid. I didn't bother decanting yet, I'll probably just pour the clear wine into glasses and then wash the bottles out as I drink them.

I did pasteurize my bottles, but today I checked on them and one of the bottles gave a little hiss of CO2. Nothing to worry about though. I'll check on them daily to make sure.

Yes, I did squeeze the wine pretty good. :p
 
Re: "This allows oxygen to get into the rice/yeast/water".

As a general rule, encouraging oxygen to mix into the mash is a good way to make rice wine vinegar, but not rice wine.

In most cases this shouldn't be a problem for the short term fermentation as in your instructions, but why try to encourage the wine to turn to vinegar, unless that is the goal?
 
Dwhill- Thanks for your instructions. I've made rice wine a few times, next time I will try your method. Sounds far easier.
 
Re: "This allows oxygen to get into the rice/yeast/water".

As a general rule, encouraging oxygen to mix into the mash is a good way to make rice wine vinegar, but not rice wine.

In most cases this shouldn't be a problem for the short term fermentation as in your instructions, but why try to encourage the wine to turn to vinegar, unless that is the goal?

Hi, brooklynkayak --

Could be. I don't know. I've read several dozen recipes for rice wine, and most of them suggest agitating the brew at some point. I assumed it was to oxygenate the mixture, since we are wanting to promote aerobic action, after all. Could be for some other reason, maybe to break up the starch that will cement the rice grains together if it's not broken up. Whatever the reason, agitating the brew for at least a couple days seems integral to the process. At the very least, it doesn't seem to hurt.
Best,
David H.
PS
I've made changes to the original quote based on your question. Thanx. Dh
 
Dwhill- Thanks for your instructions. I've made rice wine a few times, next time I will try your method. Sounds far easier.

Hi, hope it works for you. I've done this several times now, and the yield and quality is consistent. The secret is the wort mesh bag. Get the largest size that you can find as this will make your job easier. It should be at least big enough to stretch around the opening of the bucket.

Best,

David H.
 
I sort of agitate as well, but i keep the lid closed and just rotate jars in a fast twist motion to allow trapped co2 to escape and make the slurry more uniform
 

Latest posts

Back
Top