• Please visit and share your knowledge at our sister communities:
  • If you have not, please join our official Homebrewing Facebook Group!

    Homebrewing Facebook Group

Love Controller wiring

Homebrew Talk

Help Support Homebrew Talk:

This site may earn a commission from merchant affiliate links, including eBay, Amazon, and others.

awarner322

Well-Known Member
Joined
Sep 13, 2011
Messages
311
Reaction score
44
Location
Kalamazoo
Hey guys---

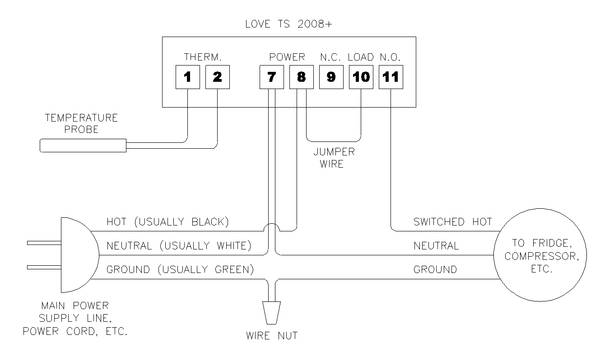
I know there are a million threads about love controller wiring...but I just wanted to make sure that I have the right idea here..and I have a few questions. I found this wiring diagram.

First question: A 3 wire extension cord....this is the standard 'heavy duty' cord you will find at any home depot...correct?

Second Question: I see that the wires going to 7 and 8 do not look to be cut..it looks like additional wire from the extension cord? If this is true...what type of wire would I need to get for that?

Thanks for the help!

Adam

LoveWiring2.jpg
 
I used cheap extension cords to assemble mine. Everything is housed in a plastic enclosure and my freezer only has a two wire plug so no need for grounds in my case.
 
Ah ic...has anyone mounted checking this out mounted their love controller right into the collar? I see that a lot of people do but am looking for some insight (or pictures) on how they wired it up and have the wires in their keezer
 
Ok...so I am not the best with electrical =/
I can open the extension cord and split the hot and run it to 10 and 11..I see that because it shows a break in the wire...but do I cut the neutral to run to 7 and 8 or do I need to add extra wire to that...confuses me

thanks for the help
 
I don't understand what you are saying there...basically I am asking how I wire up terminals 7 and 8...do i cut the wire from the extension cord like you do the hot for 10 and 11?
 
Yes. Cut the cord in half and connect the hot and neutral of the male end to terminals 7/8. Then install a jumper from 8 to 10 (maybe a short piece of the extension cord). Then connect the female end of the cord to 7 and 11.

If two wires will not fit under the terminals you can use wirenuts to make it work. The wirenut would basically go where the "connection dot" is in the diagram.

If you are using a grounded cord you can splice the ground with a wirenut also if necessary.

edit>> watch polarity on the plugs. The narrower blade is the hot.
 
So what you are suggesting is a little different then what the diagram is showing? A jumper is just an extra piece of wire that would bridge across the two terminals?

thanks
 
This may be a dumb question too...but what type of wire would I need to get..or what could I take wire from that would work for creating a 'jumper' and for the splice to 7?
 
Out of the cord I am using? Or a different one? Wouldn't I need a little more than 'a small piece' bc I have to run a splice to 7...and then create a jumper?
 
i have a love ts3 - slightly different wiring but same concept

this photo and diagram from nyakavt helped me with my wiring

The Northern Brewer Homebrew Forum • View topic - Yet another Love Controller Question

i used a wire nut to connect the two grounds together

the used some same guage white wire about 3" long and put one end in a wire nut with the white wire ends from each 1/2 of the ext cord and then used the end of that jumper to go inside the terminal

for the black wire i made 2 jumper wires like above and put them in the wire nut with the black wire from the wall plug side creating a Y of sorts - then used the ends of each jumper to go into the terminals

the terminals were so small i didn't want to try to stick more than 1 wire in them but others have done it with success
 
maybe this image will help...

that may be a way to visualize it, but that is the worst of all options in actually hooking it up. the "load", pin 10, should have the main wire running strait to it as that is what is going to be using most of the current. you dont want all of the current running across a jumper if it can be easily avioded. it would probably work, but not best practice at all.

just take that "hot" wire, and run it to terminal 10 instead of 8, and keep the jumper wire in the same place.


but what type of wire would I need to get..
any extension cord should work, but if you want to know specifically- you are looking for 14 to 16 gauge wire thickness. 12ga would be overkill but will also work. 18ga is going to be too small for the main load, but 18ga can be used for the jumper wire as its only handling a few milliamps.
 
Success!! Thanks for the help guys...works perfectly...turns on and off based on temp just like it should.

2011-12-15_19-01-38_446.jpg
 

Latest posts

Back
Top