• Please visit and share your knowledge at our sister communities:
  • If you have not, please join our official Homebrewing Facebook Group!

    Homebrewing Facebook Group

Limiting oxidation: effect of purging headspace O2 in a bottle conditioned IPA

Homebrew Talk

Help Support Homebrew Talk:

This site may earn a commission from merchant affiliate links, including eBay, Amazon, and others.
He also says that mash hopping can remove manganese. I haven't had oxidation issues lately but I've been mash hopping on my last 4-5 batches. I can't say if it's helping a lot since I didn't have major issues to begin with but I definitely haven't noticed any negative effects from it. This last hazy IPA I've been drinking which is about to kick in the keg maintained it's flavor from start to finish beautifully. Also, I believe malted oats contain alot less than flaked oats.

How much hops are you using for mash hopping? Any idea how many IBUs you would get out of, say, 1 oz of a 14% aa hop (with a 60 min boil following the mash)? Was planning on brewing an NEIPA this weekend with just 10 min, whirlpool and dry hop additions.
 
How much hops are you using for mash hopping? Any idea how many IBUs you would get out of, say, 1 oz of a 14% aa hop (with a 60 min boil following the mash)? Was planning on brewing an NEIPA this weekend with just 10 min, whirlpool and dry hop additions.
Supposedly you get no IBUs from mash hops. I guess similar to how FWH contributes far less bitterness than 60 min charge, mash hopping seems to contribute even less, or none. I use about 1/2 oz for my 4 gallon batches.
 
Supposedly you get no IBUs from mash hops. I guess similar to how FWH contributes far less bitterness than 60 min charge, mash hopping seems to contribute even less, or none. I use about 1/2 oz for my 4 gallon batches.
You do get IBUs from mash hopping but that's only because mashing is followed by boiling. Alpha-acids have limited solubility at wort PH but a measurable amount will still go into solution even during mashing. These alpha-acids will be carried over to the boil kettle and will start isomerizing as the wort is heated and finally reaches boil temperature. The yield will be quite low though compared to having the hops in the kettle the whole time the wort is being boiled as in that case extraction can continue throughout the boil.
 
You do get IBUs from mash hopping but that's only because mashing is followed by boiling. Alpha-acids have limited solubility at wort PH but a measurable amount will still go into solution even during mashing. These alpha-acids will be carried over to the boil kettle and will start isomerizing as the wort is heated and finally reaches boil temperature. The yield will be quite low though compared to having the hops in the kettle the whole time the wort is being boiled as in that case extraction can continue throughout the boil.
Whatever the IBU pickup is(if any) is pretty negligible in my experience. Even less than FWH. Pretty much not even worth trying to factor into IBU calculations
 
I guess similar to how FWH contributes far less bitterness than 60 min charge

FYI...Stan Hieronymus who knows a thing or two about hops and was one of the initial proponents of First Wort Hopping has come out to say that studies show that FWH does not really add anything special: https://appellationbeer.com/blog/we-might-have-been-wrong-about-first-wort-hopping/

I did not realize that the Aaron Justus paper was available publicly...but it turned up in a search. It says that Mash Hops have a 9.1% utilization and 60 min hops have a 44% utilization...so it seem that mash hopping adds about 20% of the IBUs as a 60 min addition: https://www.mbaa.com/membership/awards/Documents/WinningPaper_TQ-55-3-1205-01.pdf

Hmmm...not sure if I want to change up my plans for the NEIPA I hope to brew this weekend.
 
It says that Mash Hops have a 9.1% utilization and 60 min hops have a 44% utilization...
We can only dream of getting 44% utilization. You can get that using CO2 extract in a commercial system, our utilization using pellets is probably around 30% to 35% at best. :(
 
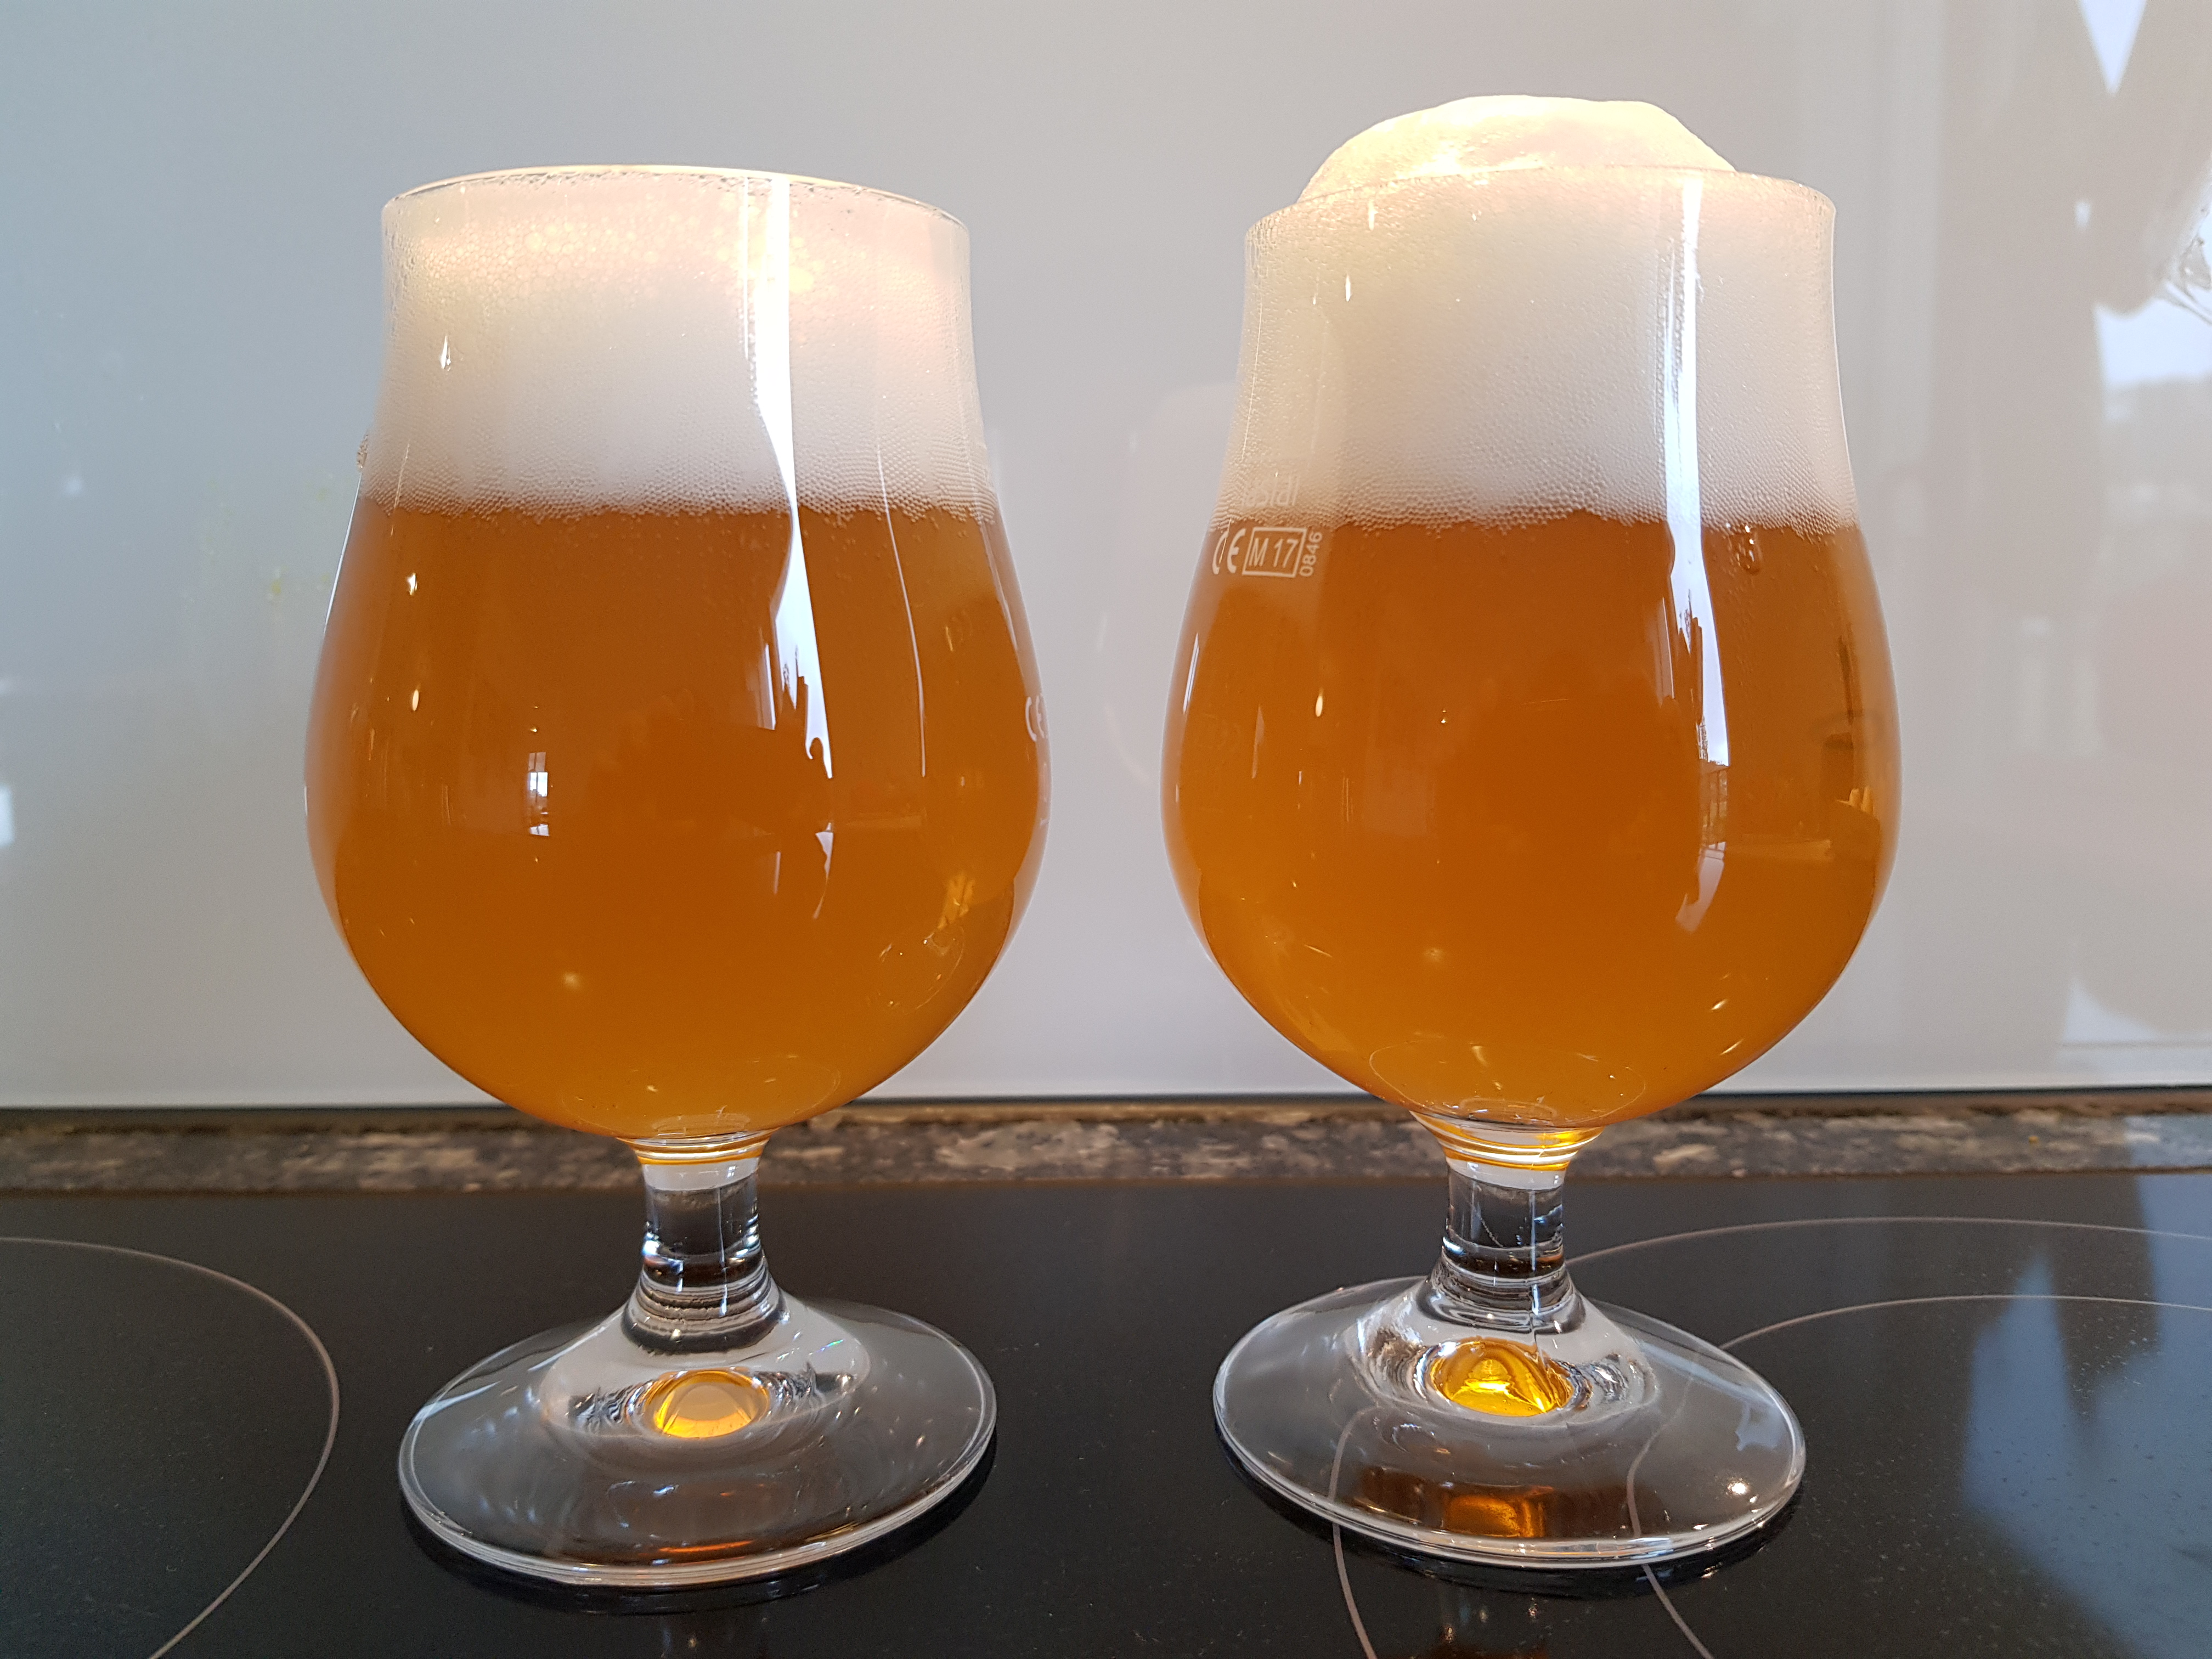
Fourth (and last) side by side comparison: left the usual headspace purged variant, while on the right is the one with very high bottle full, leaving almost no headspace (I had just about 1 cm of headspace on this one).
Both beers are identical in all respects.
So it seems the very high fill strategy does work, but it might take some practice to nail the best fill level consistently.

I want to repeat all these four variants in a much more heavily hopped beer this spring, and see what that one will give...
Cheers!

20200210_095928.jpg
 
I finally did bottle conditioned NEIPA head space oxygen effects experiment as I promised a while ago.

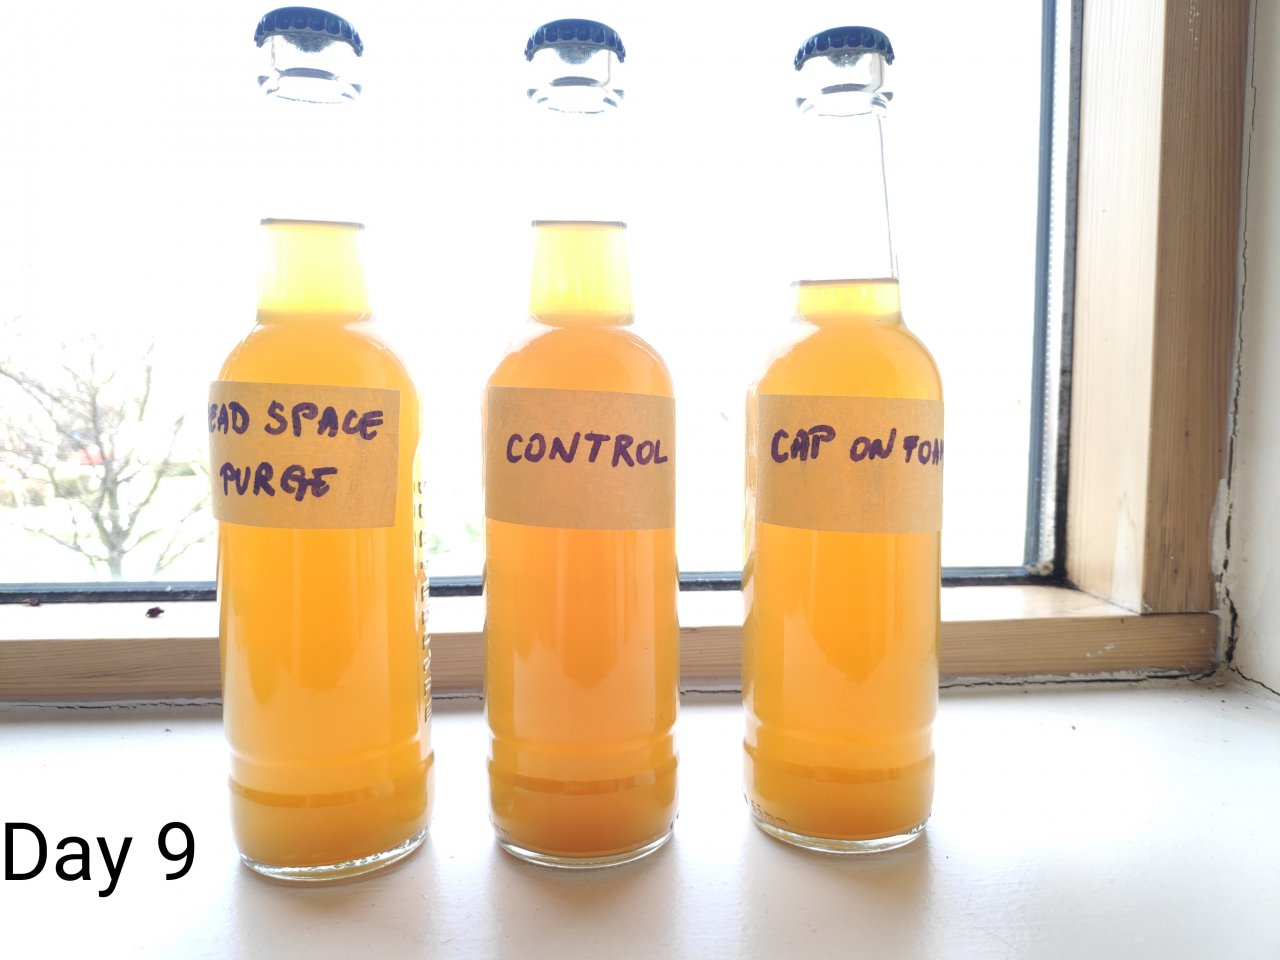
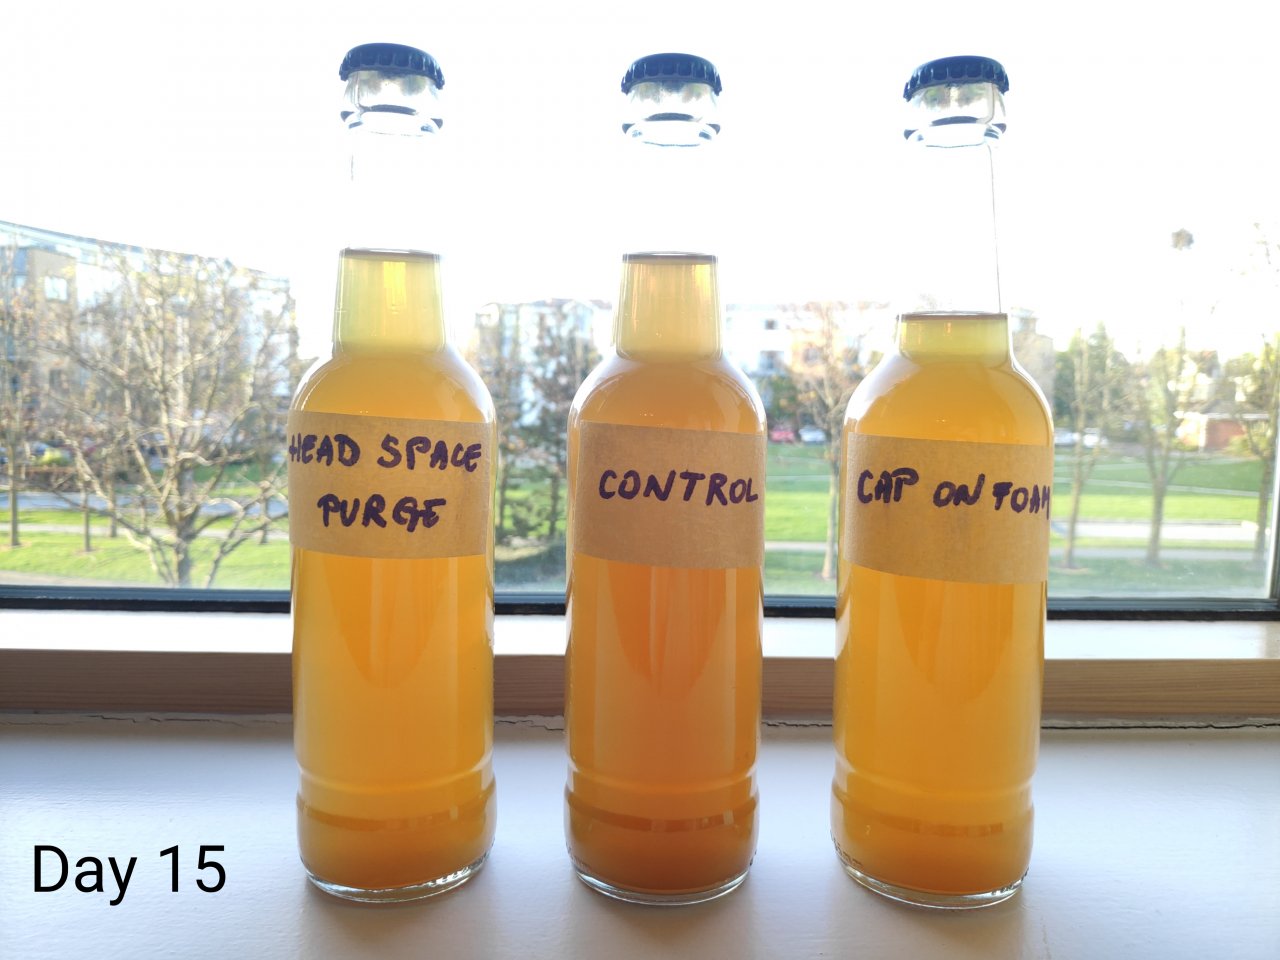
For this experiment I've made highly hopped (10g/L dry hopped) NEIPA (check the recipe here) and filled in three clear glass bottles so I can follow the color change without the need to open the beer.
First "control" bottle was just normally filled with bottle filler and caped.
Second bottle was the same as first one but head space was "purged" with wine preserve gas which is mix of mainly CO2 and Argon.
Third bottle was filled up the same as the first one but was "capped on foam" (wine preserve gas nozzle was submerged in beer and sprayed until foam reached the rim of the bottle and then capped)

I had different plans (way better) to document changes in beer color but, unfortunately, ended up taking pictures with my phone on the window.
For this reason it's almost impossible to make comparisons between individual bottles through time. For example it would be hard to compare "Head space purge" bottle on day 5 and day 11 because light conditions were different. But it is possible to compare differences between three bottles which is the main reason for this experiment.
I have not included day 1 pic for the reasons I can't explain. Also day 5 pic is awful and its there only tho show there were no differences between three bottles on that day.

Please see pics below and comment. I am happy to say that head space purge and cap on foam is working form me as I can't see any change in color between day 1 and day 19 and I will continue to bottle condition NEIPAs (by the way I love the recipe for this one).
 
@Dusan Kovacevic, Awesome! Thanks for doing this! Great you did it with transparent bottles to see color developmentsover time! It basically confirms what I thought to observe with my brown bottles, by inspecting them periodically against a light source.
Under bottle conditioning, it seems that it takes a few weeks for the oxidation signs to become apparent. I guess until the yeast is active chewing on priming sugar, it will also do its best to continue scavenging O2. Once all sugar is gone, it will go dormant and the O2 still present in the headspace will start to oxidize the beer.

From what I read it seems that NEIPAs with no active yeast in them oxidize much quicker when exposed to O2 ( in a matter of a few days or even hours).

Anyway glad it seems to work with you as well! Please do also post about aroma/flavour differences (if any) once you crack those bottles open!
 
Last edited:
@Dusan Kovacevic, Awesome! Thanks for doing this! Great you did it with transparent bottles to see color developmentsover time! It basically confirms what I thought to observe with my brown bottles, by inspecting them periodically against a light source.
Under bottle conditioning, it seems that it takes a few weeks for the oxidation signs to become apparent. I guess until the yeast is active chewing on priming sugar, it will also do its best to continue scavenging O2. Once all sugar is gone, it will go dormant and the O2 still present in the headspace will start to oxidize the beer.

From what I read it seems that NEIPAs with no active yeast in them oxidize much quicker when exposed to O2 ( in a matter of a few days or even hours).

Anyway glad it seems to work with you as well! Please do also post about aroma/flavour differences (if any) once you crack those bottles open!
Yeah, I think "purging" really works well.. Flling up the bottle to the top would do similar thing i think.
I'm going to leave that beer bottled to see how long will it take for purged bottle to start oxidising and will report back.
 
Yeah, I think "purging" really works well.. Flling up the bottle to the top would do similar thing i think.
I'm going to leave that beer bottled to see how long will it take for purged bottle to start oxidising and will report back.
If you have zero head space in the bottle, warming the bottle could cause it to break due to the expansion of the beer. This bottle failure mode is not quite as explosive as a regular bottle bomb.

Brew on :mug:
 
If you have zero head space in the bottle, warming the bottle could cause it to break due to the expansion of the beer. This bottle failure mode is not quite as explosive as a regular bottle bomb.

Brew on :mug:
Yeah, I knew it couldnt be that easy. Anyways I'm very pleased with purging so no reason to risk it with filling up for me. Especialy if this holds up for another few weeks.
 
I've been experimenting with ways to reduce oxidation in IPA packaging for a few years and can contribute a few notes:

-Purging headspace makes an enormous difference (I'll post pics later when I get them off my phone).
-Purging bottles may or may not make much of a difference in a bottle conditioned beer. Would likely make a bigger difference if bottling from a keg. Otherwise, purging headspace is much more important (but do both if you can, because why not)
-Ascorbic acid and sulfite addidions at bottling seem to do a good job. I can't confirm 100 percent because my practices were pretty tuned in by the time I started this, but for the last fills from my bucket, which are usually poured into bottles with a funnel and very oxidized even with purging, the difference has been very large.
-If you get your practices locked in, bottle conditioned hoppy beers will tend to have a better shelf life than hoppy beers that have been kegged and then bottled.

BIGGEST BOTTLING HACK

-If you don't have a beergun and CO2, the best alternative to limit oxidation is to bottle with almost no headspace. I have done this when I ran out of CO2 with a bottle-carbed NEIPA, and while I'd never do it on purpose, that batch did not see the expected color change and aroma degradation. If bottling cold, be careful to account for liquid expansion otherwise you will have bottles breaking when it warms to conditioning temps.
 
How about adding sanitized and food safe bubble wraps or similar little things containing squeezable air pockets to the bottle?

That way, the bottles could be filled to the rim without having to fear breaking bottles, while still having sufficient space for expansion of the liquid and co2.

Bit of a hustle maybe, but maybe it could work. And you wouldn't need to buy the gas.
 
I've been experimenting with ways to reduce oxidation in IPA packaging for a few years and can contribute a few notes:

-Purging headspace makes an enormous difference (I'll post pics later when I get them off my phone).
-Purging bottles may or may not make much of a difference in a bottle conditioned beer. Would likely make a bigger difference if bottling from a keg. Otherwise, purging headspace is much more important (but do both if you can, because why not)
-Ascorbic acid and sulfite addidions at bottling seem to do a good job. I can't confirm 100 percent because my practices were pretty tuned in by the time I started this, but for the last fills from my bucket, which are usually poured into bottles with a funnel and very oxidized even with purging, the difference has been very large.
-If you get your practices locked in, bottle conditioned hoppy beers will tend to have a better shelf life than hoppy beers that have been kegged and then bottled.

BIGGEST BOTTLING HACK

-If you don't have a beergun and CO2, the best alternative to limit oxidation is to bottle with almost no headspace. I have done this when I ran out of CO2 with a bottle-carbed NEIPA, and while I'd never do it on purpose, that batch did not see the expected color change and aroma degradation. If bottling cold, be careful to account for liquid expansion otherwise you will have bottles breaking when it warms to conditioning temps.
Good tip there for the folks, like myself, who are bottling cold, right after the cold crash, and decide to leave only small head space.
 
How about adding sanitized and food safe bubble wraps or similar little things containing squeezable air pockets to the bottle?

That way, the bottles could be filled to the rim without having to fear breaking bottles, while still having sufficient space for expansion of the liquid and co2.

Bit of a hustle maybe, but maybe it could work. And you wouldn't need to buy the gas.
That's an interesting idea but I have a feeling it would be pain in the ass to source food safe material. And how about pouring the beer? But if you find something please do test and share your observations here.
 
That's an interesting idea but I have a feeling it would be pain in the ass to source food safe material. And how about pouring the beer? But if you find something please do test and share your observations here.
The bubble wrap would swim and could be removed from the glass easily... Ok, beer nerd style, but should do it :D

(... I'd buy the gas....)
 
I believe enough of us shared their experiences here that we can conclude that purging head space is the way to go when bottling hoppy beer (I am going to be doing this with all my beers, hoppy or not)
Exposure to O2 doing transfer seem to have less of an impact as time beer is exposed to O2 seems to be the biggest factor here(that is if we are careful when transferring, no splashing).
There is some disagreement on how big of a role yeast have in scavenging O2 but that's not the factor we can control anyways so I believe it's better to assume that yeast have minimal impact and do everything else right and if yeast do have a significant impact even better.

It would be great if someone else could summaries the "chemical" methods of adding sulfates and acids and whatnot as I don't feel comfortable doing that.

Yeah, I was thinking of starting a thread to see if anyone has hard data on exactly how much o2 yeast scavenges. It's obviously more than zero, but definitely not as much as the old thinking on it. It sure does seem to help shelf life to have some yeast activity once the bottle is sealed, though, so that's great
 
Yeah, I was thinking of starting a thread to see if anyone has hard data on exactly how much o2 yeast scavenges. It's obviously more than zero, but definitely not as much as the old thinking on it. It sure does seem to help shelf life to have some yeast activity once the bottle is sealed, though, so that's great
I think it uses all the available o2 within the liquid, until there is no food left.

The problem, from my point of view, is that the oxygen from the air in the bottle does not get into solution fast enough. There seems to be still plenty of oxygen left in the headspace in the bottle, after the yeast ran out of food and it looks like this then slowly gets dissolved in the beer, after the yeast ran out of food, and then slowly oxidises it.

O2 diffusion into liquid is nearly instant, and it can do 1-2ppm/hr easily. So if you have yeast that is dormant, the oxidation happens before it can absorb it. This is exactly why purging the headspace is better.
In a perfect scenario, you would prime in the fermenter, allow activity to pick back up. Then bottle, purge headspace, and cap.
Platinum standard:
Then take those bottles and place them in an empty keg, and purge that.
Why an empty keg? Because the caps leak, and due to partial pressure laws, you will have a gas exchange, thus oxygen entering the bottle though that. If in a purged keg you will be echaning with purge gas instead of o2. However the keg will also be doing diffusion though its gaskets, so ther eis that to deal with as well. But it's much slower than nothing.
 
-If you don't have a beergun and CO2, the best alternative to limit oxidation is to bottle with almost no headspace.

Do you have any information about how much headspace is needed for safety? It seems like any reduction in headspace would increase the pressure (assuming no change in priming sugar) since there is less volume for the gas. I've tried reducing the headspace to about 3/4" and haven't noticed higher pressure - but that's a pretty crude way to judge pressure.
 
In a perfect scenario, you would prime in the fermenter, allow activity to pick back up. Then bottle, purge headspace, and cap.

I do not prime in the fermenter, but I usually add a little bit of sugar solution at dry-hopping time. Then dry hop for 4-5 days at 60ish in my basement. No cold crash, and I'll move the fermenters up in my living room the evening before bottling. That way the beer will be typically between 65-70 F at bottling time. So I believe (o at least, I hope) to have enough active yeast in there during the transferring and bottling process.

I have been really happy with my bottle conditioned hoppy beers since following this process, plus the headspace purging step. But it is still difficult for me to know how much all of this really contributed to overall beer quality...because I have been tweaking other process steps at the same time, like water chemistry, hopping rates,... .


Platinum standard:
Then take those bottles and place them in an empty keg, and purge that.
Why an empty keg? Because the caps leak, and due to partial pressure laws, you will have a gas exchange, thus oxygen entering the bottle though that. If in a purged keg you will be echaning with purge gas instead of o2. However the keg will also be doing diffusion though its gaskets, so ther eis that to deal with as well. But it's much slower than nothing.

Are you serious about this?...Or do you know people actually doing this? This seems to me the last frontier of being anal ;-)
 
Do you have any information about how much headspace is needed for safety? It seems like any reduction in headspace would increase the pressure (assuming no change in priming sugar) since there is less volume for the gas. I've tried reducing the headspace to about 3/4" and haven't noticed higher pressure - but that's a pretty crude way to judge pressure.
Changing headspace won't change pressure in the headspace much, unless you increase the headspace by more than about 2X. With less headspace, less CO2 will come out of the beer during carbonation, keeping the headspace pressure in a reasonable range. This can all be calculated. If anyone is really interested, I can do a couple of sample calcs for the audience, but be careful what you wish for - it will get very mathy and geeky.

Brew on :mug:
 
I've been bottling my heavily hopped NEIPA's for years with no color degradation, even months after. The tips here are pretty spot on.

- Bottle directly from fermenter with a bottling wand
- Batch prime in fermenter, wait 15-30 minutes for yeast to wake up before bottling
- Purge bottle before adding beer, and after if you have headspace.

One tip I'll add that hasn't been mentioned is to use plastic bottles if you can (preferably oxygen barrier bottles). The great thing about plastic bottles is you can squeeze them and cap with the beer having virtually no headspace. And the plastic can hold so much pressure you don't need to worry about the bottle breaking.
Plastic bottles, that have been squeezed, will create headspace when CO2 generation starts.

Brew on :mug:
 
Do you have any information about how much headspace is needed for safety? It seems like any reduction in headspace would increase the pressure (assuming no change in priming sugar) since there is less volume for the gas. I've tried reducing the headspace to about 3/4" and haven't noticed higher pressure - but that's a pretty crude way to judge pressure.

I do 1/4" or slightly less all the time and have had zero issues.
 
Are you serious about this?...Or do you know people actually doing this? This seems to me the last frontier of being anal ;-)

Yes he is serious and there are people doing this especially if your going to send beers to several competitions and want it the same over time.
 
Back
Top