• Please visit and share your knowledge at our sister communities:
  • If you have not, please join our official Homebrewing Facebook Group!

    Homebrewing Facebook Group

Limiting oxidation: effect of purging headspace O2 in a bottle conditioned IPA

Homebrew Talk

Help Support Homebrew Talk:

This site may earn a commission from merchant affiliate links, including eBay, Amazon, and others.
Yeah, although I find it hard to believe I would use less gas compared to my current practice. I really just try to flush the headspace as briefly as possible.

Now this idea brings something back to my mind: there was one guy in another forum who advocated the practice of filling directly from the spigot, without a bottling wand. This would make the beer foam up in the bottle (even though not carbonated), and he would then be able to cap on foam.
Obviously this guy had a hard time on that thread, because this practice goes against all conventional wisdom about trying to reduce air contact as much as possible.
But maybe there is something to it... if it works, that would be a hell of a cheap and straightforward method. One more thing to try!
From my few small experiments so-far I gained the impression that it is not the brief air contact during transfers that oxidizes the beer most, but much more the prolonged contact with even the tiny amount of air in a bottle headspace. As always I'm talking about bottle conditioned beer here, and working with active yeast as your friend. That might be completely different for transfers implying cold and finished beer.
I'm not saying I know anything but will offer my opinion on this anyways :) . I feel that bottling straight from the spigot (especially if you cold crash and don't bring the temperature up) would introduce some oxygen to the beer. I feel that splashing of beer against the bottom of the bottle would cause the oxygen to dissolve in beer quicker. On the other hand, filling the bottle(or bottling bucket, or secondary) without splashing would mean that O2 would need to get into the beer from the atmosphere, under atmospheric pressure, and I recon that is a very slow process, certainly not one that is measured in seconds or minutes (probably not even hours).
So I agree with your statement that the main culprit of beer oxidation would be prolonged(days, weeks, months) contact with O2 in head space couples with above atmospherics pressure in the bottle. Brief contact with O2 from atmosphere is surely negligible, unfortunately I don't feel that splashing helps but I'm not sure how much it would contribute to oxidation.
Again I'm not claiming any expertise on this and would love if someone would correct my assumptions with evidence or scientific data(hopefully the kind of data that my simple brain can understand)
 
... as a further "data point": I took on the habit of always labeling the last 5-6 bottles I fill. Like 6-5-4-3-2-1. Mostly to avoid giving them away as I feared they would be somehow oxidized. But it turned out to be an interesting small experiment in its own right.
For my last two IPA batches I did not notice any signs of oxidation from bottles 5/6 down to 2. Maybe only the very last bottle did show some darker hue and possibly also the taste was not quite up there with the rest (did not do side-by-dide comparisons hiere). But for me, the others were completely OK ant not a bit different than the ones that were filled before.
I should add that in my last IPA batch I had dry-hop matter drift over to my bottling bucket, and filling those last bottles was a pain, with the wand clogging repeatedly. I had air bubbling through the wand, had to move several times the bottling bucket back and forth, with very little beer left in it, and had to finish filling without the wand... so everything not really optimal from a LODO perspective. Still that did not seem to negatively impact those bottles.
Thank you for this. It only further proves that the biggest concern is head space oxygen, which makes sense really as it is the oxygen beer is the most in contact with. I'm thinking now....if brief contact with oxygen from the atmosphere would really oxidase beer imagine what would prolonged contact with head space oxygen under pressure would do.
 
. I feel that bottling straight from the spigot (especially if you cold crash and don't bring the temperature up) would introduce some oxygen to the beer.

Yes, I should also add that I do not cold crash. Mainly because I do not have the possibility to do so. But I am also more and more convinced that it would not be a good idea to cold crash combined with my current very basic bottling practice.
Of course, once you can cold-crash under postive CO2 pressure and then perform closed transfers with CO2, things may start looking completely different.

I usually dry hop in my basement at around 15 to 17 °C, then move the fermenters up in the living room the night before bottling.
So when I bottle the beer will be at around 20 °C usually.

That being said, I'm definitely not giving up on the bottling wand yet. I also become heart ache when I see beer splashing... but I would like to further explore the idea of trying to cap on foam.
 
Awesome thread!! thumbs up! Has anyone used any "additions" to combat the oxidation? Example vitamin C?
 
Awesome thread!! thumbs up! Has anyone used any "additions" to combat the oxidation? Example vitamin C?
That would be beyond my knowledge level.
If you have some links please do share.
I have ordered can of "Private preserve" yesterday. It's, apparently, a mix of argon nitrogen and CO2 (I tough it was argon only) so we will see how that works for me soon. I hope I get similar results to Taket_al_Tauro.
 
Yeah, although I find it hard to believe I would use less gas compared to my current practice. I really just try to flush the headspace as briefly as possible.

Now this idea brings something back to my mind: there was one guy in another forum who advocated the practice of filling directly from the spigot, without a bottling wand. This would make the beer foam up in the bottle (even though not carbonated), and he would then be able to cap on foam.
Obviously this guy had a hard time on that thread, because this practice goes against all conventional wisdom about trying to reduce air contact as much as possible.
But maybe there is something to it... if it works, that would be a hell of a cheap and straightforward method. One more thing to try!
From my few small experiments so-far I gained the impression that it is not the brief air contact during transfers that oxidizes the beer most, but much more the prolonged contact with even the tiny amount of air in a bottle headspace. As always I'm talking about bottle conditioned beer here, and working with active yeast as your friend. That might be completely different for transfers implying cold and finished beer.
Although not being that guy, this is actually what I did. But I guess the foam is, at least partially, consisting of normal air, so it might not be the best idea.

However, it would be possible to fill the bottle up until the end, meaning 100% full. If you could check if this version would also do the trick, this would be awesome.
 
Although not being that guy, this is actually what I did. But I guess the foam is, at least partially, consisting of normal air, so it might not be the best idea.

I'm not sure I understood what you mean here: Did you actually try this yourself already?

However, it would be possible to fill the bottle up until the end, meaning 100% full. If you could check if this version would also do the trick, this would be awesome.

100% full is not going to work properly IME. I tried this already. But I found out the liquid inside would expand a bit during the bottle conditioning process. I don't know the science behind this. But I could imagine that the products of fermentation (CO2 and ethanol) require somehow more space than the source compound (sugar). I can rule out thermal expansion, since the bottles did not warm up any more than the temperature they were subjected to during the first days of conditioning. On the opposite, they were stored in a cooler basement after one week of carbonating at room temps.
Anyhow I had some beer pushing through the gasket and out of the bottle. And I did not even fill that bottle 100%, but left like a 0.5 cm headspace.
The optimum would probably be to fill as high as possible, but still not too high to avoid such problems at best, and bottle bombs at worst.
That probably still requires some more experience in order to nail it correctly. As said before, I tried a higher fill on another bottle, but that wasn't high enough and I still got some darkening (oxidation).
 
I'm not sure I understood what you mean here: Did you actually try this yourself already?


100% full is not going to work properly IME. I tried this already. But I found out the liquid inside would expand a bit during the bottle conditioning process. I don't know the science behind this. But I could imagine that the products of fermentation (CO2 and ethanol) require somehow more space than the source compound (sugar). I can rule out thermal expansion, since the bottles did not warm up any more than the temperature they were subjected to during the first days of conditioning. On the opposite, they were stored in a cooler basement after one week of carbonating at room temps.
Anyhow I had some beer pushing through the gasket and out of the bottle. And I did not even fill that bottle 100%, but left like a 0.5 cm headspace.
The optimum would probably be to fill as high as possible, but still not too high to avoid such problems at best, and bottle bombs at worst.
That probably still requires some more experience in order to nail it correctly. As said before, I tried a higher fill on another bottle, but that wasn't high enough and I still got some darkening (oxidation).

I was basically just bottling directly from the spigot, but did not do any other testings. It worked better than expected but still wasn't the best for hoppy beers, indicating that the headspace is the real culprit, not the oxygen exposure during the bottling process... But we knew that already.
 
I’ll be bottling a batch on Friday and I am going to test the ideas that came up on this thread during the last days. I actually did not plan any specific “experiments” on this one, because it is not what I would consider a very hop forward beer by modern standards. It’s kind of a hybrid between a Belgian beer and an APA with “only” about 1.6 oz of dry hops (scaled to a 5 gal batch).

Still, since this thread has been revived (thank you guys), I’m eager to test new ideas, while preparing for my final boss (the NEIPA planned for next spring).

I plan on testing my “by now S.O.P” of purging the headspace against four other variants:

- Normal fill, with no headspace purge (control)

- No headspace purge, but very high bottle fill. This should leave very little to almost no headspace in the bottle after conditioning.

- Try to blow the gas under the beer surface to make it bubble and then cap on foam.

- The easiest and more reckless variant: fill without the wand, let the beer splash freely in the bottle. This should hopefully create some foam to cap upon.

This should make 8 bottles and 4 side-by-side comparisons. I would report back during January/February (should give them enough time to oxidise properly ;-)).
Awesome, thanks!!
 
Awesome thread!! thumbs up! Has anyone used any "additions" to combat the oxidation? Example vitamin C?
My understanding is that ascorbic acid should not be used alone, but only in conjunction with sulfite, because there are free radicals created by the reaction with ascorbic acid that need to be neutralized.

There are people out there adding sulfite to bottle conditioned beer that claim success. I'm a little hesitant to try it for fear of H2S.
filling directly from the spigot, without a bottling wand [...] cap on foam.
That might be crazy enough to work. Although I have a feeling that the foam will be mostly air bubbles and therefore contain oxygen.

Pour some Star San into a bottle and you'll see what I mean; it foams quite a bit.
I could imagine that the products of fermentation (CO2 and ethanol) require somehow more space than the source compound (sugar).
You know this already...
You measure fluid density before and after fermentation, don't you? ;)

Lots of interesting ideas in this thread.
FWIW the Low Oxygen crew suggests bottling while the yeast is still active because once they go dormant their ability to remove DO is greatly diminished. They also suggest minimizing bottle headspace and using larger bottles to further reduce the amount of oxygen relative to the amount of beer.

Cheers
 
My understanding is that ascorbic acid should not be used alone, but only in conjunction with sulfite, because there are free radicals created by the reaction with ascorbic acid that need to be neutralized.

There are people out there adding sulfite to bottle conditioned beer that claim success. I'm a little hesitant to try it for fear of H2S.

That might be crazy enough to work. Although I have a feeling that the foam will be mostly air bubbles and therefore contain oxygen.

Pour some Star San into a bottle and you'll see what I mean; it foams quite a bit.

You know this already...
You measure fluid density before and after fermentation, don't you? ;)

Lots of interesting ideas in this thread.
FWIW the Low Oxygen crew suggests bottling while the yeast is still active because once they go dormant their ability to remove DO is greatly diminished. They also suggest minimizing bottle headspace and using larger bottles to further reduce the amount of oxygen relative to the amount of beer.

Cheers
Priming sugar wakes them up anyway!
 
That would be beyond my knowledge level.
If you have some links please do share.
I have ordered can of "Private preserve" yesterday. It's, apparently, a mix of argon nitrogen and CO2 (I tough it was argon only) so we will see how that works for me soon. I hope I get similar results to Taket_al_Tauro.

Yea so there are several compounds to fight the oxidation. Especially wine makers are using them.

Campden is one. There is one experimentation done by brulosophy.
http://brulosophy.com/2019/02/11/po...at-packaging-has-on-beer-exbeeriment-results/

Vitamin C aka absorbic acid. The outstanding chemical property of ascorbic acid (vitamin C) is that it is a reducing agent. The suggestion is obvious that its physiological function may be associated with this property, and, if it is oxidized reversibly, with its behavior in an oxidation- reduction system.
https://www.homebrewtalk.com/forum/threads/ascorbic-acid-super-oxidizer.655210/

I have also read that Vitamin C and Campden would work great together.


There are also oxygen scavenger bottle caps that eat the oxygen from the bottle.

Next time I will make NEIPA, I will most probably document this and do experiment.

x amount of bottles where I will top the beer to the very top and cap.
x amount of bottles where I will top normally and use these special caps that should suck the extra oxygen out.
x amount of bottles where I will add campden and vitamin c
x amount of bottles where I will purge the headspace with CO2
x amount of bottles where I will add campden and vitamin c, purget the headspace with co2 and use these special caps.

EDIT: I heard that some people also use this kind of method where they rack the beer to the bottles, sanitate the caps and only add the caps on top of the bottle. Then leave them be for couple hours and once they burp (because of the yeast starting to eat the priming sugar) then close the caps? Does this make any sense?
 
Last edited:
Priming sugar wakes them up anyway!
That's true of course, but the DO uptake is delayed and inhibited if they have to "wake up", resulting in noticably more oxidation damage.

@Hemavol
You shouldn't fill all the way to the top. The beer needs room to expand.

Most bottle caps have an oxygen-absorbing feature. Everyone should already be using them IMO.
 
That might be crazy enough to work. Although I have a feeling that the foam will be mostly air bubbles and therefore contain oxygen.

It might well be. If that's the case, I will know immediately after this first test.

You know this already...
You measure fluid density before and after fermentation, don't you?

Oh man, YES, you're a genius :)

FWIW the Low Oxygen crew suggests bottling while the yeast is still active because once they go dormant their ability to remove DO is greatly diminished.

That has become my credo as well, although I by far do not apply the advanced techniques the LODO Crew are using.
But that is for sure the main reason I'm not getting into cold crashing until I have the equipement for closed systems.
I'm also adding a little bit of sugar together with the dry hops to help the yeasties wake up again and hopefully help scavenging the O2 that got in with the dry hops. The added benefit might be that the yeasts are active again and ready to go by the time I bottle a few days later. Of course, this might also well be overkill...no way of testing that...easily
 
I’ll be bottling a batch on Friday and I am going to test the ideas that came up on this thread during the last days. I actually did not plan any specific “experiments” on this one, because it is not what I would consider a very hop forward beer by modern standards. It’s kind of a hybrid between a Belgian beer and an APA with “only” about 1.6 oz of dry hops (scaled to a 5 gal batch).

Still, since this thread has been revived (thank you guys), I’m eager to test new ideas, while preparing for my final boss (the NEIPA planned for next spring).

I plan on testing my “by now S.O.P” of purging the headspace against four other variants:

- Normal fill, with no headspace purge (control)

- No headspace purge, but very high bottle fill. This should leave very little to almost no headspace in the bottle after conditioning.

- Try to blow the gas under the beer surface to make it bubble and then cap on foam.

- The easiest and more reckless variant: fill without the wand, let the beer splash freely in the bottle. This should hopefully create some foam to cap upon.

This should make 8 bottles and 4 side-by-side comparisons. I would report back during January/February (should give them enough time to oxidise properly ;-)).


Over the years I've used each of the methods you outline with varying degrees of success. None proved completely satisfactory, which led me to kegging nearly 15 years ago. However, I do still need to bottle beer for competitions or to share when a growler just won't be sufficient or remain carbonated long enough.

I've got a really old counter-pressure bottler that proved to be cumbersome and wasteful, and eventually bought a Blichmann Beer Gun which was less wasteful and messy but was insufficient with regard to purging and long-term stability.

I finally went back to counter-pressure filling (purge with CO2 before starting the fill), filling slightly above the normal height of the ulege at the top of the bottle, then shooting a quick burst of CO2 before withdrawing the counter-pressure filler. This ensures that I am totally "capping on the foam" which contains very little air. The downside is the mess it makes, and must be done in a deep sink so that the freshly capped bottles can be rinsed and the dregs washed down the drain. It does, however, expel as much O2 as is reasonably possible, especially when capped with an oxygen barrier bottle cap.

If you REALLY want to get anal about preservation, there's an article on the Low Oxygen Brewing website where a brewer actually stored his capped beer bottles in an empty keg, then capped the keg and and purged with CO2. That way any ingress of oxygen would be impossible across the beer cap barrier since the O2 in the keg had virtually been eliminated. A bit more than I'm interested in doing, but apparently it worked.

Brooo Brother
 
There are people out there adding sulfite to bottle conditioned beer that claim success. I'm a little hesitant to try it for fear of H2S.

I agree, but there might be a work-around. When I bottle wine, the last step for me before putting the empty bottle in the vacuum filling device is to rinse the bottle with a weak solution of NaMeta (0.15gr/2 liter water) and then invert it to drip-drain on a bottle tree for a few minutes. Most of the Meta solution is gone but there is still a faint aroma of sulfite.

As a side note, adding sulfites is very common in the production of all wines to preserve color and flavor stability, I presume by sequestering O2. Now granted, unlike bottle-conditioned beer, the newly filled wine sits for about 8 weeks to overcome "bottle shock". I think "bottle shock" is an inaccurate term for the dissipation of NaMeta (or KMeta) in the wine.

If I remember my undergrad chemistry from 50 years ago the sodium sulfite breaks down into free sodium and sulfate as the dissolved O2 combines with the sulfite, but I'm possibly off in my thinking. Any residual H2S, if present, quickly dissipates after the wine is opened and "breathes" or is aerated mechanically in the glass.

Would this process also work with bottled beer in scavenging O2, or is the chemical process somehow different in beer than in wine? Of course there would be a very slight increase in the amount of sodium (or potassium) and sulfate, but it would be so far below the threshold of human detection as to be a non-issue, I'd think.

Brooo Brother
 
I use sulfite in beer (hot side), cider, wine, and mead.

In aqueous solution, the K/Na metabisulfite rapidly dissociates into the K/Na ion and two bisulfite ions.
You're correct the bisulfite ions react with oxygen to form sulfate ions. The same process occurs in beer to remove dissolved oxygen.

This happens pretty rapidly, so I doubt that rinsing the bottles with sulfite adds an appreciable amount of sulfite to whatever you put in the bottles. Also FYI, the sulfite solution needs to be acidic (pH < 4) to be antimicrobial.

The problem is that yeast are very prone to forming H2S in the presence of sulfite, especially beer yeast. I find H2S to be very off-putting so I don't want it in my beer at all. Unfortunately I'm a super taster and so I'm particularly sensitive to it.
I don't want to have to let my beer "breathe" or aerate it when I pour it.

Good point on the low pH<4 factor necessary for antimicrobial protection, though I use it mostly as an oxygen scavenger and count on the SaniClean soak to sanitize. On another point, since the yeast presumably have fallen out with a cold crash wouldn't there be less likelihood of H2S forming in the presence of sulfite at bottling? Also I never, ever advocate aerating one's beer. Beer 'breathe' = BAD. Beer breath, acceptable, within limits.

I sympathize with your sensitivity to H2S. My wife and daughter are similarly blessed (or cursed) with being super tasters. I defer to them on all matters of seasoning.

Brooo Brother
 
I bottle carbonate, so I'd have active yeast.
Maybe it would be fine; I don't know. I just don't expect sulfite to work well so I'm exploring other methods first.
 
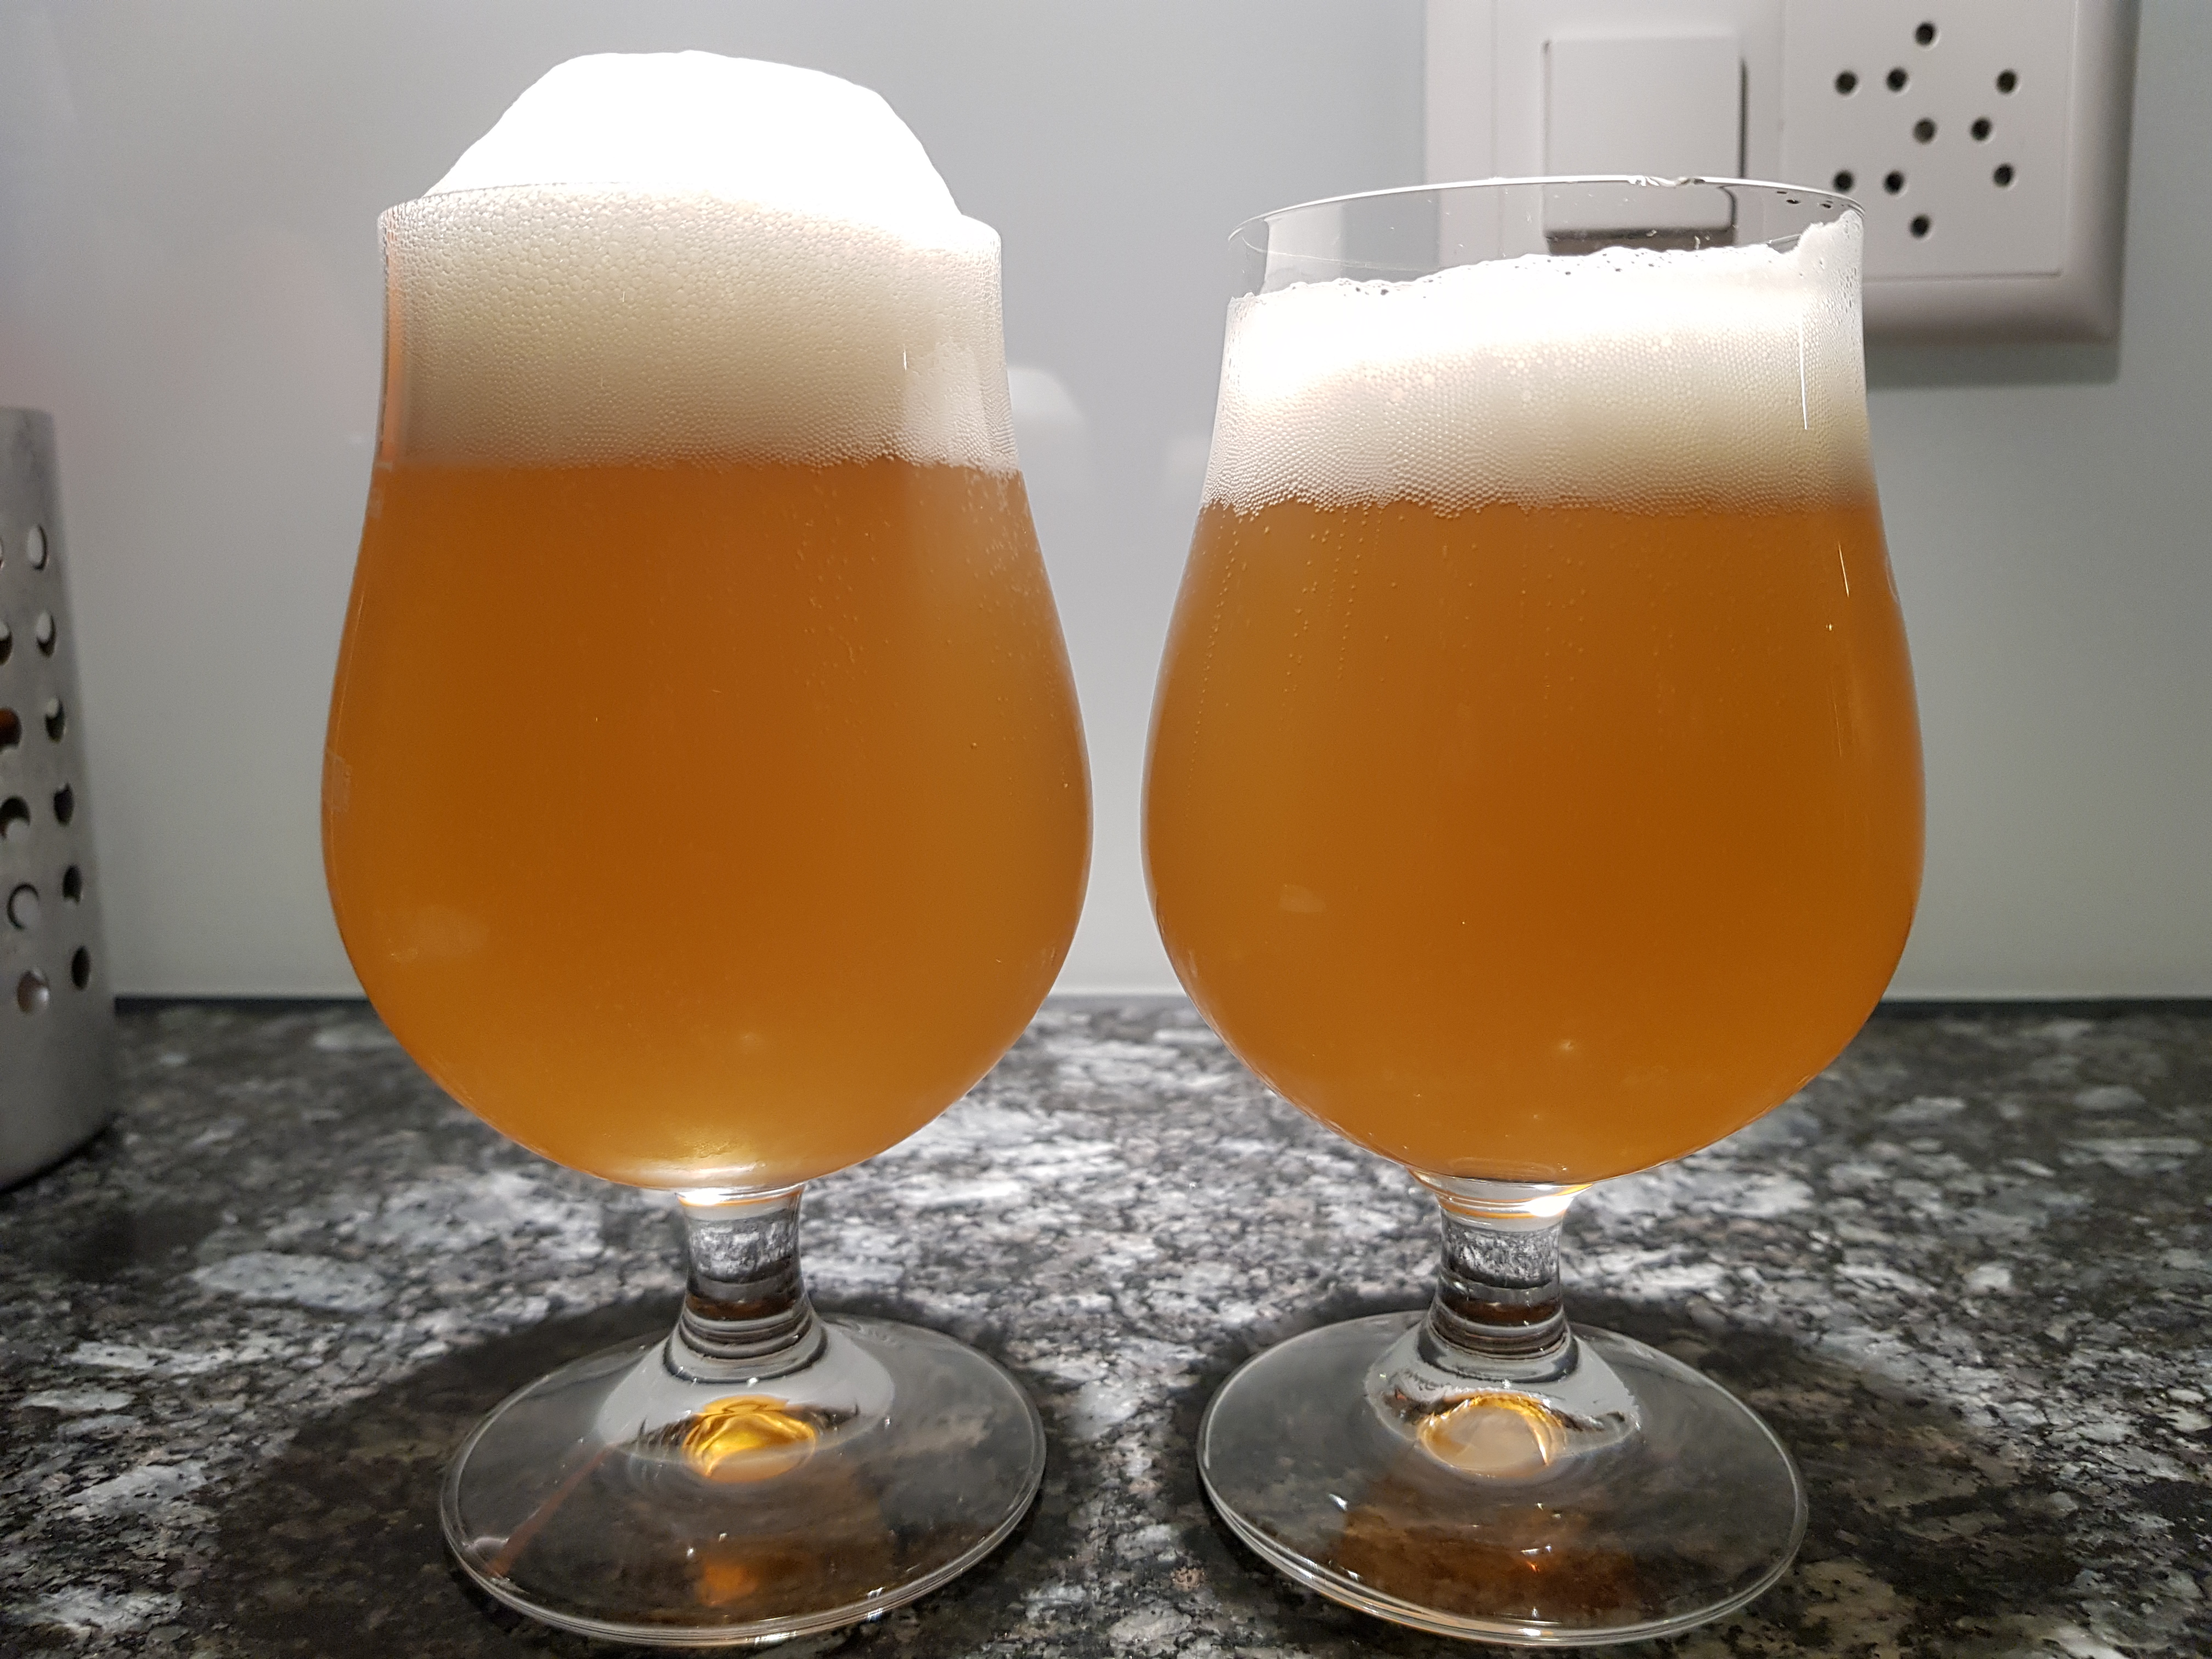
Here is the first side-by-side comparison from my small follow-up experiment (see post #39 for the layout). This is the control variant: headspace purge on the left vs. no headspace purge on the right. Now we are at 4.5 weeks post bottling date. As expected, the no-purge variant is a bit darker, so no surprises here. The lighting of the pic not being optimal, the left beer has actually a light blond color under real daylight, while the one on the right is a darker blond.

What surprised me, though, is that I also perceived a difference in aroma/flavour on this one. I would not have expected this since this beer was much less heavily hopped than my IPAs. Having only experienced what I would consider nuanced differences in IPA hop bombs, I did not expect any differences at all on such a beer with “only” about 1.5 oz of dry hops. Plus, a previous hoppy pilsner I made with about the same dry hop charge did not show any differences in aroma/flavour to me. But on this one here, the aroma of the headspace purged variant seemed brighter and more vibrant, and I perceived the flavour as more intense and layered. I should point that we are still talking about nuanced differences here: I would most probably not see any faults in the no-purged variant if it weren’t for the meticulous side-by-side tasting.

I’ll post about the other comparisons in the coming weeks.

20200108_103202.jpg
 
I have had lots of success with headspace purging myself, with a marked improvement in hop flavors and aromas. I brewed lots of IPAs that turned brown and tasted muddy, and once we started purging the headspace that all went away. We started out transferring to a bottling bucket as usual, bottling using a bottling wand, then purging with a blast of CO2 from a spare CO2 tank into the headspace before capping.

Supposedly (I think according to Bell's) the yeast can scavenge the oxygen from the beer itself during conditioning, but only up to 1/3 of the headspace. That's why previously my IPAs would be bright and hoppy from the bucket sample but rapidly degrade in the bottles. Even though we still had oxygen exposure in the bucket, the removal of oxygen from the bottle led to much more stable beers. We tested a three month old warm stored West Coast IPA bottled using this method and it was still bright in color as well as flavor with strong citrus and pine.

Now we use a Spike Flex+ and bottle directly from the fermenter using a Blichmann Beer Gun (for easier purging) and have had incredibly flavorful and aromatic NEIPAs with a great shelf life. Even without this expensive upgrade the simple purging made a huge difference. Way better quality than most(all) local mobile-canned commercial IPAs.

I do find that using ways to limit oxidation throughout the process helps as well: Avoid oats in your hoppy beers as it is more prone to oxidation than other protein rich grains, use Cryo hops if you can in your dry hop to reduce the total amount of hop and vegetable matter, and purge the headspace in your fermenter when dryhopping (we used to use an orange carboy hood and blow CO2 in the second port). Also we got rid of the autosiphon and started using the sterile siphon starter method with the carboy hood.
 
Avoid oats in your hoppy beers as it is more prone to oxidation than other protein rich grains,

Thanks for sharing your experience!
Regarding this specific point about oats: Did you ever experience this yourself (or someone you know)? I also read that oats may be responsible for an even increased oxidation risk in those beers. And I also know you do not strictly need them to make a successful NEIPA. Nevertheless, I planned to include about 10% malted oats for my first NEIPA attempt in a few months. Should I better skip them, since I do not have any Spike Flex+, beerguns or the like and I am still relying on good 'ol plastic fermenters and bottling buckets?

I too have had good success by implementing those relative simple measures as described in this thread. But up to now I was brewing more in the west coast realm of IPAs, and I know NEIPA can be far more tricky with respect to oxidation...
 
Regarding this specific point about oats: Did you ever experience this yourself (or someone you know)? I also read that oats may be responsible for an even increased oxidation risk in those beers. And I also know you do not strictly need them to make a successful NEIPA. Nevertheless, I planned to include about 10% malted oats for my first NEIPA attempt in a few months. Should I better skip them, since I do not have any Spike Flex+, beerguns or the like and I am still relying on good 'ol plastic fermenters and bottling buckets?

I read about that either on a Scott Janish blogpost or in his New IPA book, apparently the high levels of manganese in Oats are more prone to oxidation. I had used oats before in at least one of my old oxygen prone IPAs but there were so many factors involved (excess headspace in carboy, not purging carboy after dry hopping, not purging bottles, and even possibly oxidized hops that were resealed at the LHBS). I have just decided not to take the risk and use white wheat malt to add a body/head retention/protein. Supposedly you could just use a high protein malt like Rahr 2-Row or some Chit Malt and skip the oats or wheat. Even with the fancy equipment we use now I try to limit the risk of oxidation as much as I can.

As an aside, I have found water chemistry and yeast selection more important in getting that NEIPA mouthfeel than oats or wheat. The protein is just there to give the hop oils something to bind to. I also don't go crazy on the chloride like some people like to as I find high CaCl levels taste chalky to me. Using NaCl (canning salt) will get you the benefits of chloride and reasonable Na levels (around 50ppm) will enhance the flavors too.
 
Second side by side comparison from the small follow-up experiment described in post #39.
Now things start to become interesting ( and weird)
Left is the usual headspace purged variant. Right is the recklessly filled variant: filling without the wand, letting the beer splash freely in the bottle and then capping on the resulting foam.
The rightern variant is a tiny bit darker, but this is really, really marginal. Sorry the lighting on the pic is even worse than last week's, but you get the idea. Flavor- and aromawise I can't tell a difference between these beers.

If you look at the "control" comparison three posts back, and then at this one, then there is only one explanation for me: the bubbles in the recklessly filled variant must have contained mostly CO2, and not air. In fact, at the end there was even more headspace in this one, because I made a mess while filling and started splashing, and creating foam, way too early. So there was already foam reaching up to the top when the bottle was only half full, and then I had to continue filling slowly slowly, with foam spilling out of the bottle. Indeed, while filling this bottle I did everything wrong according to commonly accepted wisdom.

Now I'm eager to test this "technique" on a really hop forward beer :)


20200113_101553.jpg
 
Last edited:
Third side by side comparison. Left is my usual headspace purged variant, right is the variant where the purging gas was blown under the beer surface, as suggested by someone on this thread. This created bubbles, filling the headspace and thereby allowing me to cap on foam.

There was no difference whatsoever between these beers: neither in color nor in aroma or taste.
At least for such a moderately dry hopped beer, both methods seem to work equally fine. So for now I'll stick to my usual practice, since it is a bit easier and quicker to perform.
But I would still like to test the other variant again and in a more heavily hopped beer.

20200123_204223.jpg
 
Thanks for this experiment.
Could you do another comparison with the no-purge bottle now that a couple of weeks passed?
 
Thanks for this experiment.
Could you do another comparison with the no-purge bottle now that a couple of weeks passed?

This is not possible unfortunately, because I did not include any replicates for the variants in this one... it was quite a "minimalist " follow-up experiment... So there is not a second no-purge bottle.
But if you look at the picture on post #2 in this thread, that was a comparison at about 4 months post bottling on my first experiment. I did include 4 replicates for each variant on that one and I sampled those at several weeks intervals...
 
I read about that either on a Scott Janish blogpost or in his New IPA book, apparently the high levels of manganese in Oats are more prone to oxidation.
He also says that mash hopping can remove manganese. I haven't had oxidation issues lately but I've been mash hopping on my last 4-5 batches. I can't say if it's helping a lot since I didn't have major issues to begin with but I definitely haven't noticed any negative effects from it. This last hazy IPA I've been drinking which is about to kick in the keg maintained it's flavor from start to finish beautifully. Also, I believe malted oats contain alot less than flaked oats.
 
Back
Top