You are using an out of date browser. It may not display this or other websites correctly.
You should upgrade or use an alternative browser.
You should upgrade or use an alternative browser.
Keg to ekeggle conversion pics
- Thread starter kevink
- Start date

Help Support Homebrew Talk:
This site may earn a commission from merchant affiliate
links, including eBay, Amazon, and others.
Jtkratzer,
The o-rings are McMaster #9396k38.
Sweet, I ordered the right ones, but from www.oringsandmore.com.
Thanks again. Any more pictures of your progress? I'm working on converting my Sabco Brew Magic over to an e-HERMS and I'm going to have a lot of the same work you are with the elements/welding.
Any hangups or unexpected bumps in the road?
Hey, no problem. I think I still owe you a PM!
I may be able to dig up a pic or two, but not much progress has happened lately. I did fire up the control panel with no disasters, so that was good. I still have to weld up the ferrules that are going to seal the element connections and make a hole in a tri-clamp end cap for the element power cable. After that I'll do an hour long water boil to make sure everything's cool.
Unexpected bumps? One sticks out. If you're going to weld your element nut to your keg, pay attention to the clocking of the nut. When you screw the element it in, you will most likely want the ripples horizontal, depending on how much clearance you have under your false bottoms. I have little clearance between my element and hop stopper, so I needed my ripples horizontal. So, I screwed the element into the nut with the o-ring in place, then decided on how to rotate the nut before welding it on. Even after all that, warpage from welding slightly changed where the element got tight, so the ripples weren't perfectly horizontal when screwed in. A little tweaking of the element (twisting) got it perfectly horizontal. If you paid no attention to the clocking of the nut and you were 90 degrees off, you would be in trouble. You can't twist the element 90 degrees.
If I ever have to replace the element and the ripples are no longer horizontal, I'm going to make it tri-clamp removable so I can adjust it with the tri-clamp. I already have the flange welded to the keg. You may want to consider making yours tri-clamp removable. The tri-clamp parts are pretty cheap, so you probably won't even notice the additional money once it's all said and done. Even if you don't make your element tri-clamp removable, I highly recommend sealing your element connections with tri-clamp ferrules as I did. It's the only method I could think of that I trust!
Kevin,
I really like the design with the tri-clamp with a drilled end cap and rubber grommet. When you say you're going to go to a tri-clamp removable element when you need to replace the existing element, are you going to buy it that way or weld it up yourself?
I haven't looked hard for tri-clamp elements, but the one I did find was $180. http://www.brew-magic.com/bm_part_element.html
Thanks for the tip about the lock nut.
Kevin,
I really like the design with the tri-clamp with a drilled end cap and rubber grommet. When you say you're going to go to a tri-clamp removable element when you need to replace the existing element, are you going to buy it that way or weld it up yourself?
I haven't looked hard for tri-clamp elements, but the one I did find was $180. http://www.brew-magic.com/bm_part_element.html
Thanks for the tip about the lock nut.
I would just buy another tri-clamp end cap and either weld a nut to it or thread it to accept the same type of element that I'm using now. That end cap will then get clamped to the flange on my keg. Then, I will weld my ferrules to the new end cap so the connection are sealed. It's a little hard to explain... If I end up doing it, I'll post some pics!
You're capabale of making your own, but I'm looking at a setup on brewershardware.com that's a triclamp housing for the element. Just need to drill the hole in the keg and weld the ferrule to it.
http://www.brewershardware.com/TC15F10NPSCOV.html
http://www.brewershardware.com/TC15F10NPSCOV.html


$7.79 ($7.79 / Count)
Craft A Brew - LalBrew Voss™ - Kveik Ale Yeast - For Craft Lagers - Ingredients for Home Brewing - Beer Making Supplies - (1 Pack)
Craft a Brew


![Craft A Brew - Safale S-04 Dry Yeast - Fermentis - English Ale Dry Yeast - For English and American Ales and Hard Apple Ciders - Ingredients for Home Brewing - Beer Making Supplies - [1 Pack]](https://m.media-amazon.com/images/I/41fVGNh6JfL._SL500_.jpg)
$6.95 ($17.38 / Ounce)
$7.47 ($18.68 / Ounce)
Craft A Brew - Safale S-04 Dry Yeast - Fermentis - English Ale Dry Yeast - For English and American Ales and Hard Apple Ciders - Ingredients for Home Brewing - Beer Making Supplies - [1 Pack]
Hobby Homebrew

$33.95
Five Star - 6022b_ - Star San - 32 Ounce - High Foaming Sanitizer
Bridgeview Beer and Wine Supply


$39.22 ($39.22 / Count)
Brewer's Best Home Brew Beer Ingredient Kit - 5 Gallon (Mexican Cerveza)
Amazon.com


$10.99 ($31.16 / Ounce)
Hornindal Kveik Yeast for Homebrewing - Mead, Cider, Wine, Beer - 10g Packet - Saccharomyces Cerevisiae - Sold by Shadowhive.com
Shadowhive


$27.29 ($13.64 / Count)
$41.99 ($21.00 / Count)
2 Pack 1 Gallon Large Fermentation Jars with 3 Airlocks and 2 SCREW Lids(100% Airtight Heavy Duty Lid w Silicone) - Wide Mouth Glass Jars w Scale Mark - Pickle Jars for Sauerkraut, Sourdough Starter
Qianfenie Direct


$176.97
1pc Commercial Keg Manifold 2" Tri Clamp,Ball Lock Tapping Head,Pressure Gauge/Adjustable PRV for Kegging,Fermentation Control
hanhanbaihuoxiaoshoudian

$22.00 ($623.23 / Ounce)
AMZLMPKNTW Ball Lock Sample Faucet 30cm Reinforced Silicone Hose Secondary Fermentation Homebrew Kegging joyful
无为中南商贸有限公司


$20.94
$29.99
The Brew Your Own Big Book of Clone Recipes: Featuring 300 Homebrew Recipes from Your Favorite Breweries
Amazon.com


$58.16
HUIZHUGS Brewing Equipment Keg Ball Lock Faucet 30cm Reinforced Silicone Hose Secondary Fermentation Homebrew Kegging Brewing Equipment
xiangshuizhenzhanglingfengshop


$53.24
1pc Hose Barb/MFL 1.5" Tri Clamp to Ball Lock Post Liquid Gas Homebrew Kegging Fermentation Parts Brewer Hardware SUS304(Liquid Hose Barb)
yunchengshiyanhuqucuichendianzishangwuyouxiangongsi


$53.24
1pc Hose Barb/MFL 1.5" Tri Clamp to Ball Lock Post Liquid Gas Homebrew Kegging Fermentation Parts Brewer Hardware SUS304(Liquid Hose Barb)
Guangshui Weilu You Trading Co., Ltd
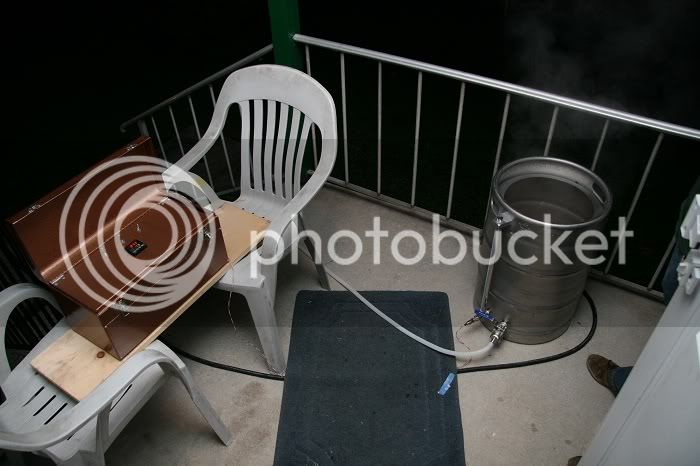
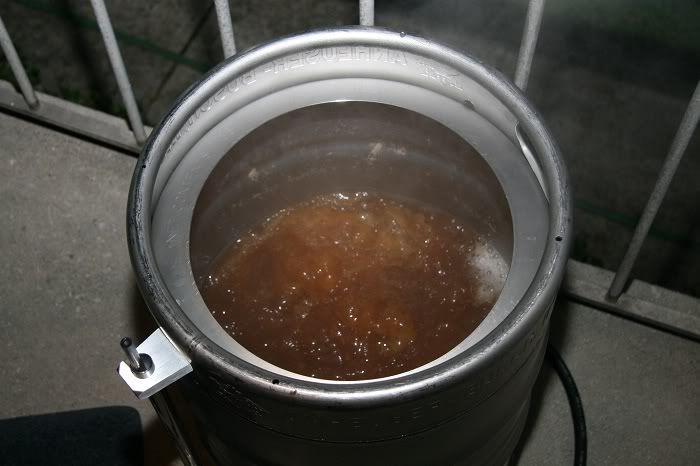
We had an "emergency" electric brew session the other night because we had a lot of wet hops to use. Even though the keggle is not completely finished (I still have to weld up the element housing and add a cord grip to it), I wanted to use it due to the amount of whole hops in the brew. I also vowed never to use an auto siphon again during our last brew session, so we HAD to use the keggle this time.
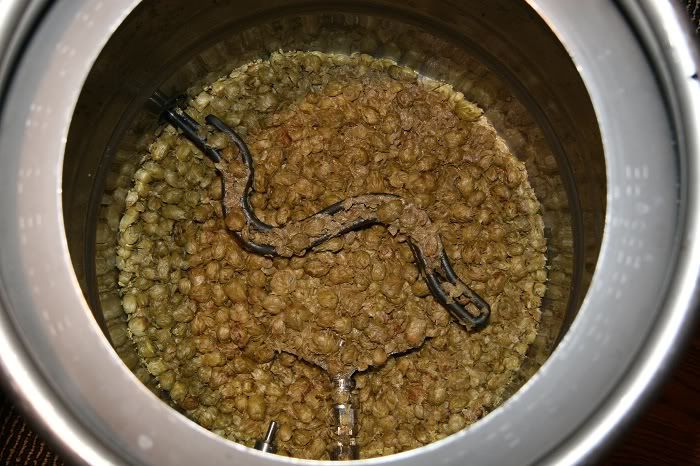
The recipe was a 6 gallon extract with grains IPA with almost all whole hops, wet and dry. We tested boil off with water prior to brewing, so we nailed that (1.5 gallons), but completely blew getting 6 gallons in the fermenter. We ended up with slightly over 5 gallons. I think it's due to all the wort that got held up in the whole hops. We finally nailed the gravity, though, which is something we never did when doing partial boils. I think that was because we also had a lot of wort held up in the hops in the bottom of the old brew kettle and we would always top off the fermenter to 6 gallons. Bad move, but the beers turned out amazing anyway. We decided not to top this batch off because the gravity was right on.
We also used a newly constructed counterflow wort chiller for the first time which worked great even with 70 something degree tap water. No more ice baths!
So, with the exception of getting shorted on the volume, the first brew in the ekeggle was a complete success. There's still a lot that I want to do and change, but it's nice to be able to brew with it in the meantime!
That design is nice, but in my opinion, it has one flaw, it is too long.
Even though the first inch of most elements is not heated, I would really think that you want the element as close to having it's base at the Kettle wall as possible.
I am looking at using a 2" sanitary ferrule on the keggle, then a recessed cup that the element goes in, and instead of screwing the element in, using a locknut (will not have clearance to be able to get socket in to tighten element) the recessed cup will be welded to another ferrule, and clamped..
-mike
You're capabale of making your own, but I'm looking at a setup on brewershardware.com that's a triclamp housing for the element. Just need to drill the hole in the keg and weld the ferrule to it.
http://www.brewershardware.com/TC15F10NPSCOV.html
That design is nice, but in my opinion, it has one flaw, it is too long.
Even though the first inch of most elements is not heated, I would really think that you want the element as close to having it's base at the Kettle wall as possible.
I am looking at using a 2" sanitary ferrule on the keggle, then a recessed cup that the element goes in, and instead of screwing the element in, using a locknut (will not have clearance to be able to get socket in to tighten element) the recessed cup will be welded to another ferrule, and clamped..
-mike
[edit] Nevermind. I mistakenly thought your comments related to the post above yours. Carry on, and cheers.
What kind of power were you putting in? duty cycle, watts? ambient temp?
We had an "emergency" electric brew session the other night because we had a lot of wet hops to use. Even though the keggle is not completely finished (I still have to weld up the element housing and add a cord grip to it), I wanted to use it due to the amount of whole hops in the brew. I also vowed never to use an auto siphon again during our last brew session, so we HAD to use the keggle this time.
The recipe was a 6 gallon extract with grains IPA with almost all whole hops, wet and dry. We tested boil off with water prior to brewing, so we nailed that (1.5 gallons), but completely blew getting 6 gallons in the fermenter. We ended up with slightly over 5 gallons. I think it's due to all the wort that got held up in the whole hops. We finally nailed the gravity, though, which is something we never did when doing partial boils. I think that was because we also had a lot of wort held up in the hops in the bottom of the old brew kettle and we would always top off the fermenter to 6 gallons. Bad move, but the beers turned out amazing anyway. We decided not to top this batch off because the gravity was right on.
We also used a newly constructed counterflow wort chiller for the first time which worked great even with 70 something degree tap water. No more ice baths!
So, with the exception of getting shorted on the volume, the first brew in the ekeggle was a complete success. There's still a lot that I want to do and change, but it's nice to be able to brew with it in the meantime!
Once it got to a boil, we turned the PID down to 75%. That was still too much, so we lowered it to 65% if I remember correctly. It probably could have gone a little lower. The ambient temp was about 60-65 degrees.
clearwaterbrewer said:That design is nice, but in my opinion, it has one flaw, it is too long.
Even though the first inch of most elements is not heated, I would really think that you want the element as close to having it's base at the Kettle wall as possible.
I am looking at using a 2" sanitary ferrule on the keggle, then a recessed cup that the element goes in, and instead of screwing the element in, using a locknut (will not have clearance to be able to get socket in to tighten element) the recessed cup will be welded to another ferrule, and clamped..
-mike
The only limitation is the size of the ferrule you weld to the kettle. If you use anything 1.5" or less, it should be fine.
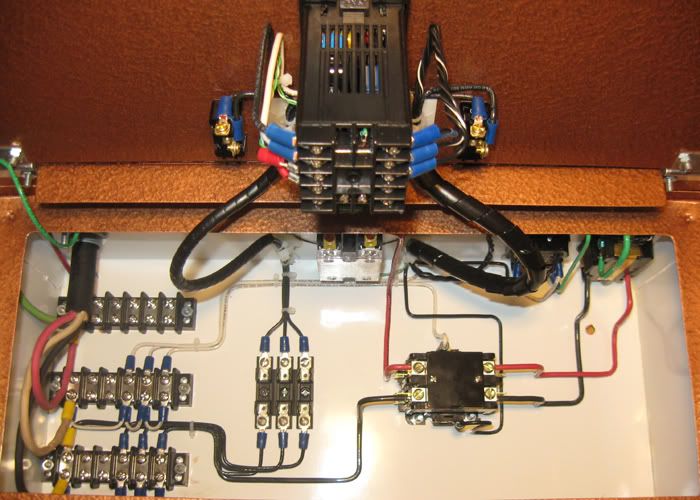
Any chance of getting a sketch out of a diagram of this? I love this and I can follow some of what's going on just from how neat you did this, but can't quite follow all of it. I've been slogging through the forums trying to find a wiring diagram to use on my single vessel eBIAB that I'm doing and this is the best one I've seen. I'm going pretty basic but also want the option (but not the strict need) to plug a pump in, which you appear to have.
This is so beautiful it brings a tear to my eye. How can I copy it?
Look here for a recirculating e-BIAB system. This is what I was going to do before I stumbled across my Brew Magic system. It has a parts list and wiring diagram.
https://www.homebrewtalk.com/f170/my-official-e-biab-build-thread-269164/
This is so beautiful it brings a tear to my eye. How can I copy it?
Thanks for the awesome compliment!
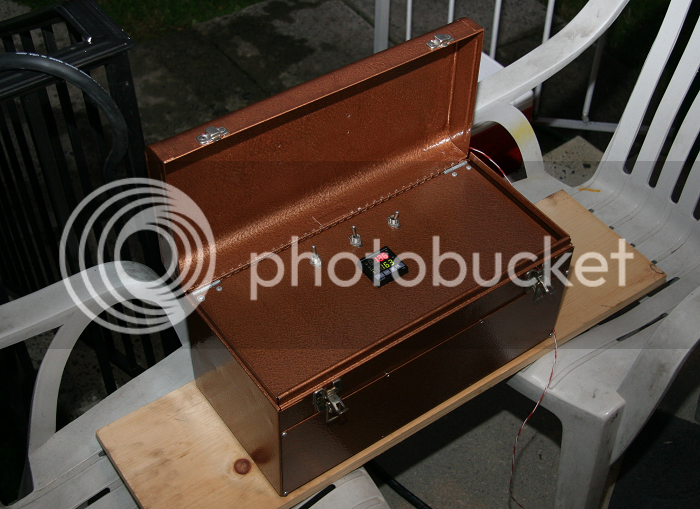
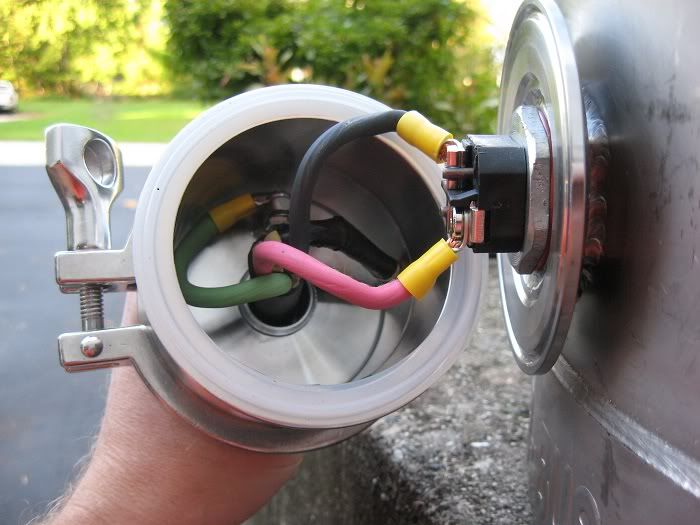
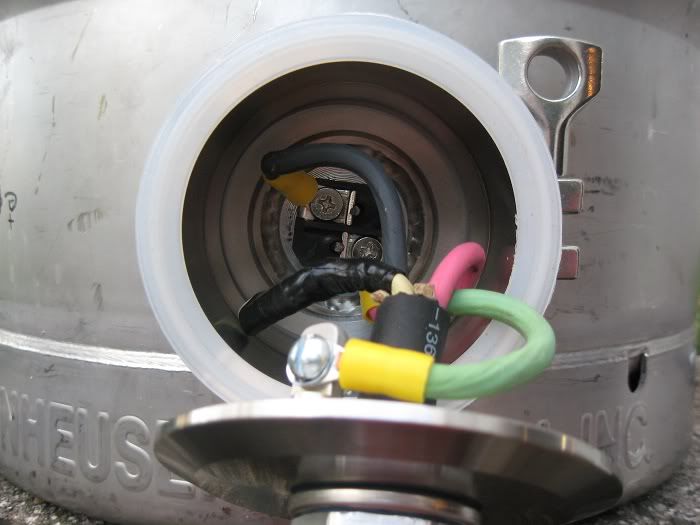
I don't have a diagram, but it's so simple that it doesn't even need one. You can see where the hots and neutral come in. One hot (black) goes to the relay and then to the element outlet. The three other hots (black) go to the fuse block and then to the switches for the PID, relay coil, and pump outlet. The three neutrals go to the PID, relay coil, and the pump outlet. The red hot goes to the SSR, then to the relay, then to the element outlet. The ground comes in and goes directly to a lug attached to the chassis. Grounds from the pump outlet and element outlet also go to the lug. The other ground that you see on the left side of the photo goes from the main ground lug to the top plate that the switches and PID are mounted to.
After that, you have the SSR control wires that go between the PID and SSR and the RTD wires that go from the RTD to the PID. That's it! Let me know if you have any specific questions and I'll try to help.
I just checked out the link to the wiring diagram that jtkratzer posted. That should have everything you need. It's a little different due to the illuminated switches, the e-stop, and how he didn't put a fuse before the relay coil, but other than that it's pretty much exactly what I did.
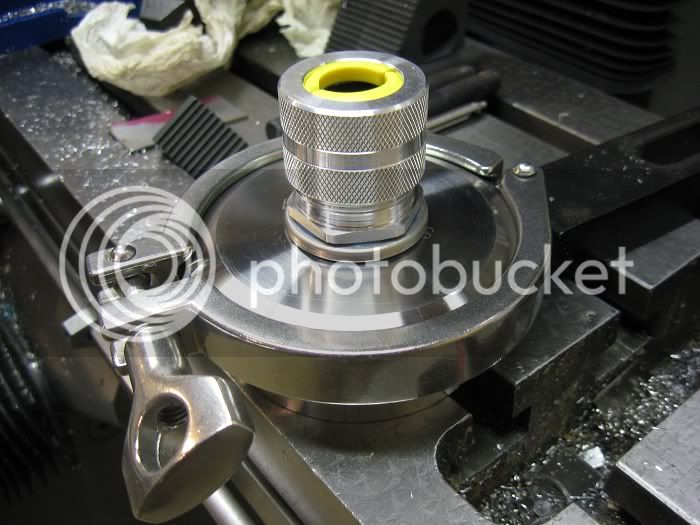
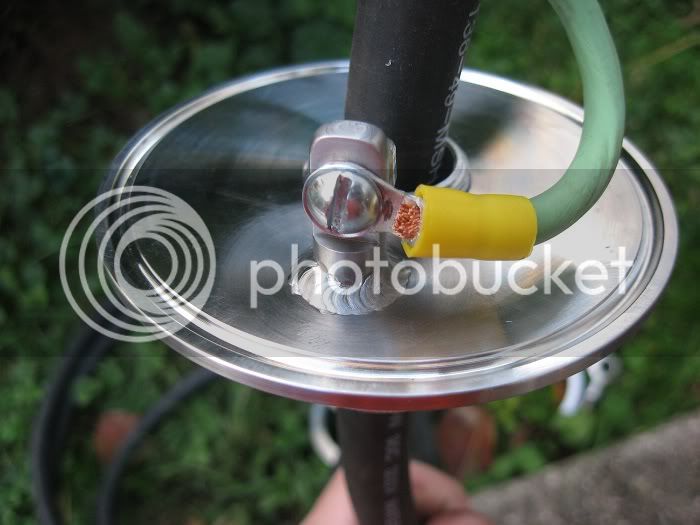
I made a little more progress after finally getting my lathe back together last night. I bored and threaded a hole in an end cap for a liquid tight cord grip for the element power cord. All that's left is to weld a tab on the inside of the end cap for the ground wire and weld this ferrule to another one so it can be clamped to the end cap that's welded to the keggle. It should provide a nice water tight enclosure for the element connections.
I should be able to hose this thing down and not get a drop of water in there. I'm actually now worried about getting water in the Auber RTD. It seems kind of cheaply made. I think they mean liquid tight from the inside. Well, duh. There's no way that the pins that stick out of the RTD are liquid tight. There's also the seam where the two parts of it are screwed together. It doesn't look like there's any gasket or sealer between the two parts, but I'll have to take it apart to check.
I should be able to hose this thing down and not get a drop of water in there. I'm actually now worried about getting water in the Auber RTD. It seems kind of cheaply made. I think they mean liquid tight from the inside. Well, duh. There's no way that the pins that stick out of the RTD are liquid tight. There's also the seam where the two parts of it are screwed together. It doesn't look like there's any gasket or sealer between the two parts, but I'll have to take it apart to check.
android
Well-Known Member
looks really good man, nice work thus far.
I should be able to hose this thing down and not get a drop of water in there. I'm actually now worried about getting water in the Auber RTD. It seems kind of cheaply made. I think they mean liquid tight from the inside. Well, duh. There's no way that the pins that stick out of the RTD are liquid tight. There's also the seam where the two parts of it are screwed together. It doesn't look like there's any gasket or sealer between the two parts, but I'll have to take it apart to check.
Yep, those Auber RTD's are not water tight. I don't think they are even water resistant.
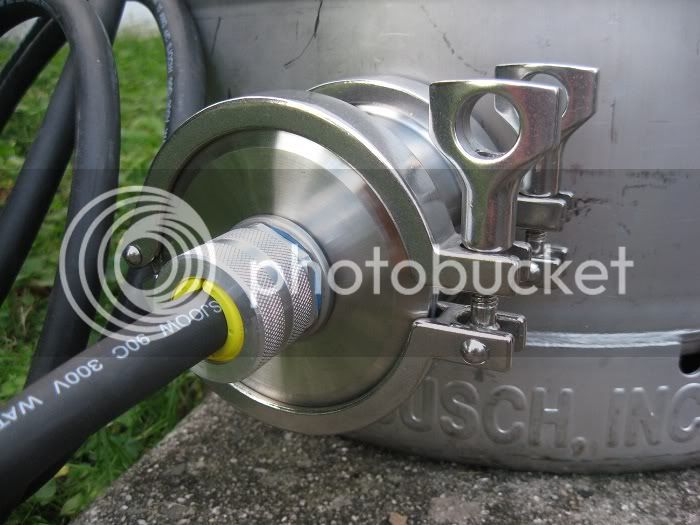
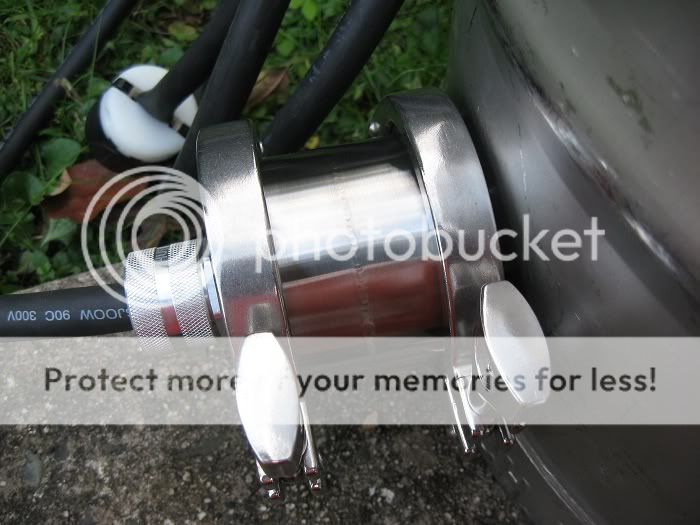
I finally made a ground lug for the keg and welded it to the tri clamp end cap of the element enclosure. I also welded the ferrules of the enclosure together, so I guess it's done! I spent a lot of time thinking about how to make the "ultimate" element enclosure that is completely water tight (or idiot proof). I believe this is it. The only thing that would make it any cooler would be to have the element tri-clamp removable. A really easy modification could be done to this setup to allow it, but I have yet to see a need. Maybe after a few batches...
Ground lug:
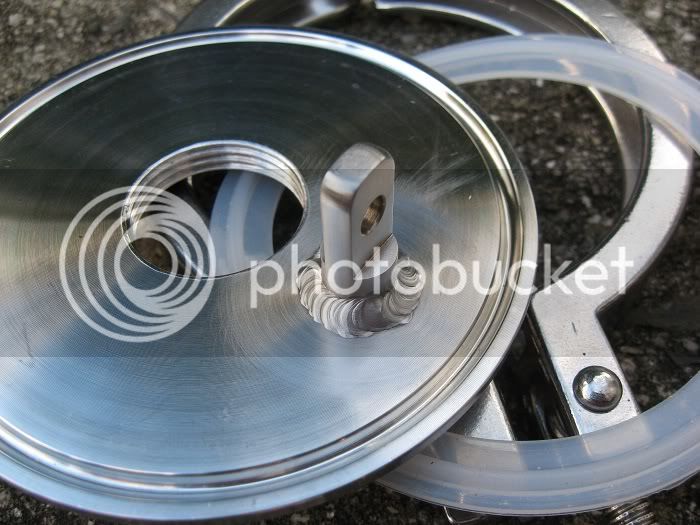
Either clamp can be removed to gain access to the element connections:
Ground lug:
Either clamp can be removed to gain access to the element connections:
Wow. I live the clamp over the element, and especially the soldered lug. Very very nice.
hatfieldenator
Well-Known Member
- Joined
- Sep 15, 2010
- Messages
- 493
- Reaction score
- 18
That is ridiculously awesome
Nice work.
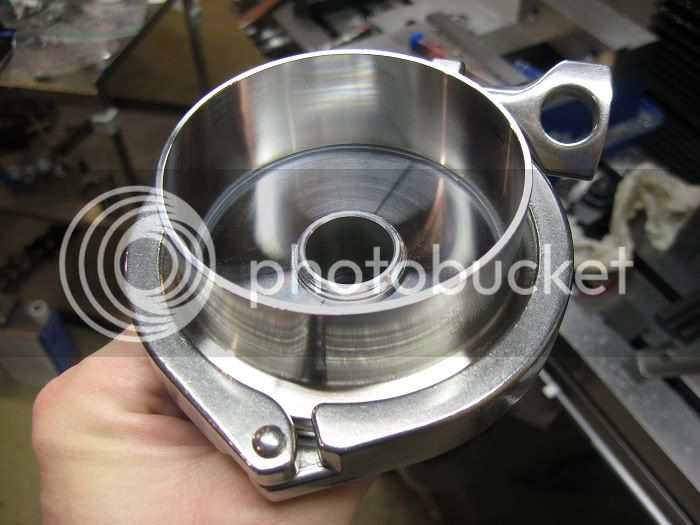
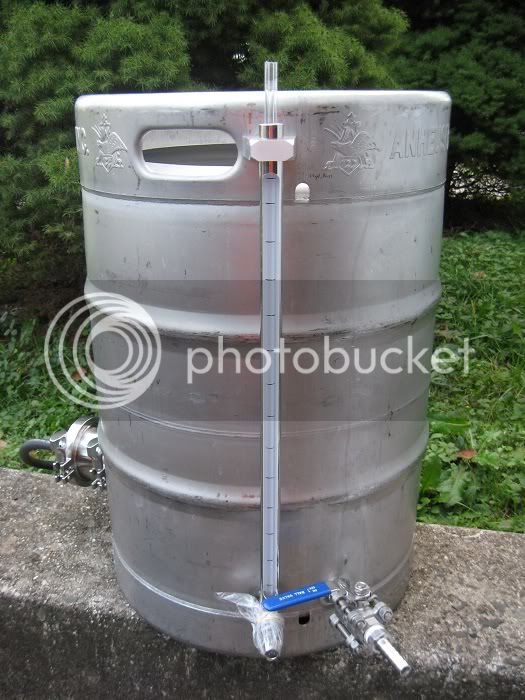
Thanks, guys. I just started on my mash tun which is going to be a rectangular cooler. I made a bulkhead out of stainless steel plate and a stainless steel nipple. I had a bag of silicone o-rings left over from the keggle element which I decided to put to good use here. I machined a groove in the plate to accept the o-ring which is designed to seal against the inside wall of the cooler.
 [/IMG]
The ~.250" thick plate turned down into a washer shape with a hole bored and a groove machined into it.
 [/IMG]
Welded to the nipple:
 [/IMG]
Installed in the cooler:
 [/IMG]
Next up is the manifold. I think I'm going to use copper pipe.
The ~.250" thick plate turned down into a washer shape with a hole bored and a groove machined into it.
Welded to the nipple:
Installed in the cooler:
Next up is the manifold. I think I'm going to use copper pipe.
I really need to learn how to weld and make better friends with my buddy who has a machine/welding shop. Your stuff is gorgeous.
slakwhere
Well-Known Member
I really need to learn how to weld and make better friends with my buddy who has a machine/welding shop. Your stuff is gorgeous.
nothing says "i love you" with subtle undertones of needing machine work like homebrew.

Thanks, jtkratzer. If you want to weld, definitely just jump in and get yourself a welder. Once you have it, you'll attempt projects that you wouldn't have even thought of before owning one.
I just built a simple copper manifold for my mash tun. I based the design on John Palmer's research which seemed sound to me. It will definitely work for batch sparging, but it should work for whatever method we decide to try.
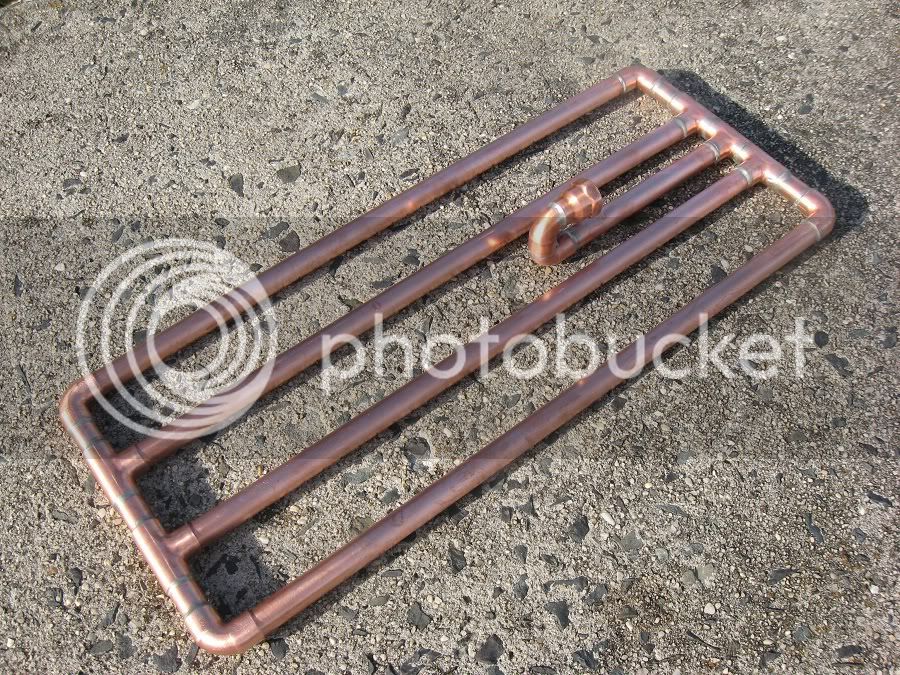
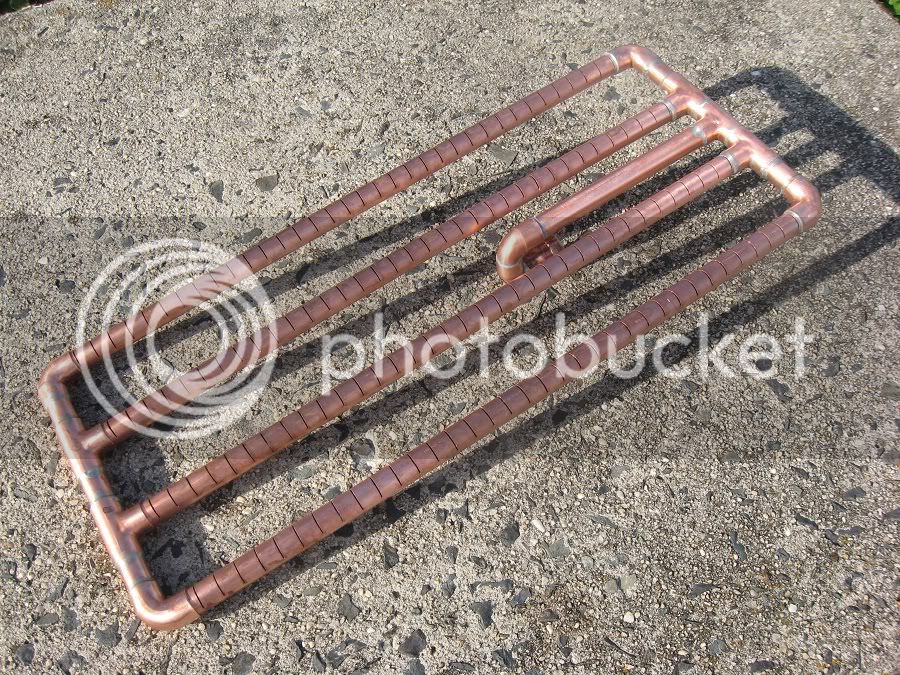
I just built a simple copper manifold for my mash tun. I based the design on John Palmer's research which seemed sound to me. It will definitely work for batch sparging, but it should work for whatever method we decide to try.
I love seeing what a machinist can build. This is an amazing build. I am going to build a cutting tool like yours for my next keg conversion, looks so much better then my hack job with a plasma cutter.
Thanks, lazybean, but I'm not a machinist (not even close). I just like to make stuff. As for building a cutter like mine to cut the top off of your next keg, check out some of my posts on the first page of this thread. I had some other ideas that might work better. I really like the idea of using an air powered cut off tool mounted to a similar rotating arm.
Similar threads
- Replies
- 63
- Views
- 5K
- Replies
- 12
- Views
- 3K
