You are using an out of date browser. It may not display this or other websites correctly.
You should upgrade or use an alternative browser.
You should upgrade or use an alternative browser.
Keg to ekeggle conversion pics
- Thread starter kevink
- Start date

Help Support Homebrew Talk:
This site may earn a commission from merchant affiliate
links, including eBay, Amazon, and others.
Can you explain a little more about how you made the hop screen?
How you handled the edges and how you attached both halves together?
Thanks!
No problem. I started by forming a piece of 1/16" diameter stainless steel rod into a frame. This dictated the size and shape of the hop stopper. I butt welded the ends together, but you could probably silver solder them together if you overlapped by a half inch or so. Then, put one piece of screen on top of the frame and one piece below it, slip in the dip tube, and tie (with stainless steel wire) the dip tube to the screens to loosely hold them together. Then tie the screens to the frame with stainless wire approximately every 1.5". At this point the thing really starts to take shape. You better check the fit in your kettle now as you won't be able to easily undo the next step. Trim the screens around the frame so there is 1/2" of screen beyond the frame (the diameter of the screens will be 1" greater than the frame). Divide that 1/2" of screen (the part that overhangs the frame) into thirds in your head or use some sharpie. Fold the first 1/3 over onto the second third and clamp tightly with pliers. Go all the way around the hop stopper. Then, fold the first folded section onto the third 1/3 and clamp tightly. This should put the folded section tightly up against the frame. The folding steps along with the wire frame really tightens up the screens and makes the whole assembly quite strong. It's a little hard to explain, so it doesn't make sense let me know.
****** my pants
-=Jason=-
:rockin:
No problem. I started by forming a piece of 1/16" diameter stainless steel rod into a frame. This dictated the size and shape of the hop stopper. I butt welded the ends together, but you could probably silver solder them together if you overlapped by a half inch of so. Then, put one piece of screen on top of the frame and one piece below it, slip in the dip tube, and tie (with stainless steel wire) the dip tube to the screens to loosely hold them together. Then tie the screens to the frame with stainless wire approximately every 1.5". At this point the thing really starts to take shape. You better check the fit in your kettle now as you won't be able to easily undo the next step. Trim the screens around the frame so there is 1/2" of screen beyond the frame (the diameter of the screens will be 1" greater than the frame). Divide that 1/2" of screen (the part that overhangs the frame) into thirds in your head or use some sharpie. Fold the first 1/3 over onto the second third and clamp tightly with pliers. Go all the way around the hop stopper. Then, fold the first folded section onto the third 1/3 and clamp tightly. This should put the folded section tightly up against the frame. The folding steps along with the wire frame really tightens up the screens and makes the whole assembly quite strong. It's a little hard to explain, so it doesn't make sense let me know.
Got it. Wasn't sure if you did a final sew after folding over, or if the screen was stiff enough to hold on its own.
We just tested the hop stopper by boiling 3 oz of Cascade pellets in 3-4 gallons of water, dumping it in the keggle, stirring it around, and siphoning it out. The hop stopper left almost everything behind! I'm very pleased and relieved as my research didn't turn up much in the way of optimum mesh size. 28 x 28 with .010" wire size seems to work very well! We'll see how it works with actual wort.
Note: No hops were sacrificed during this test. The hops were accidentally left out of the freezer for several days, resulting in hops that smelled of rabbit food. There was no better use of these hops.
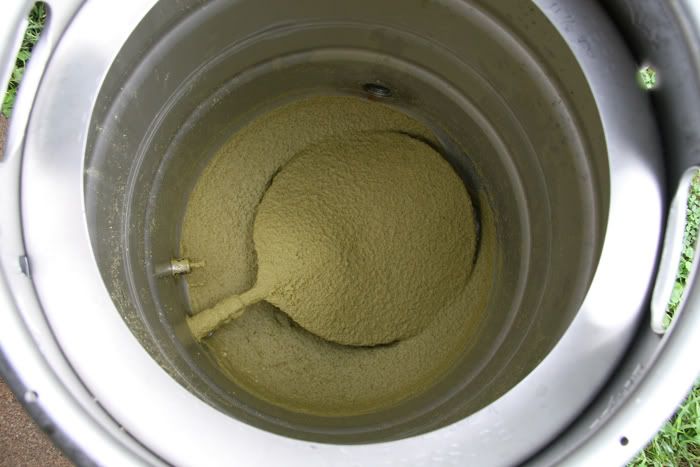
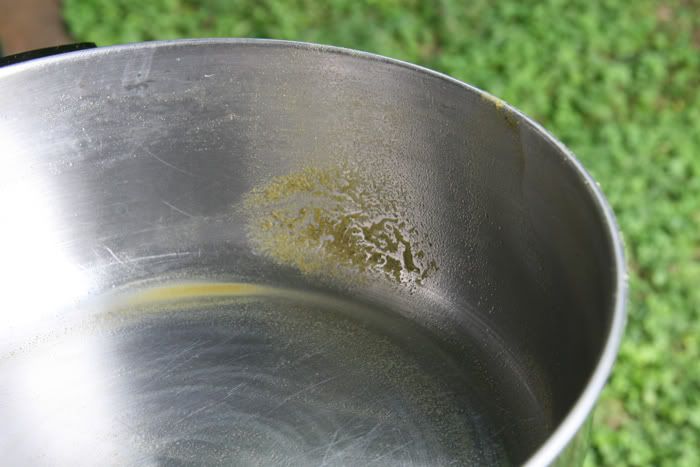
What came through the hop stopper:
Note: No hops were sacrificed during this test. The hops were accidentally left out of the freezer for several days, resulting in hops that smelled of rabbit food. There was no better use of these hops.
What came through the hop stopper:


$7.79 ($7.79 / Count)
Craft A Brew - LalBrew Voss™ - Kveik Ale Yeast - For Craft Lagers - Ingredients for Home Brewing - Beer Making Supplies - (1 Pack)
Craft a Brew


![Craft A Brew - Safale S-04 Dry Yeast - Fermentis - English Ale Dry Yeast - For English and American Ales and Hard Apple Ciders - Ingredients for Home Brewing - Beer Making Supplies - [1 Pack]](https://m.media-amazon.com/images/I/41fVGNh6JfL._SL500_.jpg)
$6.95 ($17.38 / Ounce)
$7.47 ($18.68 / Ounce)
Craft A Brew - Safale S-04 Dry Yeast - Fermentis - English Ale Dry Yeast - For English and American Ales and Hard Apple Ciders - Ingredients for Home Brewing - Beer Making Supplies - [1 Pack]
Hobby Homebrew

$33.95
Five Star - 6022b_ - Star San - 32 Ounce - High Foaming Sanitizer
Bridgeview Beer and Wine Supply


$39.22 ($39.22 / Count)
Brewer's Best Home Brew Beer Ingredient Kit - 5 Gallon (Mexican Cerveza)
Amazon.com


$10.99 ($31.16 / Ounce)
Hornindal Kveik Yeast for Homebrewing - Mead, Cider, Wine, Beer - 10g Packet - Saccharomyces Cerevisiae - Sold by Shadowhive.com
Shadowhive


$27.29 ($13.64 / Count)
$41.99 ($21.00 / Count)
2 Pack 1 Gallon Large Fermentation Jars with 3 Airlocks and 2 SCREW Lids(100% Airtight Heavy Duty Lid w Silicone) - Wide Mouth Glass Jars w Scale Mark - Pickle Jars for Sauerkraut, Sourdough Starter
Qianfenie Direct


$176.97
1pc Commercial Keg Manifold 2" Tri Clamp,Ball Lock Tapping Head,Pressure Gauge/Adjustable PRV for Kegging,Fermentation Control
hanhanbaihuoxiaoshoudian

$22.00 ($623.23 / Ounce)
AMZLMPKNTW Ball Lock Sample Faucet 30cm Reinforced Silicone Hose Secondary Fermentation Homebrew Kegging joyful
无为中南商贸有限公司


$20.94
$29.99
The Brew Your Own Big Book of Clone Recipes: Featuring 300 Homebrew Recipes from Your Favorite Breweries
Amazon.com


$58.16
HUIZHUGS Brewing Equipment Keg Ball Lock Faucet 30cm Reinforced Silicone Hose Secondary Fermentation Homebrew Kegging Brewing Equipment
xiangshuizhenzhanglingfengshop


$53.24
1pc Hose Barb/MFL 1.5" Tri Clamp to Ball Lock Post Liquid Gas Homebrew Kegging Fermentation Parts Brewer Hardware SUS304(Liquid Hose Barb)
yunchengshiyanhuqucuichendianzishangwuyouxiangongsi


$53.24
1pc Hose Barb/MFL 1.5" Tri Clamp to Ball Lock Post Liquid Gas Homebrew Kegging Fermentation Parts Brewer Hardware SUS304(Liquid Hose Barb)
Guangshui Weilu You Trading Co., Ltd
jsguitar
Well-Known Member
Very nice work! Actually, I have a Hop-stopper from the guy that came up with the idea and it's a great product, however, the design that you've used here doesn't have a crease in the screen that mine does. I'm going to guess that yours will be even easier to clean.
I like the triclover idea to connect it as I've been just been undoing the compression fitting which is brass (copper dip tube) to take it out. I'm upgrading to SS so I'm looking forward to your updates on that.
I like the triclover idea to connect it as I've been just been undoing the compression fitting which is brass (copper dip tube) to take it out. I'm upgrading to SS so I'm looking forward to your updates on that.
Very nice work! Actually, I have a Hop-stopper from the guy that came up with the idea and it's a great product, however, the design that you've used here doesn't have a crease in the screen that mine does. I'm going to guess that yours will be even easier to clean.
I like the triclover idea to connect it as I've been just undoing the compression fitting which is brass (copper dip tube) to take it out. I'm upgrading to SS so I'm looking forward to your updates on that.
Thanks! I thought I would need a crease, but after playing with the screen I realized that it's able to be formed into almost any shape. Huge thanks to the guy who came up with the idea. If I didn't want to spend 5 hours building and thinking about this thing I definitely would have bought one!
I just cleaned off the hop hindrance (I guess it needs its own name) and it was easier than expected. Some hop debris got inside, but a quick blast from the hose sent it right back out. Probable took around 2 minutes of hosing. Nice! Can't wait to brew with this!
No problem. I started by forming a piece of 1/16" diameter stainless steel rod into a frame. This dictated the size and shape of the hop stopper. I butt welded the ends together, but you could probably silver solder them together if you overlapped by a half inch of so. Then, put one piece of screen on top of the frame and one piece below it, slip in the dip tube, and tie (with stainless steel wire) the dip tube to the screens to loosely hold them together. Then tie the screens to the frame with stainless wire approximately every 1.5". At this point the thing really starts to take shape. You better check the fit in your kettle now as you won't be able to easily undo the next step. Trim the screens around the frame so there is 1/2" of screen beyond the frame (the diameter of the screens will be 1" greater than the frame). Divide that 1/2" of screen (the part that overhangs the frame) into thirds in your head or use some sharpie. Fold the first 1/3 over onto the second third and clamp tightly with pliers. Go all the way around the hop stopper. Then, fold the first folded section onto the third 1/3 and clamp tightly. This should put the folded section tightly up against the frame. The folding steps along with the wire frame really tightens up the screens and makes the whole assembly quite strong. It's a little hard to explain, so it doesn't make sense let me know.
Last question... is this 304 or 316 stainless screen?
Last question... is this 304 or 316 stainless screen?
It's 304ss.
Mikespunchlist
Well-Known Member
Wow..beautiful build. I just finished the top cut outs on my 2 sankeys. While digging through all my shop junk for materials for my jig I came across a 2" test plug for 2" PVC plumbing. For those that don't know about these they are an expandable rubber plug that has a 5/16" threaded stem that is expanded by tightening a wing nut. I removed the wing nut and put a regular nut. Tightening the nut expanded it in the neck of the keg and provides a bolt sticking up that is perfectly centered. I just drilled a hole in my wooden grinder jig and spun it for my cut. I had a perfect 12" hole which fills nicely with the stainless lid I found at the thrift store for a buck.

hatfieldenator
Well-Known Member
- Joined
- Sep 15, 2010
- Messages
- 493
- Reaction score
- 18
Beautiful work on your keggle! I'm not a welder so I have a lot of respect for those of you that can make such nice welds at home! I had mine done by the "pros" at SABCO and I can say that yours are just as nice!
Beautiful work on your keggle! I'm not a welder so I have a lot of respect for those of you that can make such nice welds at home! I had mine done by the "pros" at SABCO and I can say that yours are just as nice!
Thanks, hatfieldenator! I'm sure your kegs are pretty sweet!
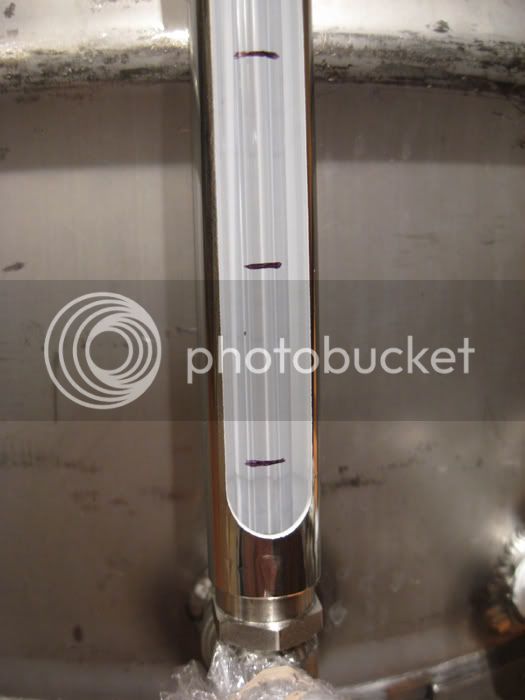
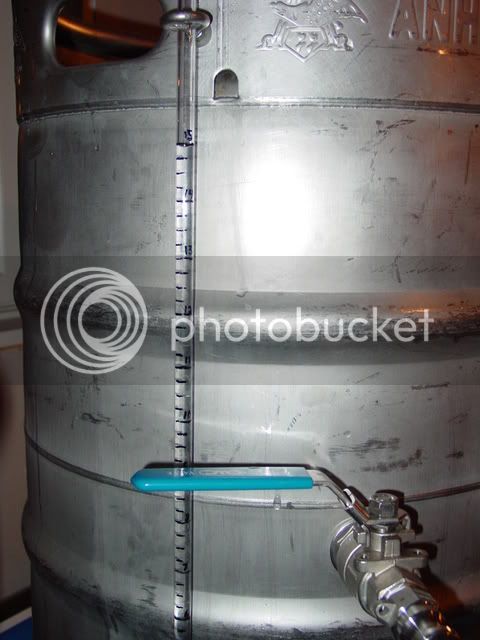
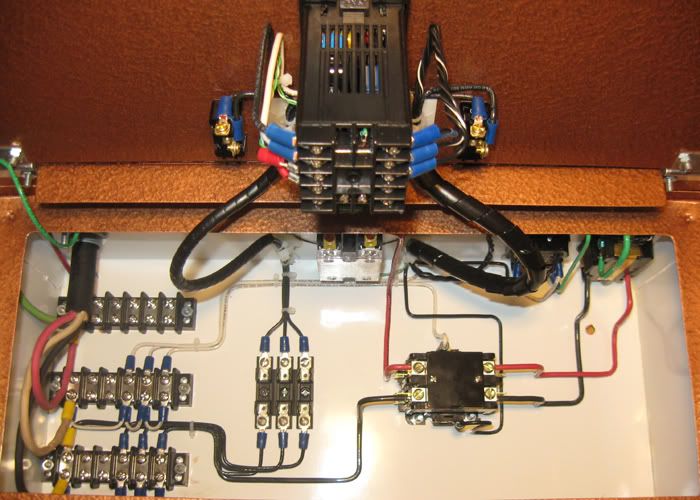
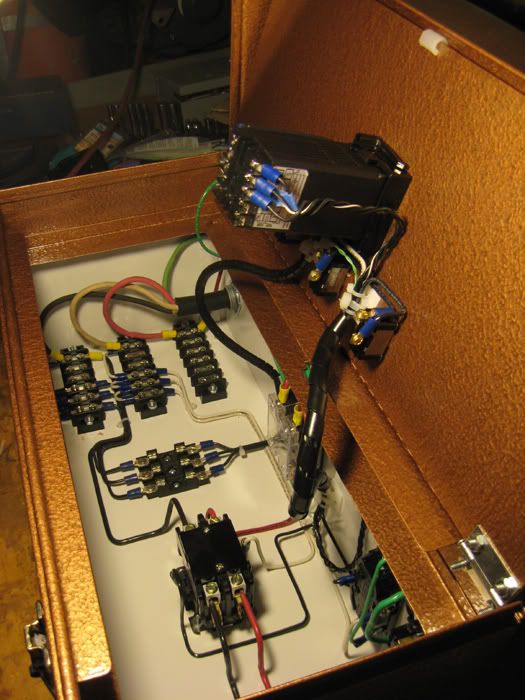
Not much going on with the keggle right now because I've been working on the control panel. I just did paint the inside of the stainless sight glass tube, though. I sprayed it with white high temp engine paint. It makes the sight glass and the graduations (which are just thin Sharpie lines right now) really stand out. I like it a lot better this way.
Dig your progress so far man.
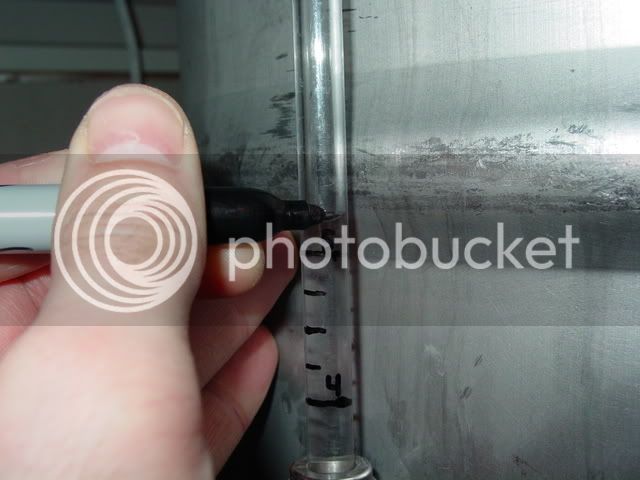
Marking the sight tubes was a bitch, X2 (HLT & BK). Make sure you've got an accessible supply of the good stuff when filling & marking!
TB
Marking the sight tubes was a bitch, X2 (HLT & BK). Make sure you've got an accessible supply of the good stuff when filling & marking!
TB
Dig your progress so far man.
Marking the sight tubes was a bitch, X2 (HLT & BK). Make sure you've got an accessible supply of the good stuff when filling & marking!
TB
Oh, we did! It took a while to do just this one keggle, but not too too long. We calculated the weight of a gallon of water in grams and weighed one gallon at a time on a digital scale down to the gram. It should be pretty damn close. After 15 rounds we were done!
Oh, we did! It took a while to do just this one keggle, but not too too long. We calculated the weight of a gallon of water in grams and weighed one gallon at a time on a digital scale down to the gram. It should be pretty damn close. After 15 rounds we were done!
I ended up marking mine in quart increments, so I filled two keggles one quart at a time! Bleh, I was starting to get drunk by the end of that chore.
Good luck with the rest of your build!
TB
I ended up marking mine in quart increments, so I filled two keggles one quart at a time!
Dude, you're nuts, but that's awesome! If I ever mark to the quart I'll probably just take the easy way out and divide each of my gallon sections into fours... except for where the ribs in the keg are. I'll probably actually measure those.
I just checked out your system thread. Looks very clean. I like it! Nice work! Where did you get those terminal strips? I've been thinking of using something similar, but I haven't been able to find anything. I don't feel like making them!
You mean the bus bars? Those are typically sold for marine use, so I ordered mine from West Marine. They are made by a company called Blue Sea Systems. Look for the 100A minibus.
Keep up the good work!
TB
Keep up the good work!
TB
Thanks, Tiber Brew. I already had some terminal strips, so I just used them. The next version will definitely have something like you used.
The control panel is done except for one minor addition. Testing will be soon!
The control panel is done except for one minor addition. Testing will be soon!
EarthBound
Well-Known Member
Beautiful wiring job!
Beautiful wiring job!
I agree. Damned nice.
Lucky_Chicken
Well-Known Member
very nice build... very intrested since this is my next step also... thanks for sharing!
shroomzofdoom
Well-Known Member
Geebus, is that a control panel or a wiring diagram? Very clean work indeed!
Geebus, is that a control panel or a wiring diagram? Very clean work indeed!
Wait... You mean the wires aren't supposed to look like they do in the wiring diagram?!
Thanks!
sils13
Well-Known Member
I have a question about the sight glass how did u make the or were did u buy the stainless piece holding the polycarbonate tubing? Love this build I may have to copy some of it great work! Cheers!
What size o-ring did you use for the element?
I have a question about the sight glass how did u make the or were did u buy the stainless piece holding the polycarbonate tubing? Love this build I may have to copy some of it great work! Cheers!
The stainless was a piece of tubing I had lying around. I think it's 3/4" or 7/8" OD if I remember correctly. I'll measure it if you want. I put it on a milling machine to cut the slot. I then turned down the OD of the compression fitting nut on a lathe (removing all but the bottom 1/8" of the hex) and opened up the ID of the stainless tube so that the stainless tube slips over the compression fitting nut. In the close up picture of the sight glass that I posted earlier, you can see how the nut was modified because the stainless tube was not seated completely on the nut. That was actually because I had just painted the inside of the stainless tube and the thickness of the paint prevented it from fitting together properly. Anyway, the top "bracket" has a hole bored to the exact size (maybe ~.001" oversize) of the OD of the tubing so it's a perfect fit. Once the bracket is bolted to the keg, it locks the stainless tube and bracket together. I was able to pick up the keg by the stainless tube when it was all assembled... it's not going anywhere!
What size o-ring did you use for the element?
I'm pretty sure it's 1 7/16" x 1/8", but I have to check... I can probably find out tonight or tomorrow.
Similar threads
- Replies
- 63
- Views
- 5K
- Replies
- 12
- Views
- 3K
