iSpindle - DIY Electronic Hydrometer

Homebrew Talk - Beer, Wine, Mead, & Cider Brewing Discussion Forum

Help Support Homebrew Talk - Beer, Wine, Mead, & Cider Brewing Discussion Forum:

This site may earn a commission from merchant affiliate links, including eBay, Amazon, and others.
I use a 100k resistor between A0 and Vbat. This gives me a nice 100k/420k voltage divider to use with the Li-ion battery voltage of 4.2V. The symmetry suits my anal retentiveness well. Although this is different to the standard design having the ability to change the battery conversion factor should allow this quite easily.

However when ever I change the battery conversion factor in the wifi manager configuration it never sticks - it always reverts to the default 191.8. All other parameters in wifi manager can be changed and stay changed.

Looking at the code we have
Code:
if (my_vfact < ADCDIVISOR * 0.8 || my_vfact > ADCDIVISOR * 1.2)
   my_vfact = ADCDIVISOR;
but given that my_vfact is 244 compared to default ADCDIVISOR of 191.8 this statement shouldn't apply.

Any ideas how I could sort this out? Has anyone else had issues changing the battery conversion factor?


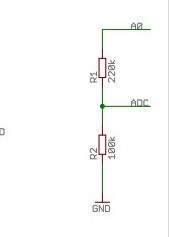
I have no experience with ADC but just wonder how do you make 100k/420k .

According the schematic I found, it should be 100k/(100k+220k)?

d1adc.jpg
 
Hi there,
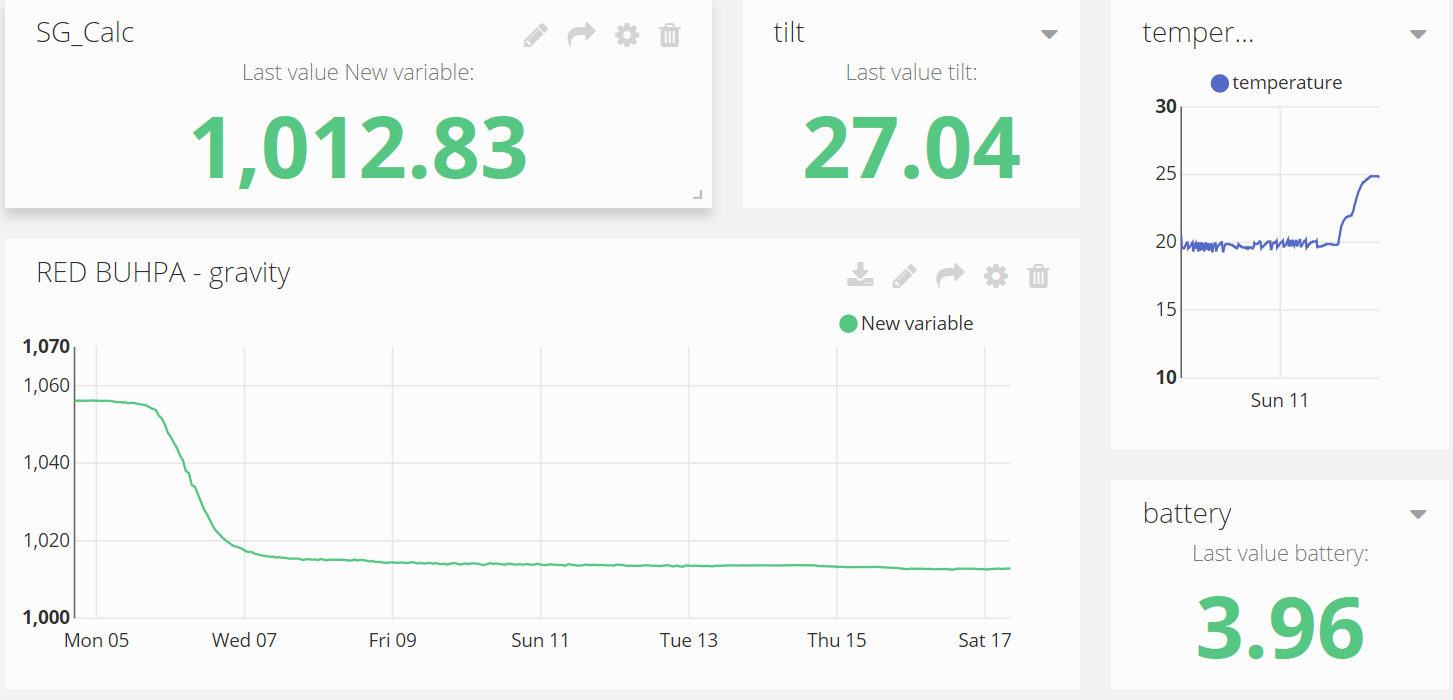
just a picture of the second rund with my alternative Yeast-tube based Ispindel!

I have made 3 gravity measument!
OG= 1053, where Ispindel said 1056!
Mid term Gravity = 1015-16, where Ispindel said 1014.
Lastly, Gravity at 1012-1013, where Ispindel said 1013,5.

So taking the error on using a hydrometer (I find it damm hard to consistent to read it the same way) then I guess this is just as good as hydrometer reading. Only it seems the resulotion is low at high gravity, but as said before as I always will take a OG measument, I can live with that!

Red Buhpa.png
 
Looking at the code we have
Code:
if (my_vfact < ADCDIVISOR * 0.8 || my_vfact > ADCDIVISOR * 1.2)
   my_vfact = ADCDIVISOR;
but given that my_vfact is 244 compared to default ADCDIVISOR of 191.8 this statement shouldn't apply.

If you do the math then you will see that it does apply. 191.8 * 1.2 = 230.16. so the second half of the or statement is true (244 > 230.16)
 
I just dry hopped the above Red Buhpa, and the tilt changed a bit and it reports G=1016, ofcouse when using around 170grams hops for 18 liter it wil impact........!

Just an consideration...!
 
I'm considering using 3D Hubs as well, but I'm not sure what material to select for the printed part.

Here are the choices:

  1. FDM
  2. SLA
  3. SLS

Anyone able to offer some advice?

Thanks!
You want FDM which is "Fused Deposition Modeling." When it gets to materials, select "PLA" which is nearly always the least expensive.
 
Back in March I printed out drawer-combo-short.stl and it was slightly large for the container; I used the hot water trick to make it work but the sled rails warped slightly. I'm going to do a 3d print for another project and thought I'd reprint the sleds (which cost me $6 for 3 last time).

Which design should I print out? Looks like previous file was renamed:
drawer/drawer-combo-short.stl &#8594; drawer/drawer-38x133.stl

There's a slimmer version:
drawer-36x133-thing2231986.stl

And there is another design in the thread but no info on which parts it is compatible with:
https://www.thingiverse.com/thing:2225597

and another, which has different parts so may not work with the original list:
Here it is: https://tinkercad.com/things/gQz4HZnh6by

It is still rough, once the components all come in I'll get more precise measurements. It is based on no math whatsoever, I just hope it tilts close to the right angle. The Huzzah will slide into the inner slot, and the MPU-6050 and perfboard into the outer one. The battery holder has feet that will clip into the holes, and hopefully the little "wings" with keep it stable against the pelting wall.

Parts List
  • Adafruit Feather HUZZAH
  • DFRobot MPU-6050
  • Generic Perfboard for resistors and such
  • DS18S20 Temp Sensor
  • NC Reed Switch
  • Magnet for reed switch
  • Battery clip for 18650
  • Battery
 
Back in March I printed out drawer-combo-short.stl and it was slightly large for the container; I used the hot water trick to make it work but the sled rails warped slightly. I'm going to do a 3d print for another project and thought I'd reprint the sleds (which cost me $6 for 3 last time).

Which design should I print out? Looks like previous file was renamed:
drawer/drawer-combo-short.stl &#8594; drawer/drawer-38x133.stl

There's a slimmer version:
drawer-36x133-thing2231986.stl

And there is another design in the thread but no info on which parts it is compatible with:
https://www.thingiverse.com/thing:2225597

and another, which has different parts so may not work with the original list:

i only tried the original sled from github and was too big, but mine works just fine, has a space for a 20g calibration weight at the bottom.

https://www.tinkercad.com/things/1TcD78DvxQu
 
And there is another design in the thread but no info on which parts it is compatible with:
https://www.thingiverse.com/thing:2225597

and another, which has different parts so may not work with the original list:

I use the one linked on thingiverse. It will work with the standard parts list easily and fit a wider variety of tubes. you can hot glue weights if required.

The one with the huzzah feather will only work with that style board. That board has an integrated battery charger and has completely different dimensions.
 
Back in March I printed out drawer-combo-short.stl and it was slightly large for the container; I used the hot water trick to make it work but the sled rails warped slightly. I'm going to do a 3d print for another project and thought I'd reprint the sleds (which cost me $6 for 3 last time).

Which design should I print out? Looks like previous file was renamed:
drawer/drawer-combo-short.stl &#8594; drawer/drawer-38x133.stl

There's a slimmer version:
drawer-36x133-thing2231986.stl

And there is another design in the thread but no info on which parts it is compatible with:
https://www.thingiverse.com/thing:2225597

and another, which has different parts so may not work with the original list:

I would not recommend using mine. I just got my pelting the other day and haven't had a chance to take exact measurements. I did some rough exploration and found that, while the ID is 40mm at the mouth, it definitely tapers down to about 36mm before the rounded tip starts.
 
I finally almost have all my parts to start assembling two of these. One thing that concerns me is sanitation, especially with the gnarly nub at the bottom of the tube. How is everyone handling sanitation of these? Has anyone seen any issues?
 
Gnarly bits if your concerned could be sanded off carefully, then sanded with 800 wet n dry with brasso should bring the spot back to shiny smooth.
 
I would not recommend using mine. I just got my pelting the other day and haven't had a chance to take exact measurements. I did some rough exploration and found that, while the ID is 40mm at the mouth, it definitely tapers down to about 36mm before the rounded tip starts.

Good idea, I will probably give that a shot. Otherwise I assume people sanitize the tube and cap separately, dry the them upside down, reassemble and pitch?
 
I finally almost have all my parts to start assembling two of these. One thing that concerns me is sanitation, especially with the gnarly nub at the bottom of the tube. How is everyone handling sanitation of these? Has anyone seen any issues?

I clean the tube after used
,charge it before using
,give it a start-san bath before dropping it to the wort.

3 batches and no problem so far.
 
hi i have the follwo hpg problem woth ispindel,
i have already assemble the kit and flash the wemo... i have configure it with ubidots every 15 min after restart the fist signal send to ubidots and thats it there is no signal anymore.
after restart and reconfigure same issue acuurs..
any idea?
 
hi i have the follwo hpg problem woth ispindel,
i have already assemble the kit and flash the wemo... i have configure it with ubidots every 15 min after restart the fist signal send to ubidots and thats it there is no signal anymore.
after restart and reconfigure same issue acuurs..
any idea?

you might be having the "deep sleep" issue for the wemos, you can use a Schottky diode BAT43 instead of the 470 Ohm resistor

you can find more info here
https://github.com/universam1/iSpindel/issues/59
 
you might be having the "deep sleep" issue for the wemos, you can use a Schottky diode BAT43 instead of the 470 Ohm resistor

you can find more info here
https://github.com/universam1/iSpindel/issues/59

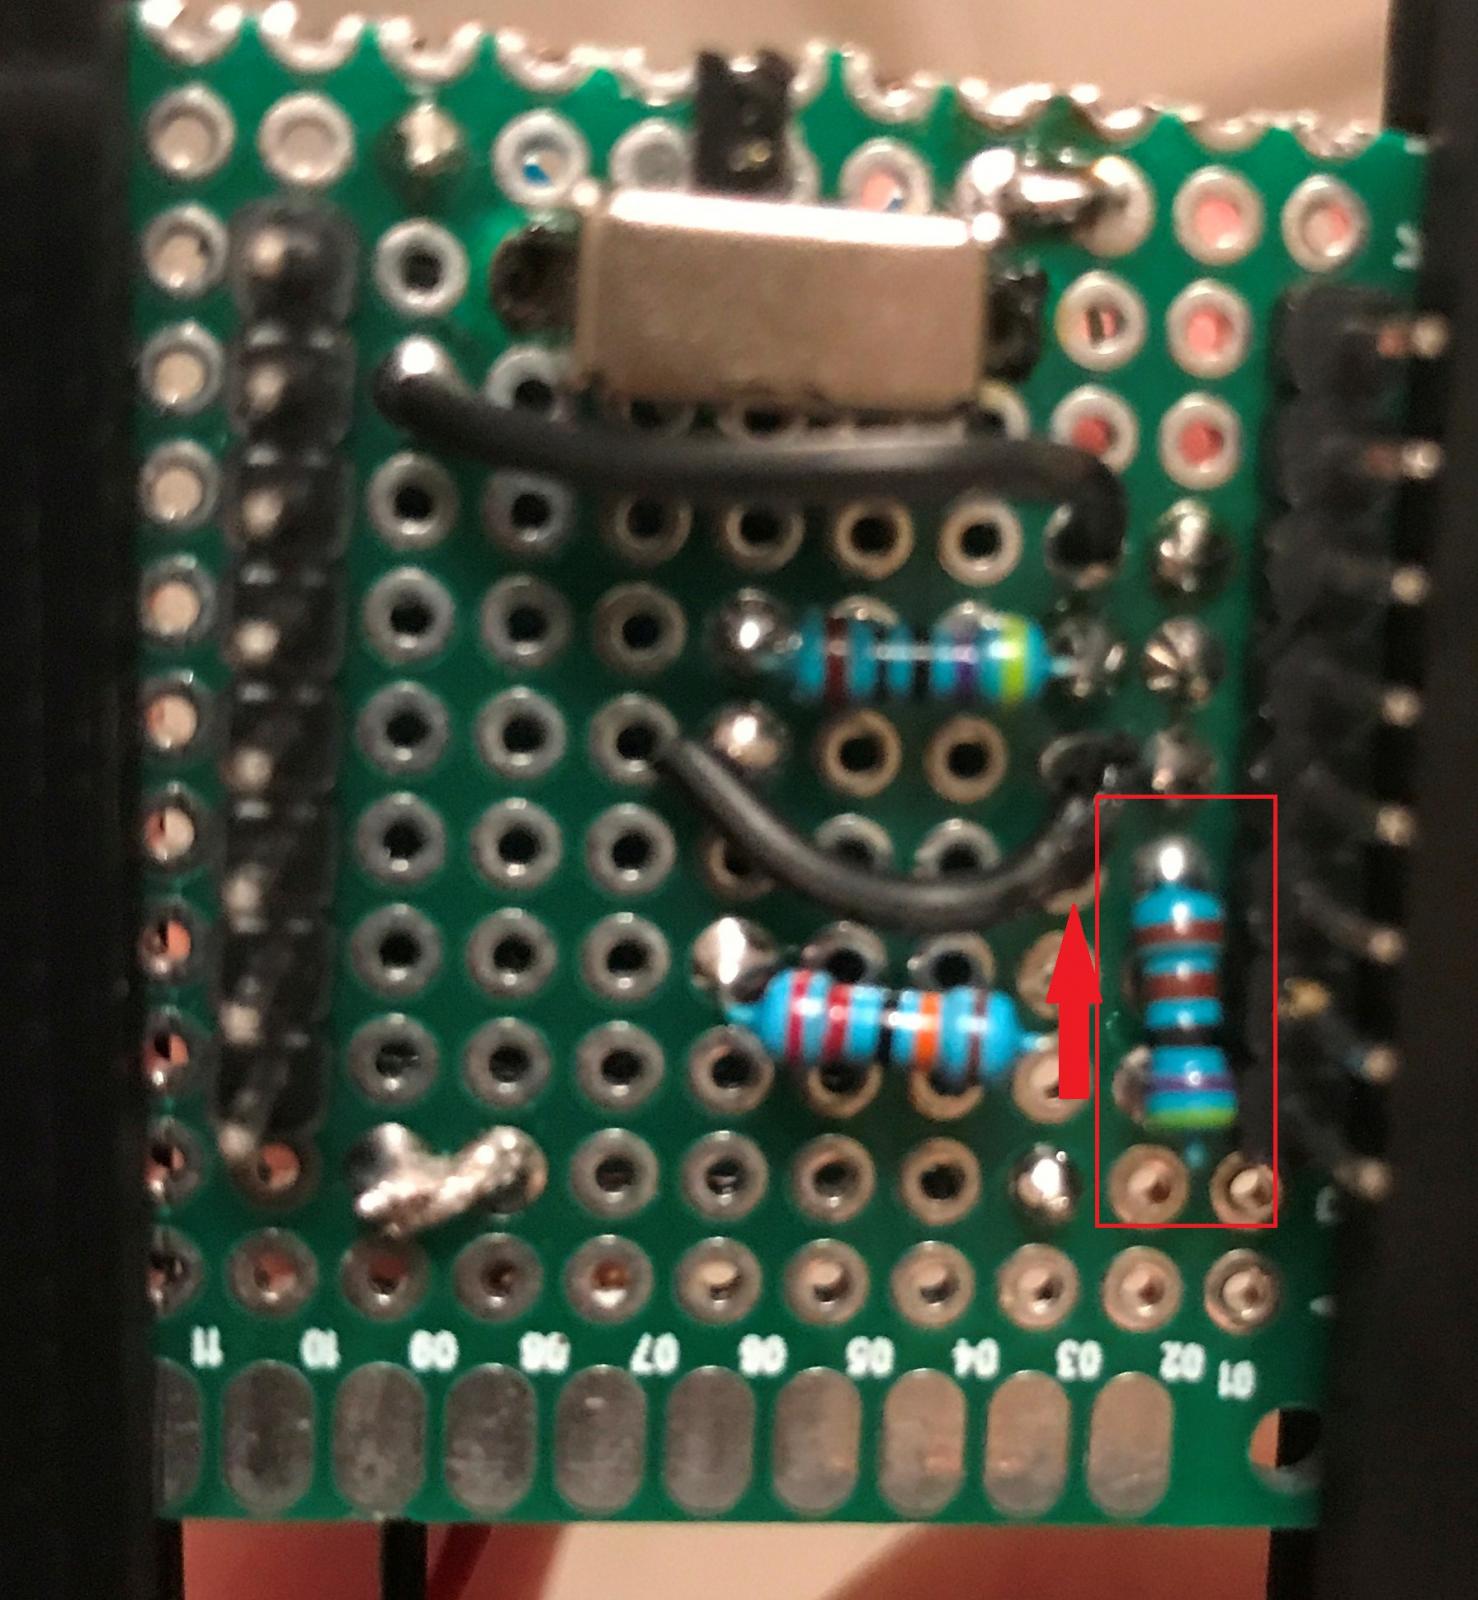
could you please help me where i must put the BAT43 and with which direction?
is the the following schema correct?
should i change the following resistor with the BAT43 with direction shown with the red signal?

IMG_4468 (1).jpg
 
I am actually waiting for my diodes too

My tests today work with the diode cathode (ring) at D0. This is with a wemos flashed with iSPindel 5.12 and only temperature sensor connector. The power is supplied direct by USB.

It did not work when the cathode was at the RST end.

It may not have the same result when using a battery as the power supply
 
could you please help me where i must put the BAT43 and with which direction?
is the the following schema correct?
should i change the following resistor with the BAT43 with direction shown with the red signal?

Last update**
issue with the deep sleep solved with a BAT43 diode i place it as shown in my schema before!!
New issue is that tilt shows only 90 and 0 i think that something goes wrong with the GY-521 Gyro & Acceleration Sensor
has anyone the same problem?
i think that shows 90'and after some minutes goes to sleep shows,0 after 5 minutes the same again 90 or 89.99 if i wiil restart maybe shows for a second the corrct angle after a second 90 again
 
Here it is: https://tinkercad.com/things/gQz4HZnh6by

It is still rough, once the components all come in I'll get more precise measurements. It is based on no math whatsoever, I just hope it tilts close to the right angle. The Huzzah will slide into the inner slot, and the MPU-6050 and perfboard into the outer one. The battery holder has feet that will clip into the holes, and hopefully the little "wings" with keep it stable against the pelting wall.

Parts List
  • Adafruit Feather HUZZAH
  • DFRobot MPU-6050
  • Generic Perfboard for resistors and such
  • DS18S20 Temp Sensor
  • NC Reed Switch
  • Magnet for reed switch
  • Battery clip for 18650
  • Battery

@MBasile
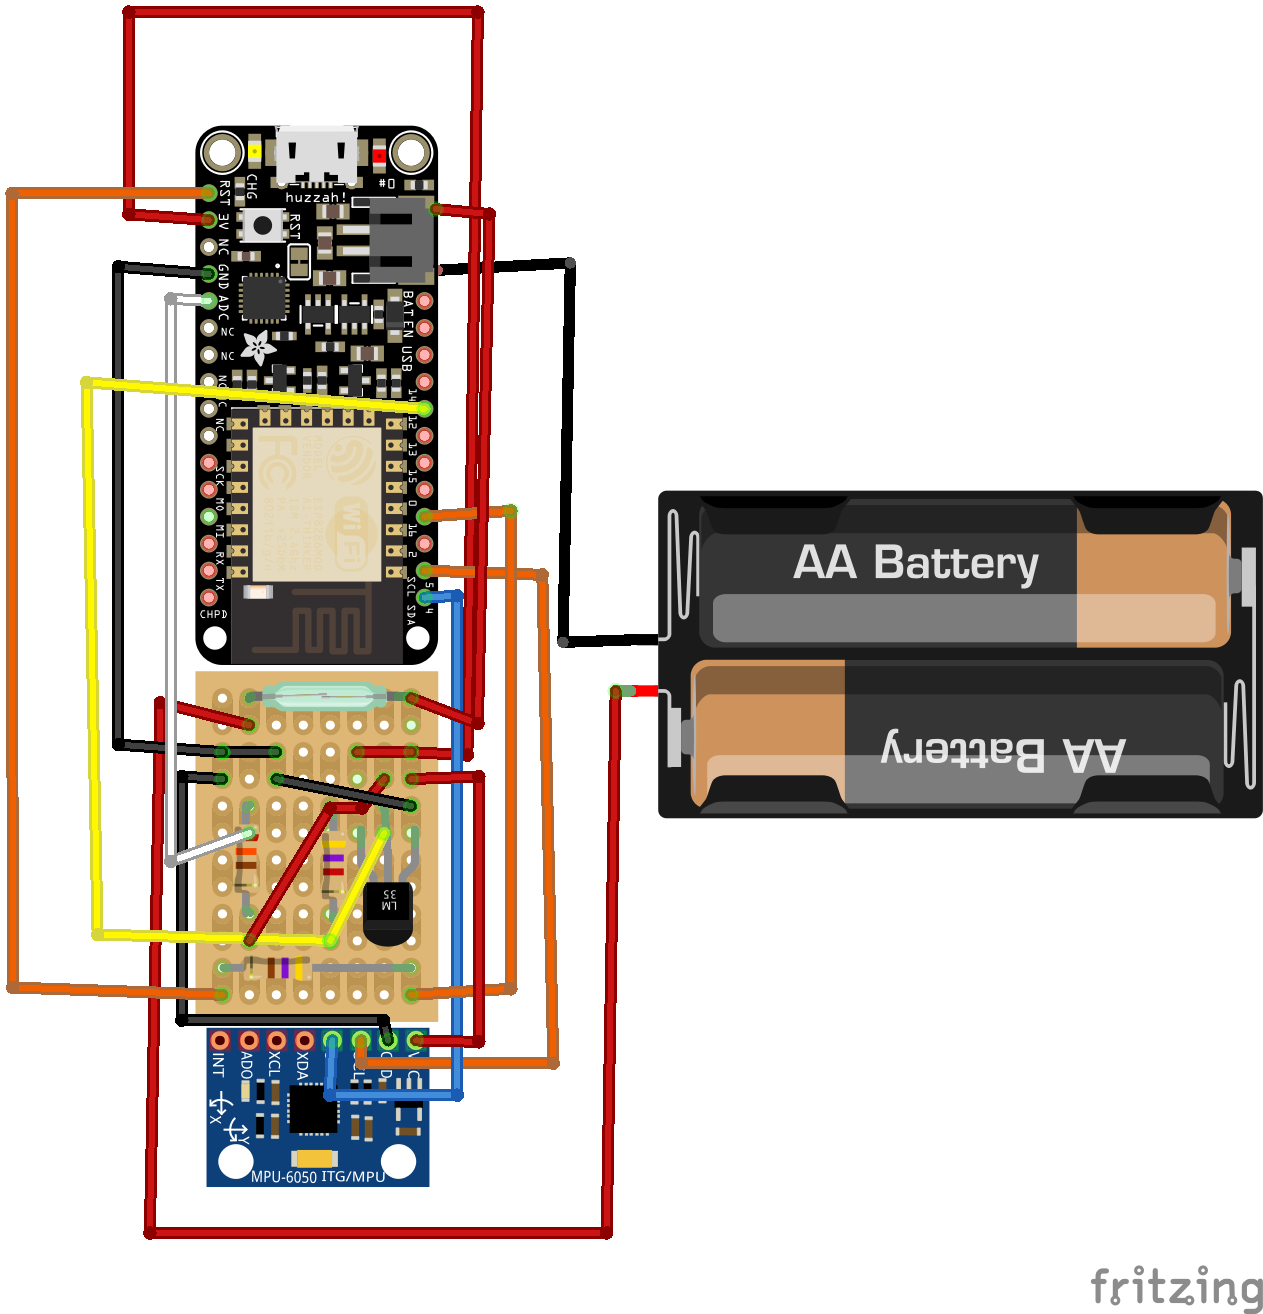
Do you have a wiring diagram for using the Huzzah (I actually ordered using your list), just got mine in today and I seem a bit confused :(

Thanks,
Daniel
 
@MBasile
Do you have a wiring diagram for using the Huzzah (I actually ordered using your list), just got mine in today and I seem a bit confused :(

Thanks,
Daniel

Hey Daniel,

I have a rough idea of the wiring that I put together a few weeks ago. I'll probably be prototyping the setup this weekend.

The battery connection is not how it will be when I'm done. I need to pick up a JST connector from Fry's to plug into the battery plug on the huzzah. Clearly the battery will not be the AAs, but the single 18650.

***THIS IS ROUGH, HAS NOT BEEN TESTED, AND IS NOT GUARANTEED TO WORK***

iSpindel_bb.png
 
I got my Huzzah flashed tonight, but I can't get it to connect to my wifi. Every time I enter the credentials and hit save, it restarts to radio mode but doesn't ever connect. Has anyone else run into this issue?

In the serial monitor I see that I'm getting the error "ERROR config corrupted." It looks like this may be an issue with to having any of the device set up yet, I'm just trying to get the board flashed and running first.
 
@MBASILE

In your schematic you have the red/black battery connection flipped from what I see on the Huzzah Feather pin out sheet.

By flipping the red/black on the Huzzah I was able to turn it on and flash the newest firmware. Still no power to the MPU but still trying to figure it out
 
@MBASILE

In your schematic you have the red/black battery connection flipped from what I see on the Huzzah Feather pin out sheet.

By flipping the red/black on the Huzzah I was able to turn it on and flash the newest firmware. Still no power to the MPU but still trying to figure it out

Thanks, I'll update that this evening.
 
@MBasile
Did you have time to look at it? get it flashed/working?

Yes, I prototyped it and got it up and going. The tilt sensor got power, but I didn't see it updating the tilt reading on the webpage. I haven't had a chance to look into it more though.
 
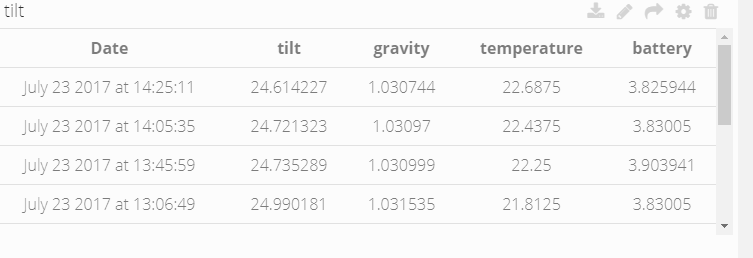
Anyone figured how to get gravity readings with 3 decimals? I have tried several polynoms to get readings with 3 decimals, but the readings shows only two decimals. I also tried without decimals, from 1000, but then the solution is with 10 as 1040 and 1050 and so on. Is there anything that I don't get. May be iSpindel fw or ubidots?
 
Anyone figured how to get gravity readings with 3 decimals? I have tried several polynoms to get readings with 3 decimals, but the readings shows only two decimals. I also tried without decimals, from 1000, but then the solution is with 10 as 1040 and 1050 and so on. Is there anything that I don't get. May be iSpindel fw or ubidots?

ArduinoJson, the library used by iSpindel, outputs two decimals by default. To output more, explicit specification is necessary. I don't see that in the source code.

I thought using integer value like 1049 instead of 1.049 should work. What is your formula?
 
Anyone figured how to get gravity readings with 3 decimals? I have tried several polynoms to get readings with 3 decimals, but the readings shows only two decimals. I also tried without decimals, from 1000, but then the solution is with 10 as 1040 and 1050 and so on. Is there anything that I don't get. May be iSpindel fw or ubidots?

I'm running 5.12 (I think) and it outputs many many decimals

ZwuL33z.png
 
ArduinoJson, the library used by iSpindel, outputs two decimals by default. To output more, explicit specification is necessary. I don't see that in the source code.

I thought using integer value like 1049 instead of 1.049 should work. What is your formula?

My polynom function for gravity is: 0.001109232x^3 + -0.154166118x^2 + 8.064994279x + 912.958345084 where x is tilt.
 
Has anyone had any success sourcing a vial/tube that would fit in a standard glass carboy neck?

I've measured my carboys, and it seems as though a tube with a total OD (with cap) of less than 28mm ought to fit. I roughly figured that would come to about 20mm ID on a tube with similar wall and cap thread thickness. That should leave just enough room for an 18650 battery (and wire from the bottom) to fit in the vessel. Only problem is, of course, finding the right diameter tube and cap :-/

I'm hoping to obtain a 3D printer soon to prototype a modified sled that would fit an ESP-12F on a narrow carrier board (along with the required electronic components), all inside a ~20mm diameter tube.

Am I insane? Has this been discussed before and I somehow missed it searching this thread?
 
Anyone figured how to get gravity readings with 3 decimals? I have tried several polynoms to get readings with 3 decimals, but the readings shows only two decimals. I also tried without decimals, from 1000, but then the solution is with 10 as 1040 and 1050 and so on. Is there anything that I don't get. May be iSpindel fw or ubidots?

Hi,
Did you manage to get 3 decimals in ubidot Reading?

/Jesper
 
Back
Top