Inkbird Quick and Easy Test Setup

Homebrew Talk - Beer, Wine, Mead, & Cider Brewing Discussion Forum

Help Support Homebrew Talk - Beer, Wine, Mead, & Cider Brewing Discussion Forum:

This site may earn a commission from merchant affiliate links, including eBay, Amazon, and others.

Hwk-I-St8

Supporting Member
HBT Supporter
Joined
Jan 10, 2014
Messages
1,916
Reaction score
869
Location
The Hawkeye State
I have an Inkbird PID, temp probe, junction box and SSR/heatsink. The PID is 100-240v AC, the SSR is 24-340V AC load with 3-32V DC. It looks like this:

1618233563884.png


I have a few questions. I'm thinking I'll test this as a 240v setup since I've got a 240 outlet in my brewing area. I don't want to invest a bunch more money in it for the initial test. I need a simple circuit. I'll need power input/output and an on/off switch. I'll probably just run the temp probe into the box with strain relief.

Also, do people normally install these with the heatsink mounted inside the box? The way this mounts to the SSR, that's the only way I can see to mount it. I could have the top plate of the heatsink on the outer edge of the box I think.
 
I’ve mostly seen heat sinks mounted on the outside for 240V/30A control panels. If you don’t see a heat sink on the outside, my guess is there’s one on the inside. This heat sink can be mounted to DIN rail which is often found inside control panels. I don’t know enough about panel design to say whether you can safely use an internal heat sink for a 240V/30A panel. Hopefully someone with more knowledge can chime in.
 
Also I found a circuit diagram here. Note that the circuit is fused - always a good idea. You didn’t mention having a fuse in your original post but that is definitely something to spend some money on. Most DIY control panel kits I’ve seen also include a main power contactor and a boil contactor in addition to the SSR but again I’m not a panel expert so I can’t say for sure that you should absolutely have those, but from what I’ve read they provide another layer of protection for the hardware by allowing current to be physically switched off.
 
Also I found a circuit diagram here. Note that the circuit is fused - always a good idea. You didn’t mention having a fuse in your original post but that is definitely something to spend some money on. Most DIY control panel kits I’ve seen also include a main power contactor and a boil contactor in addition to the SSR but again I’m not a panel expert so I can’t say for sure that you should absolutely have those, but from what I’ve read they provide another layer of protection for the hardware by allowing current to be physically switched off.
Fusing is only needed if you reduce the wire size to something that isn't rated for the full current of the breaker serving the power supply circuit. Fuses should be placed as close as possible to the point where the wire size reduction takes place. If you have split phase 240V (like the USA), then you should fuse both hot lines. For single phase 240 (Europe, etc.) you don't' have to fuse the neutral.

For testing purposes (or a really simple brewing panel) you can use a Leviton 3032 DPST switch (or equivalent) in the circuit shown by InkBird in the link above. Contactors allows you to build more flexibility, functionality (and idiot proofing) into a brew panel design.

Brew on :mug:
 
...

Also, do people normally install these with the heatsink mounted inside the box? The way this mounts to the SSR, that's the only way I can see to mount it. I could have the top plate of the heatsink on the outer edge of the box I think.
Heatsinks in the box don't work well without fans, and air inlets and outlets. The SSR can dissipate up to ~35W during operation, so proper cooling is critical. The usual practice is to mount the heatsink to the outside of the enclosure, and cut a hole in the enclosure so that the SSR can be mounted directly to the heatsink (with a little thermal paste in between to insure good contact.) However, this mounting method is tricky with the particular heatsink design that you have.

For a metal enclosure, you can strip the paint inside and out where the SSR/heatsink will mount, and sandwich the enclosure between the SSR and heatsink. Here thermal paste needs to be at both interfaces, and mounting should make sure there is good contact (everything flat) between the three elements of the sandwich.

Brew on :mug:

Yeah, that's what I thought. I looked at the heatsink and couldn't really see a good way to mount it to the box. I may just put it all on the back burner as the effort and additional cost will likely outweigh the benefit. I didn't really think it through when I jumped on the deal.
 
Heatsinks in the box don't work well without fans, and air inlets and outlets. The SSR can dissipate up to ~35W during operation, so proper cooling is critical. The usual practice is to mount the heatsink to the outside of the enclosure, and cut a hole in the enclosure so that the SSR can be mounted directly to the heatsink (with a little thermal paste in between to insure good contact.)

So doug293cz, I'm curious what you make of this controller from Brau Supply. It appears that the enclosure is metal, so perhaps the entire enclosure is acting as a heat sink? If it's only meant to output 15A to the heating element there'd be only 25% the heat dissipated from an equivalent SSR, right (since P=I^2 R)? There's no rear view of the 240V controller from Brau Supply but I'd assume there's a heat sink back there.
 
So doug293cz, I'm curious what you make of this controller from Brau Supply. It appears that the enclosure is metal, so perhaps the entire enclosure is acting as a heat sink? If it's only meant to output 15A to the heating element there'd be only 25% the heat dissipated from an equivalent SSR, right (since P=I^2 R)? There's no rear view of the 240V controller from Brau Supply but I'd assume there's a heat sink back there.
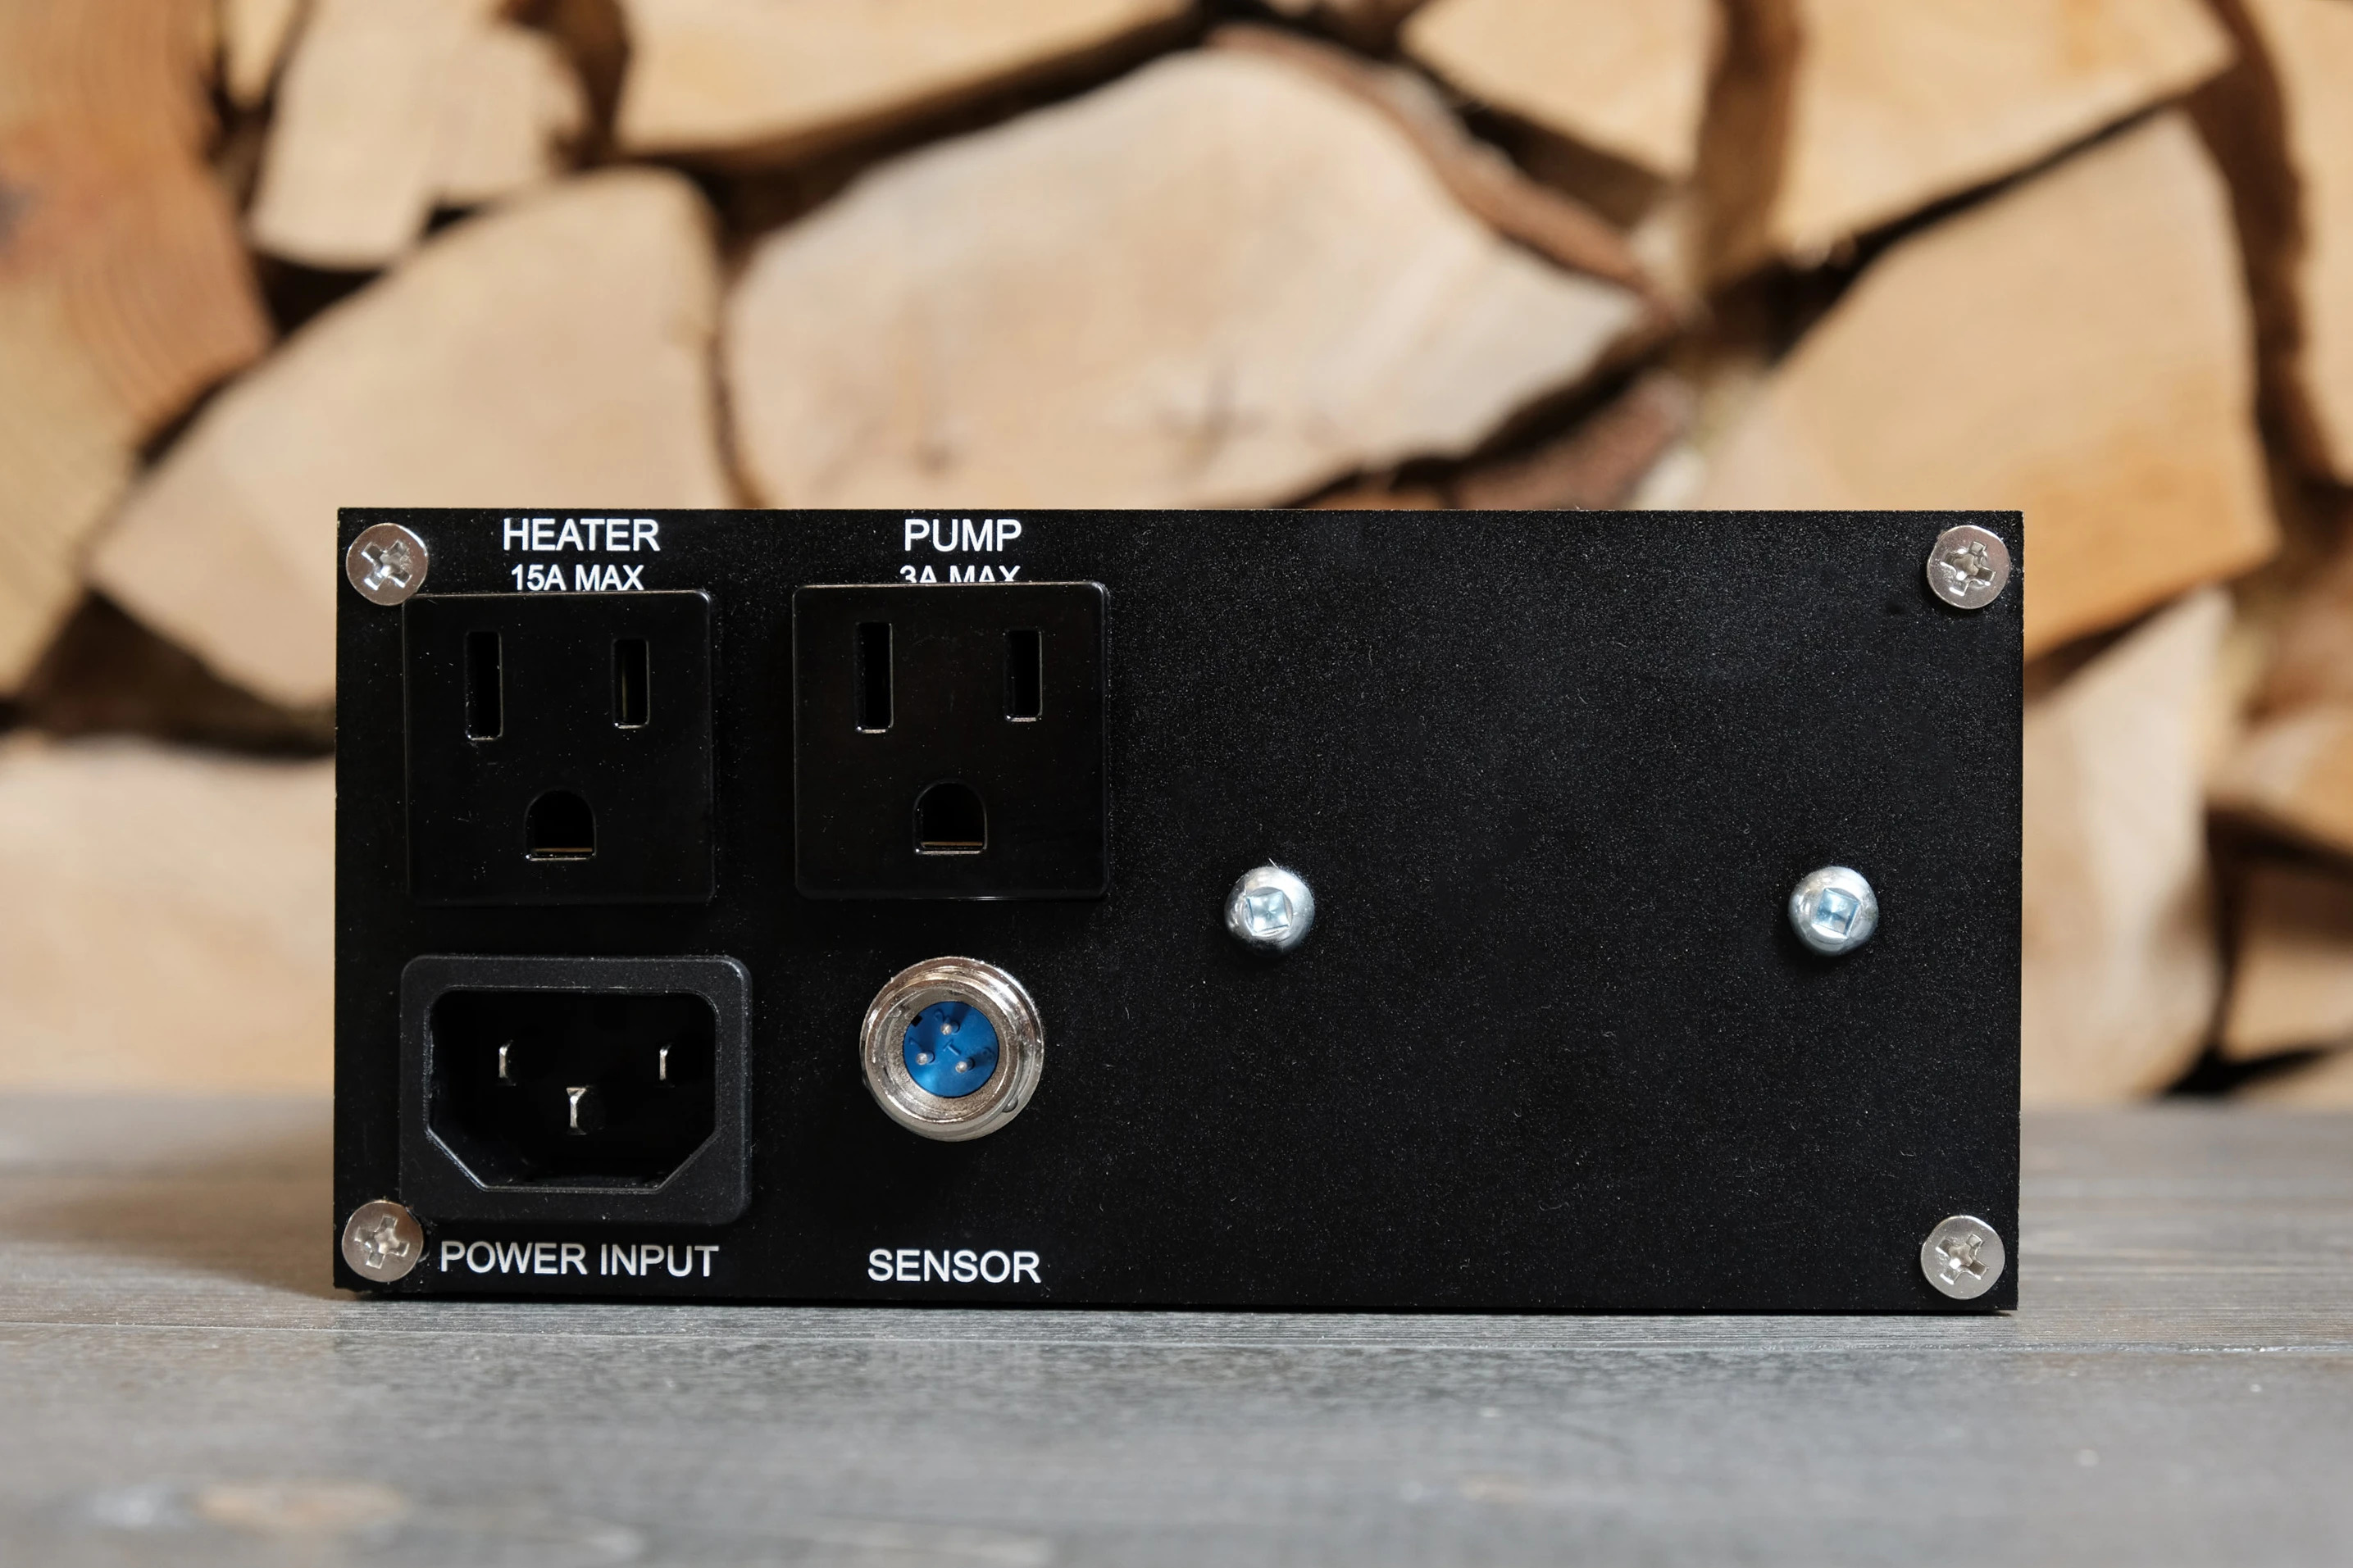
Yes, they are using the enclosure as the heatsink. I'm willing to bet that the two screw heads, that appear to do nothing, in the pic below are what holds the SSR to the enclosure wall.

1618268680565.jpeg


P = R * I^2 is the correct formula to use when you have a constant resistance, however an SSR does not behave like a resistor. The voltage drop across the device varies only slightly with varying current at working current levels. For the power dissipated in an SSR, we must use the formula: P = V * I, where V is the voltage drop across the SSR, not the circuit operating voltage. The max "ON" state voltage drop for the types of SSR's we use is usually about 1.5V, so at 15A current, the power dissipated in the SSR would be 1.5 V * 15A = 22.5W. (For the case of a 5500W element @240V, the current draw is ~23A, so the SSR power dissipation is 1.5V * 23A = 34.5W.)

I'd be interested to know how warm the enclosure gets when this device is putting out 100% duty cycle at 15A. If the case is too hot to hold your hand on (near the two screws shown above), then the SSR is likely running too hot for reliable operation. If Brau Supply isn't getting a lot of angry calls and e-mails about the unit, then it's probably got adequate heatsinking for the SSR.

Brew on :mug:
 
For a video on how to wire and program an Inkbird PID controller go to youtube and search “how to wire an Inkbird PID controller “from George from barley and hops brewing. Great videos, explained so you can understand and George is a character, you’ll enjoy and learn.
 
Back
Top