• Please visit and share your knowledge at our sister communities:
  • If you have not, please join our official Homebrewing Facebook Group!

    Homebrewing Facebook Group

ICEMASTER MAX 2

Homebrew Talk

Help Support Homebrew Talk:

This site may earn a commission from merchant affiliate links, including eBay, Amazon, and others.
As a follow-up, I employed the heating feature this weekend and it worked perfectly. I first used it to maintain ferm temps overnight as the temp was getting to the low 60s in my garage and fermentation was slowing (and thus cooling off). I also used to it warm back up to about 70F after a soft crash that went to about 55F.

What are you using for a heater? I'm looking for an option for a conical fermenter that's less expensive than the Spike offering.
 
What are you using for a heater? I'm looking for an option for a conical fermenter that's less expensive than the Spike offering.
I am using the heat pad that comes with the Spike temp control package. It attaches to the inside of the neoprene jacket via velcro and wraps around the cone. I'm not sure of their dimensions, but you might be able to use a heat belt/wrap for carboys (of course this would have to sit higher up on the conical)? something like this perhaps: FermoTemp® - Electric Fermentation Heater
 
Thanks. Yes, I have something like a fermwrap that for carboys. I'll likely try it out with the new conical and see if it will fit. Otherwise I'm going to have to try a seedling or reptile type heater.
 
For instance - this type of thing could work. It has a much higher watt density than brewing specific heaters, but in contact with a large stainless tank, it might not be too bad. I'd likely try to position it clost to the thermowell to minimize overshoot due to mixing time.

ABN Electric Silicone Heating Pad
 
@BoilerInSoCal how did you wire up the connection from the spike heating pad cord to the Max2? Did you cut one of the legs of the extension cord and wire each side of the cut wire to the two open blade connectors on the stc1000 and then the extension cord plug into the wall socket? Or cut the plug off the extension cord and connect each wire to the two blades on back of the stc1000 controller?
 
As a follow-up, I employed the heating feature this weekend and it worked perfectly. I first used it to maintain ferm temps overnight as the temp was getting to the low 60s in my garage and fermentation was slowing (and thus cooling off). I also used to it warm back up to about 70F after a soft crash that went to about 55F.

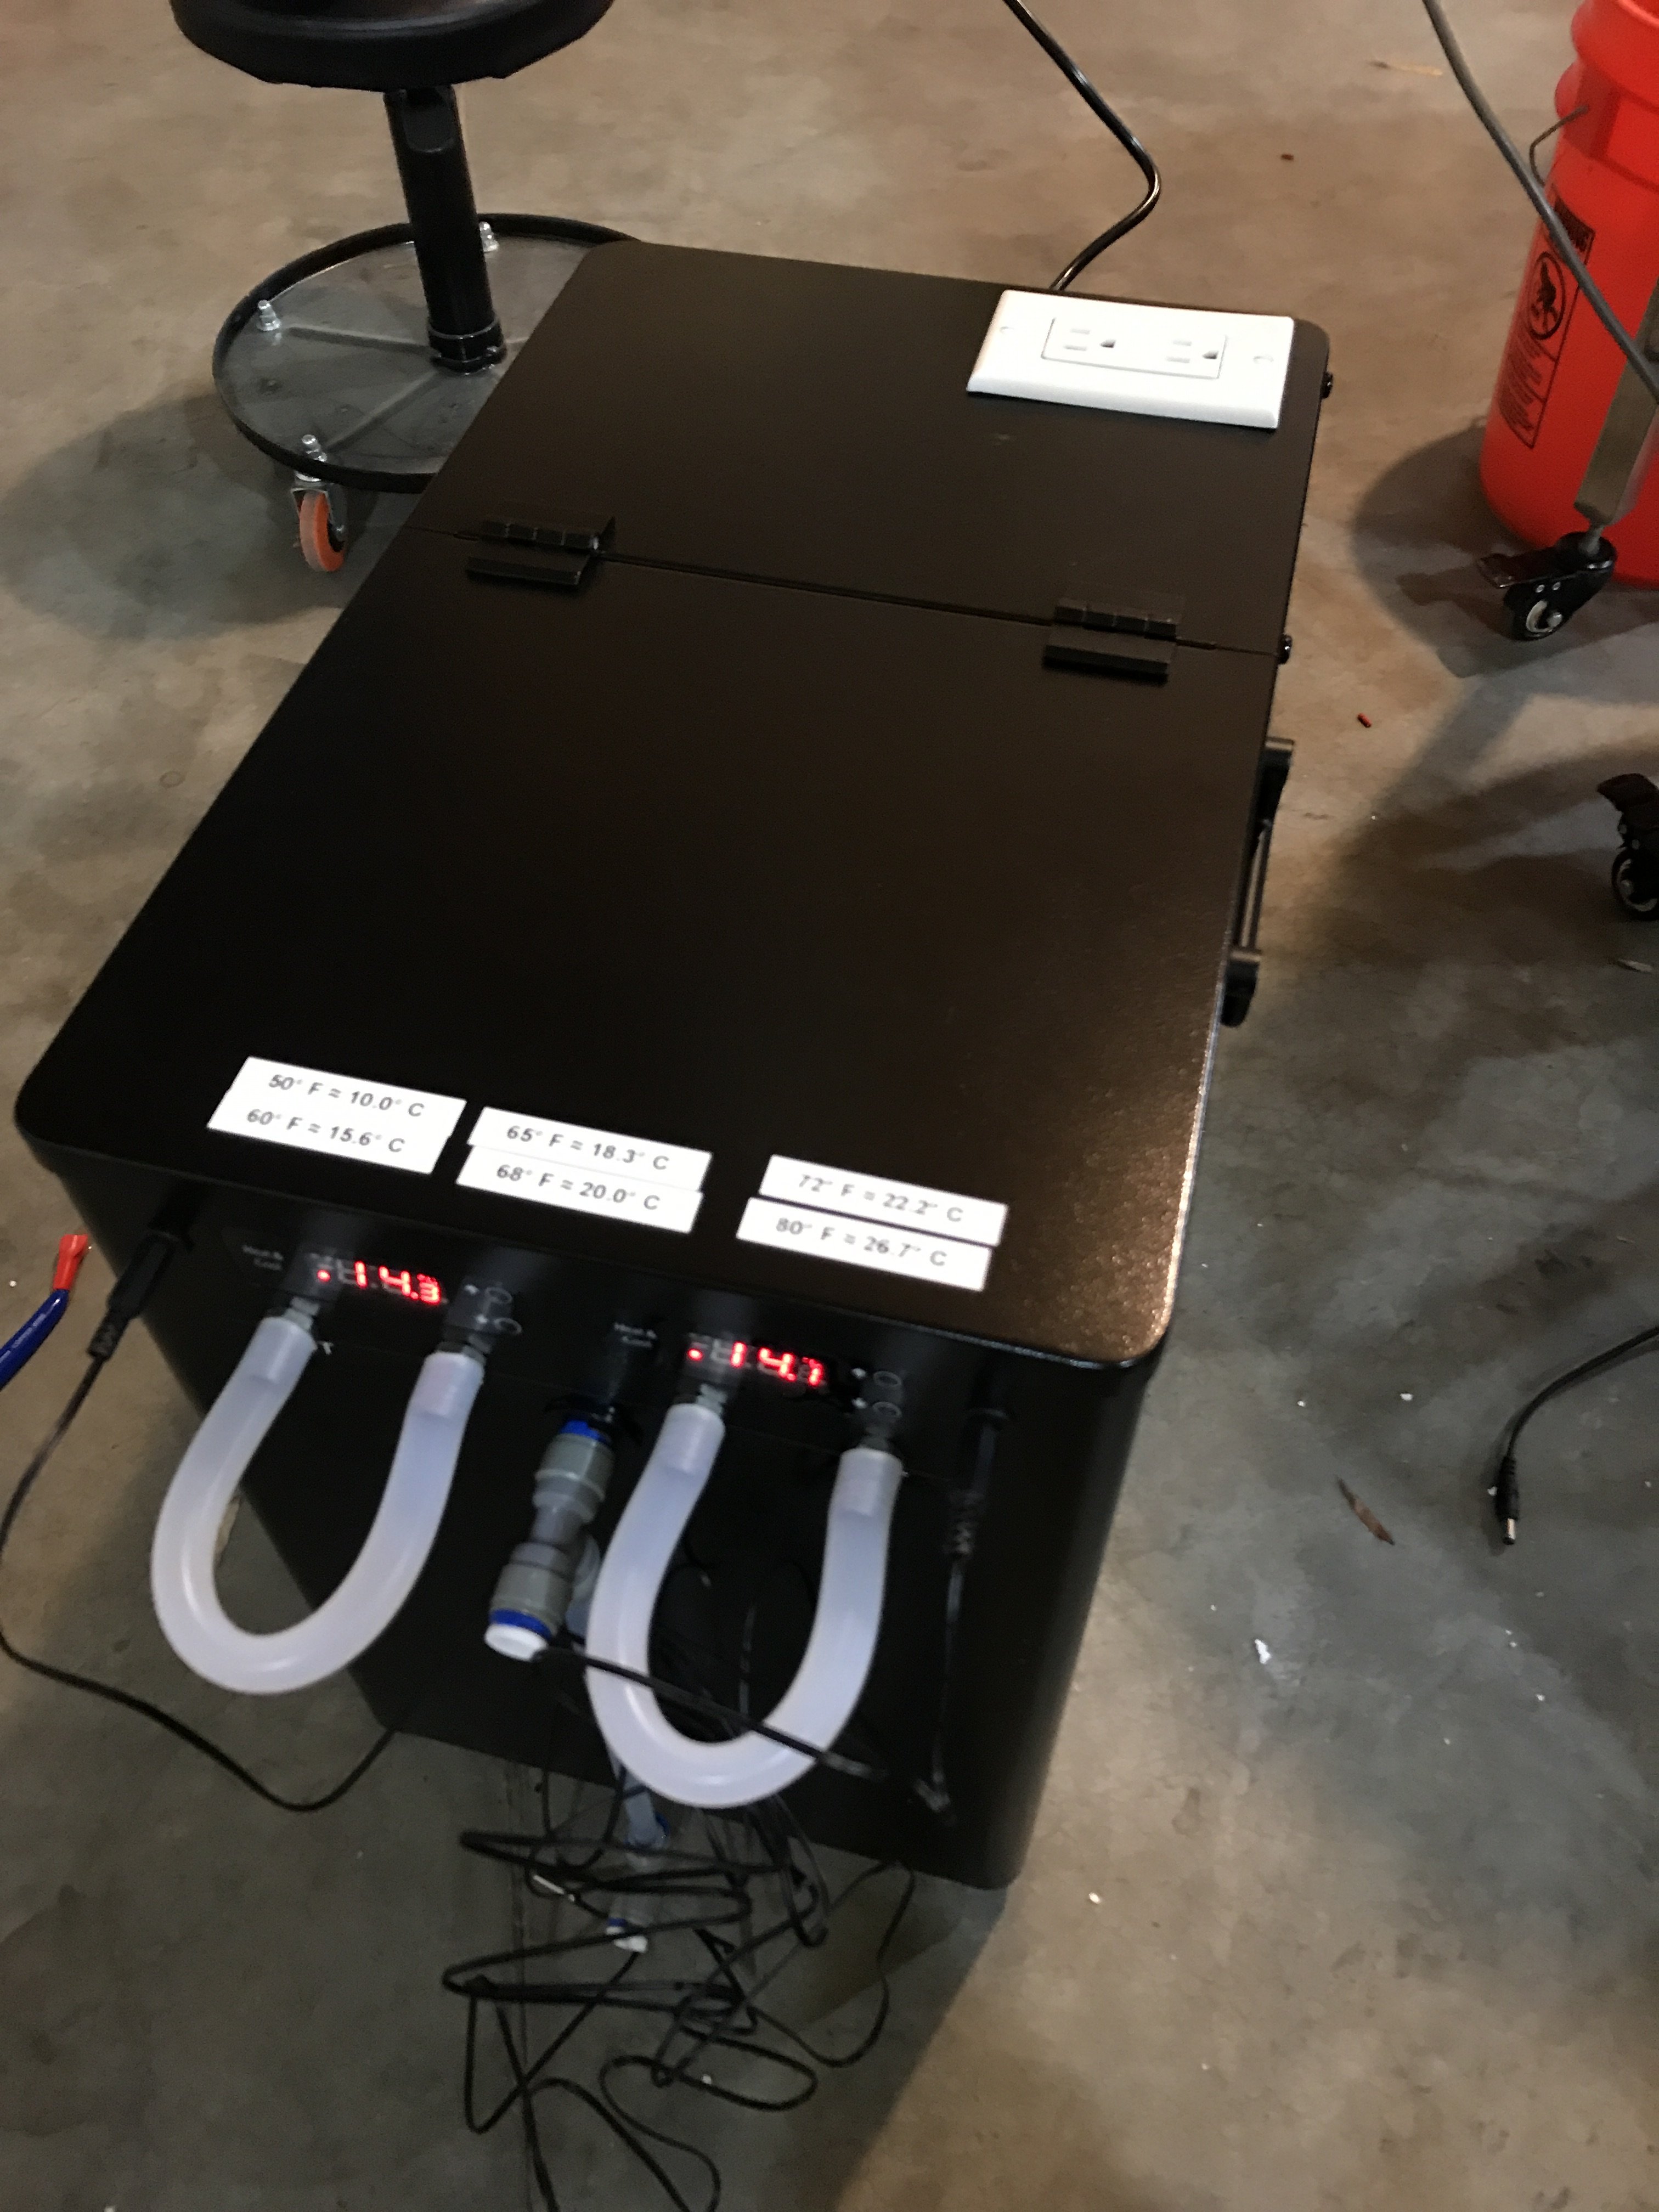
With maintaining temps, I never saw more than a 0.4 C degree overshoot, so I did not have any conflict with the cooling and thus there was no yo-yo type effect that I had read about. After the soft crash, I set the temp to 70F (21.1C) before I went to bed and woke up to 21.1C. So, I am quite pleased with how this is working on all fronts! Note that this batch was a half batch: 6 gallons in a CF10 (neoprene jacket and the spike heat pad).

And @blazin, this will definitely work for lagering 12 gallons. I've gotten 12 gallons down to 34F no problem for a cold crash with the Max set at 28F. Obviously, the unit runs more at this temp, but it certainly wasn't continuous.

That’s great to hear. I’m pumped to finally get my basement brewery going. Got the glycol chiller ordered and my wife is getting me the SSBrewtech unitank for Christmas.

Now I just need to get the plans done for the basement....
 
I hard wired in the heating relays on mine today to an outlet on the lid and confirmed they work as expected to power some 120v seed mats for heating. Unlike the Kegland manual posted (which is for 240v version), this does NOT have mains on the controllers and motors. They are 12v. But the overall instructions for wiring in the hot leg of an outlet or peripheral is sound and works.
https://mossycupbrewing.blogspot.com/2020/12/glycol-chiller-and-heater.html
 

Attachments

  • IMG_7294.JPG
    IMG_7294.JPG
    1.3 MB
@BoilerInSoCal how did you wire up the connection from the spike heating pad cord to the Max2? Did you cut one of the legs of the extension cord and wire each side of the cut wire to the two open blade connectors on the stc1000 and then the extension cord plug into the wall socket? Or cut the plug off the extension cord and connect each wire to the two blades on back of the stc1000 controller?
The STC1000 does NOT have heating relay blades on it. I wish it did, so I could put a fish tank heater in the reservoir and use the fluid to "heat" a higher than ambient target. The heating relays are ONLY on the independent vessel controllers (these are not STC1000, but not sure what model they are).

I didn't want to have to modify and wire in dedicated wires on peripherials, so I wired in switched outlets to handle this. I ran dedicated 120V supply to the input blade on each vessel temp controller from the main switch (brown wire), then the output of each controller relay to separate outlet sockets (bus bar broken to make separate) and a dedicated neutral from the main power switch (blue wire).
 
Last edited:
@jeffalanmcclain I looked at your blog post - that's helpful. Are you saying that you CAN use the relay built in to the controller to switch the 120V hot wire but that there is no neutral run to the controller? Or did you use an external solid state relay to switch the outlet?
 
@jeffalanmcclain I looked at your blog post - that's helpful. Are you saying that you CAN use the relay built in to the controller to switch the 120V hot wire but that there is no neutral run to the controller? Or did you use an external solid state relay to switch the outlet?
You CAN just switch the HOT side (even though it is 12v controlled, not 120v it is isolated and works). Just run a hot wire from the main switch to one of the spades, then out of the other one to an outlet (other side of outlet back to neutral on switch and earth ground). Or you can wire up like the instructions show to just cut the hot side and run to the spades...works fine...
 
Thanks for the info. I am eagerly awaiting the delivery of my Icemaster. I'm sure that morebeer got absolutely slammed with orders over the weekend.

What 120V heating mat are you using? I'm debating between being cheap and ordering an oil pan or seedling heater vs blowing the $$$ on the Spike 120V heater.

I just got a couple cheap 20W seedling mat heaters on amazon. It is slow, but so far it is enough to maintain. I have a 500W fish tank heater that I was hoping would work with a relay on the STC1000, but it doesn't have one so I'm going to have to replace it with an inkbird and wire that in next to heat the glycol to a target temp for ales when the shop is cold (it is sub 50'F right now, which is good for lagers).
 
20W is probably not enough. It dips down into the low 40s overnight here and I'd like to be able to ferment at 70-90 for Belgian and kveik strains. There are various silicone mat heaters that might fit the bill such as a 2x5 inch engine heater that puts out 50W or a 4x5 that puts out 100W.
 
/nod. that was why I went with a wired outlet. I can swap out heaters or whatever as long as it is 120v plug. Honestly, I'm just going to replace the STC-1000 with an ITC-1000 inkbird for $15 that has 'C and 'F *and* has a heating relay output and wire that up to the 300W fish tank heater and put it in the glycol bath. Then I need to pump into fermentation vessel on heat (only can run one target temp then).
 
/nod. that was why I went with a wired outlet. I can swap out heaters or whatever as long as it is 120v plug. Honestly, I'm just going to replace the STC-1000 with an ITC-1000 inkbird for $15 that has 'C and 'F *and* has a heating relay output and wire that up to the 300W fish tank heater and put it in the glycol bath. Then I need to pump into fermentation vessel on heat (only can run one target temp then).

I just ordered the max 2 and am planning to wire it up for heat as well. Thanks for putting together that blog post.

In regards to the fishtank heater idea, I'm not sure you would get any benefit out of heating the glycol solution instead of heating the fermentors directly with a heating pad.

With the heating pad, you are applying resistive heat directly to the fermentor only as needed to maintain fermentation temps, which is a pretty efficient way to heat.

But with the aquarium heater, you are using the same resistive heat to maintain an entire glycol reservoir above fermentation temp and then will have thermal loss pumping that heat over to the fermentors. I would think that glycol solution could get pretty nasty after an extended period of time at peak bacteria growing temps as well.
 
Yup. I’m just wanting to positively control the glycol temp. My shop can get way below freezing in winter and while I could heat it, it is expensive. Just like to have heater keeping glycol bath at 10’C if I set it there. I agree, I will still need the heating mats. And probably need one of the car block heater ones! I like my cooling to be closer to my target temp (I.e. I don’t run bath at 30’F for a 68’F ale ferment..more like 60’F).

still looking for a drop in replacement for the vessel controllers to be in ‘F without modifying/cutting the cabinet.
 
Last edited:
@BoilerInSoCal how did you wire up the connection from the spike heating pad cord to the Max2? Did you cut one of the legs of the extension cord and wire each side of the cut wire to the two open blade connectors on the stc1000 and then the extension cord plug into the wall socket? Or cut the plug off the extension cord and connect each wire to the two blades on back of the stc1000 controller?
Essentially the former, but I cut the extension cord in half (as opposed to cutting the hot leg only) simply for ease of installation and access. I separated the wires a bit at the cut ends and (i) added female blade connectors to the two cut ends of the hot leg and attached those to the controller per the instructions in the manual (pay attention to which end goes into which port); and (ii) reconnected the cut neutral line with a simple twist on connector and electrical tape. So, the extension cord plugs into the wall, runs to the controller (where the hot is interrupted/controlled) and then the socket end of the extension cord (unfortnately) just hangs outside of the lid. I plug the heat pad into the socket end of the extension cord.

Heat pad --> socket end of extension cord --> MAX2 controller --> prong end of extension cord into wall.

Not very elegant, but it works for now. Hope this helps.
 
I pulled the trigger on this chiller on Thanksgiving. Arrived today. The string has some great info. In saw there were issues when these were first delivered. Anyone have any issues yet?
 
I hard wired in the heating relays on mine today to an outlet on the lid and confirmed they work as expected to power some 120v seed mats for heating. Unlike the Kegland manual posted (which is for 240v version), this does NOT have mains on the controllers and motors. They are 12v. But the overall instructions for wiring in the hot leg of an outlet or peripheral is sound and works.
https://mossycupbrewing.blogspot.com/2020/12/glycol-chiller-and-heater.html
Great blog post! This is similar to the the "more elegant" solution for the future that I was thinking of...but even better. Thanks!
 
Great blog post! This is similar to the the "more elegant" solution for the future that I was thinking of...but even better. Thanks!
Using a "sacrificial" extension cord to cut and wire into the switched leg is also a GREAT idea (assuming you had to do an extension cord per vessel controller) and avoids having to cut in the square outlet to your chiller cabinet, but as you said, you end up with cords dangling out somewhere... Still, a much better idea than perma-modding your heaters and stuff...makes it more flexible. BTW, the STC 1000 is directly replaceable with a $15 Inkbird DIN controller, though the secondary vessel controller openings (even peeling back the tack weld metal holders for the circuit boards) don't quite fit that profile and I have not found any drop in replacement like I had hoped. :(

P.S. Also, the leg posts are metric, so you might have some luck finding some M8x1.25mm casters with threaded post (I found some for under $20).
 
Last edited:
That’s great to hear. I’m pumped to finally get my basement brewery going. Got the glycol chiller ordered and my wife is getting me the SSBrewtech unitank for Christmas.
That's great! I am really liking my move to conical w/glycol. BTW, where in NJ are you? I lived in Madison for about 8 years, but moved back to SoCal about 1.5 years ago.

Using a "sacrificial" extension cord to cut and wire into the switched leg is also a great idea (assuming you had to do an extension cord per vessel controller) and avoids having to cut in the square outlet, but as you said, you end up with cords dangling out somewhere... Still, a much better idea than perma-modding your heaters and stuff...makes it more flexible. BTW, the STC 1000 is directly replaceable with a $15 Inkbird DIN controller, though the secondary vessel controller openings (even peeling back the tack weld metal holders for the circuit boards) don't quite fit that profile and I have not found any drop in replacement like I had hoped. Also, the leg posts are metric, so good luck finding some M8x1.25mm casters. :(
Yeah, will need need two extension cords to work both controllers. I only have one fermentor...for now, that is! I'm really digging this whole setup and I can see why a recurring theme throughout the conical/glycol comparison threads is the desire to add more conicals! It doesn't help that upon receiving the CF10 and Max2 I moved on from my 2-tap kegerator and converted my GE 7cu chest freezer (that I had been using as a fermentation chamber) into a 4-tap keezer. :p
 
Yeah, will need need two extension cords to work both controllers. I only have one fermentor...for now, that is! I'm really digging this whole setup and I can see why a recurring theme throughout the conical/glycol comparison threads is the desire to add more conicals! It doesn't help that upon receiving the CF10 and Max2 I moved on from my 2-tap kegerator and converted my GE 7cu chest freezer (that I had been using as a fermentation chamber) into a 4-tap keezer. :p

LoL. Welcome to the rat race. You upgrade one part of your system that is currently "limiting" you only to find that now makes something else your limiting factor... For me, I just got a 1 BBL unitank (upping the game from my half bbl SS BME chronicle) only to realize there was not a great way for me to boil enough to even remotely fill it (currently operating on 17 year old home built converted kegs for HLT, MT and BK) and the boils are the WORST to try to push 15 gallons out on to fill my half bbl. I have considered double batching, but lot of work. So, I got a 30 gal BK from SS last weekend...only to realize now my mash tun is going to probably limit my ability to produce...LoL. And then I suddenly thought "how the hell am I going to drink 30 gallons of ONE beer"?

I have a problem. My name is Jeff...

"Welcome, Jeff"...
 
Last edited:
I just received my IceMaster Max 2 and I thought I'd provide some pictures of the actual power draw to see if anyone else has similar results. I filled mine up with 4 gallons of solution (3g water and 1g glycol) before turning it on. After a few minutes, the compressor turned on and here are the results...less than the 600 watts I was expecting.

The highest amp draw I could pull (with compressor and both pumps running) was just shy of 2.5 amps which would be about 300 watts. That's pretty far off from the 600 watts of cooling power I was expecting. Anyone else take measurements? Based on what I'm seeing, the actual wattage draw going towards cooling is about 200 watts.
 

Attachments

  • IMG_3334.jpg
    IMG_3334.jpg
    67.8 KB
  • IMG_3337.jpg
    IMG_3337.jpg
    60.4 KB
  • IMG_3341.jpg
    IMG_3341.jpg
    64.1 KB
I purchased these quick connects: Beer & Gas Quick Connect - In-Line Set (With Shut-Off) | MoreBeer
and this tubing: High Temp Silicone Tubing - 3/8 in. | MoreBeer
Which clearly didn't go so well because the tubing ID was way to large for the quick disconnects. SO...I'm thinking about buying this tubing: Amazon.com: Pure Silicone Tubing - 1/4" ID x 3/8" OD - High Temp Kink-Free Hose Tube 500F (10 Feet): Home Improvement
Using this smaller tubing INSIDE the larger tubing, along with a clamp, should provide a tight seal. If anyone has a better approach, I'd like to hear it.

The reason I need these quick disconnects is to disconnect the tubing from the Glycol chiller when moving the Spike CF5 fermenter over to the cleaning station area. The quick disconnects will allow separation without loosing much glycol solution.
 
I pulled the trigger on this chiller on Thanksgiving. Arrived today. The string has some great info. In saw there were issues when these were first delivered. Anyone have any issues yet?
no problems, working great, and Ive done three beers. Just got my 13 gallon fermenter set up so ill be running it on a 10 gallon batch soon. The problems initially were wrong instructions and the controllers were advertised as reading in F. They all read in C.
 
I bought this on cyber monday and it arrived today. Letting it stand for a day before powering on, but initial impressions are that it's a good looking unit with the exception of the internal wiring, which looks exceedingly thin for something that draws 600W. The insulation around the reservoir also seems suspiciously thin. Hopefully it won't have trouble maintaining temperature in my 100+ degree garage in the summer.
Thank you to the previous posters for helpful information about wiring in heating elements and the caster thread. I found a set of very affordable casters on amazon. In the long run I may wire in panel-mount sockets for the heating element, but for now a cut-up extension cord will have to do.
 
I just got my $15 Inkbird panel mount controllers in and the main chiller controller is a drop in replacement. The front two vessels take a little metal work, but after one of my controllers had a busted post that contacts the front press panel, I just went ahead. That and while I had Celsius conversion tables taped on the units, it sucks having to do conversion in your head on "what's my beer temp at". I *wish* I could think in metric, but I just can't.
 
Got it on Wednesday. Powered it up on Thursday night. Within 90 minutes it took the test water from 60 f to 38 f. I think that's pretty good. Left it overnight and the coils started to freeze up. The pumps were off. That's fine. Proved it has capacity.
I'll be running a 7 gallon blichmann conical with their cooling coil. I do have a grainfather conical that I need to figure out how to rig the integrated controller to work the pump. Might be using the internal pump by tricking the controller through thermal couple input.
Anybody try integrating the grainfather conical into it?

You should be able to wire the internal pump directly to the grainfather conical - both are 12V systems. There is a video here:
 
FWIW, I got everything fully upgraded to 3 new InkBird ITC-1000's. Full heater/Fahrenheit function and wasn't too hard. The primary was very easy. The others required me to get out my angle grinder with a cut-wheel on it to take off the tabs of the front panel, but once those were gone and with a hammer and chisel, the end result was an opening that fit pretty well on the other two InkBirds. You could get the ITC-1000F (12V DC powered one) if you want simpler direct wiring conversion, but I took the opportunity to clean up the horrendous wiring they had.
IMG_7398.JPGIMG_7408.JPGIMG_7417.JPG

Still have some clean up to do with some supports to make the panels sturdy, but really happy with having 'F read outs!!!
 

Latest posts

Back
Top