I Need some boil keggle PID help.

Homebrew Talk - Beer, Wine, Mead, & Cider Brewing Discussion Forum

Help Support Homebrew Talk - Beer, Wine, Mead, & Cider Brewing Discussion Forum:

This site may earn a commission from merchant affiliate links, including eBay, Amazon, and others.

slayer021175666

Well-Known Member
Joined
Sep 24, 2020
Messages
561
Reaction score
254
I was thinking about installing a PID in my boil keggle to do some hop whirlpools and to know I'm boiling at the same vigor every time. What I have is a 5500w element connected to a control panel that I made using an SSR and a rheostat dial. My thought was, if I add a PID to it, I could hold at whatever temp I want for as long as I want on the hops AND I could control the boil vigor by setting it to a certain temp instead of just trying to turn the rheostat dial to the same position every time. Now, I'm reading about it and being told that you also have to have a manual control on the PID! Isn't that what I already have with the rheostat? Water boils at 210F where I am. Why can't a guy just set the PID to 210F and let it go? It seems like manually controlling it would mean sometimes you'd be boiling with more vigor than others. With the PID set at 210F, wouldn't you know that every time you brew, your boils would be the exact same? Sure would make boil off calculating easier!
What am I not getting, here?
How would I wire this up?
If a manual boil control IS necessary, could I still use my rheostat for the manual control?
Also, The Electric Brewery site says you shouldn't use a temp probe that has NPT threads in the kettle wall installation. It says, you won't get it to seal without "straight" threads. All my other stuff is done with NPT threads through the kettle wall and it all seals. The NPT probes are more readily available AND, they are less expensive. Is this an actual concern or just, a convenience?
Let me have it, guys. I'm ready to learn.
 
You wrote: water boils at 210F. I think that will be true whatever vigor your boil, making the PID unhelpful during boil. The PID could control temperature during recirc/whirlpool though. btw, really a rheostat, or is it a potentiometer?
 
Probably a potentiometer. It is a knob you turn up or down like a volume knob on a stereo. Whether it stays at 210F or not, I know if I turn the pot (potentiometer) knob up or down, it boils with more or less vigor, accordingly. Why can't you just turn up the PID to say, 212 for more vigor or 209 or something for less vigor?
 
What you have is and SSVR (solid state voltage regulator) not an SSR (solid state relay.) You cannot control an SSVR with a typical PID. You need to replace the SSVR with an SSR to work with a PID. The PID needs to have a DC voltage control output in the 5 - 30V range, and a manual (fixed duty cycle) mode in order to control boil vigor, as PID control does not work for boiling.

A good choice for a low cost PID is a MyPin TD4 (not a TA4, as it does not have a manual mode.) The best choice for controlling something where you want to hold a temp less than boiling sometimes, and also control boil vigor other times, is an Auber Instruments EZBoil (DSPRxxx.) The lowest cost version is the DSPR120. The highest end version, the DSPR320, has relays to drive external alarms (and other devices), and allows automatic step mashing. The DSPR120 should be adequate for your stated needs.

Brew on :mug:
 
Probably a potentiometer. It is a knob you turn up or down like a volume knob on a stereo. Whether it stays at 210F or not, I know if I turn the pot (potentiometer) knob up or down, it boils with more or less vigor, accordingly. Why can't you just turn up the PID to say, 212 for more vigor or 209 or something for less vigor?
Boiling happens at a fixed temperature, depending on the properties of the liquid, and local barometric pressure. If the power is too low, the liquid will not boil. If you set the temp at or above local boiling temp, the power will stay on at 100%, thus giving you no control over boil vigor. It's just the way boiling and PIDs work.

Brew on :mug:
 
@slayer021175666 , I'll give this another try. A PID is controlled by a temperature sensor. Counter-intuitively, a vigorous boil is the same temperature as a mild boil, so the PID won't be able to help control the boil intensity. The simpler "volume control" works great for boil control.

For sub-boiling temperature control, a PID works well. Your temperature sensor should be in the path of the flow, not in the kettle itself, but between it and the pump that's driving your whirlpooling. If desired, the same equipment can control temperature when recirculating during mash.

I hope this helps.

Cheers!
 
I think I see what you mean, now. Even though the boil can be slower or faster and more vigorous, that does not mean that there is any actual temperature increase or decrease. Boiling is boiling. So, the PID would think it was doing its job fine as long as it saw the 210° f coming in through the probe. Yes?
 
And, please Riddle me this. Is there a way that I could add a PID for keeping my Whirlpool Hops at a certain temperature and still, keep my potentiometer for controlling the boil?
 
Could be a bit of a wiring challenge. I control my boil with a home-builtPWM "volume control" that turns the SSR on and off, but then plug my Auber PID into my SSR to control the whirlpool temperature. I just move one cable to switch between this - easier to show than tell.
 
What makes the EZBoil better for holding temps?
The EZBoils use a different control algorithm than PID (proportional, integral, differential) controllers. PIDs need to be tuned to get good results with a specific system. Most PIDs have an "autotune" function, but people have reported that sometimes the autotune doesn't do an adequate job (temps overshoot the setpoint significantly and/or temps are unstable), and manual tuning takes more expertise than most homebrewers have. EZBoils just seem to work well, without having to do any tuning. EZBoils also have a different power modulation mode than most PIDs, which results in more even power to the element over short time periods (a second or two.)

EZBoils also use a knob to adjust settings, and to set the boil power (just like your current system.) They have a % power display in boil mode, so you can easily set the same power run to run.

Brew on :mug:
 
Doug, it sounds like you're saying that slayer*666 can have their cake and eat it too with the EZboil, which I must admit would be cool. Shaped like a PID but is really two controllers in one!?! I might even grab one of these, esp. if it fits in the same hole that my Auber PID occupies. Looks about 1/2" deeper but same cutout. (Sorry to semi-hijack.)
 
Doug, it sounds like you're saying that slayer*666 can have their cake and eat it too with the EZboil, which I must admit would be cool. Shaped like a PID but is really two controllers in one!?! I might even grab one of these, esp. if it fits in the same hole that my Auber PID occupies. Looks about 1/2" deeper but same cutout. (Sorry to semi-hijack.)
Yes to everything you said. And no, I have no connection to Auber.

Brew on :mug:
 
So, just swap the POT and SSVR out for the EZBoil and SSR ?
Is the wiring to the SSR the same?
Are the SSR mounting holes the same?
 
Pretty much, but I recommend adding a power disconnect switch in front of the SSR. A Leviton 3032, or equivalent, will do, or you can use a more aesthetically pleasing low power switch controlling a contactor, for the disconnect.

The AC connections are the same for an SSR and SSVR. The EZBoil control outputs connect to the SSR control inputs. Unlike the SSVR, the control inputs are polarized, so you have to hook + to + and - to -. You also have to make AC power connections to the EZBoil, and connect a three wire PT100 RTD temp probe to the EZBoil.

The mounting holes should be the same.

Brew on :mug:
 
Thanks.
About the temp probe:
Sibelman said, to install the probe in the plumbing on the BK. I read that the BK probe should be installed in the kettle wall. It was on a site called, The Electric Brewery. What do I do?
 
It's possible that a kettle-mounted sensor will work fine. I haven't tried that, and I made an unwarranted "should" statement -- sorry. Dunno about the NPT-vs-straight thread issue. fwiw, my one sensor is mounted in a pipe tee with camlocks fore and aft so it can move to any of three ports: HLT recirc; HERMS coil, outlet and BK outlet.

Cheers
 
I prefer to use the temp probe in my kettle when doing a whirlpool or even holding temp for a kettle sour. I have 2 controllers that I switch back an forth from HLT an BK and the other usually is hooked to my herms pot ( that one is a PID from Inkbird ). I use a small pot for the herms as to ramp up faster for mash out. That temp probe is in line like @sibelman does. Lets say after the boil I want to whirlpool at 160 I will turn the water on to the CFC and I will set the kettle at 160 and just view the inline temp probe which at this point is hooked to my whirlpool arm. That probe might be reading 70 ish with in a few seconds but it takes a while to bring the kettle down from boiling to 160, or 90 on a kettle sour. When I get with in a few degrees I kill the water and let the kettle temp blend together, then the "Mash" setting on the EZ Boil takes it from there to hold my set temp. The inline is also the one I watch for reaching pitching temps.
 
Thanks.
About the temp probe:
Sibelman said, to install the probe in the plumbing on the BK. I read that the BK probe should be installed in the kettle wall. It was on a site called, The Electric Brewery. What do I do?
If you install the probe in the kettle, the probe tip (the active zone) should ideally be positioned between the element and the wort pick-up port going to the pump, to allow the probe to measure some of the warmest wort as it flows from near the element to the pick-up, and prevent wort overheating near the element. This is most critical if you are mashing in the same kettle that you boil in. If just doing boiling and whirlpooling in the kettle, then it is not so critical.

Thread type (pipe or straight) for the temp probe should match the female fitting into which it threads.

Brew on :mug:
 
Doug,
1. So is it better to be in the outlet plumbing or in the BK wall? I just want to maintain temps while I whirlpool hops. I never cared before NEIPAs. Now though, holding certain temps after the boil has became inmportant.
2. If It should go in the plumbing, I'll buy an NPT probe. If it should go in the kettle wall, I would want to install it weldlessly with an O-ring seal and a SS nut. They say it will be hard to seal NPT threads in the kettle wall but, I don't get why. All my other stuff (valves, sight glass, etc.) are NPT threads through the kettle wall and they seal fine. 🤔
1. The closer the probe tip is to the element, the faster the control system can respond. In order to get stable temps when there is a lag between temp changes and the controller detecting the change (distance of probe from element translates to time lag), you need to reduce the max power that the controller can send to the element. Both the DSPR310D and the DSPR320 have an "mOUT" parameter that allows you to set the max power output when running in temp control mode (Mash mode.) This can help compensate for temp response lag time, and minimize temp oscillation. Lower end EZBoils do not have this capability.

2. If you are trying to use the temp probe as its own weldless fitting (no female fitting for the probe to thread into), then you probably need straight threads to get a good seal. Male pipe threads only seal in female pipe thread fittings.

Brew on :mug:
 
The probe should be in the boil kettle wall. If you're installing it into a freshly created hole, that you're yet to drill, I highly recommend the Auber PT100-L50M14 as it comes with the gasket and locknut. Nice and easy.

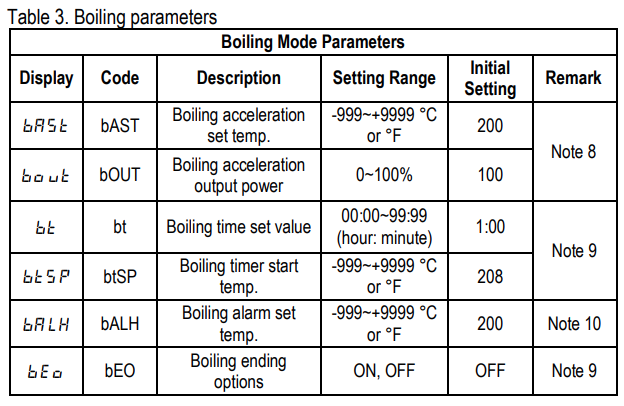
One thing that hasn't been mentioned is that the boil mode on the DSPR-xxx controllers are at LEAST as good as the SSVR potentiometer but really it's so much better. For one thing, the adjustability of the boil vigor is linear. 30% really is 30%. It also has the boil acceleration mode, which gets you to boil at 100% output and then automatically steps down to your desired boil percentage without a boil over and without your intervention.
 
It also has the boil acceleration mode, which gets you to boil at 100% output and then automatically steps down to your desired boil percentage without a boil over and without your intervention.
This aspect I don't use as I brew a lot of very high gravity beers. 100% power with a super sugary wort led to a scorched element. Oddly I got no scorched taste in that beer but the wort literally turned into like a black sugar porcelain on my element. No cleaning solution would touch it. Had to dry fire and get it red hot and it fell off as ash. That then kind of generated a flash rust on my stainless element. Lemon juice cream of tartar brillow pad and elbow grease got it back up in tip top shape. I now only set my power at 94-96% on ramp up to boil. The element light flashes quickly but not solid power on and I have never had that problem again.
 
Last edited:
This aspect I don't use as I brew a lot of very high gravity beers. 100% power with a super sugary wort led to a scorched element. Oddly I got no scorched taste in that beer but the wort literally turned into like a back sugar porcelain on my element. No cleaning solution would touch it. Had to dry fire and get it red hot and it fell off as ash. That then kind of generated a flash rust on my stainless element. Lemon juice cream of tartar brillow pad and elbow juice got it back up in tip top shape. I now only set my power at 94-96% on ramp up to boil the element light flashes quickly but not solid power on and I have neve had that problem again.
EZBoils also have the ability to ramp to boil at any user set power, lower than 100% (100% is just the default.) Still gets you to boil faster than trying to heat up at optimal boil power.

Brew on :mug:
 
This aspect I don't use as I brew a lot of very high gravity beers. 100% power with a super sugary wort led to a scorched element. Oddly I got no scorched taste in that beer but the wort literally turned into like a black sugar porcelain on my element. No cleaning solution would touch it. Had to dry fire and get it red hot and it fell off as ash. That then kind of generated a flash rust on my stainless element. Lemon juice cream of tartar brillow pad and elbow grease got it back up in tip top shape. I now only set my power at 94-96% on ramp up to boil. The element light flashes quickly but not solid power on and I have never had that problem again.

The one time I had a scorching on my element, I determined that it was because I let a very protein rich wort settle a bit before I fired up the element. From now on, I give the kettle a quick stir right before I fire up the element. Never had a problem ever again.

In any case, if you only want 95% max power on the ramp, just set "bout" to 95. Then you can set your bASt to 208F or something like that and your front end P value to whatever you usually boil at.

1638242843641.png
 
I hate my easy boil. Just gonna throw that out there. Why can't there be a more usable interface. Cmon, get out of the 80's Auber, looks like something from the Chernobyl control desk. Yes, it works well, but occasionally (this past weekend) I want to tweak something and can't for the life of me figure out how to get the little non-descript button and the dial to do what I want. Yes, I have the manual, but field expedient adjustments can't require that.
 
I hate my easy boil. Just gonna throw that out there. Why can't there be a more usable interface. Cmon, get out of the 80's Auber, looks like something from the Chernobyl control desk. Yes, it works well, but occasionally (this past weekend) I want to tweak something and can't for the life of me figure out how to get the little non-descript button and the dial to do what I want. Yes, I have the manual, but field expedient adjustments can't require that.
If you don't like the interface, why haven't you swapped it out for something more to your liking?

Trying to think of something I would want to adjust quickly in the middle of a run. The obvious two are mash temp setting, and instantaneous boil power, both of which can be adjusted simply by turning the control knob. All the other settings are things you want to set up before the mash starts, and most of those won't change from batch to batch.

Auber's interface for setting up step mashes is cumbersome, but given the form factor of the controller, and the limited number of buttons available, I don't see that there is much that can be done to improve things. And the step mash should all be set up before you start brewing. If you want a modern looking graphical interface, why not just go with BruControl?

Brew on :mug:
 
Had a friend who does factory automation offer to set up a bunch of touch screen option type stuff for a larger different setup I have. I said if it goes down in the middle of a run how will I know how to fix it and he said you won't but he would be able to work on it the following weekend when he was off work. Hard pass. If I can't fix it on the fly I want no part of it. The simpler controllers are very easy to diagnose and repair.
 
Back
Top