HOWTO - Make a BrewPi Fermentation Controller For Cheap

Homebrew Talk - Beer, Wine, Mead, & Cider Brewing Discussion Forum

Help Support Homebrew Talk - Beer, Wine, Mead, & Cider Brewing Discussion Forum:

This site may earn a commission from merchant affiliate links, including eBay, Amazon, and others.
Status
Not open for further replies.
I can't understand how the brewpi worked so well the first time, and now, I'm on try number 5.

Again, I shut down the brewpi, move it 30 feet, plug in the arduino and pi....boom. Failure to boot.

I re-flashed the working image and it appeared to bring me back to where I left off, but the web interface does not work on either the Pi or my laptop. How is that even possible? It's an exact copy...

Do I need to reflash the arduino? Is That what has been causing all these problems? Hooking up the arduino from the first setup without the permission fix to the pi with the permission fix?

I've tried googling both this and the brewpi community, and I've been unsuccessful.

Any and all help will be greatly appreciated!

Edit:

I formatted my micoSD card. Installed Rasbian. I ran the update, upgrade, rebooted, ri-update, rebooted . I cloned the git hub account and installed. Literally, that's all I did. I then shut down, and instead of moving it to the fermentation area with no monitor, I rebooted it up.

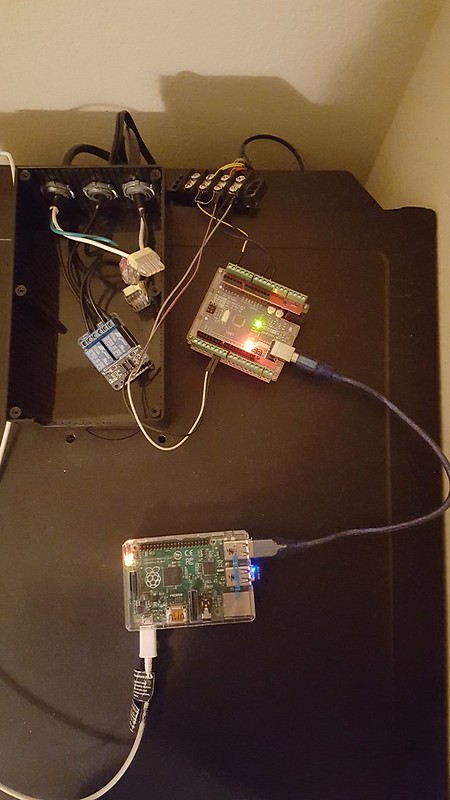
2015-09-04_04-32-58 by Mark E, on Flickr

Seriously, what did I do wrong? Why is it crashing?

The only thing that changed from when I did this the first time would be the updates. Are they too new?


Have you ever tried a different sd card?
 
Totally new to soldering question. I removed the male pins from the relay module and soldered the wire through. When it comes to the arduino female ports, do those wires need to be soldered or will the friction of the female port hold it steady enough? And if they do require soldering, any technique advice? Thank you everyone who has contributed to this! All my stuff came last night and I couldn't sleep with anticipation for this morning!


Take the male pins you removed from the relay board and stick them in the female ports. Don't use any lube, just shove them right in! Now solder the wires to those pins.
 
can you use a 3.0 usb hub for the multiple chamber set up

Also once you have your brewpi set up and running is it not possible to then change it to multi chamber configuration

I'm having major troubles over here
Thanks
 
For anyone who doesn't want to use a Debian distribution to run BrewPi, I'm working on making Arch Linux packages that I'll submit to the Arch User Repository once it is tested. I'm getting my new Arduino today so I should be submitting it to the AUR sometime next week. Sure I could use Raspbian and the install scripts, but I like Arch.

There are some fixes I had to do to the python scripts to get it to work on Python 3.2, all fixes to deprecated syntax. Older versions of python didn't throw errors when you use 0775 for an octal number (now you use 0o775), and didn't require parenthesis around print statements, and let you use print >> sys.stderr to print to STDERR (now you add ", file=sys.stderr" to the parameters sent to print). The patch file used in the brewpi-script-git package should be useful for anyone trying to run BrewPi on any system with an updated version of Python. Also, you should get some hints by examining the PKGBUILDs and other files to see what steps might be necessary for installing BrewPi on anything other than Raspbian.
 
can you use a 3.0 usb hub for the multiple chamber set up


Also once you have your brewpi set up and running is it not possible to then change it to multi chamber configuration


I'm having major troubles over here

Thanks


Some usb 3 hubs may or may not work. I've got usb2 hubs that give me problems. Following the automated install instructions will put brewpi in the top folder if your server. It's not a problem but it will give an OCD mind a hell of a time. Also there are some issues with running multiple scripts. As you've probably noticed in your error log. The multi-instance setup instructions include certain workarounds to make this possible. That's most likely where you are having trouble. If you miss any steps or accidentally forget to change each and every config file properly, you will have problems.
 
A lot of us have had issues with garbled screens but only AFTER the relays were triggered during a BrewPi profile run. I'm not sure if there was a solution to it yet. If there is, I still need one!

Try the attached diagram instead of the schematic. The schematic may be correct but because the pins aren't logically layed out you have to do a lot of "transposing" and you may have a connection wrong. Also, I don't think I used the resistors shown in mine because the software is now configured to use the Uno in a way that they are not needed.

BrewPi Rev.C - Jeff's Shield(2.0)_bb.jpg
 
The only solution I found was to use SSRs instead of a sainsmart relay. No idea why but it worked
 
I wonder if anyone with a scrambling display has tried installing the 10uF cap shown in Elco's schematics between LCD pins 1 & 2.

I'd go with a 10uF @10V radial lead electrolytic (positive side on pin 1).
Might be worth a try...

Cheers!
 
well dang. i dont have any relays hooked up at this point , and yes as you can see from the pics i have both caps :(
 
The only solution I found was to use SSRs instead of a sainsmart relay. No idea why but it worked

Are they an easy swap out? I haven't looked into them at all but I would have to fix 3 separate controllers so if it's a PITA I think I can deal with the scrambling for now.
 
Are folks using snubbing diodes on the relay coils (capacitors won't help)? If not, the return spikes can easily disrupt sensitive electronics. An SSR also eliminates the issue, but at greater cost.
 
fwiw, the Sainsmart 2-channel relay modules I use have snubbers built into the coil switching circuits.
I also don't have LCD problems with any of my three BrewPi minions, for some reason...

Cheers!
 
fwiw, the Sainsmart 2-channel relay modules I use have snubbers built into the coil switching circuits.
I also don't have LCD problems with any of my three BrewPi minions, for some reason...

Cheers!

Did you find that info in a data sheet or can you actually see them on the relay? I bought cheap 2-channel relays that are arguably a Sainsmart clone I'm wondering if I can look to see if they are there, maybe I can add them to the circuit if they are not.

I've found SSRs for $4 a piece but to replace all of them would be $24, and since I already have a whole bunch of 1N4001s around...

This may be the solution to everyone's problem though, possibly those with real Sainsmart relays aren't having an issue because they have flyback diodes installed and maybe the cheap clone relays don't have them. I wonder if anyone else with a "true" Sainsmart relay is having the scrambling issue?
 
well dang. i dont have any relays hooked up at this point , and yes as you can see from the pics i have both caps :(

Oh and back to your non-relay related scrambling... I don't necessarily understand what would be causing that issue. It seems to me that this all comes from sensitivity of the LCD to electrical noise, of which a lot is apparently created from the coil relays when they open. Is there possibly a source of noise involved in your setup? (Not sure what the other circuit board hooked up to your Pi is....)
 
Did you find that info in a data sheet or can you actually see them on the relay?[...]

Both. They're shown in the schematic, and easily identifiable on the module.

[edit]
fwiw, I use a separate 5V lead for the relay coil power vs the 5V to the opto-couplers on these 2-channel SS boards.

I've had the guts of a BrewPi Bluetooth minion running on my office desk for so long I've lost track - maybe 6 months?
I keep the setpoint around a warmish room temp so there will be some relay switching - but it doesn't have any AC connected to the relays.

Right now the heating relay is active, and after ID'ing the snubber diodes I disconnected the 5V relay power and reconnected it.
Repeated that many times - often the relay was chattering on and off.

I could not get the attached LCD to yack up a flaw. Rock solid.

Offered as a datapoint. I still have no idea wtf is going on ;)

Cheers!
 
Just want to say I built one of these and I truly love it. Love what Elco has done here even though I "homebrewed" my hardware setup of this. Couldn't (And wouldn't want to...) do it without the software. Good job!
 
Are they an easy swap out? I haven't looked into them at all but I would have to fix 3 separate controllers so if it's a PITA I think I can deal with the scrambling for now.


In my opinion they're easy to swap, the SSRs don't need soldering it's pretty much the same as the relay power in power out to heater or cooler, one wire goes to arduino pin and one to ground
 
Just curios about one thing. You guys whom have used an ssr instead of a relay. Do you experience any problems with the ssr:s leaking current?
 
Long time lurker here hoping someone can shed some light on an issue I am having with my Arduino Uno. I set up BrewPi on a Debian Wheezy install on VMWare Workstation. Everything seemed to go fine on the install and the web page is working great. I can program my Arduino via the web and it works fine. The issue comes in when I unplug the Arduino. I thought that the program/settings were supposed to persist through a power cycle, but when my Arduino comes back up, I have to reprogram it. There are no settings saved on it and when I reprogram via the web it does not detect any previous settings.

I have read through hundreds of pages on this post as well as many posts over at the BrewPi forum and none of the solutions have worked thus far. I have tried clearing EEPROM using the prebuilt script as well as sending E over serial. I have tried a couple different USB cables and even plugged in to power during programming. I have tested with the Blink program in the IDE and it does persist through a reboot so I know the Arduino itself is good. Am I wrong in thinking that the BrewPi script should stick through a power cycle? Has anyone here had any similar experience or could point me in the right direction?

Have you tried another arduino? Maybe your eeprom is bad, instead of testing the blink script maybe test an eeprom script to check if that persists through a power cycle.

[EDIT]

I wrote a pair of test scripts for you. Use the first one once to load the eeprom with bytes. After the first script says it's "Done!" then upload the second sketch and then unplug your arduino for a minute, plug it back in and load your serial prompt and watch the output.

Code:
/***************************************
**************FIRST    SKETCH*************
****************************************/

#include <EEPROM.h>

int addr = 0;

void setup()
{
  Serial.begin(9600);
  Serial.println("Writing values to eeprom. Stand by...");
  byte val = 0;
  for (int addr = 0; addr < 512; addr++) {
    EEPROM.write(addr, val++);
    if (val == 256)
      val = 0;
  }
  Serial.println("Done!");
}

void loop() {}


Code:
/***************************************
**************SECOND SKETCH*************
****************************************/

#include <EEPROM.h>

void setup() {
  Serial.begin(9600);
  
  byte expval = 0;
  byte val = 0;
  int bad_count = 0;
  
  for (int addr = 0; addr < 512; addr++) {
    val = EEPROM.read(addr);
    if (expval != val) {
      bad_count++;
      Serial.print("Error at eeprom address ");
      Serial.println(addr);
    }
    
    expval++;
    if (expval == 256)
      expval = 0;
  }
  Serial.print("Found " );
  Serial.print( bad_count );
  Serial.println(" eeprom errors" );
}

void loop(){}

[EDIT 2]
So the forum seems to be magically changing my code ?:drunk:?
Please copy and past code from the attached PDF file instead.

View attachment EEPROM Test.pdf
 
Thanks for the test files. I just ran through them from my remote connection to my PC back home without unplugging to test them out and noticed the problem in the second sketch, but figured out the correct syntax. I will try testing with the unplug in between when I get home tonight. Unfortunately I don't have another Arduino to test with to verify the integrity of my board.
 
Thanks for the test files. I just ran through them from my remote connection to my PC back home without unplugging to test them out and noticed the problem in the second sketch, but figured out the correct syntax. I will try testing with the unplug in between when I get home tonight. Unfortunately I don't have another Arduino to test with to verify the integrity of my board.

Sorry for the syntax error, I don't have a board with me at the moment to test the code. What was it so that I can correct it here?

FYI I just edited the steps from the previous post, after the first script completes writing to the EEPROM THEN upload the second script and THEN power off/on the arduino.
 
Note that while the Arduino Uno will run on 12V, the RaspberryPi won't. It wants a 5V power supply, so you'd need to provide that in your implementation as well.

Alternatively, I made a modest modification to the Arduino Uno R3 board to allow it to run directly from a 5V supply (basically, removing one component and adding a wire) which enabled a single brick solution. So that's an option - I've documented it here on HBT somewhere.

So I use a similar brick supply (5V @3A) to power everything inside my BrewPints system.
View attachment 299372
View attachment 299371

which slides into the dolly under my keezer...
View attachment 299373

It's all rather extreme but it satisfies both my inner and professional engineers ;)

The box is 12x7x3" and has everything to support RaspberryPints (principally, the Arduino AlaMode shield atop the RPi) and one internal BrewPi instance that controls my keezer. It also has a Bluetooth dongle to talk to three remote BrewPi instances that control two fridges and a cold-season (ie: heated only) ferm chamber. Everything needing power was modded where necessary to run directly from that same 5V brick.

So, aside from the AlaMode shield, that's pretty much the footprint of all the chunks needed for BrewPi running on an RPi: RPi, some compatible Arduino module, a dual relay card, and a power source to run them all. Spread out like I have it isn't particularly volume-efficient but it's reasonably easy to work on.

The only thing missing in my implementation is the duplex outlet. I'm switching a 30A relay (for the compressor) that's behind the other panel on the keezer dolly, and thus sending a low-current signal connection (you can see the cable between the panels) instead of switching AC power at the box.

If that had been a consideration I suspect I'd have had to go with a wider box and panel, but in a free-standing design there'd be room in the back-left corner where I have a USB hub now.

Just tossing this all out there...

Cheers!

My Rpi is also in an aluminum enclosure, but I think it's blocking the WiFi signal. Is that why you have those holes drilled in the cover or are they to vent heat?
 
I'd not go the rout of $4 SSRs. They are too cheap and likely do not have the proper internals to handle whatever rating the Chinese slapped on there. Has anyone tried wrapping the relay wires around a ferrite ring. In many of the open source 3d printers now you will find they do this with the stepper driver motor wires to try to reduce/eliminate electronic interference. Plus it'll be a lot cheaper than a good ssr any day. But trust me on the cheapo SSRs I've replaced my fair share of them.
 
Sorry for the syntax error, I don't have a board with me at the moment to test the code. What was it so that I can correct it here?

FYI I just edited the steps from the previous post, after the first script completes writing to the EEPROM THEN upload the second script and THEN power off/on the arduino.

The syntax error was on the first post. It looks correct in the attached PDF. I just edited the line Serial.print("Found Serial.print(bad_count);
to Serial.print("Found ");Serial.print(bad_count);
 
The syntax error was on the first post. It looks correct in the attached PDF. I just edited the line Serial.print("Found Serial.print(bad_count);
to Serial.print("Found ");Serial.print(bad_count);

Cool. Let me know how it goes.
 
My Rpi is also in an aluminum enclosure, but I think it's blocking the WiFi signal. Is that why you have those holes drilled in the cover or are they to vent heat?

The holes in the lid are the air inlet right above the power supply.
I have a 60mm fan in the opposite corner pulling air through and out.
The fan is controlled by a python script that watches the temperature sensor on the RPi SOC.
brewpints_18.jpg

I stick the mini-KB/mouse dongle and the Bluetooth dongle (and a WiFi dongle when needed) in the front panel - though the unit that's in the keezer uses the wired nic.
brewpints_03.jpg

I wouldn't surprise me that either radio could have issues inside a metal enclosure.
That's one reason my BrewPi Bluetooth minions are in plastic cases...

Cheers!
 
Cool. Let me know how it goes.

Just tested. Uploaded first code. Completed successfully. Uploaded second code. Checked serial monitor and said Found 0 eeprom errors. Unplugged, plugged back in, checked serial monitor and it said Found 0 eeprom errors. So it appears the board is good. Could it possibly be a permissions issue with the web program not having permission on a particular file or group? Or possibly a bad brewpi hex file?
 
Just tested. Uploaded first code. Completed successfully. Uploaded second code. Checked serial monitor and said Found 0 eeprom errors. Unplugged, plugged back in, checked serial monitor and it said Found 0 eeprom errors. So it appears the board is good. Could it possibly be a permissions issue with the web program not having permission on a particular file or group? Or possibly a bad brewpi hex file?

I only glazed over your problem (drunk, sorry), did you run the permission fix code?

sudo /home/brewpi/utils/fixPermissions.sh
 
Didn't you say you were running in vm? Did you remember to check that the device is being handed back over to the vm on reinsertion.
 
Didn't you say you were running in vm? Did you remember to check that the device is being handed back over to the vm on reinsertion.

Yes, it does hand the Arduino back over to the VM, but sometimes it uses a different port. It is usually ttyACM0, but will sometimes come back up to ttyACM1. It should be fine since the altport is specified as ttyACM1 in the config.cfg file.

To answer the previous question, yes, I have tried the fix permissions script a few times. I even wiped and reinstalled from scratch and also tried throwing the www-data and brewpi users into additional groups than what is specified in the instructions (dialout,brewpi,www-data).
 
took several tries, lots of frustration, but I finally got BrewPi running through VM VirtualBox on a Dell Optiplex 380 running Win7, up to and touching the Arduino, but no temp probes nor relay attached. just to test the software side. I'll eventually switch this over to an Inspirion 546 running VM VB through Win10, stash it in the basement next to the fermenting fridge.

BrewPi runs beautifully, can't wait to get it all hooked up and running production

looks like a little glitch going here, the annotations are double displaying
they also display even when turned off

testing brewpi profiles.JPG
annotations display even when turned off.JPG
 
Just tested. Uploaded first code. Completed successfully. Uploaded second code. Checked serial monitor and said Found 0 eeprom errors. Unplugged, plugged back in, checked serial monitor and it said Found 0 eeprom errors. So it appears the board is good. Could it possibly be a permissions issue with the web program not having permission on a particular file or group? Or possibly a bad brewpi hex file?

Hmmm... You said you can set up devices but when you unplug it and plug it back in are you reuploading the sketch to get it to work or can you just reset the devices alone and it works?
As far as could it be permissions... it doesn't seem like that would be the problem to me because it worked in the first place. I could be wrong.

Here are the steps I am going through.
1. Make sure brewpi script is running
2. Upload Hex file using web interface
3. Install the devices and change the temp setting from Celsius to Fahrenheit
4. Set the beer temp constant on main page

Everything up to that point works great. The graph updates fine and records the correct temps. Then I unplug the USB cable from the Arduino. When I plug it back in and view the log window it says:

"Warning: Cannot receive version number from controller. Your controller is either not programmed or running a very old version of BrewPi. Please upload a new version of BrewPi to your controller."

Nothing comes up if I refresh the devices screen. I then try to reflash the Hex file and choose to restore old settings and installed devices. When I do that, it programs fine and says successful but during the process it says that there was no previous version and no settings were restored.
 
Status
Not open for further replies.

Latest posts

Back
Top