HOWTO - Make a BrewPi Fermentation Controller For Cheap

Homebrew Talk - Beer, Wine, Mead, & Cider Brewing Discussion Forum

Help Support Homebrew Talk - Beer, Wine, Mead, & Cider Brewing Discussion Forum:

This site may earn a commission from merchant affiliate links, including eBay, Amazon, and others.
Status
Not open for further replies.
What is this "dual plug socket with usb integrated" that you speak of? Do you mean a "wall wart" type of power adapter that has two USB-style power receptacles?

Cheers!
 
I think he means a combo receptacle USB. And I think he's totally confused as to how all this works.
 
It's the electrical side that's confused me. Your run a power cable from the wall to a box that has a cooler and heater attached. The brewpi system either switches the fridge on or heater, to create the ideal ambient temp.

What I don't understand is whether if I were to get a plug socket with the built in usb charger are the USB sockets independent of the plug switches? I.e if the left plug is off is the left usb socket off as well?

What I don't want to do is have the temp controller depending on my raspberry pi for power. But I don't have enough plug sockets available to power everything.
 
What is this "dual plug socket with usb integrated" that you speak of? Do you mean a "wall wart" type of power adapter that has two USB-style power receptacles?

Cheers!

This is what I speak of -> http://www.amazon.co.uk/Double-Socket-USB-Outlets/dp/B00B9G6YO0
 
Do you have an electrician in the family? You might want to get a little help with this from someone who understands what's going on a little better.
 
Last edited by a moderator:
Unfortunately not its just me. I'm just trying to find the right components as per the drawing on the opening page.

Can I use something like the socket in the above link to power fridge, heater through the plugs and a raspberry pi through the USB which would need to be permanently on the arduino would be powered from a separate power socket (in case the RPI dies)
 
That was just an example of what a double wall socket was. Not the actual one I'd get.
 
So what would I need to look for in the ideal socket then? I'm looking for advice?
 
You need a socket to drive your fridge and heater that can run each separately. So you probably need 2 single receptacles. Then you need some kind of dc voltage transformer, either a wall wart or some other type of power supply. And a power splitter of some kind.
 
If you really want that USB socket/duplex in your set up I would wire it up as always on then add a regular socket to split into hot and cold. If you could wire the usb's independent of the sockets, you are going to have a mess of wires going to that one socket.

I have an always on duplex on my setup so I only take one plug from the wall. My pi plugs into it. But the USB really isn't necessary.
 
A little more progress...

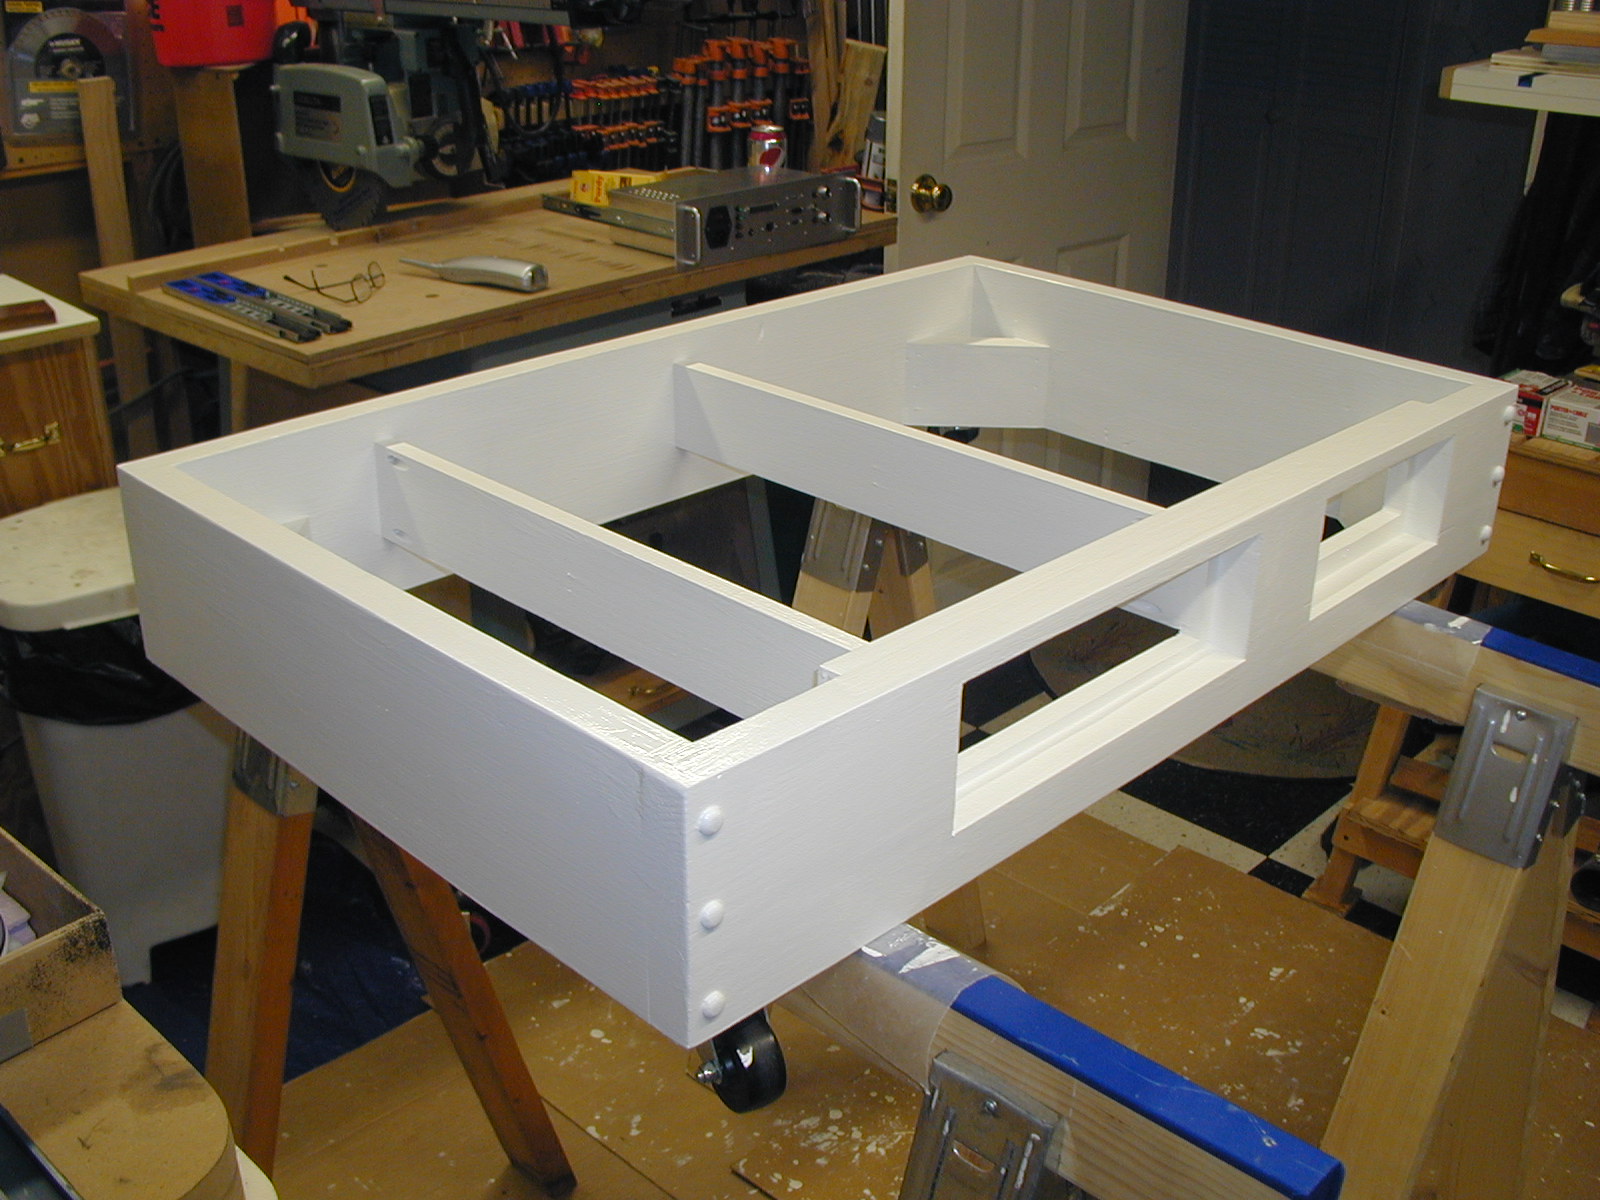
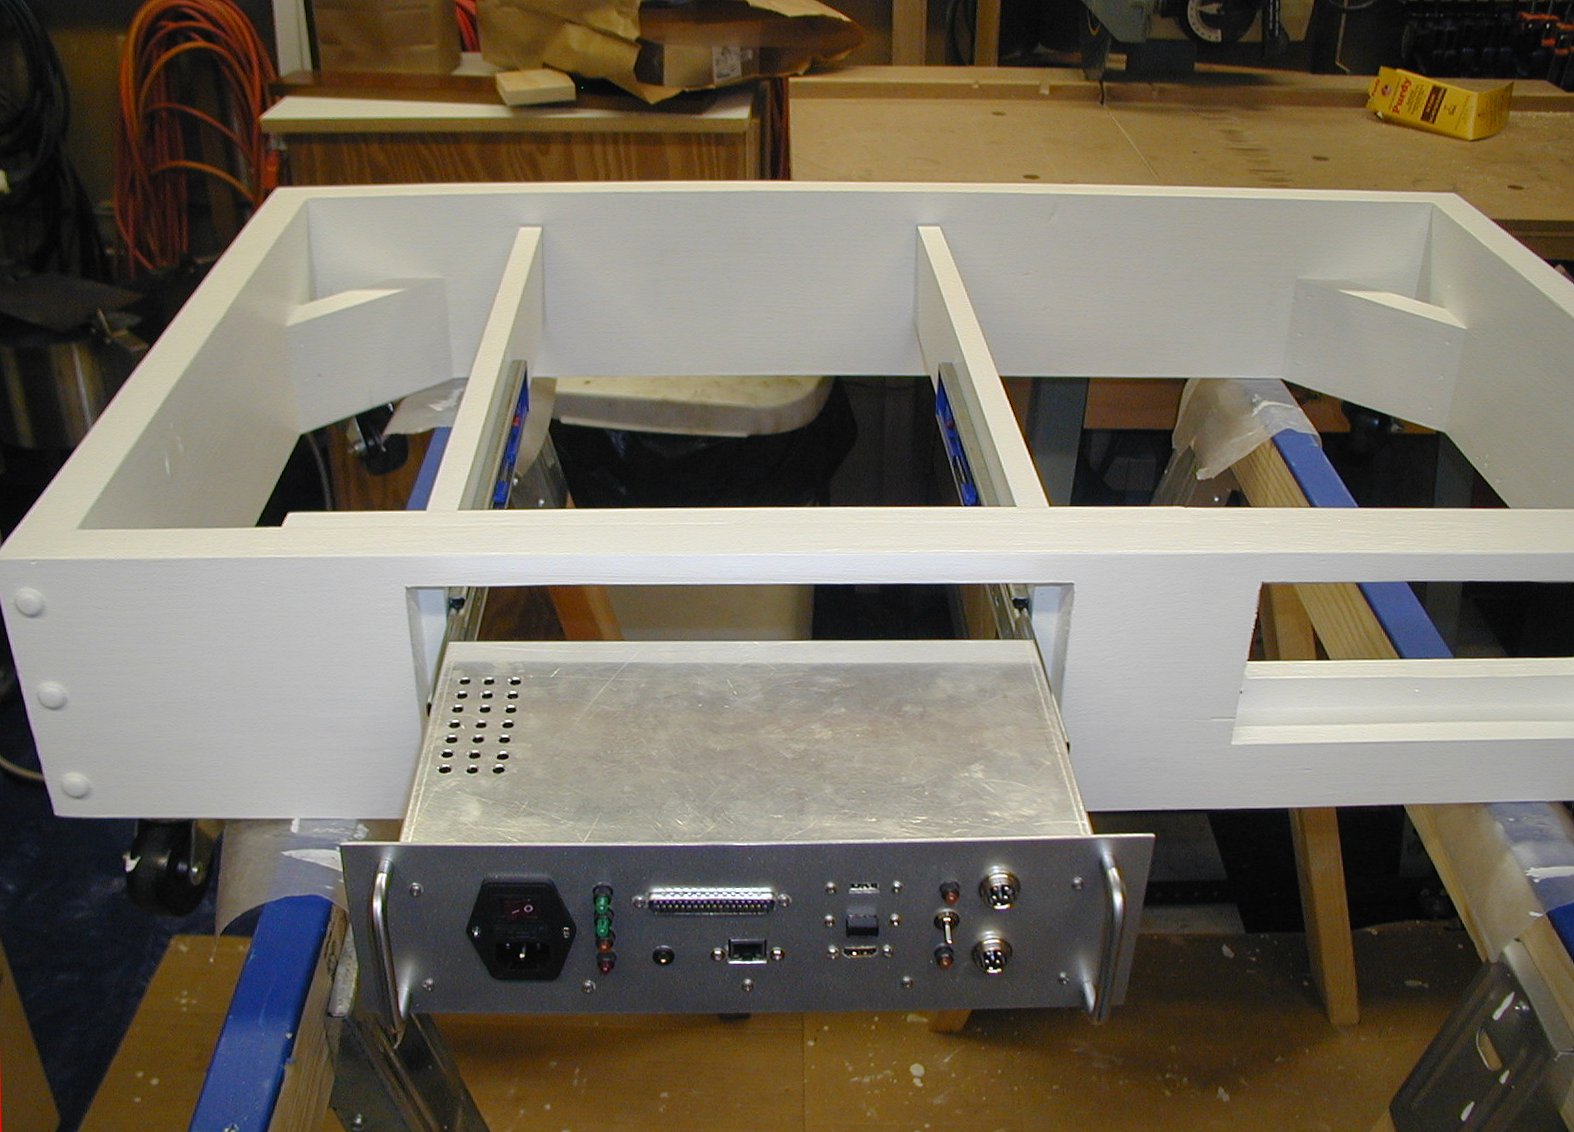
Yesterday I installed the rails and full-extension+ glides in the dolly for the new controller, tested the fit, then took the glides off and repainted the whole dolly. Today I re-installed the glides - which are pretty cool, they have a positive retract mechanism that pulls the drawer in the last 3-4 inches ($13/set at Lowes) - then got the keezer back atop the dolly after biting the bullet and temporarily unloading all the kegs to my two fridges.

Hoping to do the lid mods and have everything running tomorrow (The New England Patriots aren't playing so I don't have to actually pay attention to all of the lesser teams playing football tomorrow :D).

This build came out so clean I decided I'm going to build a clone to house the development system in my office. Already have all the sheet metal cut/bent/spot welded, front panel blank cut out (of the 1/8" thick aluminum speed limit sign one of my sons "acquired" around 15 years ago ;)) and the motherboard shaped and drilled. I'll be able to swap the crates if ever needed...

Cheers! :mug:

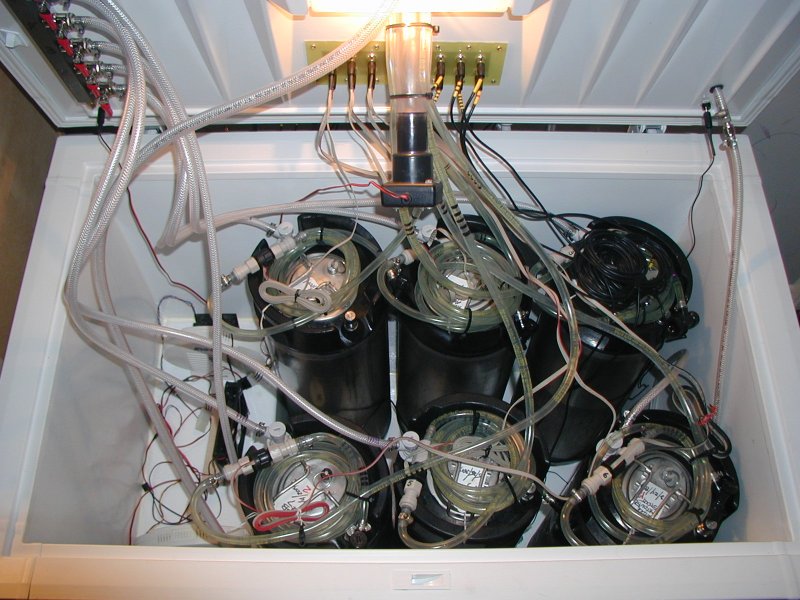
brewpints_28.jpg


brewpints_29.jpg


brewpints_30.jpg
 
At idle they should be off. If they are lit then change the inverted state. If whatever is hooked up up to the relay is on when light is off then you have the relay side hooked up backwards.

OK I know this is old but I did figure out my problem. I didn't realize that the shield has transistors to invert the output from the Arduino. I was going to add transistors to revert it back but then I sobered up and realized that I can just tap the relay triggers straight to pins 5 & 6 thereby eliminating the shield's transistors. Thank you guys for the help and patience. Cheers!
 
I still cannot see the need to do so when the software allows you to change the inverted state
 
So, I have been trying to make an external password protected page by following FuzzeWuzze's instructions on page 9 of this thread but I'm having some difficulty. For one, when i run through all the steps and restart Apache I get a message saying that it "Could not reliably determine the server's fully qualified domain name, using 127.0.0.1 for servername." I also have never been able to go to Http://brewpi to access brew pi, i have to use the IP address of my RPI. Did i miss something DNS related here?
 
You'd have to have setup the host name to be brewpi. Also you'd have to have a home network that allows domain names internally. Does your password protected site work. Because the error message you talk about isn't an error message, it's telling you that you don't have a qualified domain name, which is fine.
 
You'd have to have setup the host name to be brewpi. Also you'd have to have a home network that allows domain names internally. Does your password protected site work. Because the error message you talk about isn't an error message, it's telling you that you don't have a qualified domain name, which is fine.

<FilesMatch "index.php">
Allow from all
authuserFile /var/www/private/.htpasswd
AuthName "YOUR LOGIN HERE"
AuthType Basic
<Limit GET POST>
require valid-user
</Limit>
</FilesMatch>
<FilesMatch "beer-panel.php|config.php|configuration.php|control-panel.php|maintenance-panel.php|previous_beers.php|program_arduino.php|s ave_beer_profile.php|start_script.php">
Order deny,allow
Deny from All
Allow from 192.168.
</FilesMatch>

In this code do I leave "index.php" or do i change that to whatever I want? I changed it to something else and when I went to browse the page the password protection worked but then it said it couldn't find the page. Using "my ip address/index.php is not password protected when I leave the code that way.
 
Don't ask me I don't care for password protection nor do I know anything about php script. I just know I've seen a lot of people freak out because it have them an "error" when it's not an error it's just an unnamed server in the domain.
 
Don't ask me I don't care for password protection nor do I know anything about php script. I just know I've seen a lot of people freak out because it have them an "error" when it's not an error it's just an unnamed server in the domain.

Yeah, it works when i just leave it with index.php so I'll just leave it like that for now. So, now how do I make my internal IP address external from my intranet? I'm guessing I have to port forward via my router but, to what IP address? Do I need to host it somewhere?
 
You'll be hosting from your external ip. Type in ipchicken.com into a browser.
 
Ugh… the words wifi dongle are synonymous with 10 posts trying to figure out why it won't work.
 
Also only one USB slot and no Ethernet port. Although, with a USB hub and a WiFi dongle I suppose you could get away with it.

Yeah, saw the video this morning. It's a good fit for bounded applications but if you need to add a hub the advantage over even a B is pretty much lost...

Cheers!
 
Why won't they just make a raspberry pi with a faster processor. That's all it needs
 
Aaaaand it's done! For a little while, anyway ;)

Took a full two days longer than I expected, but she's up and running and purring like a beer-besotted kitten :ban:

A bunch of pics:

- the lid "Before". The two rails are for mounting manifolds and/or secondaries

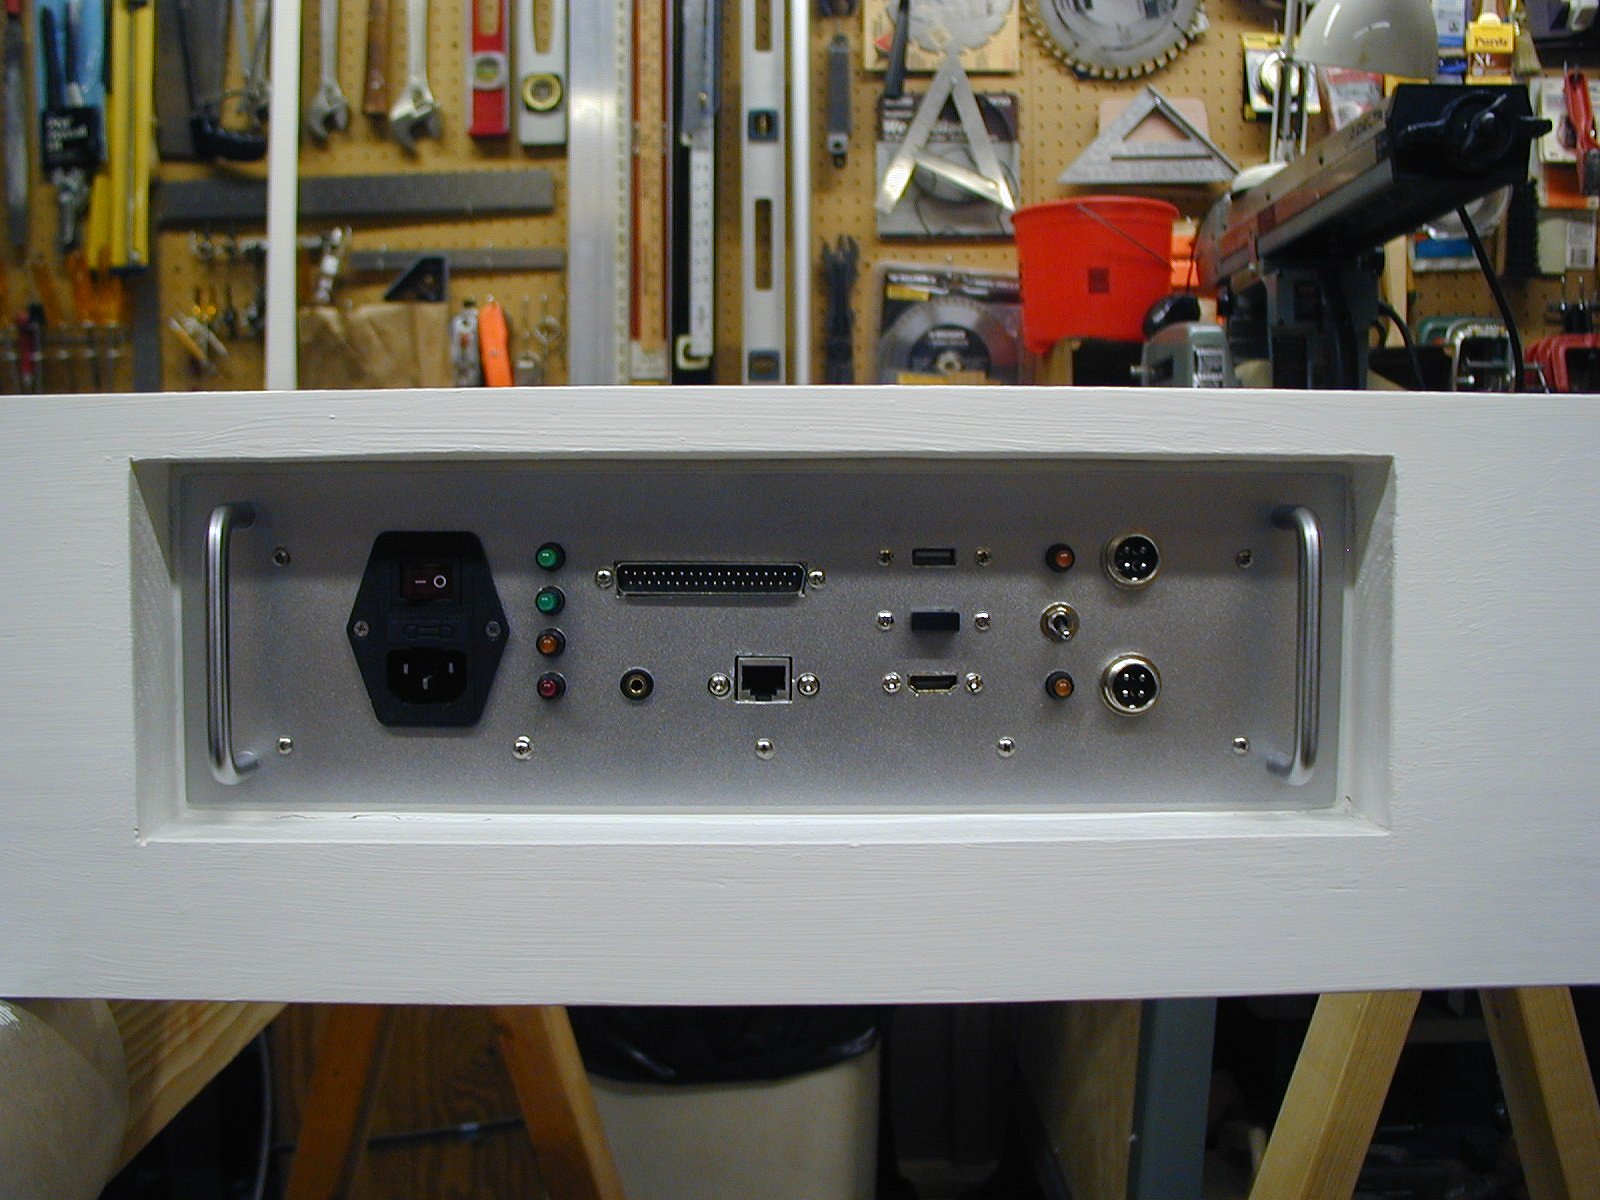
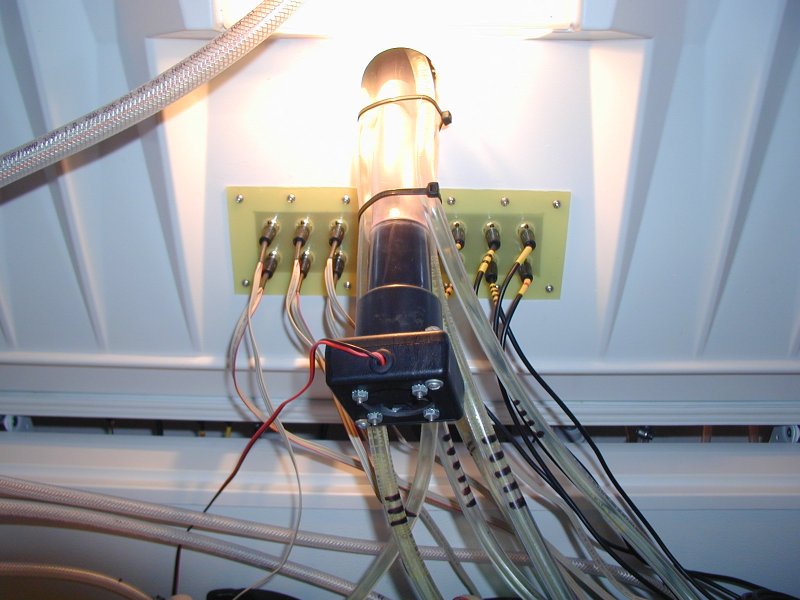
- lid cut and maple enclosure installed to support the connector panel

- oil-based paint on all the supports

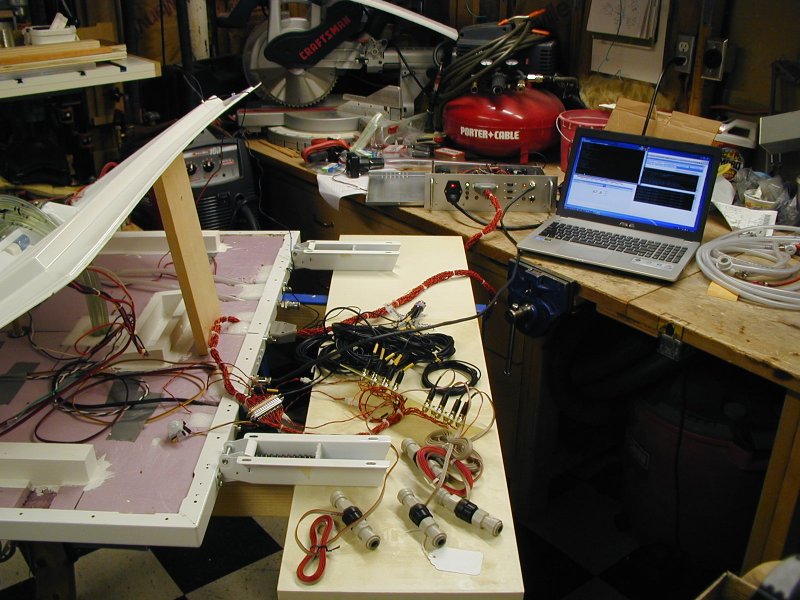
- full system testing before buttoning up the lid

- keezer reloaded with kegs and sensors

- close-up of the connector panel

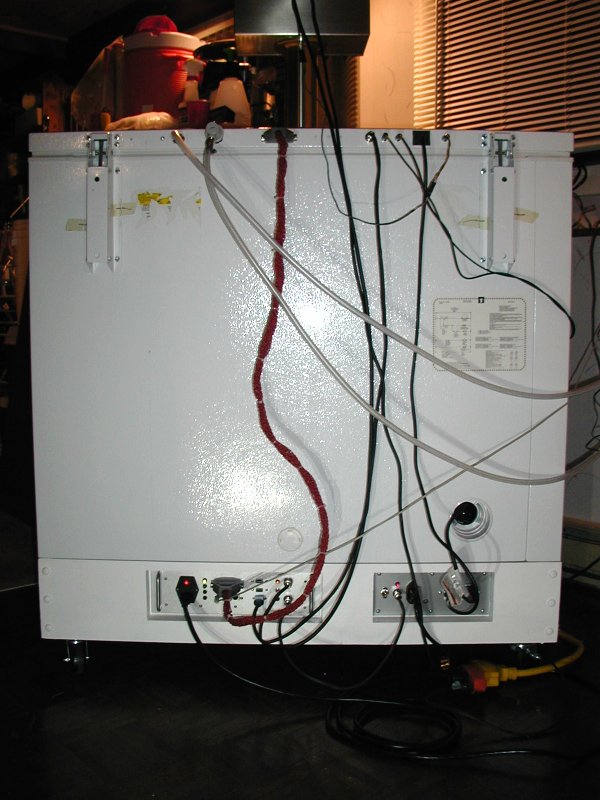
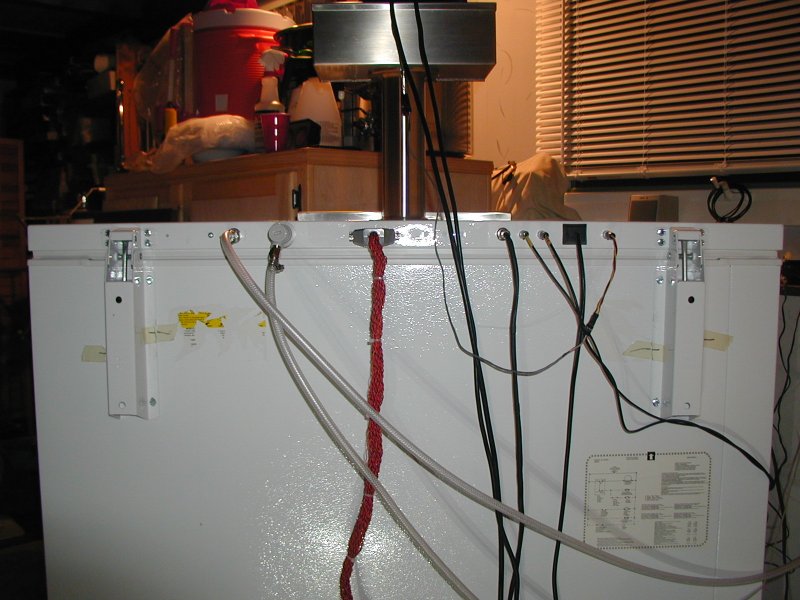
- rear view. There's a lot going on back there!

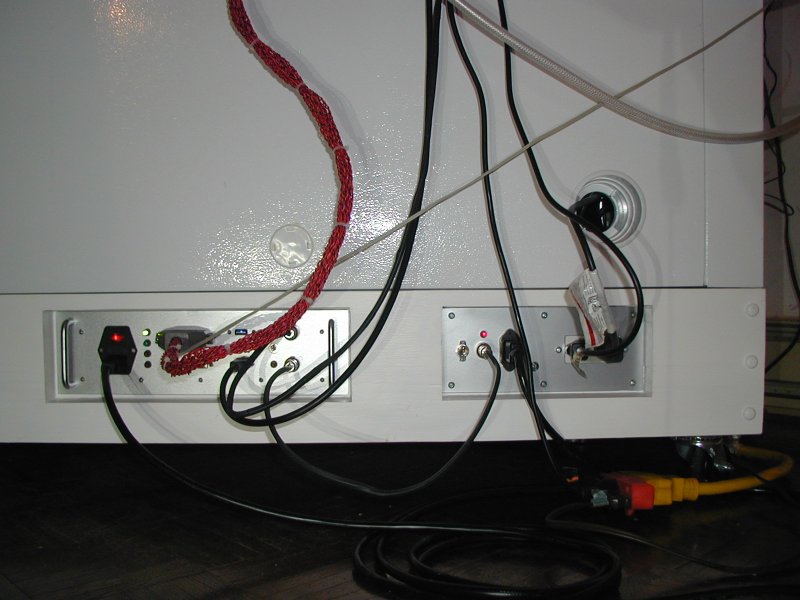
- the BrewPints crate on the left with the original controller to the right. The latter provides 12VDC for the interior fans, 120vac for the dome light and to run the MH1210 in the front of the lid, and houses a big honking relay to control the compressor on command from either the MH1210 or BrewPi (the switch is on the BrewPints panel). By moving one cable I can yank the BrewPints box totally out of the dolly if needed and leave the MH1210 to run the show.

- from left to right: Beer-Gas feed, CO2 feed, BrewPints sensor cable, 12VDC & MH1210 relay control cable, Temperature Logger Room Temp sensor, BrewPi Room Temp sensor, 120VAC to lid & MH1210, and the PIR sensor.

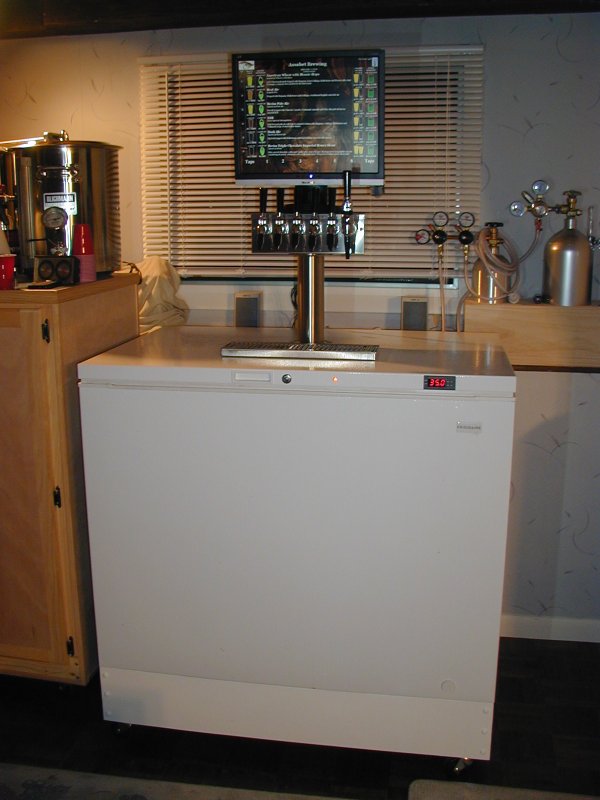
- and the front. Low art, high tech. Story of my life ;)

So far the wee Edimax dongle is performing admirably considering it's slammed up against a baseboard heater and not only on the wrong side of the keezer from all the beacons in the house, it's essentially under the keezer. I have to say I'm impressed that a $4 bit o' kit works that well.

Meters and probes are all working perfectly, I exported the running R'Pints database from the old system to the new one and have been tracking pours without skipping a beat.

I'm going to run on the MH1210 for the first few days to make sure it works properly - it's going to be my fall-back if BrewPi has issues. Then I'm going to dig through this thread to find what folks have done to tune BrewPi for use as a keezer/kegerator thermostat. I'm pretty sure I've seen a suggested tweak or two.

I ran a bunch of twisted pair wires up into the tower for future considerations, and there are end-to-end spares in the sensor cables to match. Going to be working on something to go up there next, I think, once I get a BrewPints clone up and running using my original R'Pints kit.

Anyway...time for another beer!

Cheers! :mug:

brewpints_32_sm.jpg


brewpints_36_sm.jpg


brewpints_40_sm.jpg


brewpints_41_sm.jpg


brewpints_47_sm.jpg


brewpints_46_sm.jpg


brewpints_43_sm.jpg


brewpints_44_sm.jpg


brewpints_45_sm.jpg


brewpints_48_sm.jpg
 
Cold weather is here and we're about to hit a freeze, so I figure I need to find a heat source for my chamber. It's a 15.5 cuft chest freezer. I found this small space heater locally available at walmart: http://www.walmart.com/ip/Pelonis-Fan-Forced-Heater-with-Thermostat/21804031 . It's similar to the small Lasco that OP links in the first post.

What do you guys have to say about the safety of using one of these? I ask because I woke up this morning to find about 1/2" of beer and starsan on the bottom of the freezer from blow-off overflow. If I hadn't expected blow-off this time and not used the blow-off hose, it surely would have exploded in there and drenched any heater that I may have had. I'm no electrician, but that seems like it would cause a bad day.

Do I need GFCI protection? What other safety measures are you all taking? Should I look into more "moisture friendly" heating options, if so what are they?
 
Damn what kind of airlocks are you using that your fermenters will blow up?
 
You could put one of those gfi pigtails in there or just raise the heater up off the bottom. You should be fine. Since the power to the heater will only be "hot" when brewpi calls for heat I wouldn't really worry about it. Or you could just plug the whole thing into a gfi protected outlet.
 
Cold weather is here and we're about to hit a freeze, so I figure I need to find a heat source for my chamber. It's a 15.5 cuft chest freezer. I found this small space heater locally available at walmart: http://www.walmart.com/ip/Pelonis-Fan-Forced-Heater-with-Thermostat/21804031 . It's similar to the small Lasco that OP links in the first post.

What do you guys have to say about the safety of using one of these? I ask because I woke up this morning to find about 1/2" of beer and starsan on the bottom of the freezer from blow-off overflow. If I hadn't expected blow-off this time and not used the blow-off hose, it surely would have exploded in there and drenched any heater that I may have had. I'm no electrician, but that seems like it would cause a bad day.

Do I need GFCI protection? What other safety measures are you all taking? Should I look into more "moisture friendly" heating options, if so what are they?

My FermChamb is foamboard built off a small dorm fridge and during summer I will have condensation issues even running fan full time inside. I have take to putting the PC fan and Lasco heater up on something to keep them 1/2" off the bottom most area of the FChamb.
 
If drowning is truly a concern, the only safe approach is to plug the rig into a GFI-protected outlet, and make sure the chassis is securely tied to safety ground. Any current flowing through ground will instantly trip the GFI. Putting a GFI inside would be less effective as the GFI can't protect anyone if its input is submerged...

Cheers!
 
But gfi's have been known to trip when attached to certain types of heaters or motors. While you shouldn't have this problem with newer appliances or newer gfi receptacles, it is something to think about.ive even seen them trip because I slammed a door too hard that had a gfi on the same wall. While I would never abdicate not using one because of safety, I will point these facts out.
 
Now that I've added a LCD display to my Brewpi, I was wondering about adding a selector encoder. Has anyone done it? Is it worth the effort?
 
The last few parts I needed finally came straggling into my mailbox, so my build is now complete. And it bench tests fine. :ban:

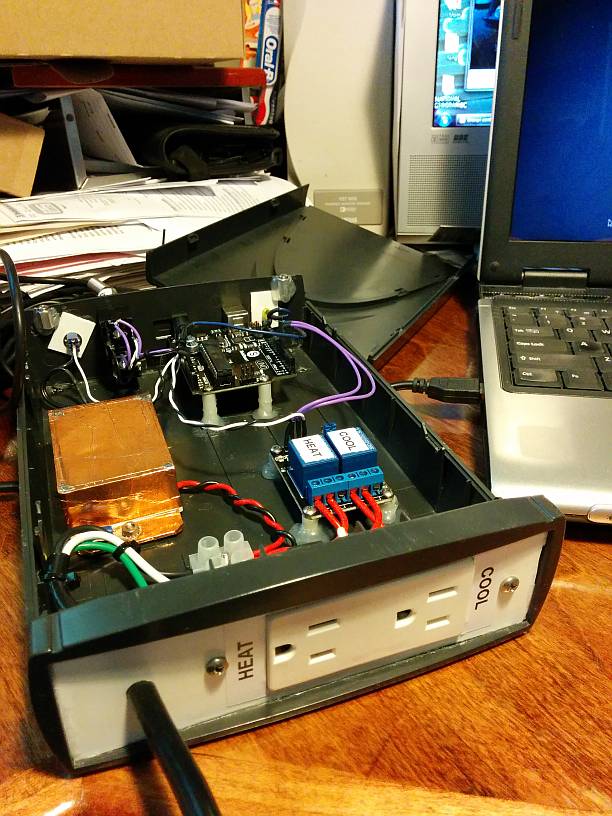
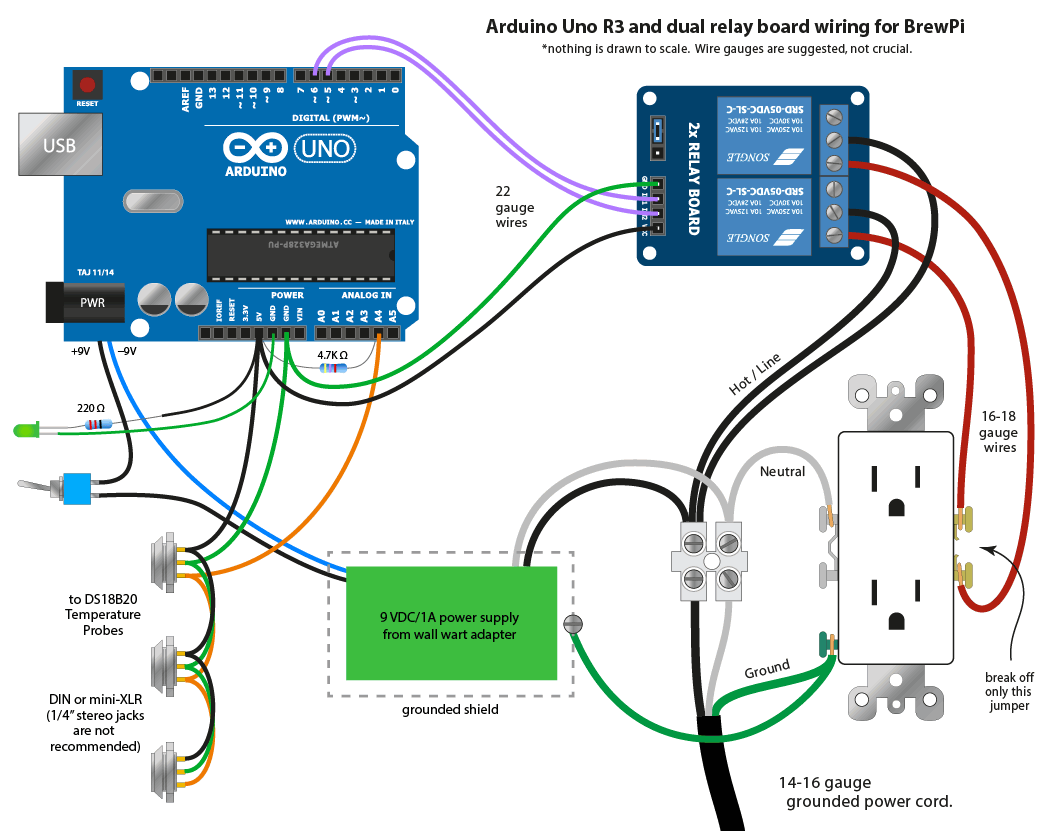
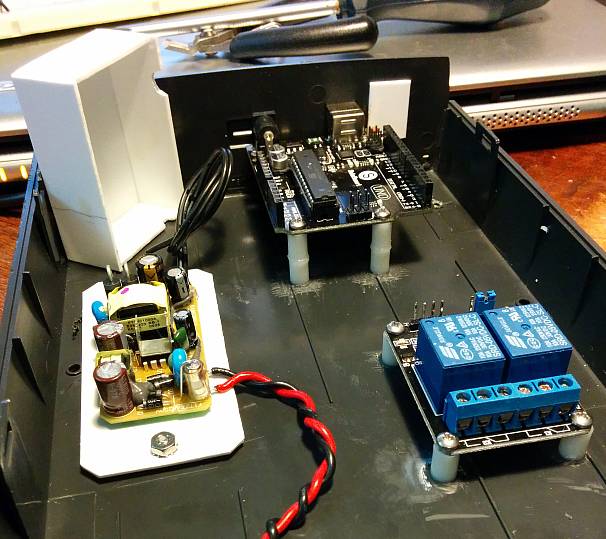
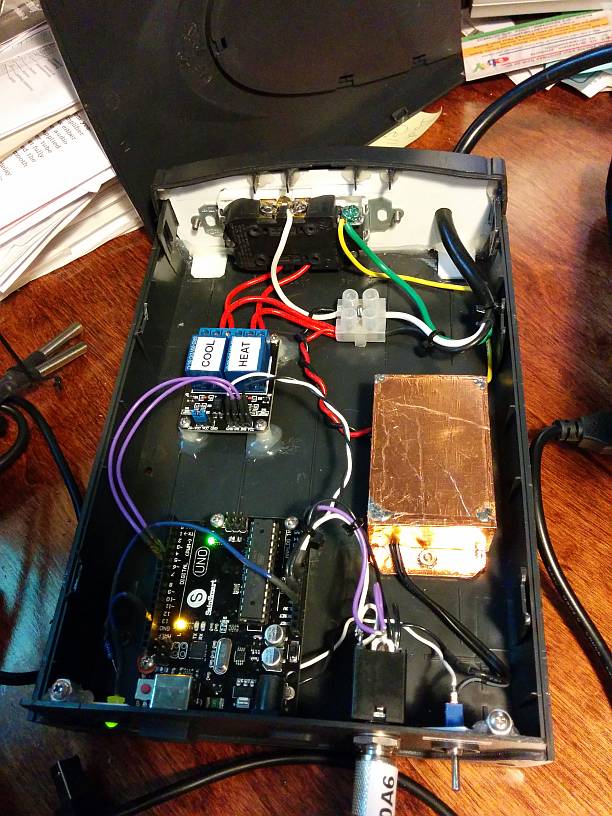
Here's some pics and the final wiring diagram I used. It's all very simple and basic. I hope it inspires someone to dive in.

I used 1/4" stereo "headphone" plugs/jacks and I don't recommend them because they will short 2 of wires together as you insert the plug. I added a power switch so I could turn off the arduino while plugging/unplugging (and yes, I also need to unplug the USB cord). mini-XLRs would be perfect but they're really expensive. DIN plugs are probably good for this application.

I also demolished a 9V/1A wall wart and used its circuit board as a power supply for the Arduino. I crazy-glued together a plastic box to mount it in, and covered the box with copper tape to provide some shielding, as switching power supplies can generate a lot of 'interference'. The copper tape is grounded.

I added an LED for a power indicator because my case is not transparent, and I'm not using an LCD panel.

I labelled the probe plugs with the last 5 digits of the probe's address so I can tell them apart.

I'm not impressed with the Sainsmart relay board's AC terminals. They use VERY low quality Philips head screws which slip and round over and strip easily, so I'm not confident in the connections they are making. I may replace those terminals if I see any problems there.

..Todd

ard1.jpg


ard2.jpg


ard3.jpg


wiring-diag.gif
 
Here's a pic from early on showing the power supply and plastic box I made. I just cut up a sheet of 16th inch thick plastic and used superglue gel to stick it together. Love that stuff.

The back panel of the project box where the outlet and power cord is, is made of 2 layers of the same plastic glued together.

I used #4 threaded nylon standoffs to mount the boards. Glued them down to the box with superglue, then pliled on a bunch of hot glue to build up some joint support.

..Todd

ard4.jpg
 
I used 1/4" stereo "headphone" plugs/jacks and I don't recommend them because they will short 2 of wires together as you insert the plug. I added a power switch so I could turn off the arduino while plugging/unplugging (and yes, I also need to unplug the USB cord). mini-XLRs would be perfect but they're really expensive. DIN plugs are probably good for this application.

In my opinion, the CAT3/Telephone connections are the best connection to use. My problem with the mini xlr is the length of the plug. I bought a 12' telephone cord and cut it in half, giving me (2) 6' cables. But I built by own temperature probes.

I then used a Leviton wall plate with 4 jacks for connection to the Arduino.
 
I'm digging these aircraft connectors. They are much bigger than mini xlr's but smaller than regular xlr's
 
In my opinion, the CAT3/Telephone connections are the best connection to use. My problem with the mini xlr is the length of the plug. I bought a 12' telephone cord and cut it in half, giving me (2) 6' cables. But I built by own temperature probes.

I suppose regular RJ45s on a network (cat5-6) cable would do the trick too. Even cutting a long cable in half as you did to get 2 long ends, if you don't have an RJ45 crimper.

Yeah, lots of options. Just not stereo 1/4" plugs. Live and learn. (I should have known better, being an ex-audio techie.)

..Todd
 
Status
Not open for further replies.

Latest posts

Back
Top