HOWTO - Make a BrewPi Fermentation Controller For Cheap

Homebrew Talk - Beer, Wine, Mead, & Cider Brewing Discussion Forum

Help Support Homebrew Talk - Beer, Wine, Mead, & Cider Brewing Discussion Forum:

This site may earn a commission from merchant affiliate links, including eBay, Amazon, and others.
Status
Not open for further replies.
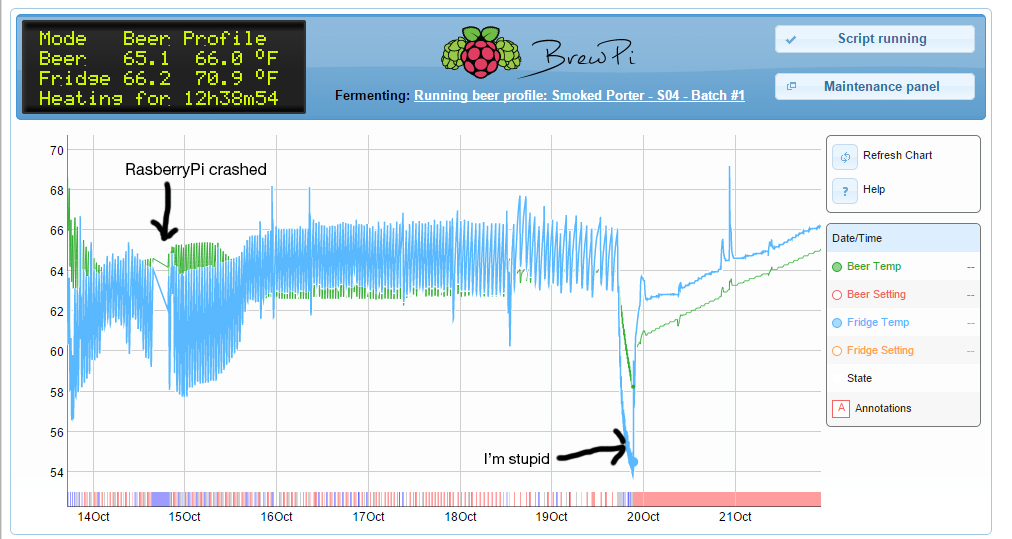
Here is a hard data proving why one should use a thermowell vs. taping to the side of a keg. Keep in mind I had my probe insulated while taped as well (bubble wrap, lots of it). I installed the thermowell during this recorded data. It should be pretty clear when it was installed.

pre_post_thermowell.png
 
Here is a hard data proving why one should use a thermowell vs. taping to the side of a keg. Keep in mind I had my probe insulated while taped as well (bubble wrap, lots of it). I installed the thermowell during this recorded data. It should be pretty clear when it was installed.

It would be really interesting and educational to see what the beer temp was, measured with a thermowell, during the first half of that test. I bet it was pretty flat. It would also be interesting to see what the temp of the outside of the fermenter was, measured with a probe insulated to the side, during the second half of that test. I bet it would vary quite a bit as the chamber temp fluctuated, but I'm only guessing.

Has anyone done this type of test yet? I always wondered what the inside temp of my carboys were when my chamber was controlled by a probe strapped to the outside of the fermenter.
 
I'm definitely considering a thermowell after my first fermentation, temps didn't seem completely accurate. Also... planning on using my brain a little bit too.

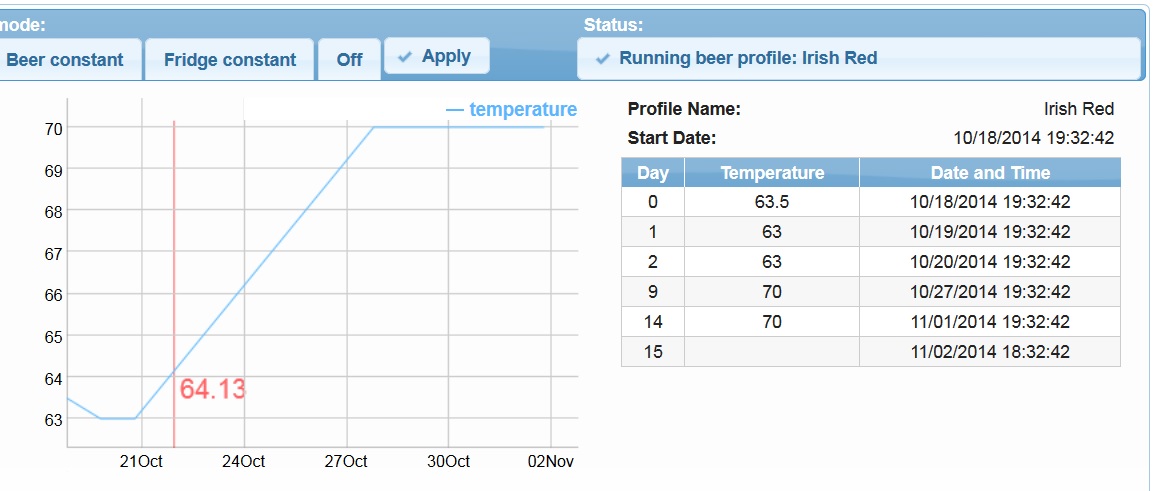
For some reason I assumed that leaving the temp field blank for a day would allow for the program to find the average temperature on that day instead of just powering the fridge at full blast and dropping to the lowest temp possible.

While it's 100% user error, it'd be cool if that were an option (unless it is and I missed it) to have it either force you to provide a value if it's blank, erase it if you didn't fill it in -- or "find the average" between day 5-8 for ramping.

fail.jpg
 
It would be really interesting and educational to see what the beer temp was, measured with a thermowell, during the first half of that test. I bet it was pretty flat. It would also be interesting to see what the temp of the outside of the fermenter was, measured with a probe insulated to the side, during the second half of that test. I bet it would vary quite a bit as the chamber temp fluctuated, but I'm only guessing.


Has anyone done this type of test yet? I always wondered what the inside temp of my carboys were when my chamber was controlled by a probe strapped to the outside of the fermenter.


I would also be interested in that data. If I can figure out a way to record it with my setup I'll give it a shot with a beer that isn't too sensitive to temperature. But regardless of the stability of the beer temp., one thing that is immediately clear with this data is reduce duty cycle on my heating and cooling devices.
 
If you leave the temp field blank it should turn the temperature control off during that period. To make it consistently ramp you would put a starting temp one day and in the next line the day with the ending temp.

temps.jpg
 
I would also be interested in that data. If I can figure out a way to record it with my setup I'll give it a shot with a beer that isn't too sensitive to temperature. But regardless of the stability of the beer temp., one thing that is immediately clear with this data is reduce duty cycle on my heating and cooling devices.

The easiest way to accomplish this is to use an additional sensor that is assigned to the Room Temp. That way it is logged, but not used in any of the control algorithms. I intend to do this with my setup once I have the time to get it set up testing on a carboy of water.

Also, Thank you Fuzze for this incredible thread. Also, Elkoe, WBarber, and Day_Trippr! Your continuing commitment to this thread allowed me to produce my own version of this excellent controller in short order!
 
Last edited:
The easiest way to accomplish this is to use an additional sensor that is assigned to the Room Temp. That way it is logged, but not used in any of the control algorithms. I intend to do this with my setup once I have the time to get it set up testing on a carboy of water.


Also, Thank you Fuzze for this incredible thread. Also, Elko, WBarber, and Day_Tripper! Your continuing commitment to this thread allowed me to produce my own version of this excellent controller in short order!


Interesting. I didn't realize the room temperature sensor was ignored in Elko's algorithm. I was thinking about installing one because my BrewPi actually lives outdoors with large day/night fluctuations (Colorado). I was going to hook up a room (for me world) temperature sensor assuming it would help. Knowing this bit of information I guess I won't bother.

I would also like to thank Elko, Fuzze, and friends for all their hard work.
 
That is my understanding of the way the Room Sensor works. In the interest of (Beer) Science. I have set up my BrewPi the way I had planned to test the Thermowell vs. Side of Carboy.

I anticipate that the Thermowell setup will ultimately be the better method, but wanted to know how it compared since I had always placed the sensor on the side of the carboy in previous ferments without the BrewPi.
 
Do y'all just dangle a fan in your fridge and let her rip or are y'all deliberate about how you set it up? I was thinking of trying to use the fan with a tube to draw air directly from the bottom and force it to the top like in the case of the "Mother of a Fermentation Chiller".

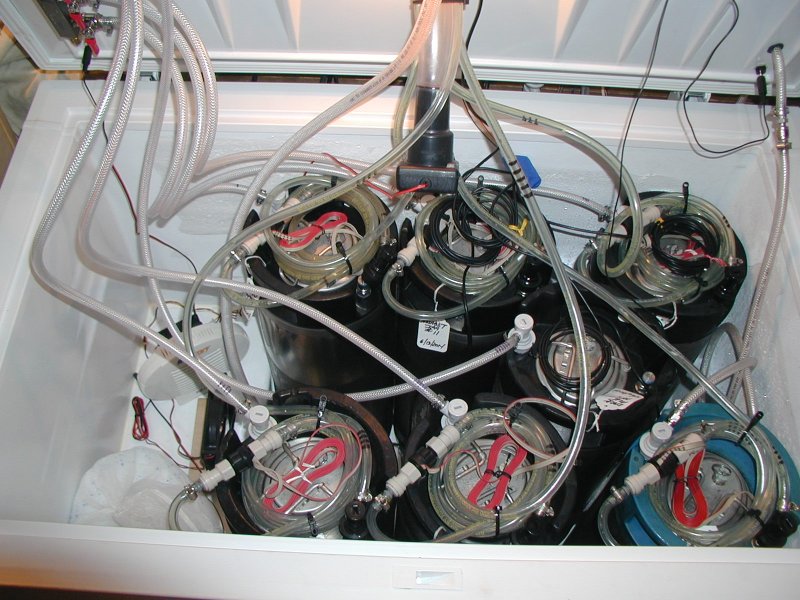
fwiw, here's a shot of my keezer's guts. In the middle of the hump on the left you can see a 120mm fan screwed to a block of maple and aimed across the channel between the two rows of kegs (and I usually don't keep a 7th keg in the keezer). Also on the hump is an Eva-Dry 500 with an 80mm fan running half-speed pushing air into the drier; and a paint strainer bag filled with 4 pounds of desiccant - which didn't do a heck of a lot and has been discontinued.

Dangling from the lid at 12 o'clock high is a 40mm fan pushing keezer air through a 1" ID thickwall tube up into the tower.

All fans run 24/7. The temperature differential from top to bottom is negligible at all times, and the tower temperature is usually within 8°F of the kezer air...

Cheers!

flow_meter_install_08_sm.jpg
 
If you leave the temp field blank it should turn the temperature control off during that period. To make it consistently ramp you would put a starting temp one day and in the next line the day with the ending temp.


I believe that only works if it's the last entry. If you leave a temp field blank in the middle of your schedule then brewpi would just ignore it and continue ramping to the next temp in the schedule.
 
OK so I got it and I am thrilled! I am unsure how to tell anyone what I did to correct the issue but everything is in working order now! I really wanted to thank everyone who helped me out along the way! FuzzeWuzze, Day_Trippr, and wbarber69 just to name a few and everyone else that has helped. Thank-you
 
Here is a hard data proving why one should use a thermowell vs. taping to the side of a keg. Keep in mind I had my probe insulated while taped as well (bubble wrap, lots of it). I installed the thermowell during this recorded data. It should be pretty clear when it was installed.

I'm having trouble understanding your chart. Is the ambient temp around your fermentation chamber very low? The fridge temp stays above the beer temp by quite a bit during the early part of the fermentation. And then, at about the time when fermentation activity likely died back, the fridge temp dove below the beer temp. Are you using some type of heater (e.g. Fermwrap) and if so, is it in contact with the beer probe? :confused:
 
He may have had one probe lower in the cooler while the beer temp probe was stuck to the side of his fermenter. I use ferwraps and my fridge sensor tucked inside the fermwrap. My fridge temps swing high when the wrap is on and then they kinda fall back down to reflect the beer temp when it's off.
 
Here is a hard data proving why one should use a thermowell vs. taping to the side of a keg. Keep in mind I had my probe insulated while taped as well (bubble wrap, lots of it). I installed the thermowell during this recorded data. It should be pretty clear when it was installed.

See, now, I keep reading just the opposite--that a *WELL INSULATED* probe on carboy's outside wall, kept on opposite side from fridge/heater direct view, will essentially measure same as wort. See this post for instance:

"Jamil discussed this on a BrewStrong a while back. In short, if you insulate the probe on the outside it's just as good as a thermowell. He cited studies one guy did where a probe was directly in the wort, in a thermowell, and taped on the outside. All were essentially the same. JZ tapes down some bubble wrap on the outside of the probe. ... If you're using a space heater in there, I'd keep the probe (insulated or not) away from it."
 
Jamil wasn't using a BrewPi set up for temperature control when he wrote that.

Wasn't his point that there was little difference between temperatures in thermowell versus side of FV? Doesn't the PID algorithm simply correct setpoint versus actual beer temp, so how beer temp is measured, if the same using two methods, would present the same temp to the PID algorithm?

:confused:
 
The thing is. You're measuring the entire thermal mass of a body of liquid. If you can read the core of that mass as opposed to the outer "skin" of the liquid you will have much more consistent reading. Say your vessel is glass. When the freezer kicks on and starts blowing cold air on the glass the glass will start to reflect to air temperature much faster than the core of the thermal mass. This would cause your compressor to shut off prematurely and also cause it to have to kick back on a few minutes later once the glass balances back out to the interior temperature of the chamber. While the thermal mass of the liquid should be sufficient enough to maintain a steady temperature, you also have the active fermentation heating things up in there. I didn't write the algorithm that brewpi uses, but I have read the accounts of much more stable temps using thermowells as opposed to just insulating it to the side. There are other variables that can change the outcome as well. Taller skinny vessels may be better at reading from the side, where shorter fatter vessels will be better suited to using thermowells. All that being said. On the brewpi site they recommend thermowells for a better experience. If they recommend it then it's good enough for me.
 
All I know is with the BrewPi two temp sensor set up (one in thermowell and one in chamber) I get temps within less than .5°+/- of the setpoint. Maybe it will work with an exterior mounted temp probe too. All you can do is experiment with it to see what kind of results you get.
 
Hi guys. This has been a great read and project for me and I have my setup almost complete. The only thing left is connecting the relays. I'm using the Sainsmart 2ch and I'm confused about the polarity on the inputs. I wired it just like FuzzeWuzze showed and have both Pin types set to Inverted (in BrewPi). I was under the impression that the relays would stay in the normally open position until the BrewPi sent 5V to the IN1 or IN2 terminal on the relay. However the relays seem to be activated by GND to the INs. Am I missing something here?
 
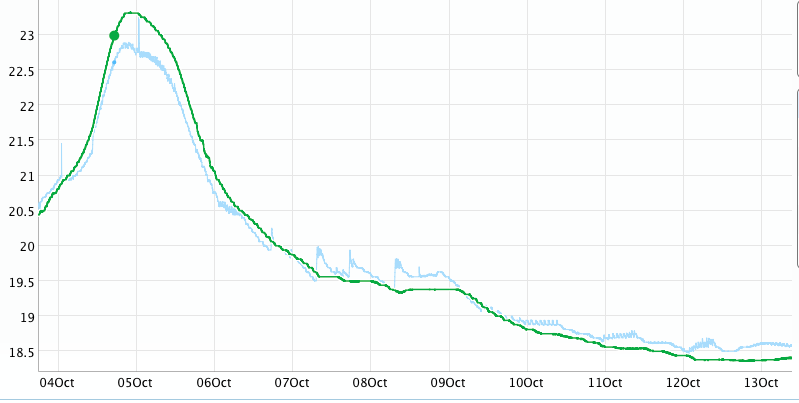
FWIW here is a basement test. I do this IPA this way all the time and added a tap to the keezer because my wife prefers it be on tap all the time. Anyway the beer temp(green) is in a thermowell and the fridge temp (blue) is just duct taped to the side of my fermenter. I use a big white plastic barrel (with the red lid) and ferment about 12 gallons of wort. I figured i would collect some data while i had a brew going all old school with no control. I just picked up a replacement freezer so temp control will be on for the next brew. I do have a room probe on my system. I'll control my next brew via the thermowell and add the room probe to to the side with insulation. to see how well they track.

Screen Shot 2014-10-22 at 4.32.19 PM.png
 
Are the lights on on the relay board? The in1 and in2 receive 5v from the 5v rail and ground it to activate the relay. Have you tried toggling the inverted state in the maintenance panel. Also when you do you have to hit apply every time.
 
When the blue and red lights are OFF on the BrewPi shield, the lights on the relay board are ON.
 
See, now, I keep reading just the opposite--that a *WELL INSULATED* probe on carboy's outside wall, kept on opposite side from fridge/heater direct view, will essentially measure same as wort. See this post for instance:


"Jamil discussed this on a BrewStrong a while back. In short, if you insulate the probe on the outside it's just as good as a thermowell. He cited studies one guy did where a probe was directly in the wort, in a thermowell, and taped on the outside. All were essentially the same. JZ tapes down some bubble wrap on the outside of the probe. ... If you're using a space heater in there, I'd keep the probe (insulated or not) away from it."


My probe was well insulated mounted opposite the heat oddly enough. I do think the wort was likely at a constant temperature. It has to be, to much thermal mass to fluctuate rapidly. But the key take away from my graph is how much less my heating and cooling elements had to run. Additionally while the wort will hold a constant temp in the situation you describe it is different from what you are measuring.
 
The thing is. You're measuring the entire thermal mass of a body of liquid. If you can read the core of that mass as opposed to the outer "skin" of the liquid you will have much more consistent reading. Say your vessel is glass. When the freezer kicks on and starts blowing cold air on the glass the glass will start to reflect to air temperature much faster than the core of the thermal mass. This would cause your compressor to shut off prematurely and also cause it to have to kick back on a few minutes later once the glass balances back out to the interior temperature of the chamber. While the thermal mass of the liquid should be sufficient enough to maintain a steady temperature, you also have the active fermentation heating things up in there. I didn't write the algorithm that brewpi uses, but I have read the accounts of much more stable temps using thermowells as opposed to just insulating it to the side. There are other variables that can change the outcome as well. Taller skinny vessels may be better at reading from the side, where shorter fatter vessels will be better suited to using thermowells. All that being said. On the brewpi site they recommend thermowells for a better experience. If they recommend it then it's good enough for me.


You hit it on the head with your compressor cycling. We are talking about gallons and gallons of liquid. It isn't changing temp the second a heater or compressor kicks on. And more importantly it is holding a constant temperature. The point of having the thermowell is to limit the duty cycle on your devices. Even if you don't care about your power bill, this is ultimately useful for increasing the longevity of your compressor and heating device.
 
Hi guys. This has been a great read and project for me and I have my setup almost complete. The only thing left is connecting the relays. I'm using the Sainsmart 2ch and I'm confused about the polarity on the inputs. I wired it just like FuzzeWuzze showed and have both Pin types set to Inverted (in BrewPi). I was under the impression that the relays would stay in the normally open position until the BrewPi sent 5V to the IN1 or IN2 terminal on the relay. However the relays seem to be activated by GND to the INs. Am I missing something here?

The Sainsmart relay board exposes both the Normally Open and the Normally Closed poles. Most folks - those who don't have indicators on their GPIO signals - run with the BrewPi channels inverted, and use the Normally Open relay poles.

Given your shield LEDs indicate the "1" GPIO state, you could simply set BrewPi to Non Inverted, and connect your loads to the Normally Closed poles. Thus wired, your BrewPi shield LEDs will light when the corresponding load is "hot".

Of course, the LEDs on the relay board will then be inverted - they'll be unlit for a hot load.
You pays your money and you makes your choices ;)

Cheers!
 
While we're talking about probe placement, has there been any discussion on the best place to place a thermowell with respect to the sidewalls of the fermenter? If you had a thermowell in the fermenter, but up against the wall, it would be similar to having a probe insulated to the outside of the fermenter. In contrast, you could put the thermowell dead center. This would result in longer cycle times (probably). Which would provide the best approximation of the overall beer temperature? I'm sure this has been studied by someone at some point, whether they were brewers or chemists doing something totally different, but I'm not familiar with any actual studies. It seems to me that about about 1/4 to 1/3 of the diameter of the fermenter from the wall would be better than either dead center or up against the wall, but that is a total guess!
 
My thermowells are near center mass. I don't have long cycle times. Active fermentation is like having a recirculating pump in there.
 
Active fermentation is like having a recirculating pump in there.

Yes, obviously. You're not going to change your temp probe placement when active fermentation is done, so you will want it to be in the optimum position for post-active fermentation.
 
The + and - on the relays is wired correctly. So just to be clear, here is what the outputs on the shield are doing at the various states:
Pin Type Inverted, Idle: No light, - pin = -, + pin = -
Pin Type Inverted, Cooling: Blue light on, - pin = -, + pin = +5V
Pin Type Not-Inverted, Idle: Blue light on, - pin = -, + pin = -
Pin Type Not-Inverted, Cooling: no light, - pin = -, + pin = +5V

Is this the way BrewPi is supposed to work? It makes sense to me and I'm getting the feeling that this relay is screwy. If this is the case I'll just buy a different relay and keep this one for another project. Anyone please confirm. Thanks!
 
The Sainsmart relay board exposes both the Normally Open and the Normally Closed poles. Most folks - those who don't have indicators on their GPIO signals - run with the BrewPi channels inverted, and use the Normally Open relay poles.

Given your shield LEDs indicate the "1" GPIO state, you could simply set BrewPi to Non Inverted, and connect your loads to the Normally Closed poles. Thus wired, your BrewPi shield LEDs will light when the corresponding load is "hot".

Of course, the LEDs on the relay board will then be inverted - they'll be unlit for a hot load.
You pays your money and you makes your choices ;)

Cheers!
I think you have that backwards. If I set the pin type to non-inverted, the shield lights are on at idle and turn off when cooling or heating. The relay lights work no matter what. Basically, I either need the BrewPi to turn on the shield lights when the + pins = GND, or I need a new relay.
 
While we're talking about probe placement, has there been any discussion on the best place to place a thermowell with respect to the sidewalls of the fermenter? If you had a thermowell in the fermenter, but up against the wall, it would be similar to having a probe insulated to the outside of the fermenter. In contrast, you could put the thermowell dead center. This would result in longer cycle times (probably). Which would provide the best approximation of the overall beer temperature? I'm sure this has been studied by someone at some point, whether they were brewers or chemists doing something totally different, but I'm not familiar with any actual studies. It seems to me that about about 1/4 to 1/3 of the diameter of the fermenter from the wall would be better than either dead center or up against the wall, but that is a total guess!

Mine is placed in an extra port of one of those orange carboy caps. With the 16" thermowell, it hangs somewhat diagonally into the wort. I placed the end of the temp probe all the way down into the thermowell, so this is pretty close to the center of mass in the fermenter. I saw very minor temp changes during the normal cycling of the chamber, but I can't say that temp closer to the sides of the carboy were not affected. Close enough for guvment work, and in my mind, for making good beer. Heck, this is definitely way better than the ice bottle shuffle I was doing before, and yet I still made good beers then.
 
Close enough for guvment work, and in my mind, for making good beer.

Agreed. This might even be better than what most breweries do. I know of one large brewery that uses simple on-off control for their fermentation temps. No fancy algorithms. I always strive for perfection, though!
 
Last edited by a moderator:
For comparison here is the aircraft connector versus the mini xlr panel mount connectors. Xlr on the right

ImageUploadedByHome Brew1414029116.598240.jpg
 
And they have plenty of room for 2 jacketed cables meaning I can cut down on the amount of connectors needed to finish out my project.

ImageUploadedByHome Brew1414029868.934974.jpg
 
Status
Not open for further replies.
Back
Top