HOWTO - Make a BrewPi Fermentation Controller For Cheap

Homebrew Talk - Beer, Wine, Mead, & Cider Brewing Discussion Forum

Help Support Homebrew Talk - Beer, Wine, Mead, & Cider Brewing Discussion Forum:

This site may earn a commission from merchant affiliate links, including eBay, Amazon, and others.
Status
Not open for further replies.
Got it, first attempt said it could not record to stderr.txt, no file existed so I used nano to create one and tried to load again. No updates in window while header said Programming, keep and eye on the output below to see progress, stayed blank.

Hmm, I guess I will start with checking the ls /dev/ttyACM* sequence then double check all the .cfg files for correct addresses. I did update my fixPermissions.sh for the web path (both left and right) and run them.

I have other problems that may be related as I cannot get either left or right to start scripts from the web page, but the sudo /etc/init.d/cron restart gives me no errors.

Ah well back to head banging, midnight and I get up at 5:30.....


I'm betting that you either didn't follow each step in day_trippers manual install instructions. Or you're not using pi as the default user…
 
Started fresh with a new 32GB SD with the 9/9/2014 raspbian wheezy and did cut & paste to a SSH window and got a little better results, but still no load of the Arduino unos from my Firefox browser, nor do the updates, like c to f go through. Below is a snippet that had many repeats for both left and right units on load command:

Traceback (most recent call last):
File "/home/brewpi/left/brewpi.py", line 391, in startBeer(config['beerName'])
File "/home/brewpi/left/brewpi.py", line 275, in startBeer setFiles()
File "/home/brewpi/left/brewpi.py", line 244, in setFiles os.makedirs(wwwDataPath)
File "/usr/lib/python2.7/os.py", line 157, in makedirs mkdir(name, mode)
OSError: [Errno 13] Permission denied: '/var/www/left/data/My First BrewPi Run/'
Sep 30 2014 17:41:08 Notification: Script started for beer 'My First BrewPi Run'
 
I think we can rule out the sd card as the problem at this point…
 
Are you using a certified copy of raspbian? Did you change the user name and/or password on initial install? Did you run all updates (apt-get update, apt-get upgrade, rpi-update) before trying to install brewpi? Did you run fixPerissions.sh for each instance? Did you install brewpi using the install script before doing the manual install (because don't)? You're having permissions problems
 
Are you using a certified copy of raspbian? Yes
, Did you change the user name and/or password on initial install? Only for the sql server install, not for anything else, RPi or BPi
Did you run all updates (apt-get update, apt-get upgrade, rpi-update)before trying to install brewpi? Yes to the first 2 cannot find the rpi-update in the guide.
Did you run fixPerissions.sh for each instance? Yes
Did you install brewpi using the install script before doing the manual install (because don't)? no
You're having permissions problems

Yeah thats what I thought, but would like to know what I have done wrong. I guess I can reformat the SD card and try again. I am using the latest drop of raspbian and still have it on my PC so it is only time. Roughly a day per run. every entry was cut & paste from the guide (just added left & right to the /home/brewpi/left & /var/www/left structure)
 
Do this step again:

$ sudo usermod -a -G www-data pi

$ sudo usermod -a -G brewpi pi

Stop reformatting everytime. There's a lot of steps to follow and you could just be messing something different up each time. Or you didn't account for a name or address deviation in your setup somewhere. Also, what page comes up when you type localhost into the browser on the pi.

Sorry I saw this too late, but this was only the second format/load. It is much better. I had to start the scripts manually but they are running, I managed to get my 4 sensors programmed (1 chamber and 1 beer per fermenter) however both of my beer sensors have disappeared and the system does not see them any more. I have some minor tweeking to do but it now looks good, and I have to learn to use it.
Thank you very much for all of your time, consideration, and support!
Mike

Update: The scripts ran for around 20 minutes then stopped and the browser run script will not work, nor the configuration items. Running in the latest Firefox.
 
[...]I had to start the scripts manually but they are running, I managed to get my 4 sensors programmed (1 chamber and 1 beer per fermenter) however both of my beer sensors have disappeared and the system does not see them any more.[...]

The Log window can be very helpful wrt sensors coming and going...

Cheers!
 
I've been lurking on the forums for a few years being rather lazy. I was recently trying to decide what to do with a RaspberryPi I was given and stumbled across this thread. I've created my own build basically duplicating what you wonderful folks have laid out. Thanks for everyone's contributions! I'd like to add one nifty trick I have not seen elsewhere in this thread or others related to BrewPi that was useful in my build.

I was concerned about being able to re-use my temperature probes if this project didn't pan out, and also a bit worried about ease of moving, stress on wires, having my BrewPi out in the cold in a poorly sealed project box, etc.

I used 1/8" headphone jacks as an interconnect between my project box and the temperature sensor instead of feeding the cable through a hole. This allows me to easily disconnect the sensors and also means I don't place a lot of stress on the solder joints or have an ugly hole in my project box. And plugging my temperature sensors in and out is as easy as plugging in headphones. I'm not sure how often I'll take advantage of this, but with the cheapo sensors I purchased on Amazon I was also worried about their lifetime/durability.

For those concerned about signal quality, the resistance across the headphone jack was around 0.1 ohms for each connection, so I don't this this is enough to matter.
 
I used 1/8" headphone jacks as an interconnect between my project box and the temperature sensor instead of feeding the cable through a hole.

Aren't headphone jacks two wires, and the temperature sensors three wires? I just ask because I used min XLR jacks on my build, thinking regular headphone jacks wouldn't work...
 
Aren't headphone jacks two wires, and the temperature sensors three wires? I just ask because I used min XLR jacks on my build, thinking regular headphone jacks wouldn't work...

S18P-2.jpg
 
So I've been chasing another problem, I wanted to add an LCD to my build. Before I fully knew what all went into the BrewPi I ordered the Sainsmart LCD with an I2C header attached. I've seen on this thread and elsewhere various people attempting to hack this into the code using the LiquidCrystal library. What I haven't seen is anyone confirming success with this franken-build. Has anyone successfully gotten this to work? Or am I better off desoldering the I2C header and using the shift register solution?
 
The Log window can be very helpful wrt sensors coming and going...

Cheers!

Thanks day_tripper, but when the script stops so do the updates in the window. I have a permissions error somewhere and robert over at brewpi is looking over an ls -lR /var/www/left/ listing to see if he can help.
Mike
 
Have you tried following the guide to the letter. Name everything like day_tripper laid it out instead using left and right use brewpi1 brewpi2. The only thing that will vary for you will be the symlink entries. Then we can rule out anything else being wrong with the walk through. This is why I haven't published a new walk through yet. I guarantee you it's something dumb that you don't even realize is wrong.
 
Have you tried following the guide to the letter. Name everything like day_tripper laid it out instead using left and right use brewpi1 brewpi2. The only thing that will vary for you will be the symlink entries. Then we can rule out anything else being wrong with the walk through. This is why I haven't published a new walk through yet. I guarantee you it's something dumb that you don't even realize is wrong.

Everything I did was cut & paste from the web listing to my SSH window and I do not think the system has a problem between brewpi1 & left, which I was very careful on.
However one item that struck me as odd was the call out from the
udevadm info -a -n /dev/ttyACM0 | less
line. My output was KERNELS=="1-1.3:1.0" and 1-1.5:1.0 so my rules file looks like this:
SUBSYSTEM=="tty", KERNEL=="ttyACM*", KERNELS=="1-1.3:1.0", SYMLINK+="arduino_right$
SUBSYSTEM=="tty", KERNEL=="ttyACM*", KERNELS=="1-1.5:1.0", SYMLINK+="arduino_left$
 
The single easiest way to find ownership/permissions issues is to use something like WinSCP on a networked peecee. The graphical/columnar display makes outlier file attributes stick out like the proverbial sore thumb.

As for the symlink stuff: fwiw, I switched from using the USB-relative symlinks to serial numbers. The procedure was documented earlier in this thread (way back by now) but in a nutshell:

Interrogate to a log file:

$ udevadm info -a -n /dev/ttyACM0 | less > info.log

Then edit the log:

$ nano info.log

Look for the Arduino(s) datasets:

ATTRS{manufacturer}=="Arduino (www.arduino.cc)"

Find the serial attribute(s) and use that/those to enumerate the Arduino boards. Here are the symlinks for my twin BrewPi instances:

SUBSYSTEM=="tty", KERNEL=="ttyACM*" , ATTRS{serial}=="85334333931351F0F020", SYMLINK+="brewpi1", GROUP="brewpi"

SUBSYSTEM=="tty", KERNEL=="ttyACM*" , ATTRS{serial}=="85336303532351F0A031", SYMLINK+="brewpi2", GROUP="brewpi"

Cheers!
 
wbarber69, I think I located two of my stupid mistakes, as all is running beautifully!
First when I reloaded my SD card I failed to notice that raspi-config needed to be re-run as it was not configured correctly. File structure expand, country time zone, etc. which I ran.

Second I think when I was using nano (all uses) after I did ^o I do not think I hit return before ^x therefore my files were not saved. All were redone and my script in the browser is working like a champ!

My apologies to you and the group, plus a ton of thanks and appreciation to you for your patience and support for a newbie. I have learned some new things!

I am now ready to finish my hardware configuration (heat/cool/sensors) and plan my next 2 brew session profiles!

Mike
 
You also named your symlinks arduino_left and arduino_right. Try just calling them left and right
 
So I've been chasing another problem, I wanted to add an LCD to my build. Before I fully knew what all went into the BrewPi I ordered the Sainsmart LCD with an I2C header attached. I've seen on this thread and elsewhere various people attempting to hack this into the code using the LiquidCrystal library. What I haven't seen is anyone confirming success with this franken-build. Has anyone successfully gotten this to work? Or am I better off desoldering the I2C header and using the shift register solution?

I went down the same path as you. Eventually I gave up and pulled the I2C and built a shift register circuit [Look Here]
 
I went down the same path as you. Eventually I gave up and pulled the I2C and built a shift register circuit [Look Here]


Bummer. I kind of figured that was the case.

But thanks a ton for providing the schematic! Looks like I'll go that route as well.

Thanks again.
 
The single easiest way to find ownership/permissions issues is to use something like WinSCP on a networked peecee. The graphical/columnar display makes outlier file attributes stick out like the proverbial sore thumb.

As for the symlink stuff: fwiw, I switched from using the USB-relative symlinks to serial numbers. The procedure was documented earlier in this thread (way back by now) but in a nutshell:

Interrogate to a log file:

$ udevadm info -a -n /dev/ttyACM0 | less > info.log

Then edit the log:

$ nano info.log

Look for the Arduino(s) datasets:

ATTRS{manufacturer}=="Arduino (www.arduino.cc)"

Find the serial attribute(s) and use that/those to enumerate the Arduino boards. Here are the symlinks for my twin BrewPi instances:

SUBSYSTEM=="tty", KERNEL=="ttyACM*" , ATTRS{serial}=="85334333931351F0F020", SYMLINK+="brewpi1", GROUP="brewpi"

SUBSYSTEM=="tty", KERNEL=="ttyACM*" , ATTRS{serial}=="85336303532351F0A031", SYMLINK+="brewpi2", GROUP="brewpi"

Cheers!

day_tripper, Thanks for your input and support too. However all is working well so I think I'll leave it alone.
Mike
 
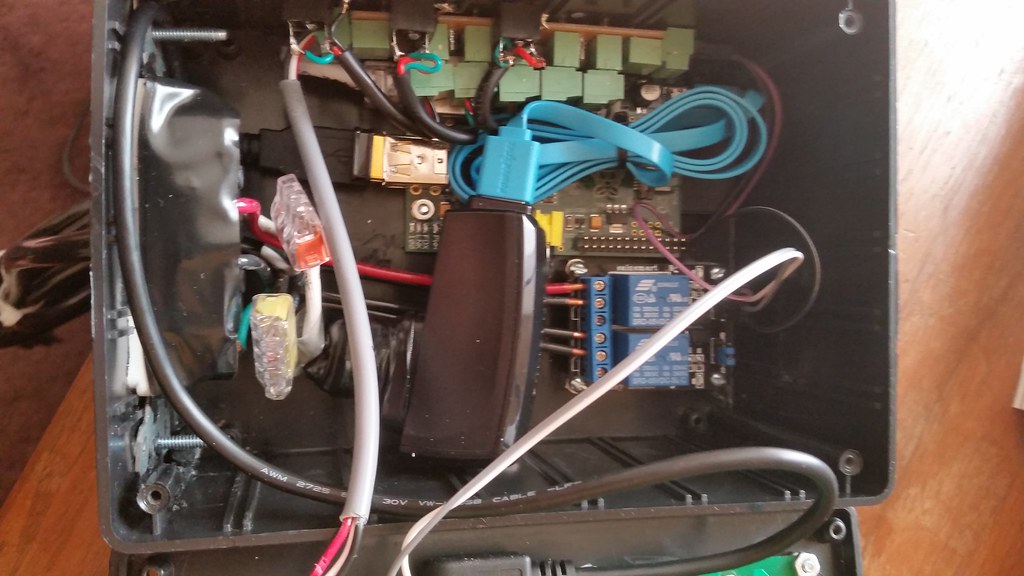
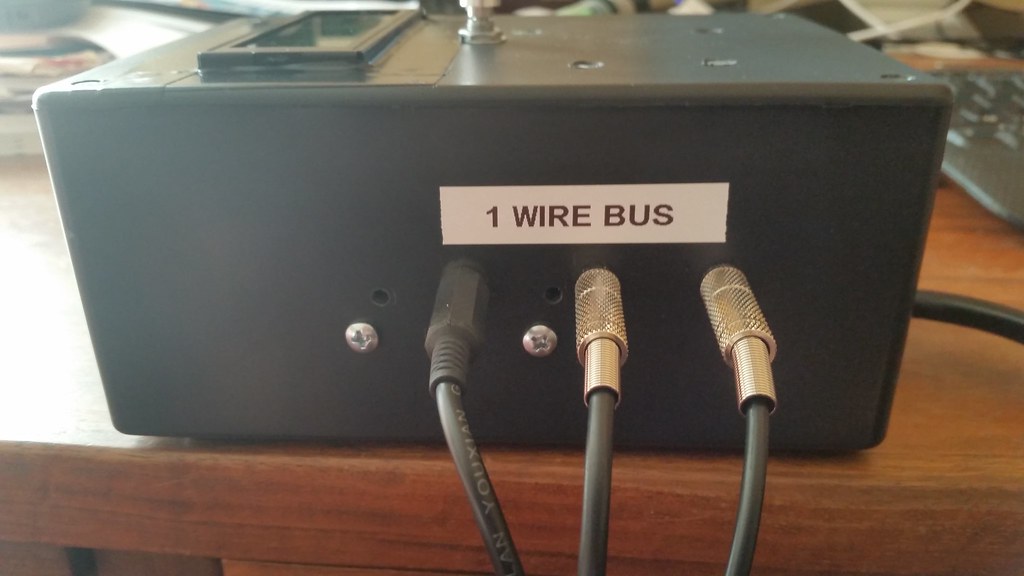
Here's my BrewPi implementation. I wanted to minimize the size of this to roughly the footprint of an STC1000 controller. I picked up a RadioShack project box, and ordered Elco's BrewPi shield and 20 x 4 LCD display (arrived in 3 days from the Netherlands to California...Thanks Elco!). I also picked up a Sainsmart 2-relay board, 1-wire temp. probes, Raspberry Pi B, Arduino Uno R3, Edimax WiFi dongle, 8 GB class 10 SD card and breadboard hookup wire from Amazon Prime. I fabricated a Cat5e Ethernet port using RJ45 connectors and a short piece of Cat5e so that I could connect the box to the LAN if/when needed. All circuit boards are solidly mounted to the box using standoffs.


A peek inside:


The bottom:


The probes:


Ethernet jack:


Since taking the pics, I've wrapped the power wires coming out of the relay board with electrical tape, but all wires are pretty secure inside.


A note about the 1-wire connections. I used Elco's 1-wire board and then used 1/8" (3.5 mm) stereo TRS jacks mounted through the case. The probes themselves are 1/8" stereo plugs from Radio Shack. I suggest using the nickel or gold plated ones instead of the plastic ones, as the latter seem to easily become faulty during soldering. Also, I originally had the data line on the tip, but this results in shorting of the 1-wire bus and the Arduino and RaspPi when connecting/disconnecting probes. Instead, place ground on the sheath, data on the ring and 5V on the tip. In this way, plugging and unplugging the temp probes does not short 5V to ground. This results in only a temporary interruption with the 1-wire bus, which is quickly resolved by the BrewPi software.

Overall, this is a good setup for me because it is fairly compact, and I don't intend to have more than one ferm temp at a time.
 
Very clean install! Excellent work.

Thanks! I wasn't sure this was going to work, because although the RPi is pretty compact on its own, when all of its needed accessories are attached (e.g. SD card, USB/LAN cables, etc), it takes up quite a bit of that project case. BTW, the WiFi dongle seems to be working just fine despite being packed inside the case with so many wires and electrical noise near it. We'll see how it works over the long run.
 
Here's my BrewPi implementation. I wanted to minimize the size of this to roughly the footprint of an STC1000 controller. I picked up a RadioShack project box, and ordered Elco's BrewPi shield and 20 x 4 LCD display (arrived in 3 days from the Netherlands to California...Thanks Elco!). I also picked up a Sainsmart 2-relay board, 1-wire temp. probes, Raspberry Pi B, Arduino Uno R3, Edimax WiFi dongle, 8 GB class 10 SD card and breadboard hookup wire from Amazon Prime. I fabricated a Cat5e Ethernet port using RJ45 connectors and a short piece of Cat5e so that I could connect the box to the LAN if/when needed. All circuit boards are solidly mounted to the box using standoffs.


A peek inside:


The bottom:


The probes:


Ethernet jack:


Since taking the pics, I've wrapped the power wires coming out of the relay board with electrical tape, but all wires are pretty secure inside.


A note about the 1-wire connections. I used Elco's 1-wire board and then used 1/8" (3.5 mm) stereo TRS jacks mounted through the case. The probes themselves are 1/8" stereo plugs from Radio Shack. I suggest using the nickel or gold plated ones instead of the plastic ones, as the latter seem to easily become faulty during soldering. Also, I originally had the data line on the tip, but this results in shorting of the 1-wire bus and the Arduino and RaspPi when connecting/disconnecting probes. Instead, place ground on the sheath, data on the ring and 5V on the tip. In this way, plugging and unplugging the temp probes does not short 5V to ground. This results in only a temporary interruption with the 1-wire bus, which is quickly resolved by the BrewPi software.


Overall, this is a good setup for me because it is fairly compact, and I don't intend to have more than one ferm temp at a time.

Great job. I've used the stereo jacks for a couple of brews now and they've worked fine. I'll have to check how I wired them but good tip on the possible shorting problem. Cheers


Sent from my iPhone using Home Brew
 
Great job craigmw looks cool. I've used the stereo jacks for a couple of brews now and they've worked fine. I'll go back and check how I wired them - good tip on the possible shorting problem. Cheers


Sent from my iPhone using Home Brew
 
fwiw, a 3-pin mini-XLR is a much better connector for this application, but if you avoid hot-removal/hot-plugging the 3.5mm-1/8" stereo connectors are adequate enough...

Cheers!
 
I would think that as long as you make sure the ground is the base contact, which it should be anyway, you shouldn't have to worry too much. I'm gonna go with the phono plug method. Only because the supplier I was getting my cheap 10 packs of xlr connectors from stop selling the good ones and I can't seem to find them anywhere right now. My intention is to use 5v for tip data on middle and ground base. I can see where shorting could still be an issue but I don't think it'll be a problem since once I have them plugged in I don't see any need to remove them.
 
Great job craigmw looks cool. I've used the stereo jacks for a couple of brews now and they've worked fine. I'll go back and check how I wired them - good tip on the possible shorting problem. Cheers


Sent from my iPhone using Home Brew

Thanks!

Yep. I almost gave up on them and went with RJ45 jacks. However, if the 5V is on the tip, there are no problems. If a probe is not fully plugged in, the ground and data line are shorted, but this only blocks the 1-wire bus. No issues with shorting the 5V line (basically the same thing as pulling the Arduino pin to ground). With the 5V on the ring, major issues! The real advantage to using 1/8" (3.5 mm) TRS plugs and jacks is that they are compact. In addition, you can use off the shelf 1/8" stereo extension cords if you need a longer run to your probe.
 
fwiw, a 3-pin mini-XLR is a much better connector for this application, but if you avoid hot-removal/hot-plugging the 3.5mm-1/8" stereo connectors are adequate enough...

Cheers!

Actually, no problem hot-plugging these. When you insert or remove the jack, there is a momentary interruption of the 1-wire bus, but this is quickly resolved once the plug is fully inserted. The key is to make sure that the 5V line is on the tip and the ground is on the sleeve of the TRS jack. This way, there is no concern about shorting 5V to ground. I've tried this dozens of times with the BrewPi booted, and have had no issues. Fortunately, I figured out pretty quickly that having the data pin on the tip was a bad idea!
 
I would think that as long as you make sure the ground is the base contact, which it should be anyway, you shouldn't have to worry too much. I'm gonna go with the phono plug method. Only because the supplier I was getting my cheap 10 packs of xlr connectors from stop selling the good ones and I can't seem to find them anywhere right now. My intention is to use 5v for tip data on middle and ground base. I can see where shorting could still be an issue but I don't think it'll be a problem since once I have them plugged in I don't see any need to remove them.

Yeah, it seems to work well. If wired correctly, this makes for a cheap and reliable method for connecting probes. I'm contemplating building a Strangebrew Elsinore to control my BIAB setup, and will likely go this route for my temp probes and 1-wire switches.
 
Yeah, it seems to work well. If wired correctly, this makes for a cheap and reliable method for connecting probes. I'm contemplating building a Strangebrew Elsinore to control my BIAB setup, and will likely go this route for my temp probes and 1-wire switches.


Personally I'm waiting for elco to come out with the next brewpi total brewery solution he's working on. It looks great and it's in a tight little package with touch screen. It's all in the preliminary design phase but the spark core shield looks amazing. Everything's going to be one-wire or serial interfaced. Actuators, pumps, fans, sensors, etc. there's even talk of having a sg sensor built right into the boil pot!
 
Personally I'm waiting for elco to come out with the next brewpi total brewery solution he's working on. It looks great and it's in a tight little package with touch screen. It's all in the preliminary design phase but the spark core shield looks amazing. Everything's going to be one-wire or serial interfaced. Actuators, pumps, fans, sensors, etc. there's even talk of having a sg sensor built right into the boil pot!

Yeah, I seem to recall him tinkering with this, but it seems it has been a while. Does it look like this is happening soon?

I do like the simplicity of Doug Edey's StrangeBrew Elsinore. I'd like to use this to control gas-fired kettles, so whichever solution makes this easier will be the way I go.
 
Finally got it working. Got rid of the relays, apparent ground loop, and went with the SSRs. However with 10 gallons of water in my fermenters I got some strange results, see screen shot below, the heat and cool are oscillating and the frig setting has wild swings. I have not tweaked the advanced settings, and would appreciate recommendations. Also while my right chamber has a chart and is recording my left chamber chart is blank all the other HTML items are there and active.

chart.jpg
 
Status
Not open for further replies.

Latest posts

Back
Top