• Please visit and share your knowledge at our sister communities:
  • If you have not, please join our official Homebrewing Facebook Group!

    Homebrewing Facebook Group

How to add permanent volume markings to a kettle (illustrated)

Homebrew Talk

Help Support Homebrew Talk:

This site may earn a commission from merchant affiliate links, including eBay, Amazon, and others.
question about using a old wall-wort: does it need to be DC, like a battery? or will AC output work too?

DC has a permanent + and - side, so you can attach the leads so that all you are doing is removing metal where you etch.

AC alternates +/- so you will end up making a black deposit instead of removing metal and leaving a white etch line.


You can also use the DC to remove metal, and then go back over it with AC to darken the lines. Check out the knife forums, they're all about this stuff:
http://www.bladeforums.com/forums/showthread.php/562469-etching-tests
 
Will any type of vinegar like red wine, Apple or rice work the same as distilled or is there a certain property to distilled that makes it suitable?
 
Worked like a charm. Started with a 9 volt, but switched to my laptop charger which worked a lot faster for my 19 gallon pot. Started smoking a few times.. Got pretty hot.
 
I gave this a shot over the weekend. I think it came out pretty nice! It's not perfect but it will definitely get the job done. I used a 12v DC power supply from an old wireless router.

wwin1ap.jpg


YzyOPcE.jpg
 
Success! I had the polarity on the battery backwards!

Measuring...
20160301_104933.jpg

Figuring out gallon marks...
20160301_114858.jpg

Taping...
20160301_124536.jpg
20160301_125217.jpg

Done...
20160309_122717.jpg

All cleaned up...
20160309_133323.jpg

Pics don't do justice but it came out nice.
Thanks!
 
Been following this thread for some time, and have actually read the whole thing believe it or not. Finally got around to doing a test of this last night on my HLT. It had stamped gallon markers but I figured doing the half gallon graduations would be good practice for when I do the boil kettle with a full line set-up.
Some anecdotal advice, just from my experience doing this. I had no trouble with the vinegar/salt ratio suggested by the op. I did spend some time mixing it in well. I found it took a good minute of vigorous stirring to fully dissolve. A 9v battery was sufficient and didn't take much time to do the few lines I did in the test. I used large gauge speaker wire and actual 9v battery terminals to attach it. I taped the other end close to the work area and did a good wrap of the q-tip about half way up the bulk of the cotton.
I'm pretty stoked with the process and can't wait to do the BK.
I do plan to do a better job sealing the tape seams on the BK as any small gap for it to leak will etch under, as you can see. Maybe the heavy duty electrical tape was not the best to overlap that seam.
lmPzbG.jpg
 
In this case I just measured and found them all to be the same. So I halved the distance and went from there. I plan to measure my boil kettle 1 gallon at a time using the volume lines in my 10 gal Igloo mash tun. I filled it today for that reason and used the HLT above to check accuracy. I filled 2 gallons at a time and found I had about 4 extra cups at the end after 10 gallons. Not sure if the HLT or the cooler are off but it's close enough for my liking (+/- 0.4%). Since the kettle will match the mash tun, everything should be consistent in the end.
 
OK. So here she is. I have to say I'm quite happy. Big up to the op for the easy tutorial.

I followed the original directions to a T and had no issues. I used only one battery and did find the process slowed as I got towards the last 10 minutes of etching or so. As others have said, lay-out was the longest and most tedious part. Between the two-step process of doing lines, then numbers, I had a good 2 hours into layout and another hour into etching. Of course, much more time put into layout would have meant a cleaner outcome. (I do recommend spending some time here.) I feel like to get much more precise would have meant MUCH more time. and hey, it's just going to have boiling wort in it.
pelmI7.jpg
 
PS. I found reusable, stick-on numbers at Hobby Lobby in the glass etching area. They are pretty durable and withstood lots of re-positioning. They even washed up good afterward. Which, means I can glass etch the carboys to match next....
 
Just finished mine. I used white vinegar and salt solution but instead of a battery, I used a DC variable bench power supply. In the event that someone makes a mistake while etchieng or does not like how it came out...if the etched area is not deep into the metal (probably kept it in the same spot too long) you can use Stainless steel buffing compound along with a dremel and a cotton wheel (you can get them in the dremel section) to polish the etching right out.

I accidentally etched the 0 first when I went to etch 10....oops. Used the buffing compound to buff off the 0 and I was able to etch the 1 on top of it.

I was going to buff out the 8 since it's a little off, but, I didn't want to go crazy...

EDIT: For some reason the link I added to the product page on Ace would not work for whatever reason so i just added a picture of the product

2016-03-13.jpg


pACE3-980496enh-z6.jpg
 
For those who used a wall wart/plug: do you still connect it the same way, solid black wire (negative) to the Qtip, and the striped/marked wire (positive) to the kettle?

I just did my markings with the battery. Gonna do the numbers next but wanted more power and didn't want to electrocute myself. I was going to use a 12VDC 300mA charger. All good? Thanks.

Yup connect the same way. Make sure it's outputting DC. Don't electrocute yourself!! Also risk of burns and fire. The end of the q-tip gets pretty hot.
 
Yup connect the same way. Make sure it's outputting DC. Don't electrocute yourself!! Also risk of burns and fire. The end of the q-tip gets pretty hot.
Thanks man. Did it this weekend. Got better results with the wall charger than the battery. Battery was working fine, just a longer process. The wall wort did great. Even put my initial on the handle of my big stainless spoon so I'll always know it's mine! Great thread thanks for the great advice.
 
WARNING!
I just learned this past weekend. When you are getting ready to throw out parts to an old system and you finally get to the pot, do NOT look inside at the pretty etchings. I will doubt your resolve to get rid of that work, especially when it was your first good work.

Sigh.

:)
 
WARNING!
I just learned this past weekend. When you are getting ready to throw out parts to an old system and you finally get to the pot, do NOT look inside at the pretty etchings. I will doubt your resolve to get rid of that work, especially when it was your first good work.

Sigh.

:)

That's why my kettle is being passed down to my son when the time comes. He is responsible for the creativity and design and he is my little Ironman, so it is only right and just for him to be the next owner.
 
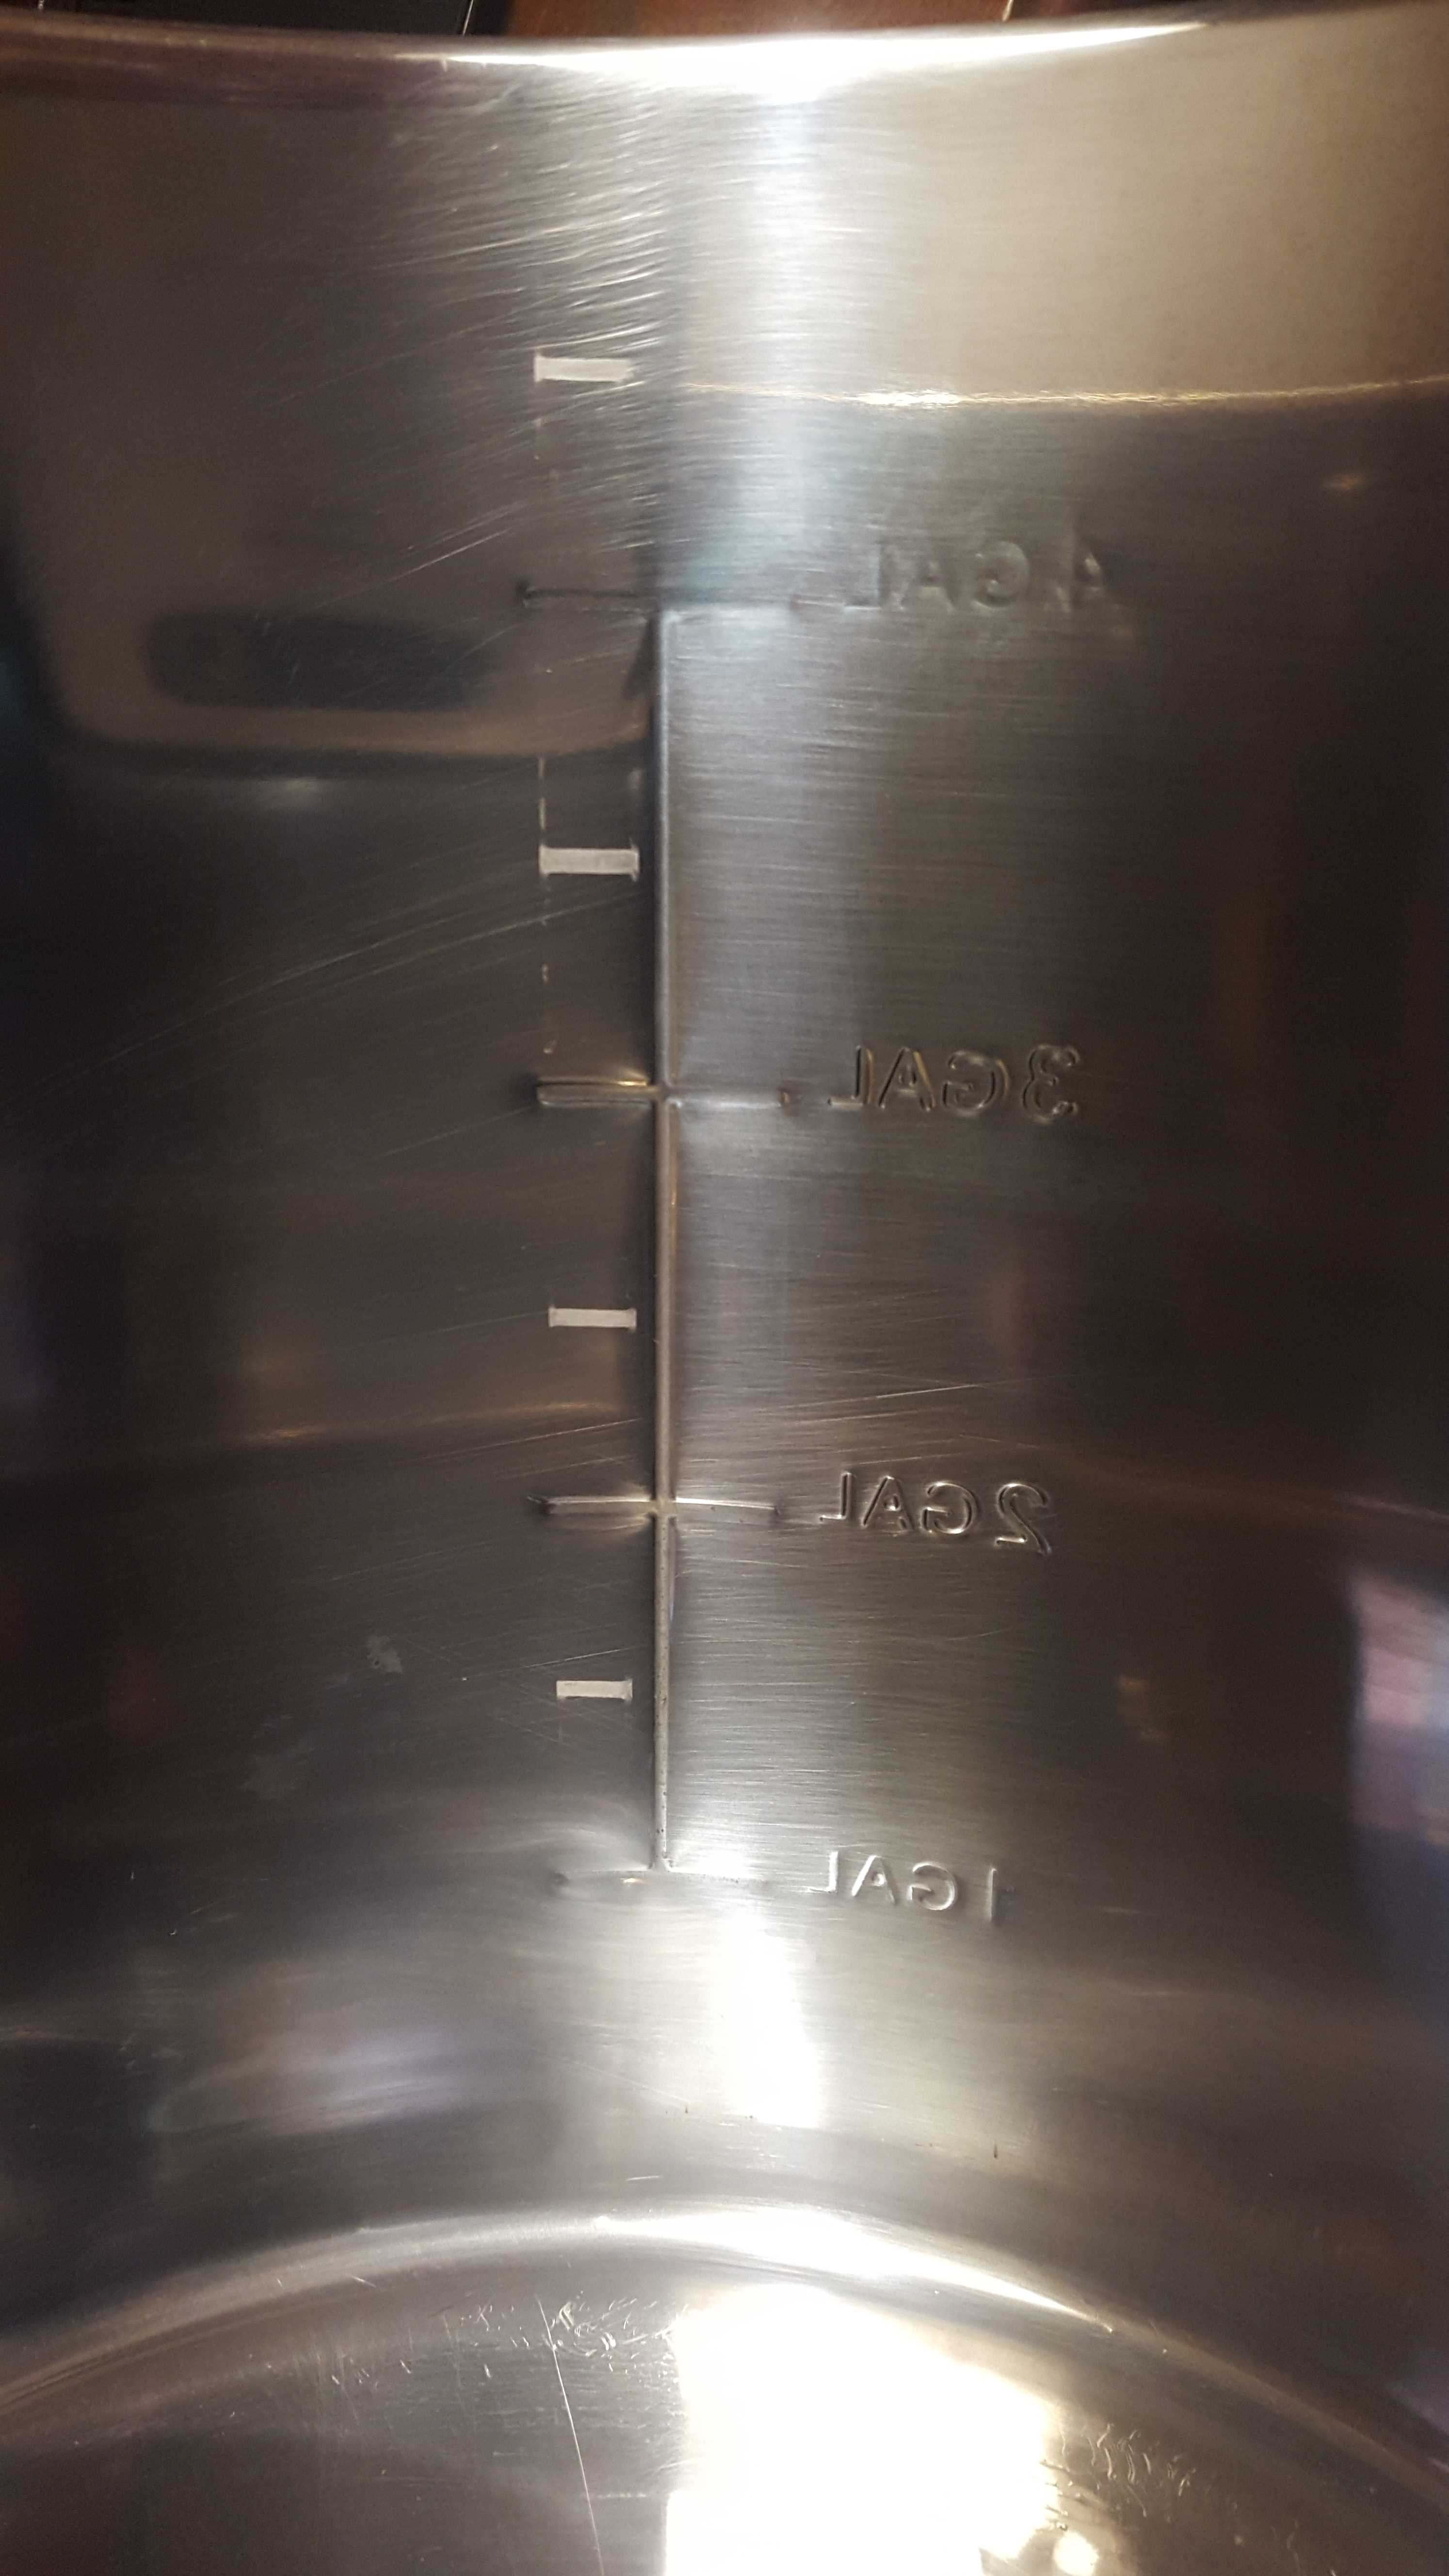
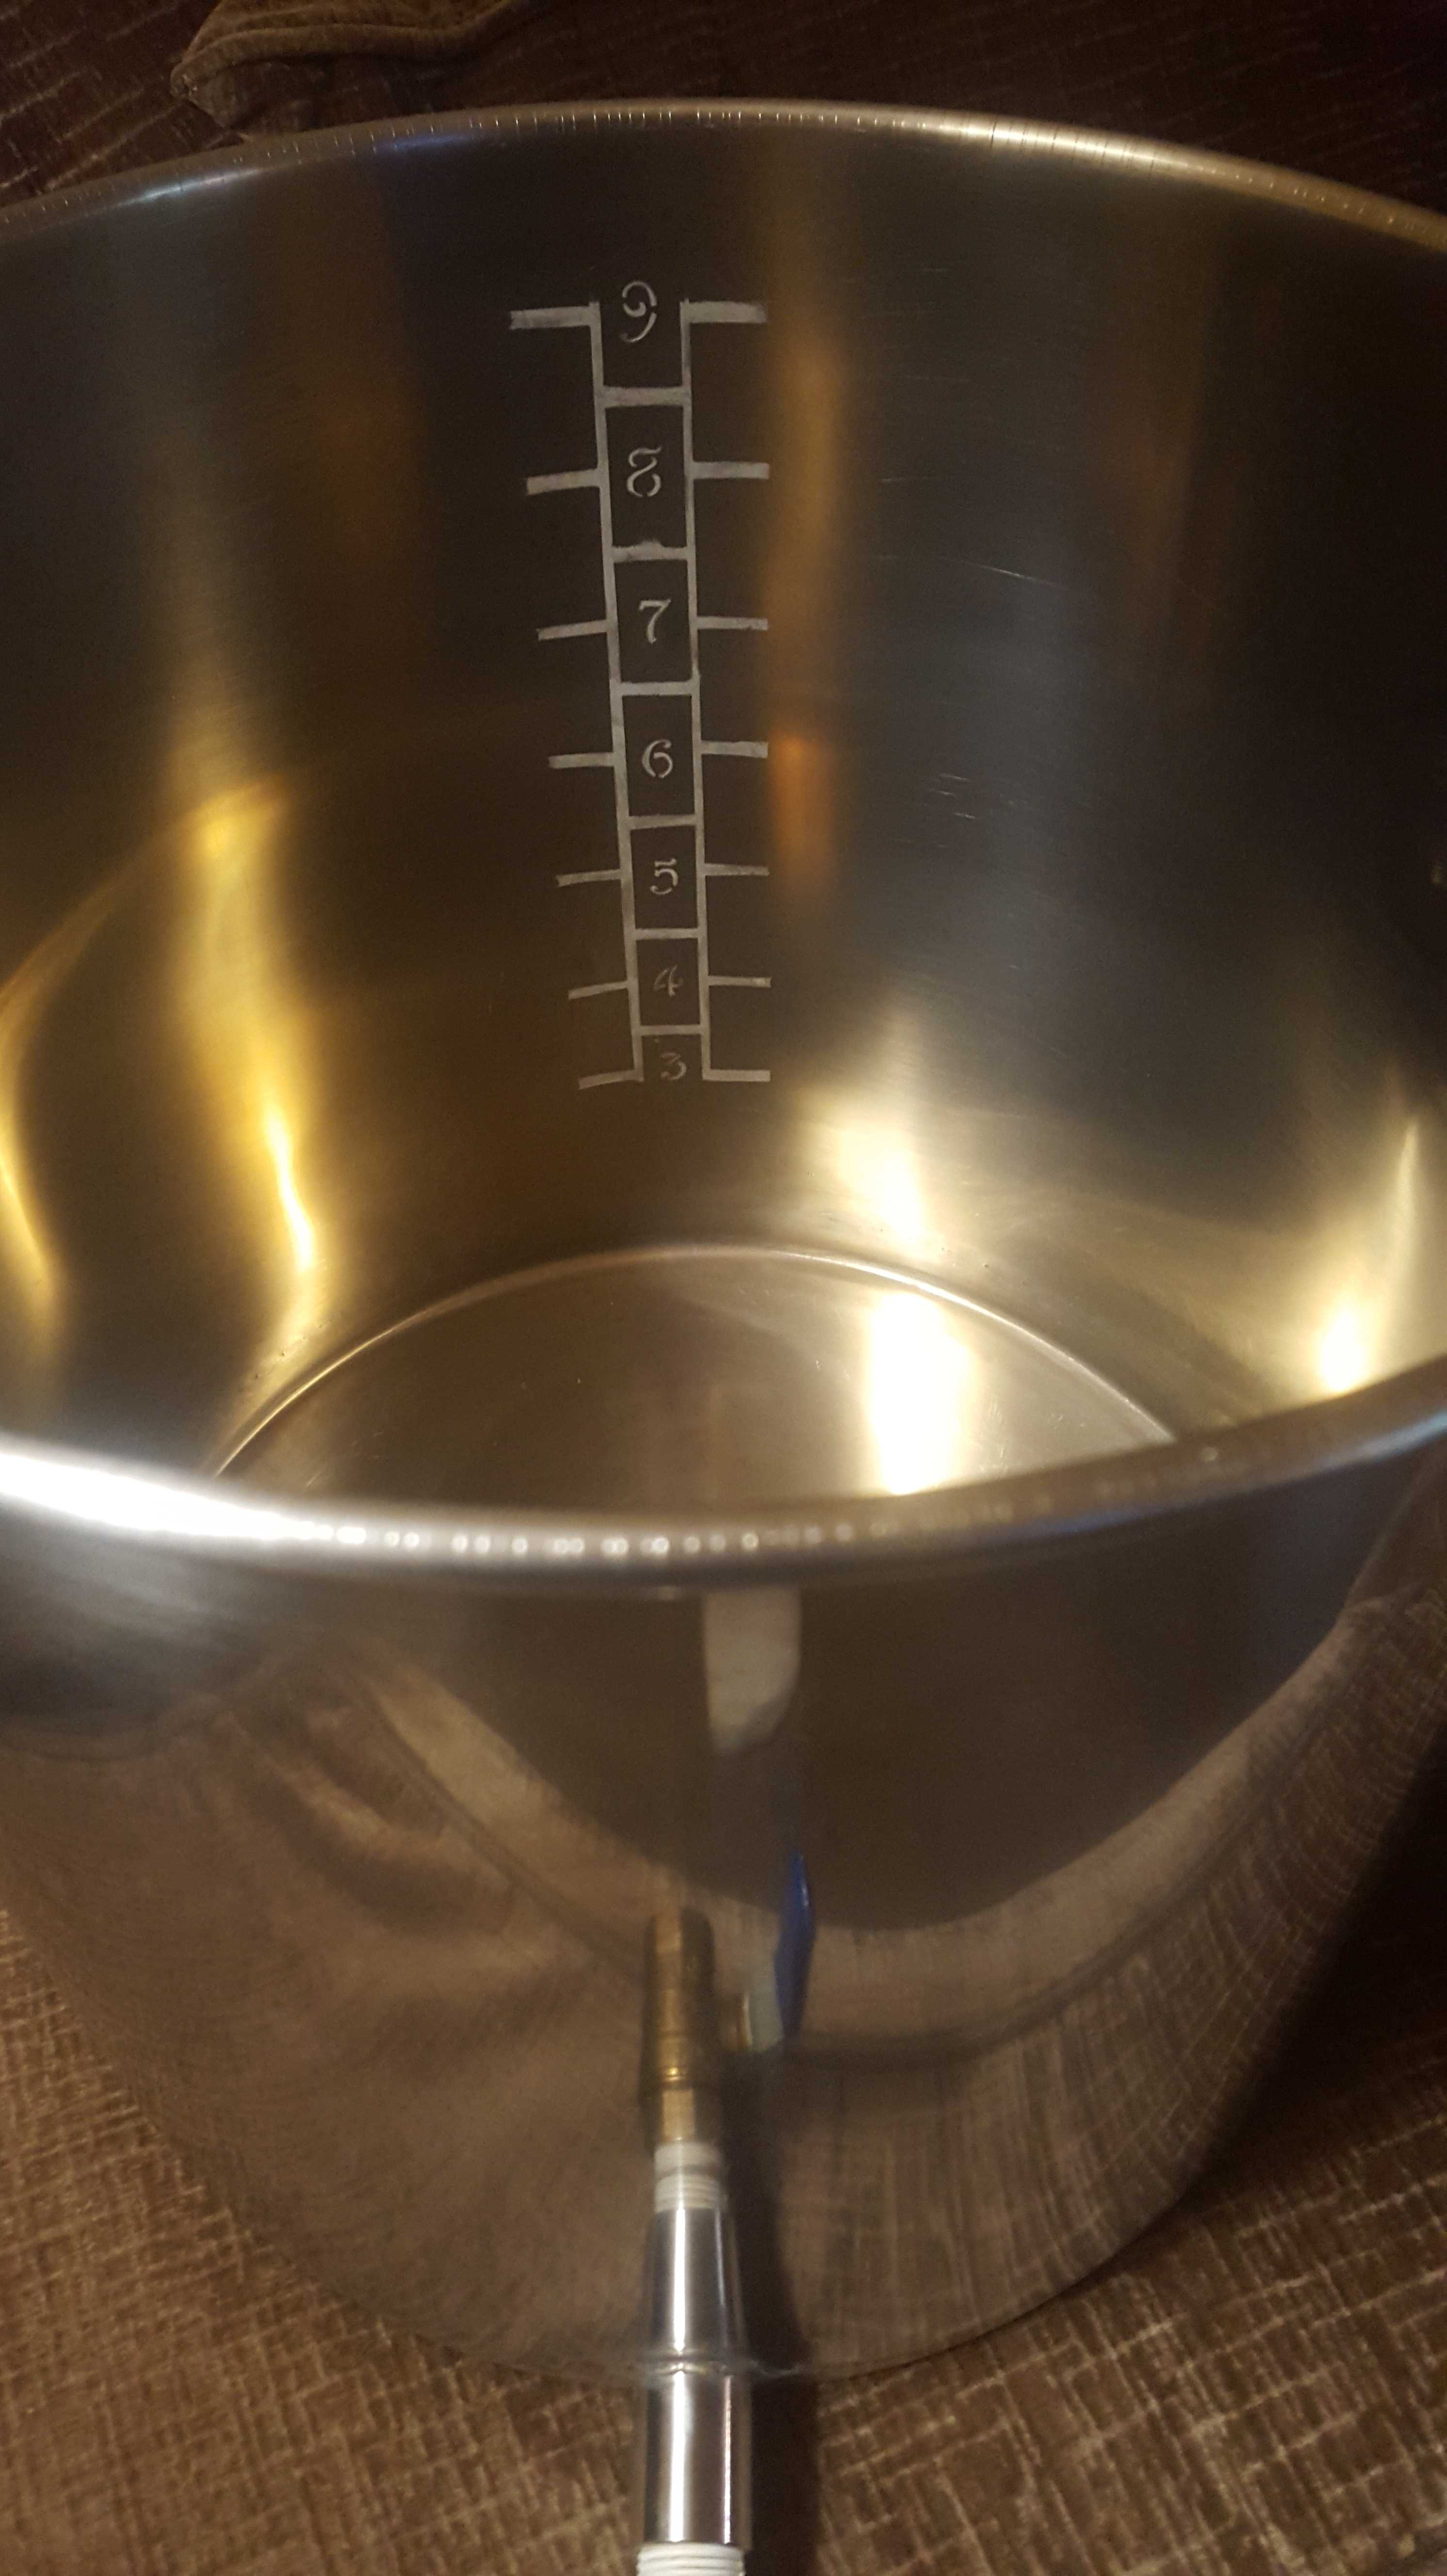
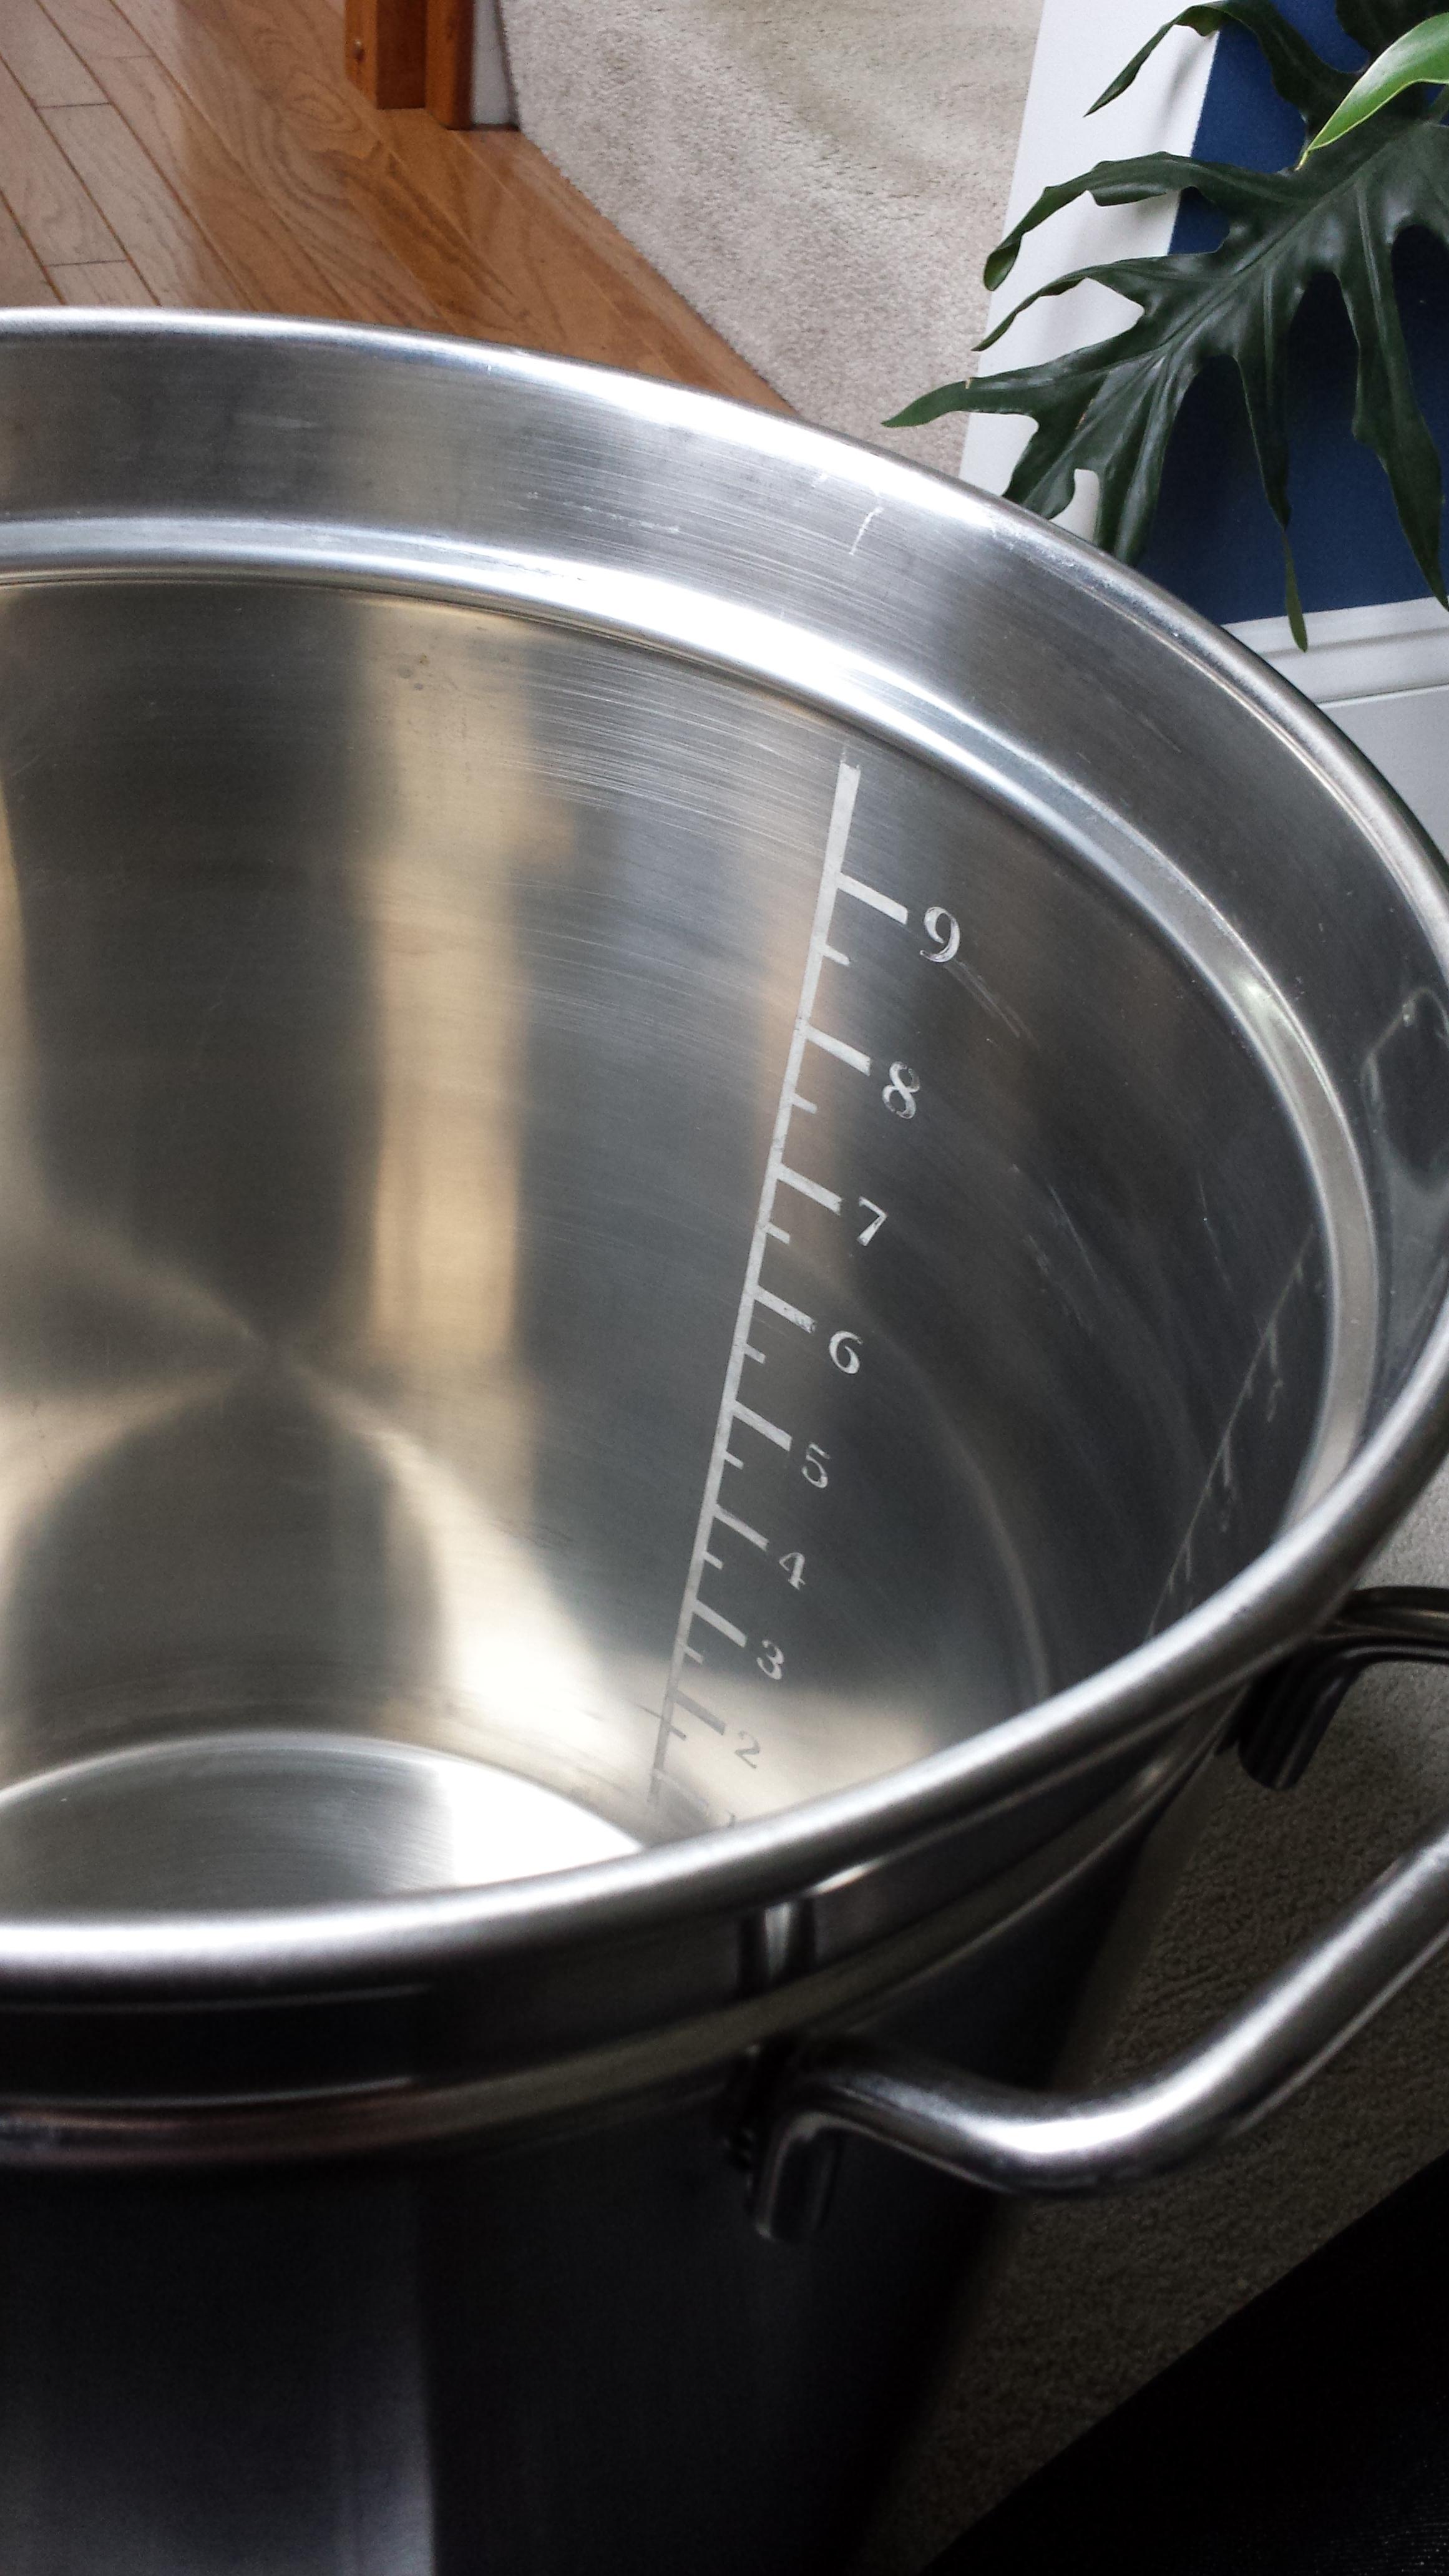
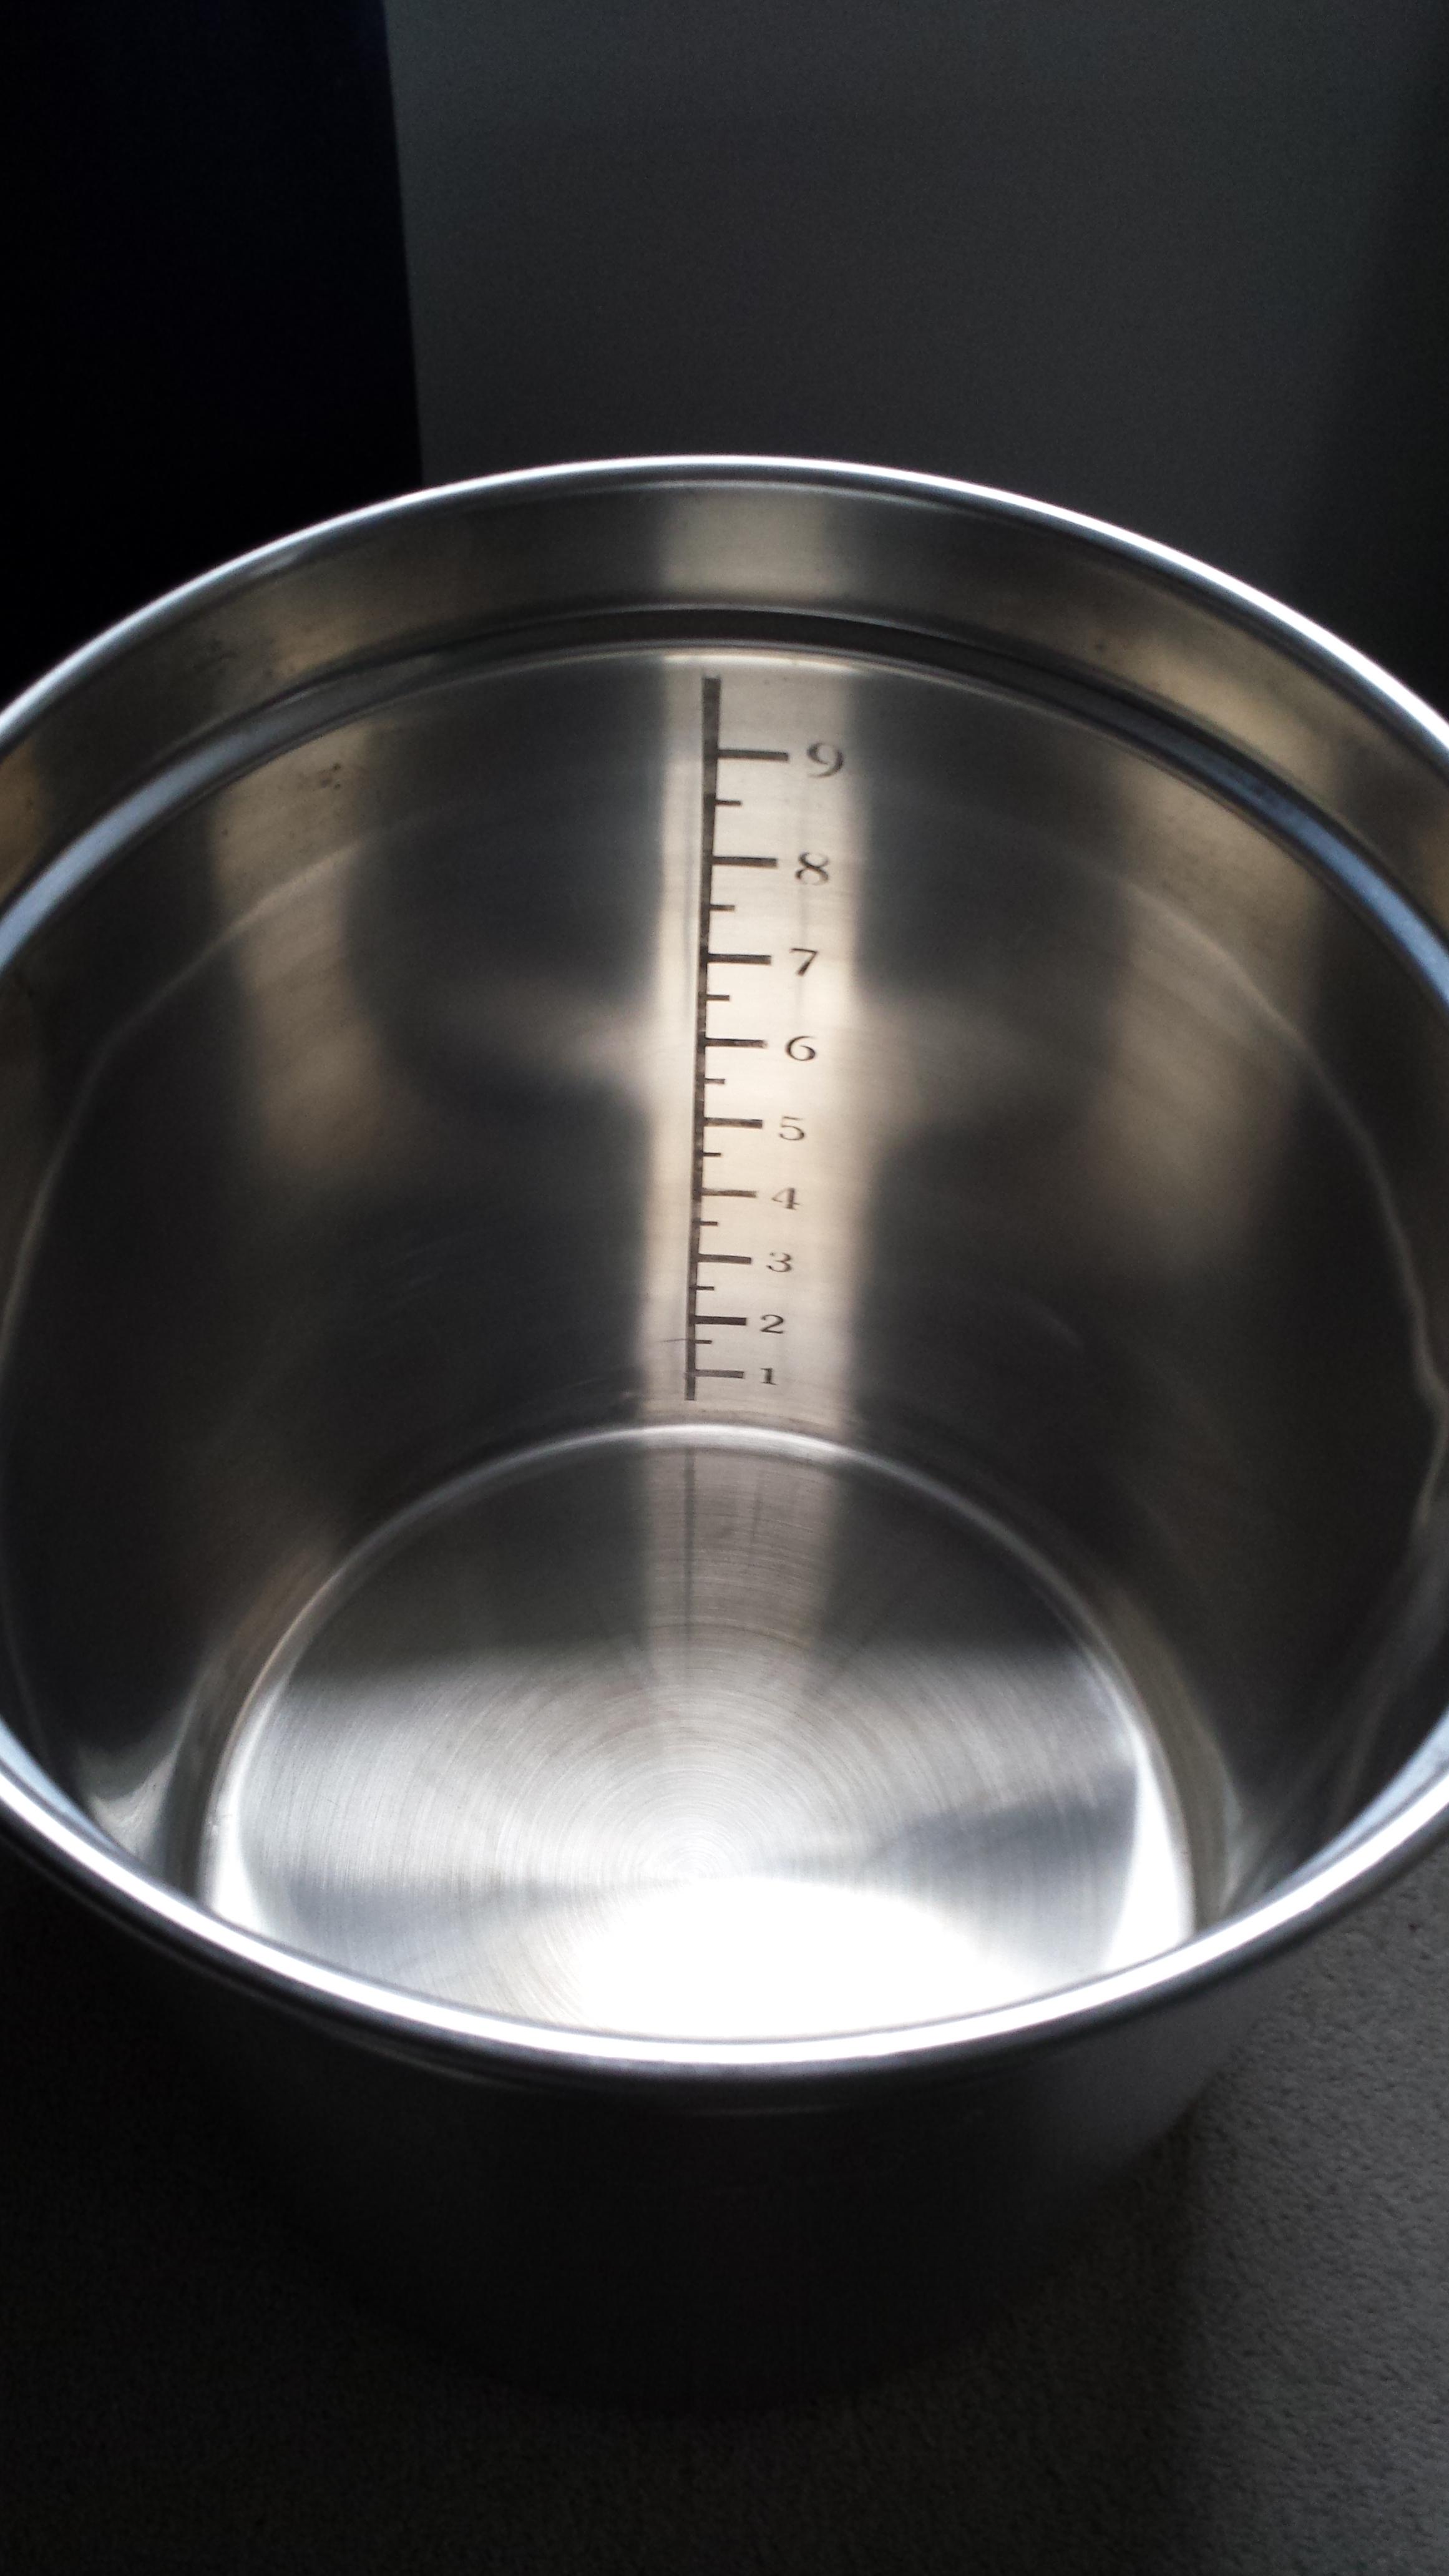
i have yet to do it but plan to measure with a gallon measuringq cup i purchased a whilewhile7 back. You can use a pencil to mark, oro crayon i believe.


6


i used a milk jug and taped thea upper level of the water with electrical7 tape. I would pour in one gallon then tape and continue with the next. Thea marks were quite off from the quart marks that the pot came with on my little pot.
 
You could also measure the water level by weight.

That's what I did when calibrating my sight glass. I weighed out a gallon of water and marked it on the gallon jug with a sharpie. Then, as long as you fill to the same spot on the line each time, you have a repeatable gallon.
 
What's the preferred technique to find ur markings? Weigh out a half gallon at a time to do half gallon increments or eyeball it with a measuring cup?
 
What's the preferred technique to find ur markings? Weigh out a half gallon at a time to do half gallon increments or eyeball it with a measuring cup?

Just use a measuring cup to measure out a half gallon or a gallon. Then measure from the bottom of the pot to the waterline and use that height as your measurement. Just measure out the rest of the marks.
 
Just use a measuring cup to measure out a half gallon or a gallon. Then measure from the bottom of the pot to the waterline and use that height as your measurement. Just measure out the rest of the marks.

That's what I did, but note that if you really want to be precise, don't use the "measuring" technique until you've already filled the kettle above any attachments at the bottom that could affect the volume, such as a whirlpool arm or pickup tube. I know they don't take up much volume, but if you're off by 1/32 of an inch, and you're marking off a 15 gallon kettle, that error compounds the higher up the kettle wall you go. By the time you get to the top, you could be off by as much as a half an inch, which could be a couple quarts of liquid, depending on your kettle geometry.
 
Back
Top