Heatstick = awesome!

Homebrew Talk - Beer, Wine, Mead, & Cider Brewing Discussion Forum

Help Support Homebrew Talk - Beer, Wine, Mead, & Cider Brewing Discussion Forum:

This site may earn a commission from merchant affiliate links, including eBay, Amazon, and others.
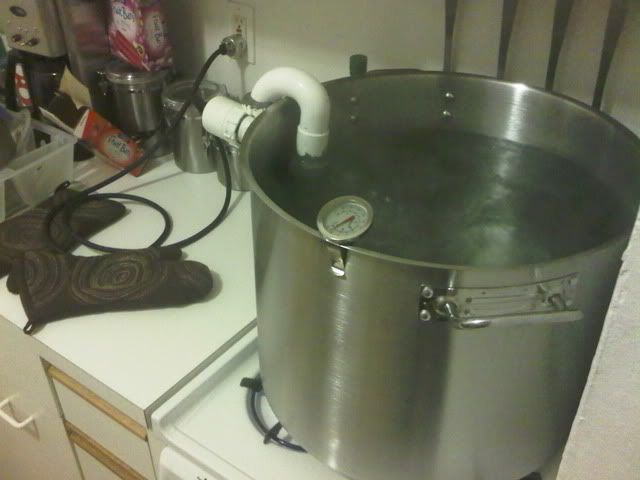
I got my new 15 gal megapot tonight and wanted to see how long it would take to boil 11.5 gals of water with my heat stick and stove combined. I have one of those smaller apartment gas stoves (with all four burners on) and just built this 1500 Watt heat stick. The water boiled in just under one hour, starting at 40 degrees. See the picture below. I took it right at the one hour mark. The boil got harder in the next few minutes, but I had to turn it off, write this post, and go to bed. I can't wait to start doing 10 gallon batches.

IMG00214-20100215-2358.jpg
 
1 hour from 40 degrees! That's pretty good. I normally start at like 160 degrees and it take about 10-15 minutes (five gallon batches). So starting from 40 degrees, 1 hour is pretty good.
 
Over a year ago I bought the parts to build two heat sticks, and I finally got around to putting them together. I bought two of these low watt density 1500W elements.

I used them to brew last weekend, and they worked beautifully! After the brew, however, I noticed that the elements were now a dull, darker grey. I also went back and looked at the link that I posted above, and now see that they are zinc plated.


All cleaned up and zinc-free. Here's how.
 
nice addition lustreking. I may have to do this to mine, but the coating seems pretty hardy so far so there might be some variance between brands.

I have used my heatstick for 4 batches (3 after rebuilding) now and it works pretty darn well! So far so good for the NSF-rated plumbers epoxy.

2000w heatstick plus one burner on my glass-ceramic stove:
145 to boil in under 21 min
(and I mark that at whatever I feel like is a fully vigorous boil FWIW)

last two batches I've had more boil-off than I planned for (though some might be heat contraction)... So it def. does the job.
 
It is JB Weld. When playing with electricity I like to cover all my bases.

I imagine you could get a good seal with a compression fitting alone, but I don't like to take chances. Hot water has the tendency to loosen fittings, so I wonder if it would have an effect on the PVC compression fitting. One solution would have been to use such a long piece of the metal drain pipe that no fitting is submerged in the water, but that didn't work for my design because I wanted to use the curved PVC piece so that the heat stick would sit balanced on the pot rim and I wouldn't have to find a way to support the heat stick.

I'd keep an eye on it. I wouldn't be surprised if you start seeing the jb weld flaking off. Unless you really scuffed up the surface of the pvc, in my experience jb weld doesn't adhere to it that great.
 
Good call. I thought I had scuffed up the PVC well enough. But after my first use of the heat stick, the JB weld had separated from the PVC and I could easily break it off. So I built another heatstick with a lot less JB weld on the outside and none on the PVC. It sucks that I ended up spending more money, but at least this time I got to build the heatstick to be longer so that it would sit on the bottom of my 15gal pot.
 
I used a 15" right angle drain-er-oo for mine, and I also used a reducing nut on the end so there is virtually no epoxy contact with the water AND I used NSF rated epoxy putty which seems to be holding up thusfar.

The downside is my "hold-er-in-place" doodad is a lot more wonky than your design. Gets the job done though.

This is in a 5 gal aux pot:
IMG_5091.JPG


And in action in the 10 gal brew pot.
IMG_5124.JPG
 
Hey Guys,

I was purchasing the items I need to make a heat stick earlier and I noticed that the nut on the waste tubing is zinc plated. I thought that zinc was not food safe and posed a health risk. Do they even make stainless or chromed nuts for this tubing?
 
Yes,

They do make Chrome slip nuts for drain pipes.

I reccomend a 1 1/2 x 1 1/4 reducing nut as it will snug around the element threads nicely. See my previous posts (last few pages) for some pictures...

You probably won't find it at HD. Try and Ace or other smaller store.
 
I use my heat stick with zinc plated nut. I don't think it makes any difference, although this is not an expert opinion so if you get sick don't come crying to me. That said, I made an american pale ale with my zinc nutted heatstick and just came in second at a competition so it doesn't seem to effect the flavor of the beer. I simply don't believe that this small amount of zinc is going to harm me. Maybe I'm wrong, but I am not worrying about it. Besides, the yeast need small amounts of zinc and my local water has almost zero zinc in it, so I'm hoping that the nut helps more than it hurts. Of course I have absolutely no background in chemistry or metallurgy so it is very likely that there are good and bad types of zinc, and the nut provides the bad type.
 
So I finished my 1500W 120v heat stick last night and tested it out today. I was able to get 6.5 gallons to a boil on the stove with burner and heatstick. I started at about 50 degrees and got to a boil in about an hour. I should be able to go from mash temps to boil in about 25-30 minutes. Heatstick definitely = Awesome.

I can certainly see myself going fully electric in the future when I am no longer an apartment dweller.
 
I use my heat stick with zinc plated nut. I don't think it makes any difference, although this is not an expert opinion so if you get sick don't come crying to me. That said, I made an american pale ale with my zinc nutted heatstick and just came in second at a competition so it doesn't seem to effect the flavor of the beer. I simply don't believe that this small amount of zinc is going to harm me. Maybe I'm wrong, but I am not worrying about it. Besides, the yeast need small amounts of zinc and my local water has almost zero zinc in it, so I'm hoping that the nut helps more than it hurts. Of course I have absolutely no background in chemistry or metallurgy so it is very likely that there are good and bad types of zinc, and the nut provides the bad type.

totally agree.

So I noticed there was some rustish type substance forming around the base and threads of the heating element. I ordered some food-grade high temperature rtv silicone, I plan to encase the base of the element in that after scrapping the rust off.

I got the sealant on the web as I don't want to go hunting for it locally:

http://www.emisupply.com/catalog/adhesives-sealants-tapes-silicones-c-239_397.html

i had the same problem after like 2 uses of my heatsticks. i found some DAP silicone (food safe and high temp rated) at my local ace to cover the rust prone base after i tried to scrub as much of it off as possible. appears to be holding up well.
 
x2...that looks perfect.


I still think the best option for sealing the element wiring is to use a coupling of some sort around the base of the element that is filled with epoxy, jb weld, etc.

Here's a pic of mine drying:
2000450136_large.jpg


It slips snugly into the end of the drainpipe...i add sealant when i slip it in, but even if liquid were to get into the pipe it wouldn't come in contact with exposed wiring

Love the design here, but how did you ground it to the drain pipe. It appears that you completely encapsulated everything before you attached the ground...or am I missing it?
 
Plastic be it ABS or PVC has a coefficent expansion rate higher than that of JB weld, what starts out as sealed will expand and pop breaking away the adhesive bond between the two materials allowing seepage. I would venture to use liquid plastic dip for pliers and tool handles to fully coat the joint and threads. just another idea.
 
Plastic be it ABS or PVC has a coefficent expansion rate higher than that of JB weld, what starts out as sealed will expand and pop breaking away the adhesive bond between the two materials allowing seepage. I would venture to use liquid plastic dip for pliers and tool handles to fully coat the joint and threads. just another idea.


I agree that with time the plastic and JB weld may seperate. However, if you design it right the JB weld itself will encapsulate all of the electrical components and the pvc part is simply left as a mold that is left on. I used a paper towel roll and encapsulated all the electrical wires. After it dried I simply ripped off the paper towel roll and sanded off the residual paper that stuck.
 
Yea agreed, the pvc is just a form for the epoxy. Perhaps just a wrap of electrical tape would do the same thing. For me, I just coat all the lugs w/ epoxy and call it good, and so far so good.
 
Love the design here, but how did you ground it to the drain pipe. It appears that you completely encapsulated everything before you attached the ground...or am I missing it?

I just cut a small slit in the rubber coating over the wires near the top of the drain tube, cut the ground wire and pulled out the plug end enough to attach it to the pipe. Then wrapped it back up nice and tight with electrical tape. If you go this route and need more details, let me know.
 
How did you spread the silicone to effectively encapsulate that area?

just used a popsicle stick to spread it as evenly as possible. worked fairly well. tried my best to keep it off the actual heating part, but nothing seems to be affected by the little bit that got on it.
 
I agree that with time the plastic and JB weld may seperate. However, if you design it right the JB weld itself will encapsulate all of the electrical components and the pvc part is simply left as a mold that is left on. I used a paper towel roll and encapsulated all the electrical wires. After it dried I simply ripped off the paper towel roll and sanded off the residual paper that stuck.

Also,with some trial and error you can get a pvc part that fits very tightly into the end of the drain pipe, so it's not going to expand much. I literally had to search through the bin to find one that was just perfect since even within the same size, the OD varied just enough that some wouldn't fit, while others were loose.
 
I have this burner: http://www.agrisupply.com/product.asp?pn=64494
but it's not cutting the mustard since an upgrade to a Blichmann 20G boiling 18.5 gallons (fear my boilover!).
Propane propane propane... suck.

I have only 110 available right now in the garage. Can I get a heat stick (or two? I can check if there are separate circuits) built for 110 that will assist or take over for this burner? In the long run it could cut costs, but also waiting 1.5 hours to achieve a boil is killing me.
 
nathan, yup. you can build as many 110 heat sticks as you have unique circuits in the garage that can handle a 20a load.
 
The heatstick described in the original article is one meant for 110V. The most powerful element you can get for that voltage is 2000W, and according to those that use them, two of those will do the job for you.

200)W is a rating base don 120V, so if you have 110V, you'll get a little less wattage than 2000W, but it'll be close enough.
 
Okay, now I have to find someone in the brewclub to tackle this and count circuits. No more wimpy boils! I will have my triple-batch (3x15g) brewday! I WILL!
 
you should be able to figure out the circuits easily by checking out the electrical panel in your house and figuring out
(a) how many breakers are driving outlets in the garage?
(b) what amp rating are they?

I was disappointed to find that my garage is all on one circuit (along with the receptacles on the outside of my house) and it was only rated for 15A.

edit: if you've only got 15A, you are MAXED OUT at 1500W (2000W is too much), and you probably don't want anything else (like a fridge or freezer) plugged in at the same time.
 
No more wimpy boils! I will have my triple-batch (3x15g) brewday! I WILL!

Hang on... did you mean 3 batches @ 5 gallons each or 3 batches @ 15 gallons each?

you might have a very hard time boiling 15 gallons with 4000W. Not sure, just guessing....
 
if that's the case and a new circuit needs to be run, perhaps we would run a 220. I didn't read closely enough to tell, but I assume there's a buku-sized version that would be a single-device to run a boil. If we got to that, I'd still love to make the little 110 for heating the HLT.

these big 15gallon batches are costly to cook up! with my current configuration our buy-in-bulk seems marginal with the wasted propane... ugh.
 
It's a 20 gallon kettle, boiling 18.5 gallons.
I have the humongous burner, but we are having trouble getting it to work quickly enough. Ideally we could get enough electric to maintain a rolling boil, and use the burner to get it there in combination FAST.

And yes, I want to run THREE batches in one day that are each 15 gallon batches, for a total of nine carboys of fermenting goodness at the end of the day. I have done three 10g batches in a day before the upgrade, boil time and vigor is my trouble right now (and cranking out that much propane at once is making us poor).
 
That's kind of what happened to me.

I was originally going to keep boiling with propane and build a HERMS that used a 1500W element on 120V. but, when I found out that my garage was 15A and already had the chest freezer and fridge running on that circuit, I knew I was going to have to have electrical work done, so I went balls-out with 240V/50A added in the garage.
 
if that's the case and a new circuit needs to be run, perhaps we would run a 220. I didn't read closely enough to tell, but I assume there's a buku-sized version that would be a single-device to run a boil.

I think that even a 5500W 240V element will be taxed out trying to boil 15gallons.
 
if taxed, I can run that big ass burner under it to work in combo to get a boil, then hopefully kill the burner and let electricity maintain it... I figure any amount less propane I use will quickly pay for the thing.
Brew club getting together thursday evening to discuss.

btw... Walker, that avatar is disturbing. Possibly moreso after seeing Alice in Wonderland last night.
 
Back
Top