• Please visit and share your knowledge at our sister communities:
  • If you have not, please join our official Homebrewing Facebook Group!

    Homebrewing Facebook Group

Grainfather!!

Homebrew Talk

Help Support Homebrew Talk:

This site may earn a commission from merchant affiliate links, including eBay, Amazon, and others.
The last couple years they have had a Black Friday sale. It was 10% off everything. Go to their website and signup for emails. In the past they’ve sent an email on Black Friday about the sale. Good luck I really enjoy mine. Just wish it would heat up a little quicker. Hoping Mrs. Claus gets a hot rod heat stick to ramp temps up quicker.


I've got a 1000W heatstick to turbo heat mine...works well but never had to use it...if you have the newer grainfather you likely know you can program it to start earlier...
 
even with its "slow" ramp times im still under 5hrs including cleanup for a brew day.

So, GF owners, i've read many many threads pertaining to this unit and other similar electric all in one systems. I'm trying to down size for a smaller footprint and indoor winter brewing while living in a townhouse in the northeast. I'm close to pulling the trigger on a GF.

Current owners, any regrets? Improvements? Concerns?

I have found some decent deals running now, but what are the chances this thing drops below 850 shipped for black friday/cyber monday?

Any opinions welcomed.

I have two mash paddles. one stainless for stirring the uh mash. and a plastic one for scrapping the bottom where the element sits to keep stuff from baking during the first part of the boil. already had the plastic one from starter kit years ago but its not sturdy enough to handle really thick mashes without bending like crazy. but I also dont want to scratch the stainless moreso for just preventing my own annoyance.

pump is a tad weak, but as its incorporated into the system is adequate.

I have concerns about the connection from the element plug where it goes into the control box. It already lunched one grainfather and controller on me (replaced under warranty). I dont think itll be an issue again most likely.

overall I really like the system. I brew far far more often with it than before. Hell I brewed on saturday... indoors when it was 45 degrees outside and raining in my kitchen while watching Startrek TNG on netflix on my tv. Yep... makes for much more enjoyable a brewing experience.

plus the now standard bluetooth controller means I can have my strike water heated as soon as I get out of the shower in the morning or when I get home from work or as I leave to go to the brewstore to get grains and what not hah (10min delay + 10min roundtrip + 30minutes of bsing with the store owner and sharing some of my latest batch means its ready when I get back home).
 
Thanks for your opinions guys. Good to hear from some users that have very legimate pros and cons. That's what I was looking for.

Sounds like this system will work just fine for my current arrangement. The small footprint and compact design are a true selling point. When more space becomes available to me, I can look at larger rigs with more options.

Thanks again.
 
Just got my Grainfather in the mail, controller screen seems to be damaged and not fully readable.

Question, when should the switch on the bottom (black portion) of the unit be on? Only when I'm heating or whenever I'm using the unit?

Thanks.
 
Just got my Grainfather in the mail, controller screen seems to be damaged and not fully readable.

Question, when should the switch on the bottom (black portion) of the unit be on? Only when I'm heating or whenever I'm using the unit?

Thanks.


Leave it on. Controller takes care of the power application.
 
Anyone do a killer Pilsner on their Grainfather here? I know there's a few on the connect cloud but just looking to narrow things down...

Pilsner are easy, they are basically SMASH. You don't need a recipe.


100% Pilsner Malt
Noble hops at 60min. and 15 min.
1.050 OG
30-35 IBU's
Lager yeast (W-34/70 is cheap and easy)
 
So i picked up a grainfather a few weeks back. I wanted to simplify my process and have a smaller footprint due to lack of extra space. Man, this thing was a breeze to use. Zero problems from mash to chill. No problem with the boil. If i work on my clean up process i bet i can fit a brew day in under 4 1/2 hours. This thing may have just put the spark back in my home brewing.
 
So i picked up a grainfather a few weeks back. I wanted to simplify my process and have a smaller footprint due to lack of extra space. Man, this thing was a breeze to use. Zero problems from mash to chill. No problem with the boil. If i work on my clean up process i bet i can fit a brew day in under 4 1/2 hours. This thing may have just put the spark back in my home brewing.

My last batch had a 4 hour "brew day" including the cleaning. Well, I cheated, a little, by having the water measured and prepped, grains conditioned and milled, and delay timer set for strike temp reached when I got home from work.

The cleaning is a no-brainer as there is enough down-time during the brew to get everything, other than the main vessel cleaned.

The biggest "delays" are the strike heat, the sparge, and the bring-to-boil. I'm thinking of getting a heat stick to assist with getting the boil temp sooner.
 
So i picked up a grainfather a few weeks back. I wanted to simplify my process and have a smaller footprint due to lack of extra space. Man, this thing was a breeze to use. Zero problems from mash to chill. No problem with the boil. If i work on my clean up process i bet i can fit a brew day in under 4 1/2 hours. This thing may have just put the spark back in my home brewing.

4 1/2 hours is definitely doable. CONGRATS on the purchase of your GF!:mug:
 
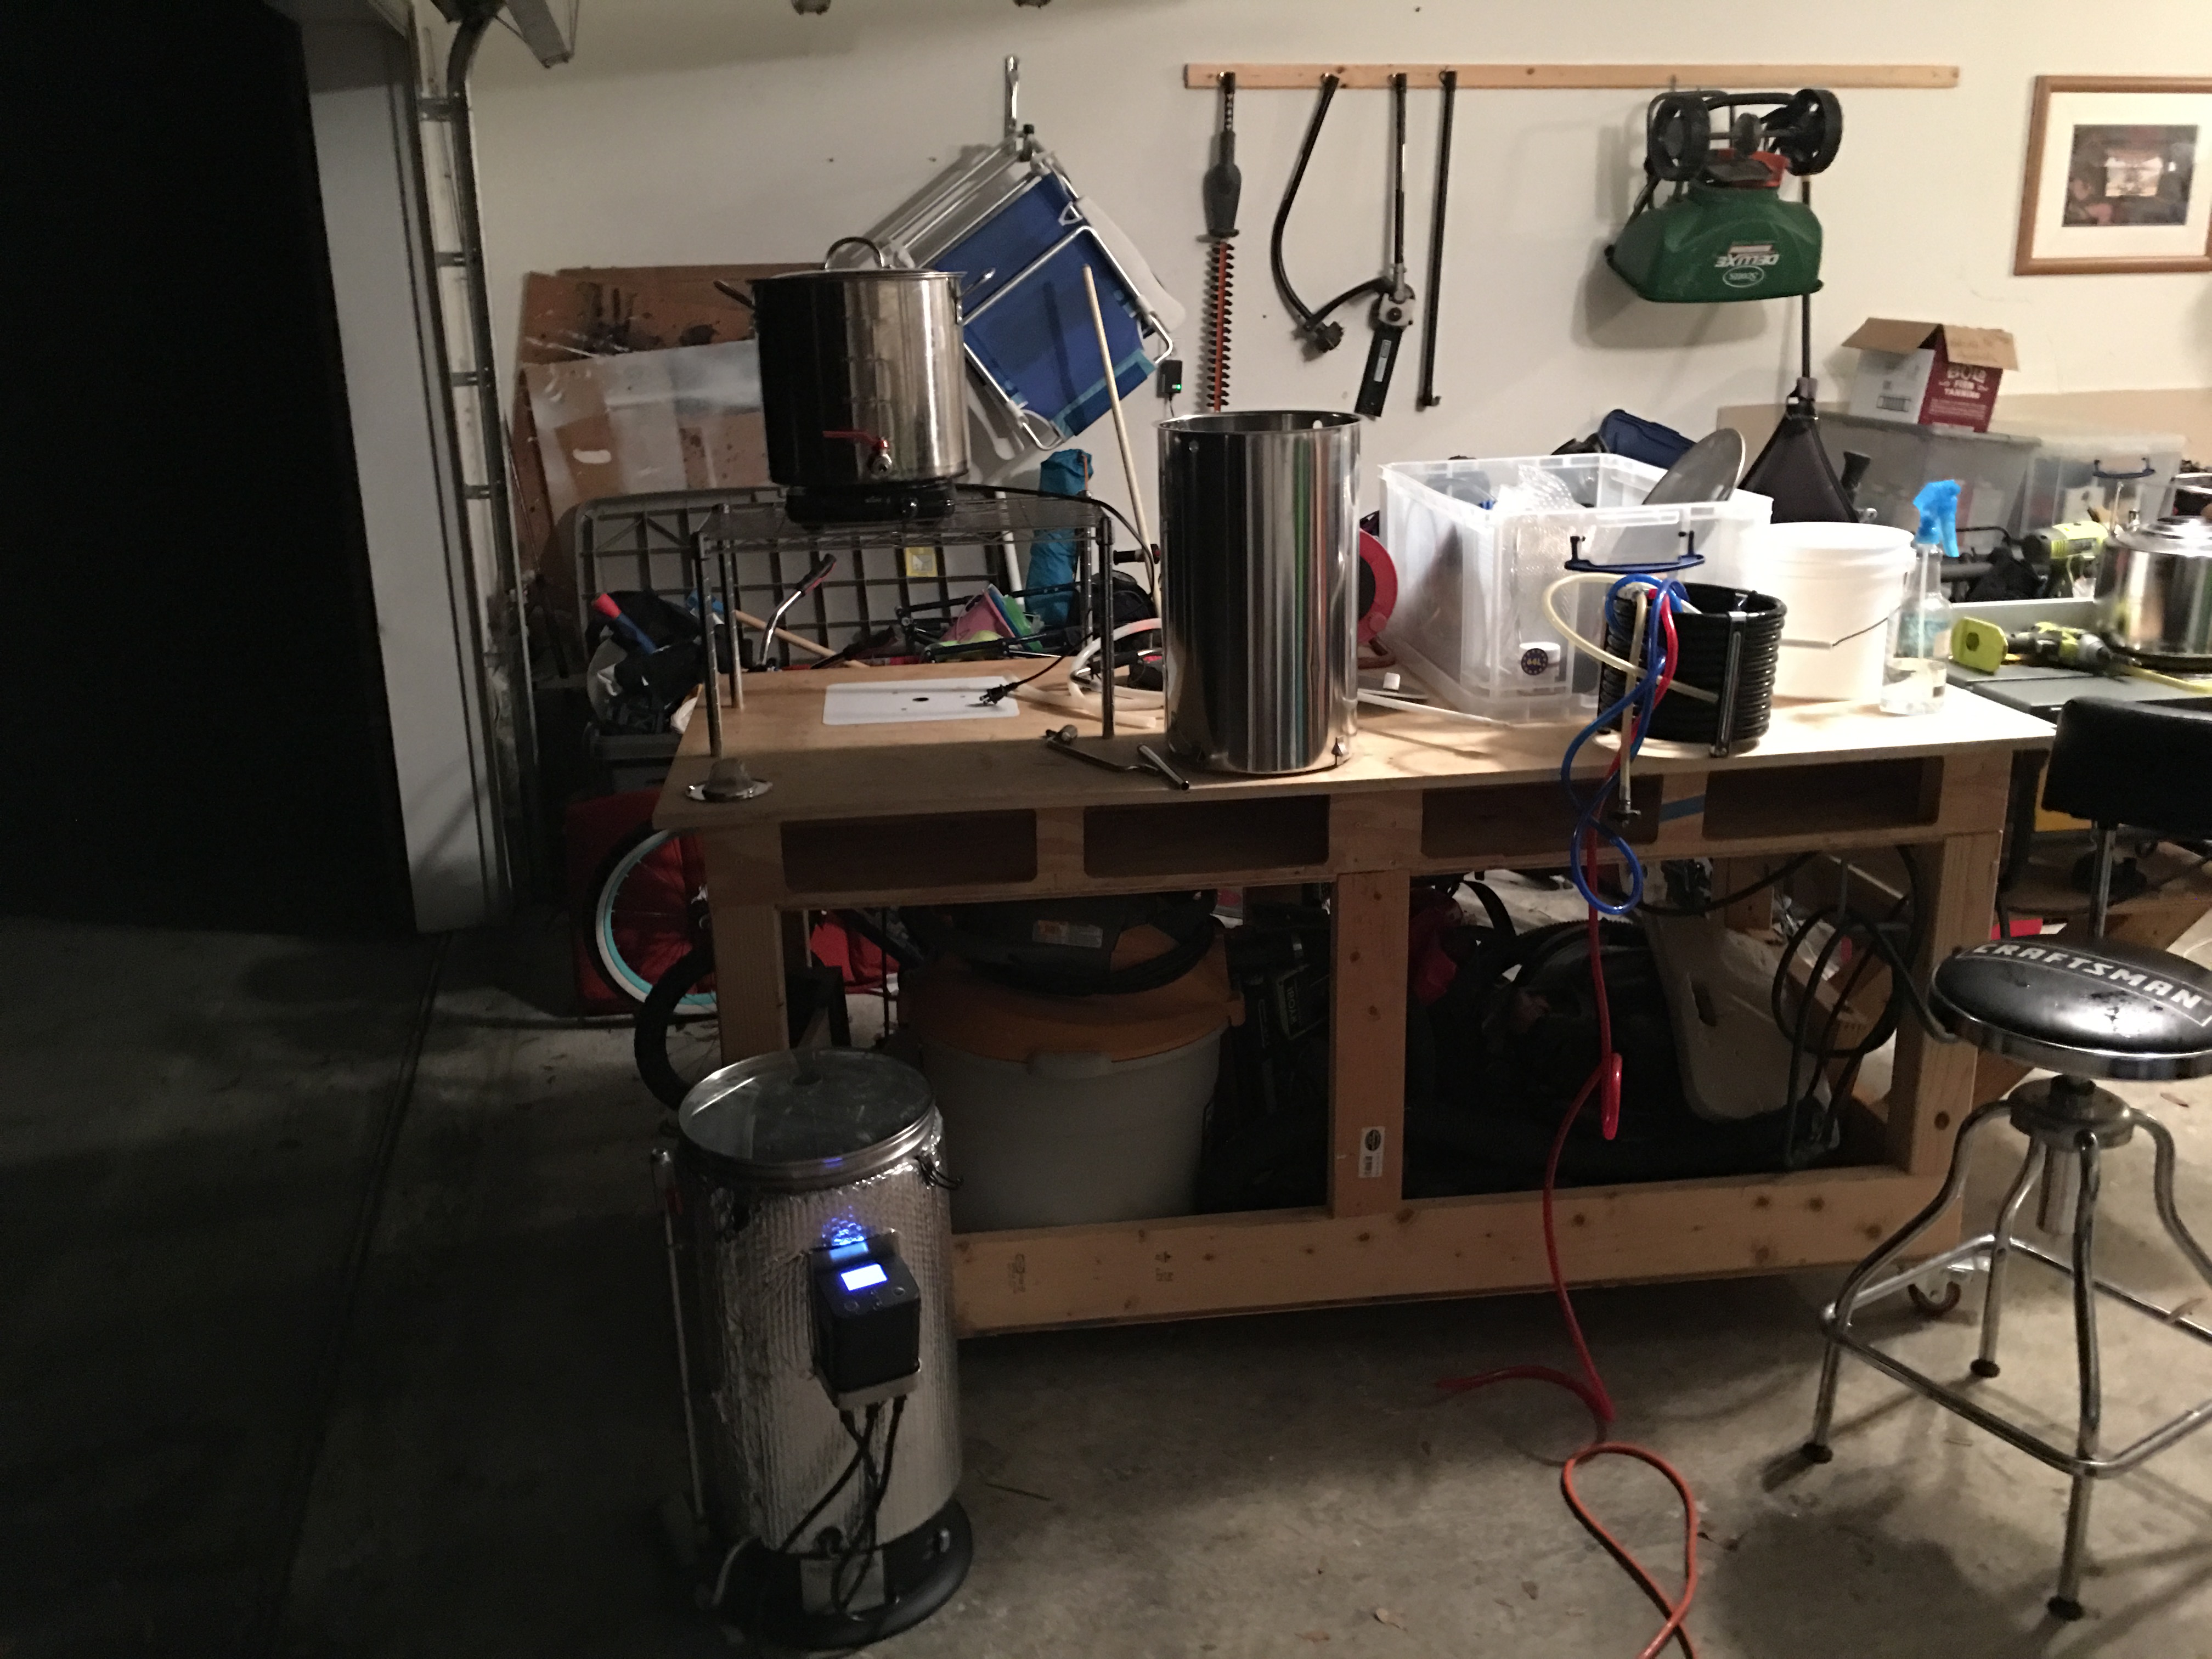
So I documented my grainfather brew day. Please give me any pointers to improve efficiency or shorten my brew day. Aside from a grainfather with a connect control box. I am using a 5 gallon pot with a cheap hot plate and inkbird thermostat. The whole process takes 6 hours total. But really only 4.5 hours if I ignore the day prior setup and the time it takes to come up to mash temp. Here is my brew day:

The night before brew day. (40 mins)

· Set up wheeled workbench with sparge pot on top of platform and burner, place thermostat near pot.

· Calculate recipe and input to Grainfather app/website.

· Rinse out Grainfather and sparge pot and fill with calculated mash and sparge volumes

o 10 lb grain bill, 5.5 gallon fermenter quantity, and 60 minute boil came out to 4.16 gallons of mash water and 3.36 gallons of sparge water.

· Place "trub trap" in Grainfather and put lid on top.


Brew Day

· As soon as you wake up/get home turn on Sparge hot plate and Grainfather, start recipe and let water come to temp. (50 mins)

· Stirred in grains, put on recirculation pipe and set to mash.

· Mashed with recirculation valve full open for 60 minutes

· After automatic mash-out at 168, sparge at 168.

· As soon as you lift the grain bin above to drain, manually turn on the heat to boil.

· Sparge occurred quickly and I tried to keep a level of water above the grain bed at all times (maybe half an inch or so). Next time I’ll try a slower sparge for better efficiency. Efficiency was calculated at 80%

· Place sparge water thermostat probe in sanitizer.

· After sparging and draining complete, take a preboil reading of gravity and volume, then put the lid back on with a towel on top to help it get to temp.

· Connect the counter-flow chiller.

· Clean everything as soon as you can, and set up sanitized materials and fermenter while the boil is taking place.

· During the last few minutes of the boil, place the silicon output hose of the counter-flow chiller in the wort and clamp in the direction of the "whirlpool" soon to come.

· After the boil with associated hop additions, kill the boil and turn on the pump. The water is still plenty hot to sanitize the counter flow chiller, while using your paddle to get a good whirlpool going.

· As soon as whirlpooling with the paddle is complete, clean it and place it in sanitizer

· Take a gravity and volume reading

· After 5 minutes of whirlpool, consider the counter-flow chiller sanitized and start the cooling water into the counter-flow chiller, give it another 10-15 minutes or whirlpooling, while cooing the wort back into the Grainfather. Collect the now heated counter-flow chiller water for cleaning later.

· After about 15-20 total minutes of whirlpool, place the temp probe from the sparge water thermostats into the counter-flow chiller output hose and place the whole thing into the fermenter. Adjust the Grainfather pump valve to reach a suitable temp. During a cold night, the valve was completely open and the output wort was 75 degrees, the Grainfather read the temp as 165 still.

· After all is transferred, use sanitized paddle to aerate wort, sprinkle yeast, close up and place in fermentation chamber.

· Rinse everything out and pour hot counter-flow chiller water back into Grainfather, mix in cleaner, turn pump and heat on (140 degrees) and let cycle for about 15 minutes. Pump out and give it all a good scrub then rinse.

· 4.5 hours from temps to full clean up.

IMG_4812.JPG
 
I love this thing. Normally, I'm super into my brew day standing by the grainfather every second of the day and taking notes. Today, I had a really relaxed brew day and it went great. Heated strike water around 12pm, mashed in a few hours and just let it go while I watched the Texans game, cold sparged at half time, brought up to boil and periodically checked on it to add hops/chocolate additions (it was a porter). Chilled after the game was over.
 
· As soon as you wake up/get home turn on Sparge hot plate and Grainfather, start recipe and let water come to temp. (50 mins)

Why not use the super handy delay timer to heat strike (mash) water. Would cut even more time off essentially.
 
Good call. I don’t get home at a normal time though. But I will definitely start using for weekend brews.
 
Hey everyone, long time no post. Well, my GF pump stopped pumping with the CFC chiller two brews ago. I had a really old CFC when I bought my GF so got a new one and that didn't fix it, just wasn't making it through. So I got a new pump on Aliexpress delivered today and plugged it in. I didn't have any stainless fittings, hope these lead-free brass are okay. Mash is going right now, so far so good. I like having the extra power, still to be seen after the boil. The pump is pretty quiet and the temperature hasn't been fluctuating as much from before. I'll let you all know how the rest goes soon.


I apologize if this has been discussed but was wondering what everyone is setting their grain crush at for the GF. I’ve got a MM3 and just started conditioning my malt. Wow what a visual difference! However my efficiency went to **** even with the gap on my mill to .032ish. Sparge was incredibly fast (clearly too fast) which I would think was a big part of the issue. Is it possible I was getting some channeling or was the grain bed just too porous? I feel like if I go less than .050 non conditioned I get fine efficiency but there is way too much material that makes it through the bottom filter plate into the boil. I purchased a fine mesh SS screen that I cut to fit on top of the bottom plate to try to keep more particulate out but I got some weird efficiency issues with that as well (although I couldn’t quite figure that out)
 
I apologize if this has been discussed but was wondering what everyone is setting their grain crush at for the GF. I’ve got a MM3 and just started conditioning my malt. Wow what a visual difference! However my efficiency went to badword even with the gap on my mill to .032ish. Sparge was incredibly fast (clearly too fast) which I would think was a big part of the issue. Is it possible I was getting some channeling or was the grain bed just too porous? I feel like if I go less than .050 non conditioned I get fine efficiency but there is way too much material that makes it through the bottom filter plate into the boil. I purchased a fine mesh SS screen that I cut to fit on top of the bottom plate to try to keep more particulate out but I got some weird efficiency issues with that as well (although I couldn’t quite figure that out)

I use a paint straining bag around the bottom plate, and it works great, no more crud floating around after mashing
 
I use a paint straining bag around the bottom plate, and it works great, no more crud floating around after mashing

What do you mill at? What are your efficiency numbers usually? Still get good recirc and the wort clears by the end of the Mash?
 
What do you mill at? What are your efficiency numbers usually? Still get good recirc and the wort clears by the end of the Mash?

My Barely crusher is set at about .050, my last brew was an Oatmeal stout (Yooper's) efficiency was 82% according to Beersmith, wort is always clear at the end of the mash. was hard to tell on this last one, due to it being a stout, but it turned out great. I was adjusting the flow so that no wort went down the overflow port, but I have recently started using a strainer over the overflow to keep stuff from going down it , and this with the paint straining bag over the bottom plate works for me.
 
My Barely crusher is set at about .050, my last brew was an Oatmeal stout (Yooper's) efficiency was 82% according to Beersmith, wort is always clear at the end of the mash. was hard to tell on this last one, due to it being a stout, but it turned out great. I was adjusting the flow so that no wort went down the overflow port, but I have recently started using a strainer over the overflow to keep stuff from going down it , and this with the paint straining bag over the bottom plate works for me.

So you just wrap the strainer around the plate? And it all fits with the gasket?
 
So you just wrap the strainer around the plate? And it all fits with the gasket?

I can't remember what size it is, but I got it at home depot. basically i slide the bottom plate into the bag and position it so the opening of the bag is below the plate. I then cut a hole for the overflow pipe. so to screw in the pipes, I reach in through the bottom of the bag with the nut, and the pipe goes in the hole I cut. When you screw it together, it holds it all in place. you know how sticky those plates can be when inserting them into the grainfather, the bag actually makes the plate slide in pretty effortlessly. I don't know if the bag is the issue, but I have had a couple of stuck sparges. I was using flaked oats and flaked corn, so that could have been the issue, but I use about a half pound of rice hulls now with every brew. They are cheap, impart no taste, so i figure why not.
 
I apologize if this has been discussed but was wondering what everyone is setting their grain crush at for the GF. I’ve got a MM3 and just started conditioning my malt. Wow what a visual difference! However my efficiency went to badword even with the gap on my mill to .032ish. Sparge was incredibly fast (clearly too fast) which I would think was a big part of the issue. Is it possible I was getting some channeling or was the grain bed just too porous? I feel like if I go less than .050 non conditioned I get fine efficiency but there is way too much material that makes it through the bottom filter plate into the boil. I purchased a fine mesh SS screen that I cut to fit on top of the bottom plate to try to keep more particulate out but I got some weird efficiency issues with that as well (although I couldn’t quite figure that out)
Everything you've done sounds like it should not result in a lower efficiency. If anything, it should be better. My Schmidling Malt Mill is set to default 0.045," I always precondition my grain, and I also use a SS steel screen at the bottom. My BH efficiencies are usually in the 80s, and conversion in the high 90s. My sparges are also usually quick (<15 minutes.) You did not specify if the efficiency was Brewhouse or Conversion, or the size of the grain bill. If Conversion, you may not have stirred the wort thoroughly after sparging to make sure it was homogenous before pulling a sample. If it was Brewhouse, I'm thinking you may have channeled through your grain bed, or possibly, your grain wasn't as fresh as it could be. IMO, you are correct to meter the flow down the overflow pipe as you know it's going down through the grain bed. My recommendation is next time, make sure your MM3 is correctly set and adjustment screws tight, have a good crush, and make sure your mash is fully stirred before setting the top plate and starting. If this is a session beer, or the grain bill is <9 pounds, make sure you follow the GF instructions (unless you are using small pipework.) Chalk this one up to an anomaly and try again. RDWHAHB. Hope this helps. Ed
:mug:
 
Back
Top