You are using an out of date browser. It may not display this or other websites correctly.
You should upgrade or use an alternative browser.
You should upgrade or use an alternative browser.
Frigidaire Model FRC445GB Mini-Fridge Kegerator Conversion
- Thread starter noremorse1
- Start date

Help Support Homebrew Talk:
This site may earn a commission from merchant affiliate
links, including eBay, Amazon, and others.
OK. I found my own answer...
About page 54, there's a bit about someone who accidentally cut the cap tube, which seems to be required only if you're using the OEM thermostat. So, I sucked it up and cut the cap tube. The compressor is still running... Whew...
I decided to test the Love controller by setting the set point higher than the current temp and the compressor turned off. I then reset the set point lower than the current temp and... nothing.
After waiting for five minutes, which is the default value for the minimum off time, the compressor kicked back on.
Like I said above, my Love install is pretty simple. No light, no door switch. I just connected the live, neutral and compressor live to the controller.
When I replaced my thermostat I was able to pull all the stock parts out. But yeah cutting the tube is fine. I replaced mine with a cheap ebay thermostat. Works great!
myspoonistoobig
New Member
- Joined
- Nov 24, 2012
- Messages
- 3
- Reaction score
- 0
Hi y'all. Long time lurker, first time poster. Just wanted to send a huge shout out of thanks to this thread and a few others for making my kegerator possible. Figured I'd share some photos of my buildout. I've had it up and running for several months now, but I just got around to finally putting in my third faucet today and am now satisfied.
I went with the Lowes model for no other reason than it was cheaper. In retrospect, I think the Best Buy model may be better as I understand that the inner door simply unscrews. If that's not the case, then it's just a huge mess no matter what, so go with whatever's cheaper. I carefully cut around the edge of the lip where the magnetic seal tucks in, then tore off the plastic sheeting, which wasn't fun, and then just hacked away at the foam. I can't stress enough that you should do this in a garage if at all possible - somewhere well ventilated but not out in the open so you can clean up after yourself. This foam almost certainly will give you cancer. Buy a cheap-o face mask and wear eye protection.
I bought some spray foam to fill in the valleys, then caulked in a corrugated plastic sheet flush against the inside of the door. I saw another thread or possibly somewhere in this thread where someone put acrylic in, but that was pretty expensive and also heavier. It's possible that acrylic would be better for temp purposes, but honestly, this has been fine. The acrylic certainly would be more rigid for securing the shanks, but again, this has been adequate. Initially, I removed the casing around the light and thermostat and moved them out of the way as previously described so that I could fit two 5-gallon ball locks side by side.
I then drilled some holes through the door with some hole saws. If I had or had access to a drill press, that would have been ideal since one of my shanks went in a little crooked. After that, it was just two small holes and a 6 inch drip tray and I was good to go.
Since I'm a sucker for making things nicer than they need to be and my girlfriend's brother is an electrical engineer, I decided to upgrade to a temp controller. This thread was instrumental in making that dream a reality. Went with this PID controller and it's great. The light still works, but since there's nothing on the door currently to trip the switch, I just taped down the switch (hence the ugly mess of blue tape). Eventually I'll figure out a way to make that work. Or not. Anyway, I can't help anyone with the wiring as my girlfriend's brother did all of the hard work.
Now, after having it a while, I thought "Hey, I bet I could fit a 2.5 gallon on the back hump." So I picked up two of these 2.5 gallon kegs. To my dismay, they are ever so slightly wider than standard ball locks and don't fit side-by-side. HOWEVER! I noticed I could fit one on the hump and one in the front, then stagger a five gallon in front, which means three kegs, plus a 5 pound cylinder in the fridge, self contained! So today I installed a three way distributor in the upper left hand corner (affixed with velcro, not sure if it will hold up, but better than risking hitting some coolant lines with a screw) and drilled another hole for a faucet. Everything fits, plus I have room on top of the 2.5 gallon in front for my dehumidifier. Ideally, the faucets would be spaced out better, but honestly, not sure if the doors would close if they went much wider, plus this drip tray looks decent.
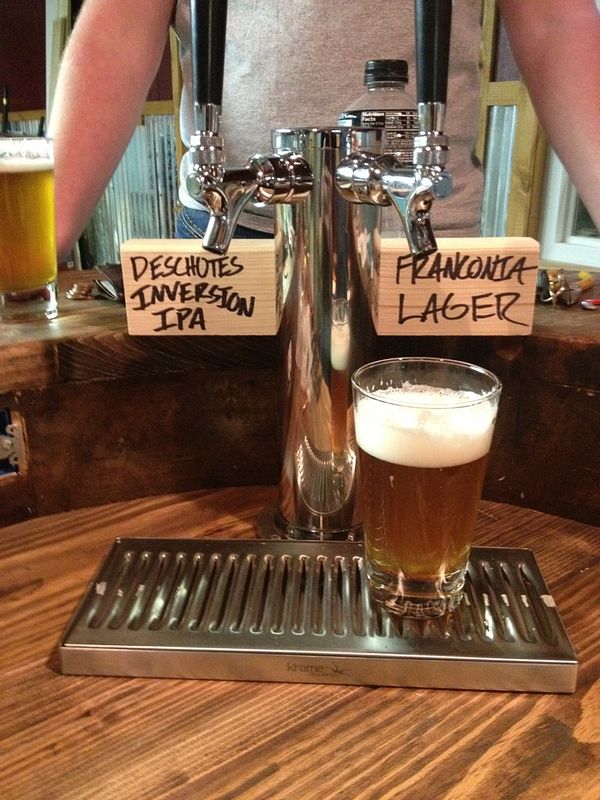
Tricked it out with Duck Rabbit and Trou du Diable tap handles - with a standard black one for the middle since it's a little tight there - and a ton of bottle cap magnets and I have a three-brew dispenser in a tight package to keep SWMBO happy.
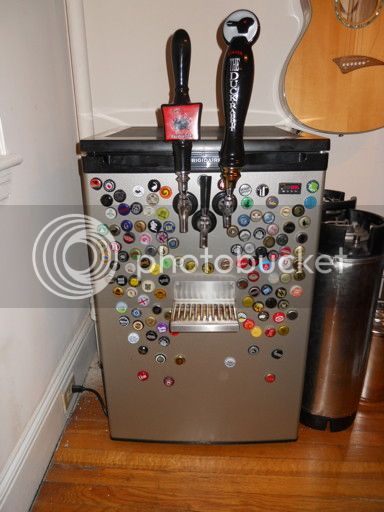
Anyway, not sure if someone already confirmed the three-keg configuration works, but this certainly does. It's tight, but it works.
Cheers,
Mike
I went with the Lowes model for no other reason than it was cheaper. In retrospect, I think the Best Buy model may be better as I understand that the inner door simply unscrews. If that's not the case, then it's just a huge mess no matter what, so go with whatever's cheaper. I carefully cut around the edge of the lip where the magnetic seal tucks in, then tore off the plastic sheeting, which wasn't fun, and then just hacked away at the foam. I can't stress enough that you should do this in a garage if at all possible - somewhere well ventilated but not out in the open so you can clean up after yourself. This foam almost certainly will give you cancer. Buy a cheap-o face mask and wear eye protection.
I bought some spray foam to fill in the valleys, then caulked in a corrugated plastic sheet flush against the inside of the door. I saw another thread or possibly somewhere in this thread where someone put acrylic in, but that was pretty expensive and also heavier. It's possible that acrylic would be better for temp purposes, but honestly, this has been fine. The acrylic certainly would be more rigid for securing the shanks, but again, this has been adequate. Initially, I removed the casing around the light and thermostat and moved them out of the way as previously described so that I could fit two 5-gallon ball locks side by side.
I then drilled some holes through the door with some hole saws. If I had or had access to a drill press, that would have been ideal since one of my shanks went in a little crooked. After that, it was just two small holes and a 6 inch drip tray and I was good to go.
Since I'm a sucker for making things nicer than they need to be and my girlfriend's brother is an electrical engineer, I decided to upgrade to a temp controller. This thread was instrumental in making that dream a reality. Went with this PID controller and it's great. The light still works, but since there's nothing on the door currently to trip the switch, I just taped down the switch (hence the ugly mess of blue tape). Eventually I'll figure out a way to make that work. Or not. Anyway, I can't help anyone with the wiring as my girlfriend's brother did all of the hard work.
Now, after having it a while, I thought "Hey, I bet I could fit a 2.5 gallon on the back hump." So I picked up two of these 2.5 gallon kegs. To my dismay, they are ever so slightly wider than standard ball locks and don't fit side-by-side. HOWEVER! I noticed I could fit one on the hump and one in the front, then stagger a five gallon in front, which means three kegs, plus a 5 pound cylinder in the fridge, self contained! So today I installed a three way distributor in the upper left hand corner (affixed with velcro, not sure if it will hold up, but better than risking hitting some coolant lines with a screw) and drilled another hole for a faucet. Everything fits, plus I have room on top of the 2.5 gallon in front for my dehumidifier. Ideally, the faucets would be spaced out better, but honestly, not sure if the doors would close if they went much wider, plus this drip tray looks decent.
Tricked it out with Duck Rabbit and Trou du Diable tap handles - with a standard black one for the middle since it's a little tight there - and a ton of bottle cap magnets and I have a three-brew dispenser in a tight package to keep SWMBO happy.
Anyway, not sure if someone already confirmed the three-keg configuration works, but this certainly does. It's tight, but it works.
Cheers,
Mike
Last edited by a moderator:
These mods have been discussed but not in detail, or shall I say spelled out for the less capable DIY.
1. Muffin fan that runs from external power source parts list and instructions.
2. Anyone put this on castors or a cradle with castors.
3. Anyone have a clever design to mount the co2 outside while working with request number two for a neat but semi portable kegerator. Ie roll it to the porch, roll it to the living, roll it to the garage.
4. I am thinking through the door taps to save some scratch and keep it simple, putting on wheels would raise it up a bit to make the pour easier.
Thanks!
cfd577
Active Member
Has anyone been able to fit a corny keg and a 1/6 keg in this fridge together? I've read in this post that it might be possible but haven't seen anyone who has done it. If anyone has pics and/or advice on mods would be great.


$58.16
HUIZHUGS Brewing Equipment Keg Ball Lock Faucet 30cm Reinforced Silicone Hose Secondary Fermentation Homebrew Kegging Brewing Equipment
xiangshuizhenzhanglingfengshop


$53.24
1pc Hose Barb/MFL 1.5" Tri Clamp to Ball Lock Post Liquid Gas Homebrew Kegging Fermentation Parts Brewer Hardware SUS304(Liquid MFL)
yunchengshiyanhuqucuichendianzishangwuyouxiangongsi

$22.00 ($623.23 / Ounce)
AMZLMPKNTW Ball Lock Sample Faucet 30cm Reinforced Silicone Hose Secondary Fermentation Homebrew Kegging joyful
无为中南商贸有限公司


$53.24
1pc Hose Barb/MFL 1.5" Tri Clamp to Ball Lock Post Liquid Gas Homebrew Kegging Fermentation Parts Brewer Hardware SUS304(Liquid Hose Barb)
Guangshui Weilu You Trading Co., Ltd


$10.99 ($31.16 / Ounce)
Hornindal Kveik Yeast for Homebrewing - Mead, Cider, Wine, Beer - 10g Packet - Saccharomyces Cerevisiae - Sold by Shadowhive.com
Shadowhive


![Craft A Brew - Safale BE-256 Yeast - Fermentis - Belgian Ale Dry Yeast - For Belgian & Strong Ales - Ingredients for Home Brewing - Beer Making Supplies - [3 Pack]](https://m.media-amazon.com/images/I/51bcKEwQmWL._SL500_.jpg)


$176.97
1pc Commercial Keg Manifold 2" Tri Clamp,Ball Lock Tapping Head,Pressure Gauge/Adjustable PRV for Kegging,Fermentation Control
hanhanbaihuoxiaoshoudian

$7.79 ($7.79 / Count)
Craft A Brew - LalBrew Voss™ - Kveik Ale Yeast - For Craft Lagers - Ingredients for Home Brewing - Beer Making Supplies - (1 Pack)
Craft a Brew
$172.35
2 Inch Tri Clamp Keg Manifold With Ball Lock Posts, Pressure Gauge, PRV (0-30 PSI) – Homebrew, Fermentation, Kegging System
wuhanshijiayangzhiyimaoyiyouxiangongsi


$20.94
$29.99
The Brew Your Own Big Book of Clone Recipes: Featuring 300 Homebrew Recipes from Your Favorite Breweries
Amazon.com


$28.98
Five Star - 6022b_ - Star San - 32 Ounce - High Foaming Sanitizer
Great Fermentations of Indiana


$27.29 ($13.64 / Count)
$41.99 ($21.00 / Count)
2 Pack 1 Gallon Large Fermentation Jars with 3 Airlocks and 2 SCREW Lids(100% Airtight Heavy Duty Lid w Silicone) - Wide Mouth Glass Jars w Scale Mark - Pickle Jars for Sauerkraut, Sourdough Starter
Qianfenie Direct

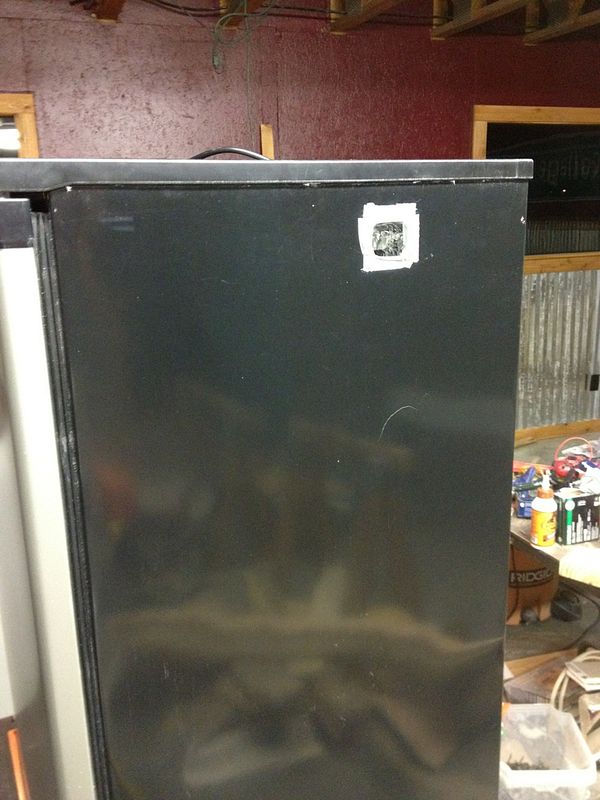
I contacted Electrolux the maker of the Fridgedaire model in question and they confirmed there are no coils in either side or back wall of this fridge. I guess I can drill into it at will to install the CO2 mounting bracket. Yippee.
Hey, so I tried drilling though the side. I drilled forward of the thicker plates, nearest the door, and I don't think I hit any vital organs. Unfortunately, I see no evidence of any cooling at all. Every inch of the unit is at room temp or warmer. Did I still manage to ruin it?
So did we decide that there are indeed refrigerant lines running through the sides?
ps i feel bad joining a forum just for this thread, but this is the encyclopedia of the internets on this model conversions. Everywhere you find info on this fridge references back to here. I will be attempting to fit two commercial 1/6ths in mine, and will definitely post back with tech.
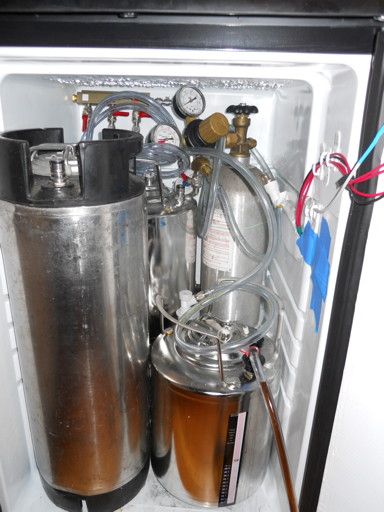
As promised: Two commercial 1/6 barrels in this fridge.
As with all my beer related projects, I thought I was taking good detailed pics at the time, but lots of beer was consumed while working so they didn't come out that great.
Anyways, we started with a frigidaire 4.4 cu ft fridge that I picked up on craigslist for $75 almost new. The dude said he bought it about 1.5 yrs ago but has had it unplugged for the last year. It works great.
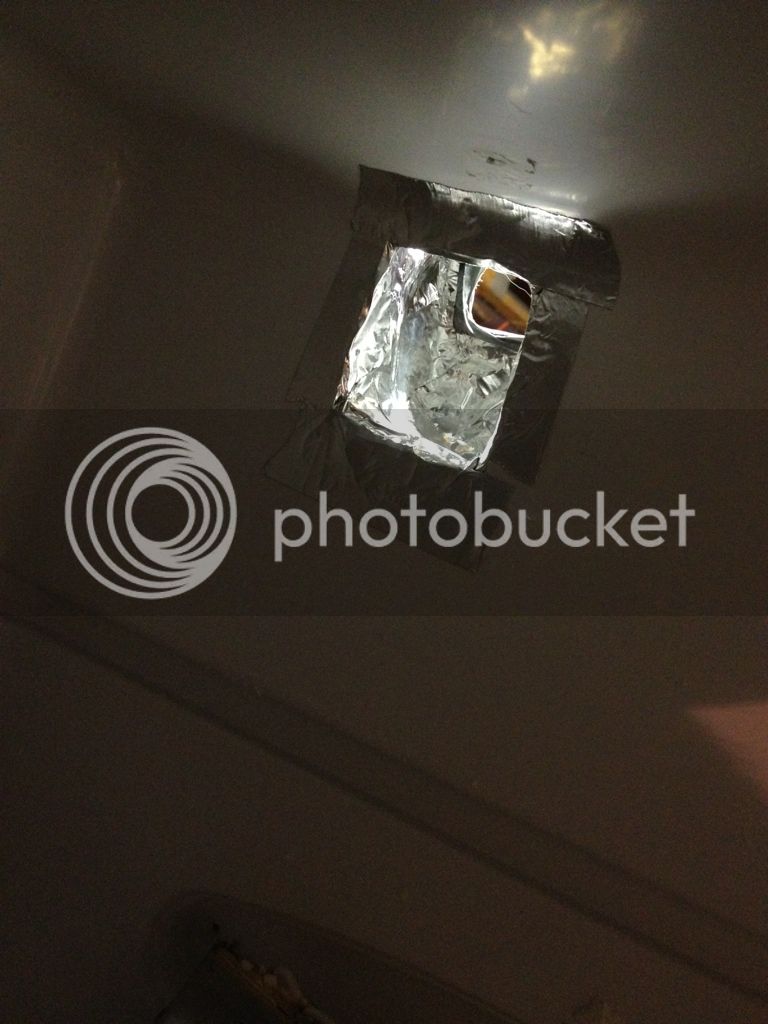
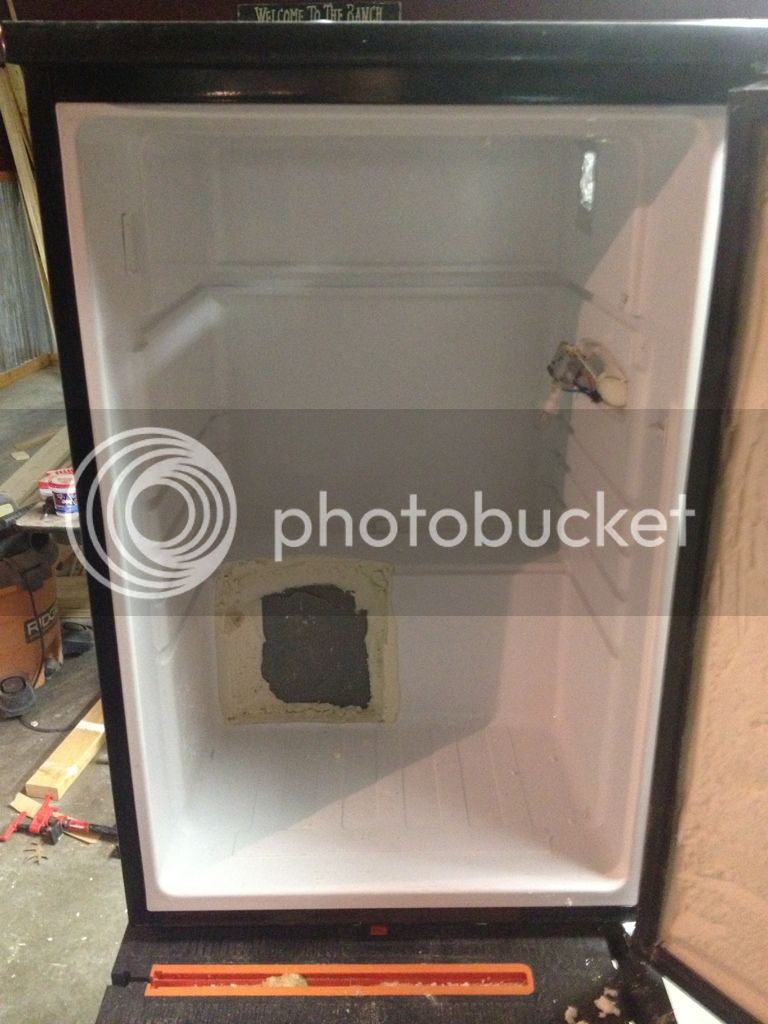
The first thing I did was cut the hole for the beer lines. I didn't want to put any extra work into it if i was just going to kill it by hitting a line. We tried using the cornstarch/vodka test on the side and it didn't really do anything but make it look like bigfoot ejaculated on the fridge. Had a good laugh over that one. So i ended up going through from the inside. I cut away a square of the plastic about 2x2" with my handy razor blade, and then carefully dug through the foam with a screwdriver to expose the outside shell of the fridge and the coolant lines. I honestly don't know why everyone doesn't go through the inside like this. I ended up being right over a coolant line and was able to easily see it and avoid it.
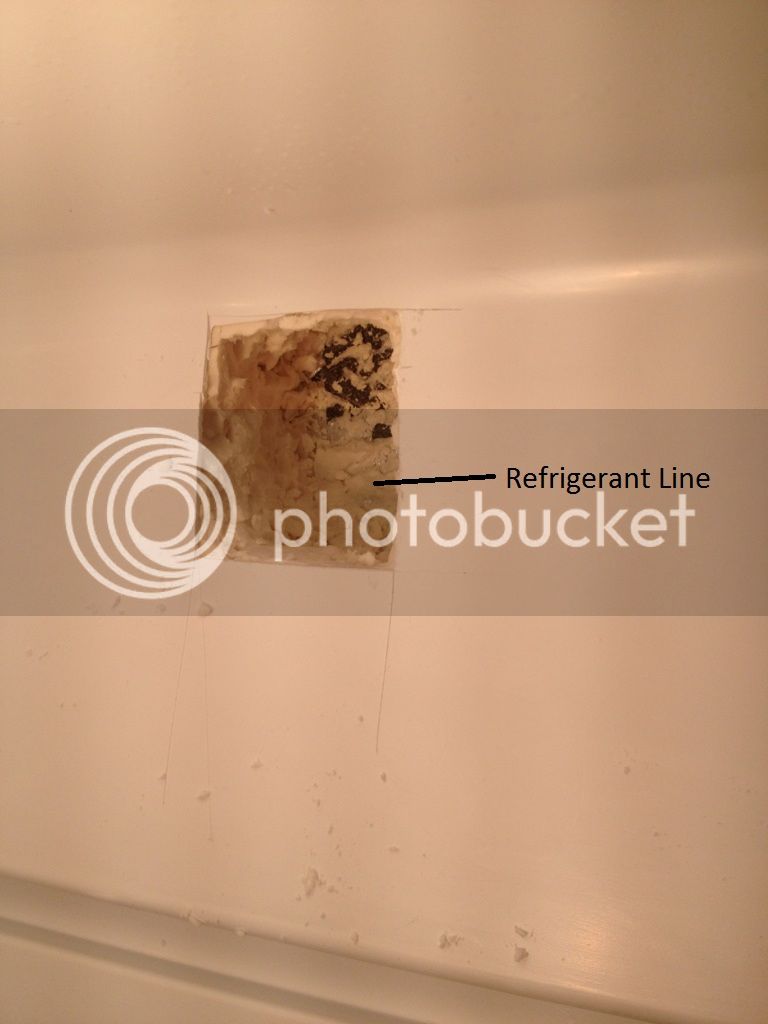
Once I had the line located I drilled a 3/8"-ish hole through from the inside where i wanted my opening centered. I used a cutoff wheel on my angle grinder to cutout a square hole on the outside (overkill but it worked well). We covered the sharp edges with duct tape to protect the lines, and used foil tape to clean up the opening. Thus creating the magnificent glory hole.
Next thing I did was gut the door. We started with a sawzall, holy overkill! We finally realized that a razor blade cut through the plastic like nothing, and was much easier to control. Used knives and stuff to cut out foam. At the end i needed a tiny bit more off in one spot for the door to seal, and found that a drywall rasp work excellently. That foam is messy as heck though. Also note: the seal pulls off easily and goes back on easily. Pull it off when gutting the door so you don't trash it. It just snaps in place.

We still needed a bit more depth so I notched the compressor hump. Easy work with a razor blade. There's nothing in there to hurt. Go to town. The gray you see in the middle is the cardboard stuff on the exterior. I taped some fiberglass insulation over it on the outside to keep it halfway efficient. I pulled the paper off the insulation and use foil tape to alleviate my concerns of fire with it being next to the hot compressor.
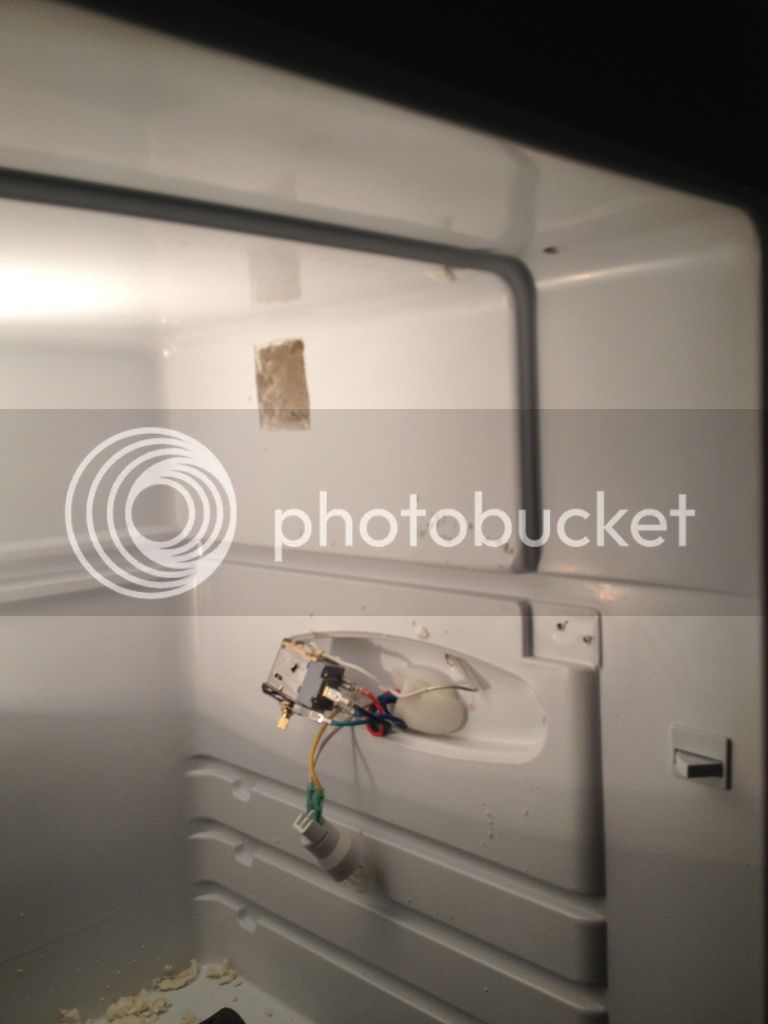
oh yeah I did this shenanigans with the thermostat too, but it's been covered in depth here
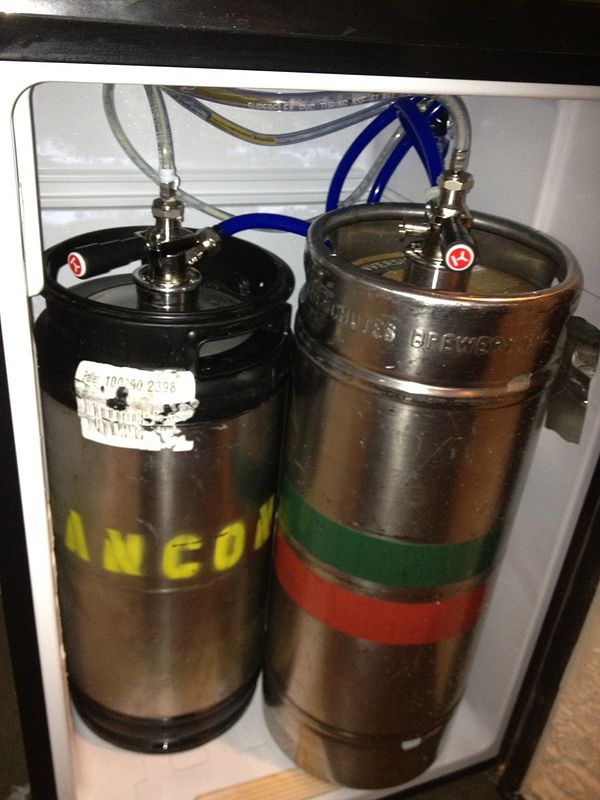
voila! two 1/6 barrel commercial kegs. The black short one is actually a hair wider than the "standard" one. So with two normal 1/6's i'll have even more room. I used a wood shim (like for construction framing) under the front keg because it wanted to lean out. Works great.
First Pour. Cheers!
As with all my beer related projects, I thought I was taking good detailed pics at the time, but lots of beer was consumed while working so they didn't come out that great.
Anyways, we started with a frigidaire 4.4 cu ft fridge that I picked up on craigslist for $75 almost new. The dude said he bought it about 1.5 yrs ago but has had it unplugged for the last year. It works great.
The first thing I did was cut the hole for the beer lines. I didn't want to put any extra work into it if i was just going to kill it by hitting a line. We tried using the cornstarch/vodka test on the side and it didn't really do anything but make it look like bigfoot ejaculated on the fridge. Had a good laugh over that one. So i ended up going through from the inside. I cut away a square of the plastic about 2x2" with my handy razor blade, and then carefully dug through the foam with a screwdriver to expose the outside shell of the fridge and the coolant lines. I honestly don't know why everyone doesn't go through the inside like this. I ended up being right over a coolant line and was able to easily see it and avoid it.
Once I had the line located I drilled a 3/8"-ish hole through from the inside where i wanted my opening centered. I used a cutoff wheel on my angle grinder to cutout a square hole on the outside (overkill but it worked well). We covered the sharp edges with duct tape to protect the lines, and used foil tape to clean up the opening. Thus creating the magnificent glory hole.
Next thing I did was gut the door. We started with a sawzall, holy overkill! We finally realized that a razor blade cut through the plastic like nothing, and was much easier to control. Used knives and stuff to cut out foam. At the end i needed a tiny bit more off in one spot for the door to seal, and found that a drywall rasp work excellently. That foam is messy as heck though. Also note: the seal pulls off easily and goes back on easily. Pull it off when gutting the door so you don't trash it. It just snaps in place.
We still needed a bit more depth so I notched the compressor hump. Easy work with a razor blade. There's nothing in there to hurt. Go to town. The gray you see in the middle is the cardboard stuff on the exterior. I taped some fiberglass insulation over it on the outside to keep it halfway efficient. I pulled the paper off the insulation and use foil tape to alleviate my concerns of fire with it being next to the hot compressor.
oh yeah I did this shenanigans with the thermostat too, but it's been covered in depth here
voila! two 1/6 barrel commercial kegs. The black short one is actually a hair wider than the "standard" one. So with two normal 1/6's i'll have even more room. I used a wood shim (like for construction framing) under the front keg because it wanted to lean out. Works great.
First Pour. Cheers!
whiskeyjack
Well-Known Member
Getting ready to buy the bestbuy model of the fridge. Would any one that has bought this fridge care to comment on how it has lasted and if they would recommend still getting it or not ? I am just going to put 2 5 gallon corny's hooked up to a party faucet. I may go to a tower eventually but not in the near future.
MissouriBrewer
Member
Been running it for two years now, zero issues.
csh
Member
Getting ready to buy the bestbuy model of the fridge. Would any one that has bought this fridge care to comment on how it has lasted and if they would recommend still getting it or not ? I am just going to put 2 5 gallon corny's hooked up to a party faucet. I may go to a tower eventually but not in the near future.
I've had this fridge for about six months or so. It's been running most of the time and has held a steady temp. I added the Love temp controller and ran two beer lines through the top to a tower. I normally have two 5gal corneys with a 5lbs CO2 tank. I designed a bar with a space for this cooler. It is not built in but has an airspace all the way around it with a vent fan pulling air across the sides. From my perspective, even if the fridge dies after two or three years, I'd go get another one because of how easy it is to fit homebrew kegs into it, especially since I know how to run the beer lines through the top.
The only comment I have is if you decide to run lines through the top -- and I know everyone has said it already -- dig out the styrofoam insulation outside, or at least in the garage. It will go EVERYWHERE.
I went with the front tower to save tearing out the top. Used a 2" PVC pipe as the internal conduit in the tower, fits nice against the foam. I built a tower fan, but have had no issues with foamy first pour so it's not being used. When i do use it, set the thermo warmer and expect your tower top to sweat! Easy build running good for the first month so far.
ledzepp817
New Member
- Joined
- Mar 16, 2013
- Messages
- 1
- Reaction score
- 0
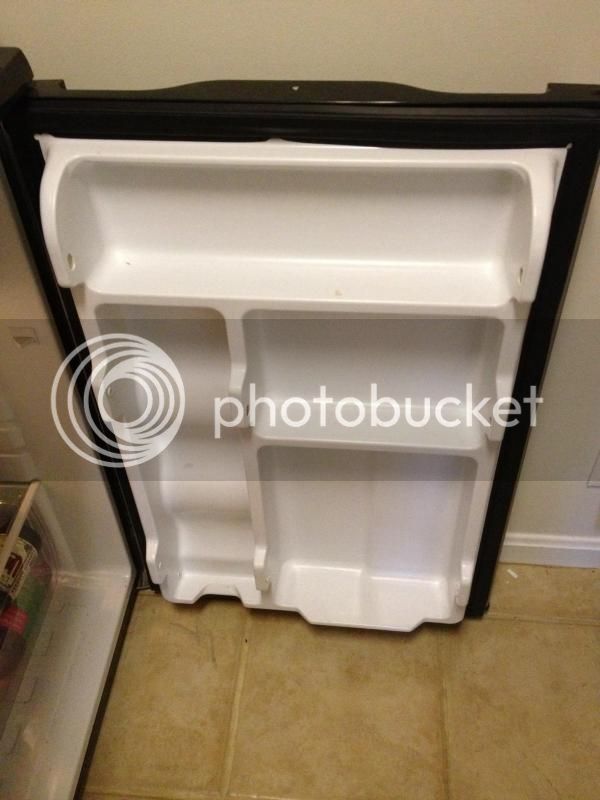
Hi everyone, I seem to have a different door than most on here. It has a handful of compartments for drinks and whatnot. Does anyone here have the same door? Did you have to remove to fit two cornys in there? If not, how do you remove the white interior side of the door?
Here's what I'm talking about:
Thanks everyone
Here's what I'm talking about:
Thanks everyone
Hi everyone, I seem to have a different door than most on here. It has a handful of compartments for drinks and whatnot. Does anyone here have the same door? Did you have to remove to fit two cornys in there? If not, how do you remove the white interior side of the door?
Here's what I'm talking about:
Thanks everyone
Remove baffles / seal, hacksaw the plastic out of the door, remove insulation, seal back up, replace baffles. I used a sheet of plexiglass to seal the door that I glued, caulked and spray painted so it looks very nice. if you don't care what it looks like, duct tape would probably work.
BrewThruYou
Well-Known Member
Hi everyone, I seem to have a different door than most on here. It has a handful of compartments for drinks and whatnot. Does anyone here have the same door? Did you have to remove to fit two cornys in there? If not, how do you remove the white interior side of the door?
No, you do not have to remove the interior side if you are running two ball-lock cornies. I've been running 2 ball-locks for maybe 2 years with no issues.
When I replaced my thermostat I was able to pull all the stock parts out. But yeah cutting the tube is fine. I replaced mine with a cheap ebay thermostat. Works great!
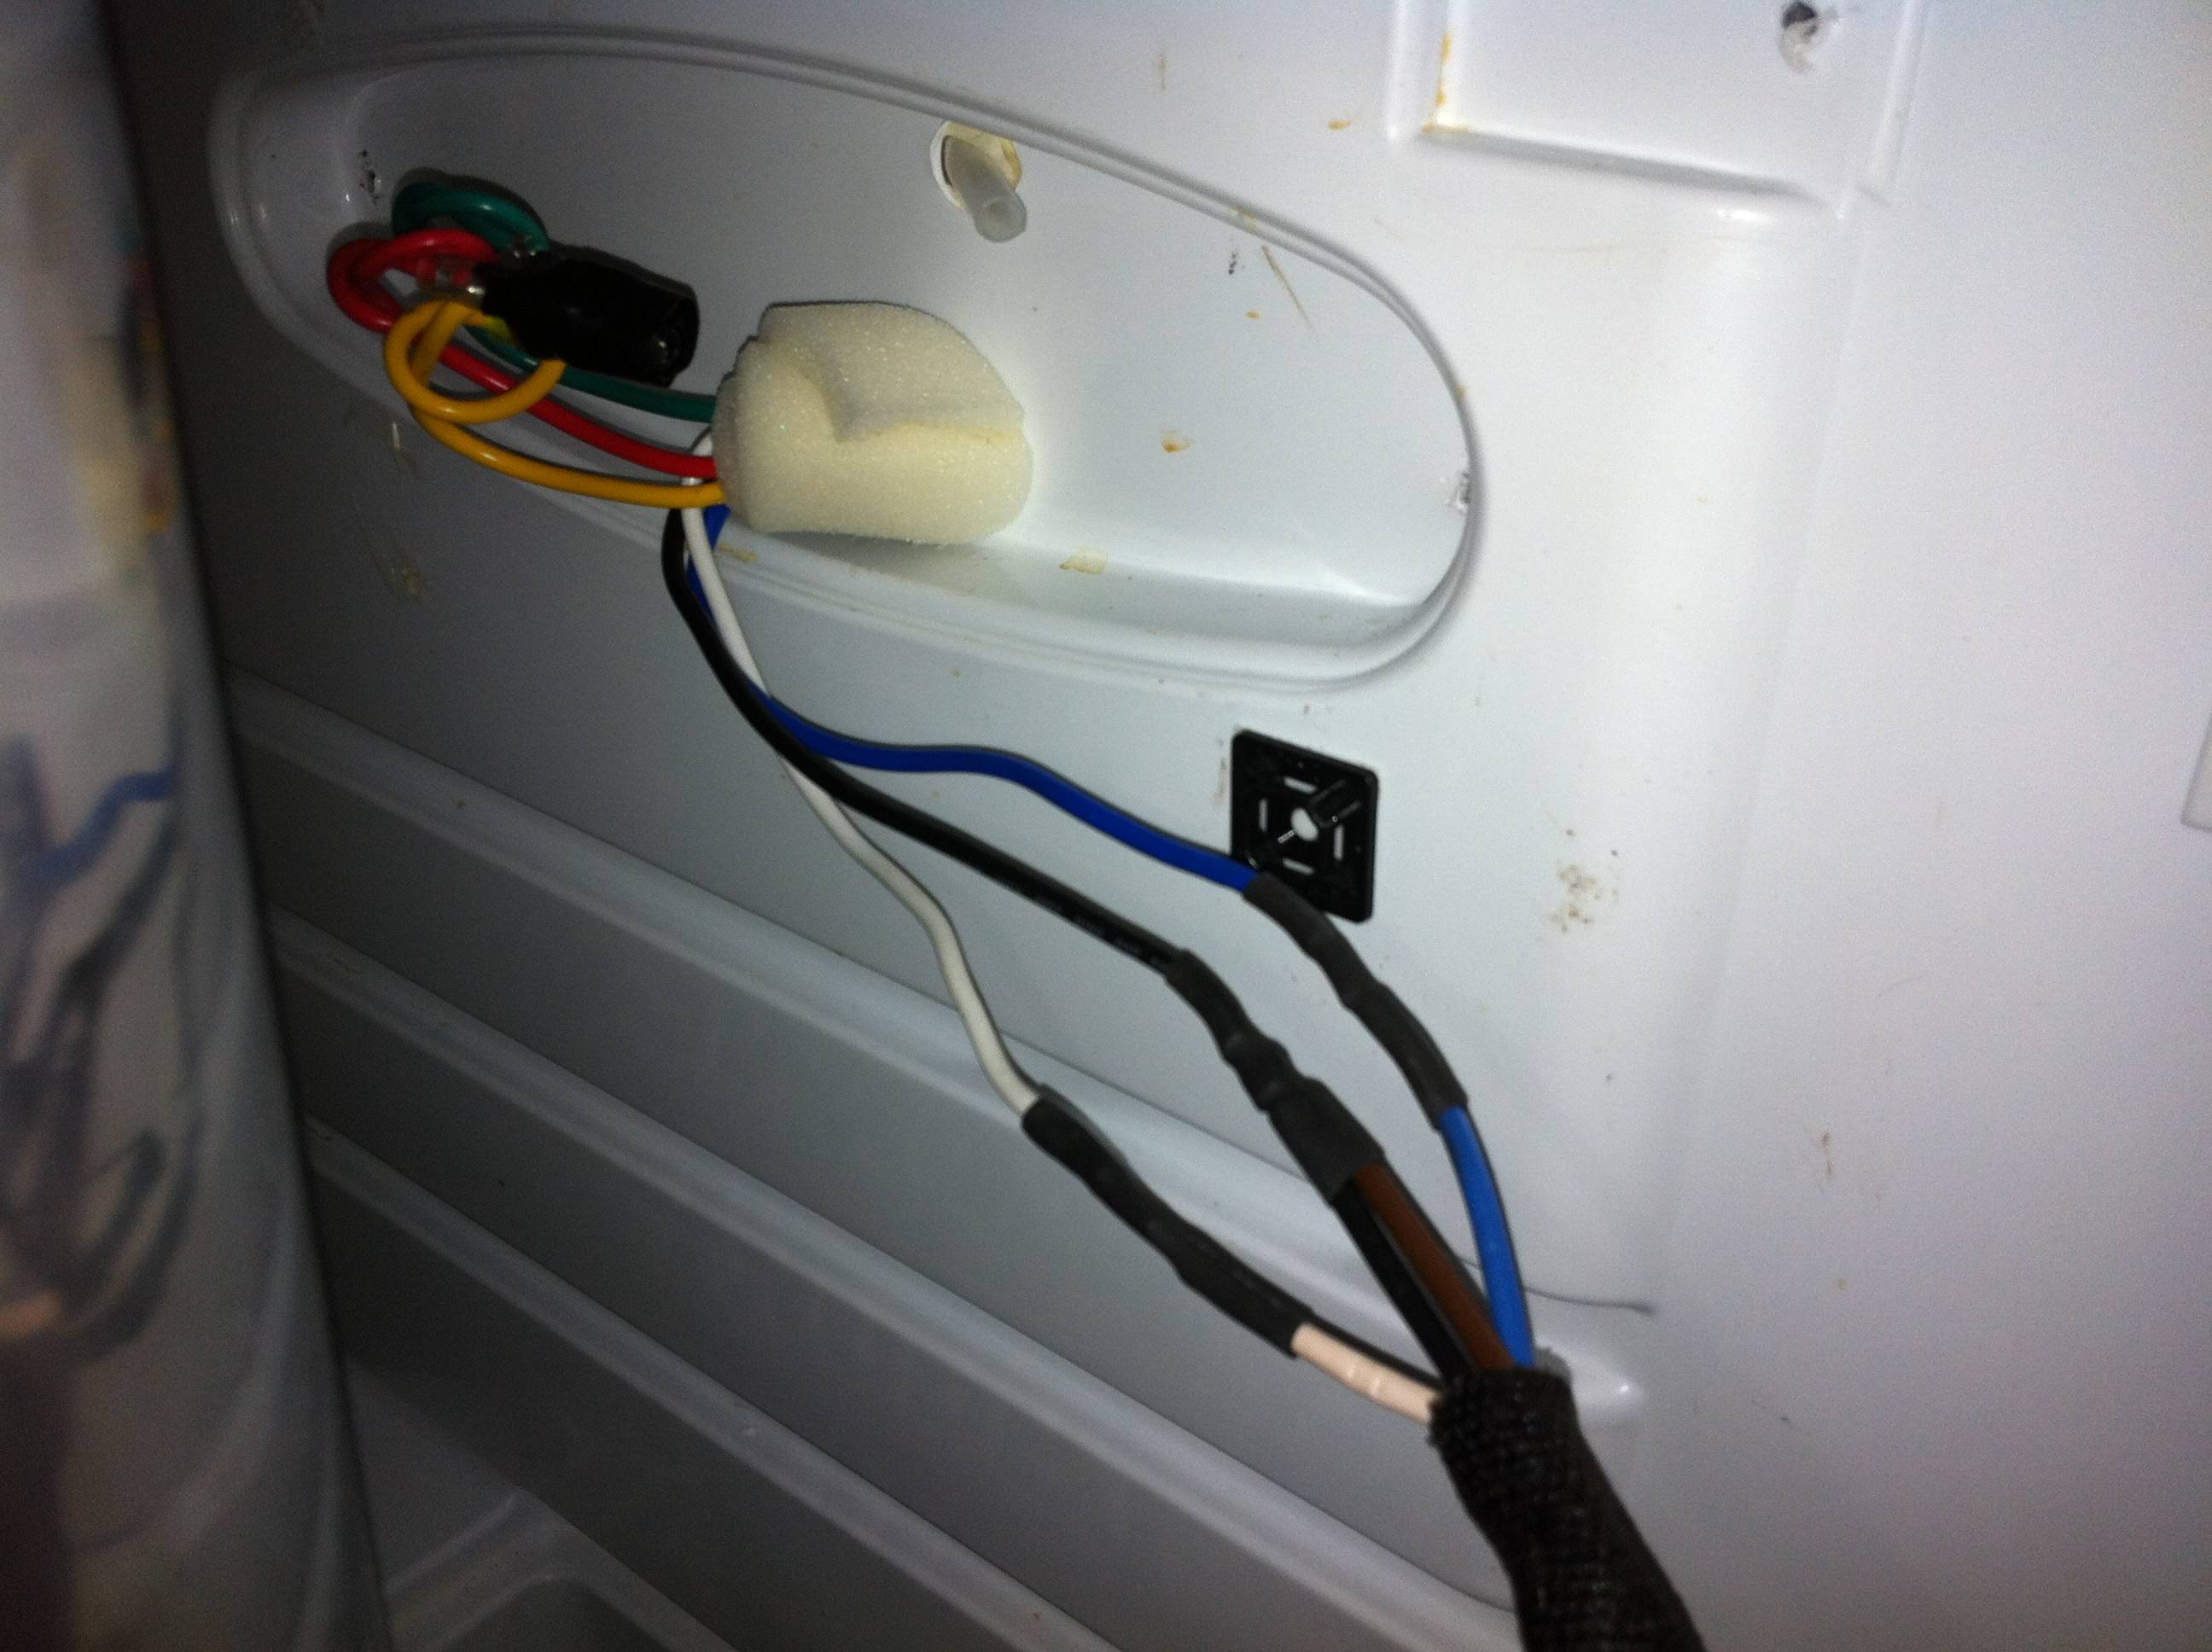
I am trying to wire this exact fridge and I cannot make out where the wires goto on the back of the controller, what gauge the wire is, and if the red, green and yellow wires are wired together and capped, or if they are unlinked and just in the same place unwired together and capped. Please help I really want o get this last step done on my fridge so I can use it next week to lager a batch of beer.
parottthead
New Member
- Joined
- Jun 11, 2013
- Messages
- 4
- Reaction score
- 1
I am planning on using this fridge, but I have an outdoor bar I built several years ago that is only about 16" deep. I am thinking of putting the fridge at the end of the bar, which would necessitate using 2 90 degree elbows to get the beer to the tap. The distance from top of fridge to bottom of tap tower is about 1 foot horizontally. Would it be worth running the lines through copper tubing or could I just insulate them?

This thread has been really awesome. I saw one of these mini's pop-up on CL in my area. I did a quick google search about converting it, and this thread showed up. So I bought the thing. I have been slowly working on, real life has not given me the time needed to sit down and complete the project. However, this weekend I should be good to go.
While shopping for materials, I ran into an issue. The expanding foam selection at my Lowes only carries one brand, DOW. I read both bottles, and even went to DOW's site to get some answers, but I could not. The bottles said that cold adversely affects the foam. Since I am going to be putting this directly into contact with the refrigerant lines, what will happen to it? Will it still be good? The other question I had, since the existing material is very dense, shouldn't I try and match that with whatever I put back?
Anyway, I want to thank everyone for contributing to this thread, and making it overflow with information. My end result will hopefully be a keggerator/fermentation chamber. The keggerator conversion seemed like the most work involved, so I started there. I have been working on using the brewpi.com setup for the fermentation side, but I'm still waiting for all my parts to come in.
While shopping for materials, I ran into an issue. The expanding foam selection at my Lowes only carries one brand, DOW. I read both bottles, and even went to DOW's site to get some answers, but I could not. The bottles said that cold adversely affects the foam. Since I am going to be putting this directly into contact with the refrigerant lines, what will happen to it? Will it still be good? The other question I had, since the existing material is very dense, shouldn't I try and match that with whatever I put back?
With the insulation, you are simply trying to match or exceed the R-value of what is in there, which I think I concluded was around R-10. I used fiberglass insulation initially because expandable foam it messy... when it's not used in a joint or enclosed area it's a free-forming mess. I say initially because when I opened the top for some design modifications a year later I found that the fiberglass had absorbed a lot of moisture off of the copper pipes. So I replaced it with foam, let it expand and harden, then trimmed it off flat. If you foam it up and put the top on, it will bulge.
I just checked a can... interesting about how it says cold will affect the insulation! That's an ass-covering statement if I ever heard one.
Dave
Never Mind. I found it after a long session of reading about 20 threads on the topic.
Geez Brother, that was ridiculously simple, after all the sweating you and I did looking at different schematics and pictures.

parottthead
New Member
- Joined
- Jun 11, 2013
- Messages
- 4
- Reaction score
- 1
When I replaced my thermostat I was able to pull all the stock parts out. But yeah cutting the tube is fine. I replaced mine with a cheap ebay thermostat. Works great!
I have an STC1000 controller that I plan to put on this fridge. I know how to configure the controller, but my question pertains to the wiring in the fridge. Mine has Blue/Black/Red going to the temp dial, with the Yellow/White going to the light. All of the posts indicate that Black is 120v in, Blue 120v to compressor, and White neutral. This all makes sense, but I was wondering what the Red is. Has anyone looked at a schematic?
Thanks!
pH
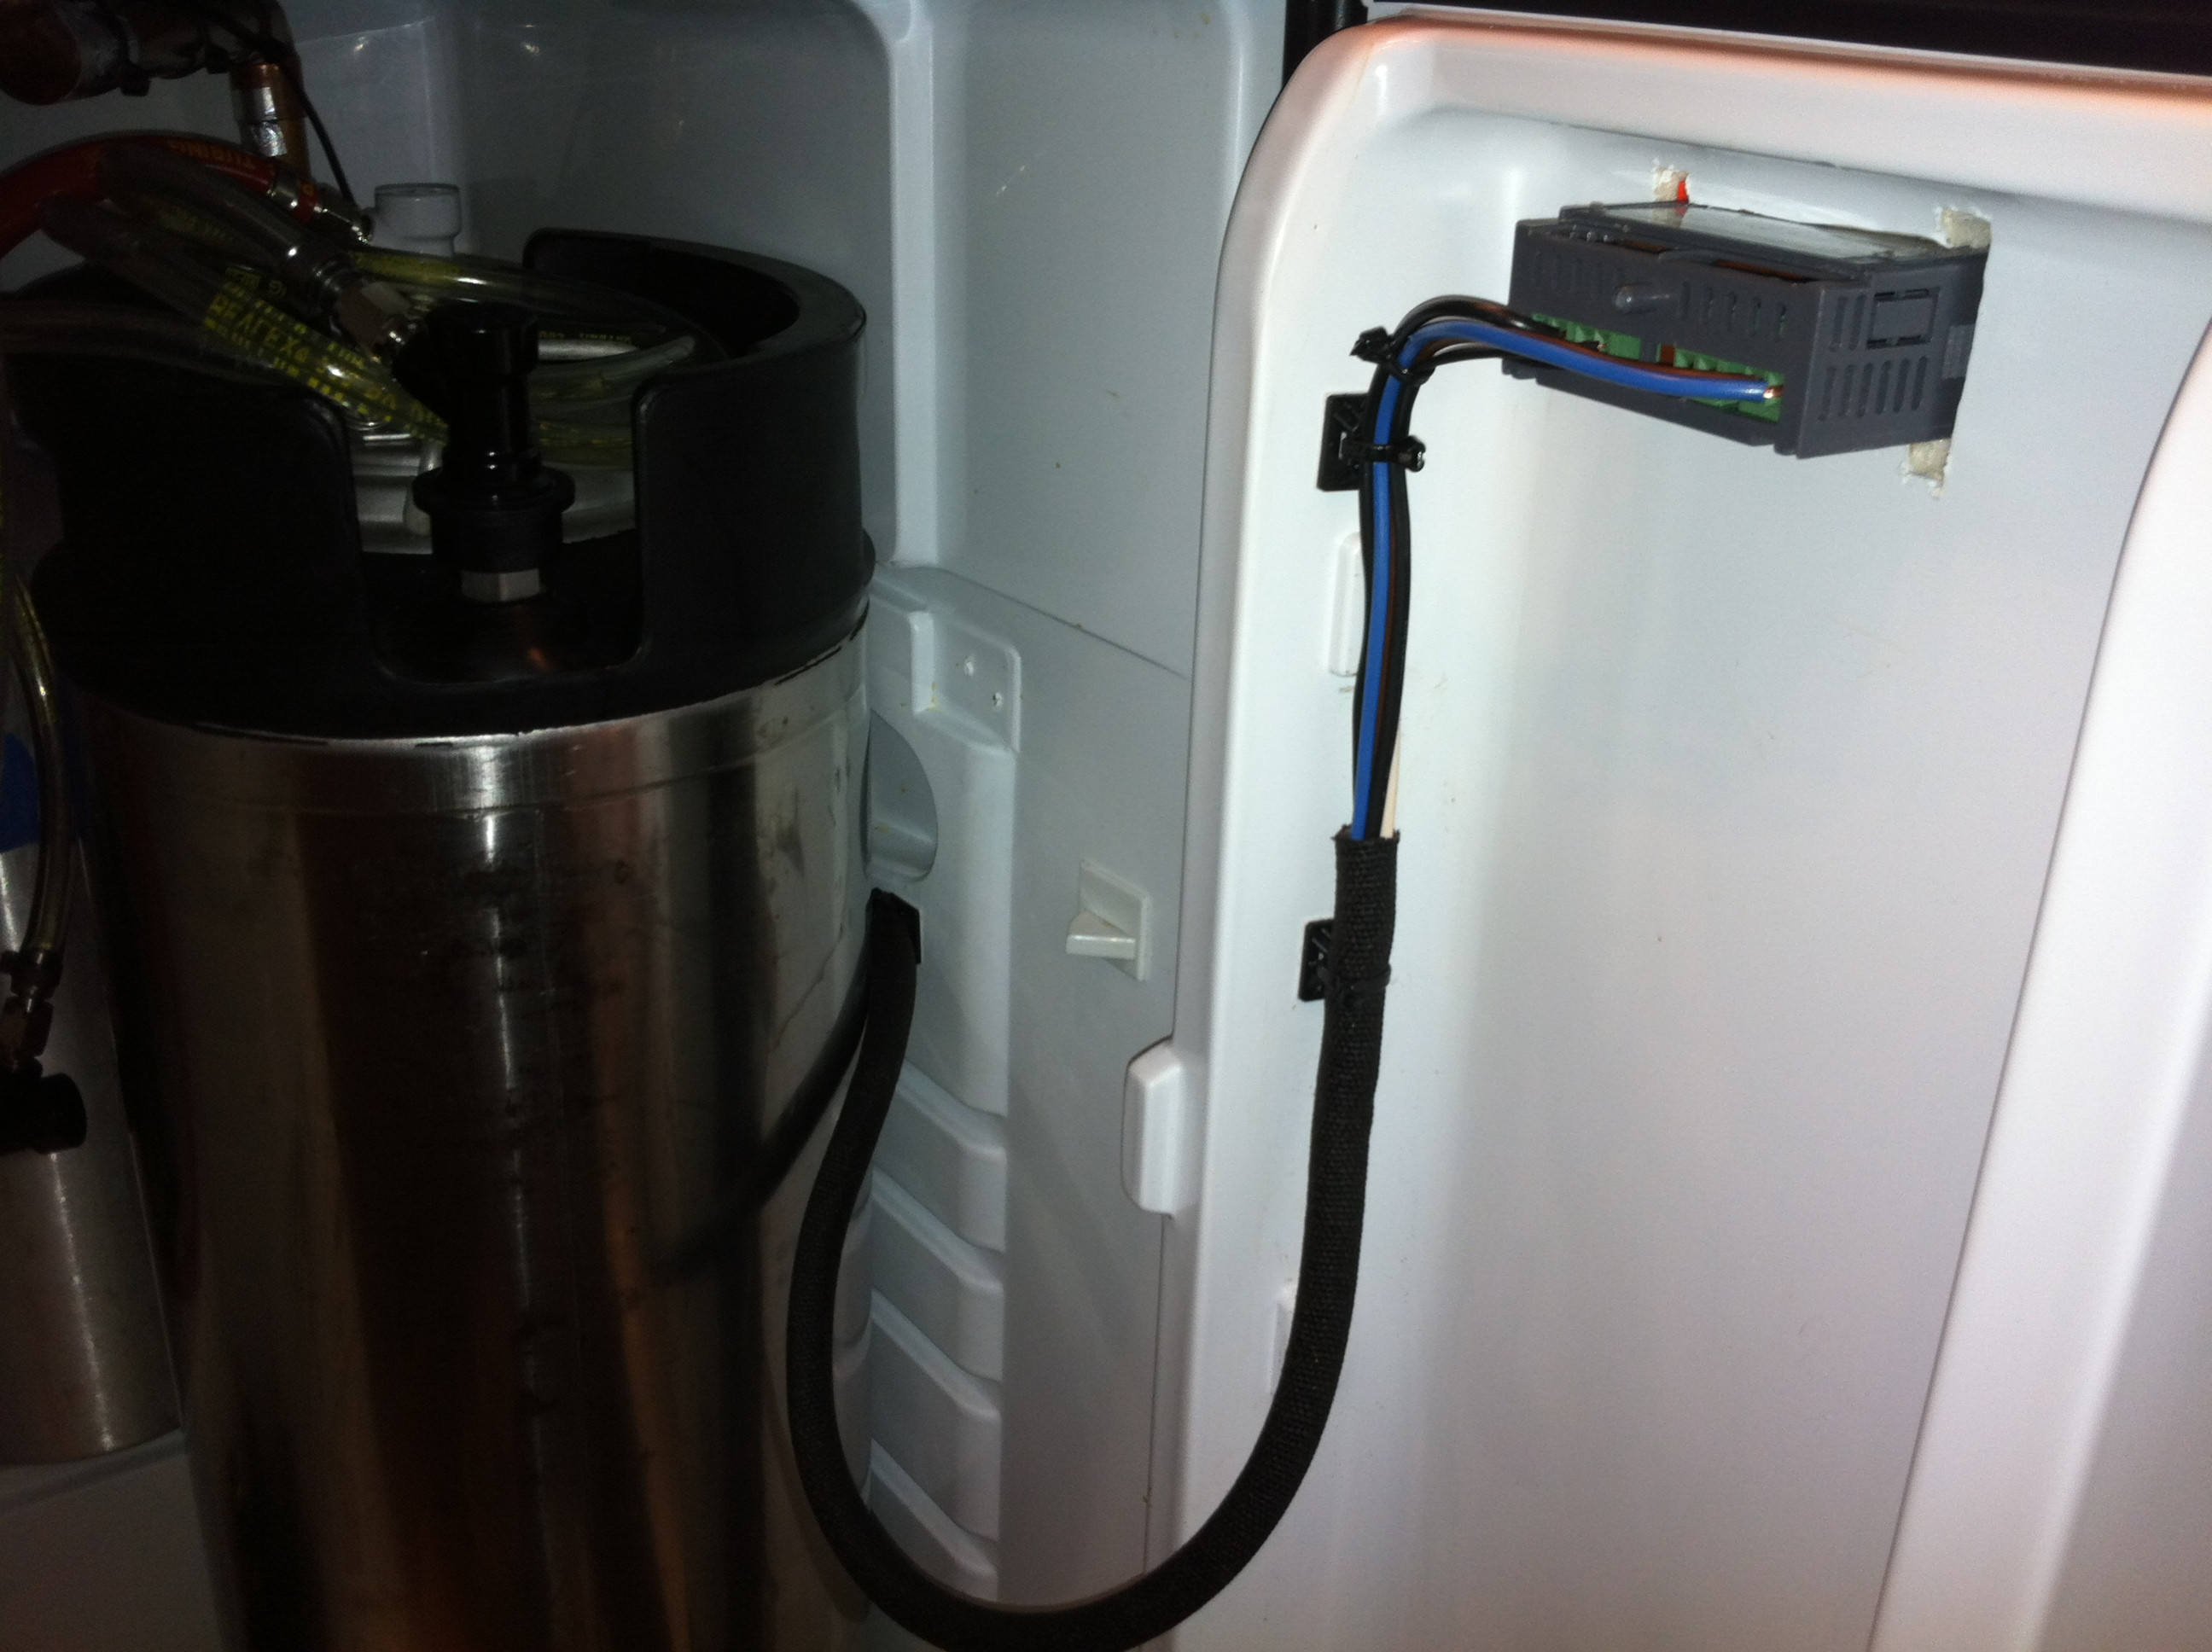
I found the post with the wiring detailed, and last night disconnected the OEM light and thermostat and installing an STC1000 in the door. It is working fine.
Geez Brother, that was ridiculously simple, after all the sweating you and I did looking at different schematics and pictures.
I know right so simple after all. And to think we were trying to reverse engineer the fridge schematics lol.
Hopefully this is the right group to ask. Has anyone had any experience using a brewpi with this type of fridge? I currently have mine setup as a kegerator, but I'm wanting to add the brewpi to it, so I can ferment my beer in it.
The brewpi uses an arduino to control two soild state relays, one for heating, and one for cooling, that will control the fridge's compressor and light blub. The light is easy, it only has two pins, however the temp controller for the fridge has 4 pins, (5 if you count the thermostat). I hooked a meter up to the system and when it is off, the red and blue lines are connected. Once power is applied, red and blue connect to the black line. So black is power in, green is ground, white is the thermometer, but what do red and blue connect to, and which lines should I connect my solid state relay to? I would like to keep this as "stock" as possible as was hoping that i could just run the SSR to the leads on the controller.
Any suggestions? (FYI, yellow and white in background goto the light fixture.)
Schultzey24
Member
- Joined
- Aug 22, 2013
- Messages
- 9
- Reaction score
- 0
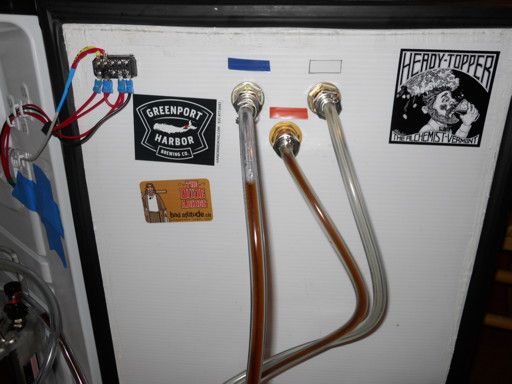
Just a couple of quick pics to show how I hacked this beast apart to get a 1/6 and corny to both fit in there, as I mentioned a few posts above. Left side gets the sixtel, the right side gets the corny.
First keg comes today. Rise Up Stout from Evolution Brewery in Delmar DE. Good stuff!


I can't figure out what is on the back wall of the first pic? This is exactly what i am trying to do this weekend! Thanks for the pics!
HowardMBeers
Well-Known Member
My fridge (this model) started making a clicking noise every minute or two and was not cooling. Turns out it was the relay that kicks the compressor on. I googled part #QP2-4.7 and bought a replacement. The replacement had three prongs instead of the single prong like the original piece, but it worked just fine when I replaced it.
Hello Everyone. First post here. Thanks for posting all the advice on how to convert this fridge. I converted mine this AM. Here are a few pictures of the process just in case folks are interested. I decided to mount the taps on the door because it's in the kitchen under the counter top.


Something you need to watch out for: The Fridgidare isn't designed to be a built-in as the evaporator coils are built inside the sidewalls. Without adequate airflow, it won't cool very well or efficiently and will probably have a short life. I have seen it installed as an undercounter but the user installed small fans to push air along the sides to make it work. Just an FYI. You did a nice job with your install!
Similar threads
- Replies
- 21
- Views
- 2K
- Replies
- 10
- Views
- 9K
- Replies
- 0
- Views
- 2K
