• Please visit and share your knowledge at our sister communities:
  • If you have not, please join our official Homebrewing Facebook Group!

    Homebrewing Facebook Group

Frigidaire Model FRC445GB Mini-Fridge Kegerator Conversion

Homebrew Talk

Help Support Homebrew Talk:

This site may earn a commission from merchant affiliate links, including eBay, Amazon, and others.
I didn't remove the inside of the door, just cut a hole for the temp controller to fit through it. Pulling back the weatherstripping, it looks like the inside plastic piece is glued in place. I'd think you could work your way around the seal and pop it off, but I'm really not sure. The door of the frigidaire doesn't come apart as easily as the ol' Sanyo's did. Inside the door is more of the foam insulation that you ran into on the top.

I get the condensation as well. I just knock off all the ice whenever I switch out a keg and it keeps it under control fairly well.

Good luck!
 
Question for those that put taps on the door.

What size faucet shaft does it take?

I was going to go with a tower, but decided I needed the top for the ice maker more than a tower:)
 
I get frost in the compact fridge while using it for bottles and cans. Switching to kegerator should reduce the moisture cause the door opens less frequently...would one of those damp rid containers eliminate the icicle problem that some are experiencing in the kegerator conversions?
 
Got mine off craigslist yesterday for $60, got two kegs and a co2 tank ready to go. Anyone know a good (cheap) place to get a regulator for the co2 tanks and a good (again cheap lol) place to buy stuff i need to put a two tap tower?
 
Nice craigslist score - I bought mine retail.

I don't know that either are super cheap, but I got my gear for the two tap tower conversion from kegconnection.com and have also had good experiences ordering stuff from kegworks.com.

When buying I'd reccomend splurging for the Perlicks. Let me know if you have any questions about the conversion - I wrote this article documenting mine and am local to you if you need help:

http://www.popularmechanics.com/technology/how-to/tips/diy-draft-step-by-step-kegerator-plans
 
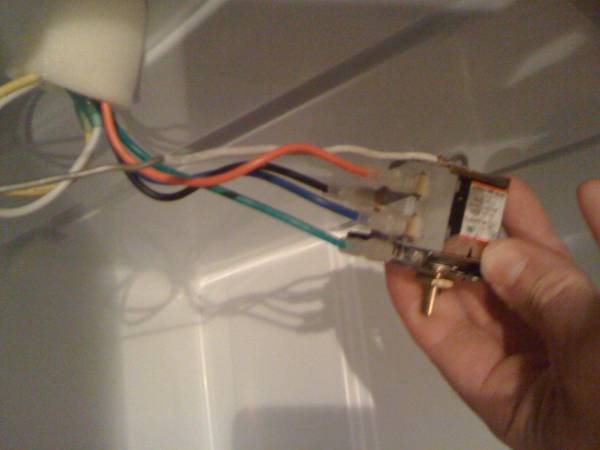
I had my thermostat pushed to the side and had to do some work on an air hose and somehow i pulled out the green and blue wire for the stock thermostat. Can anyone tell me where they go? Is the thermostat shot?

Nevermind. Quick multimeter reading showed me which was ground and which wasn't, assumed green was ground and blue was the other. Fridge is running fine now.
 
Just picked up a Frigidaire FRC445GM, same fridge. Small scratch, no key but at 130.00 not a bad deal.

Anyway gonna start assembling the parts asap. Already have the Perlick Faucets, 5lbs. CO2 and lines.... need a tower and other goodies.

Quick question. Any of you ever have an issue with the condensation and having it leak outside to the floor or the room?

Thanks and I will post pics as they get taken.
 
sorry if this has already been covered but has anyone fit 2 pinlock kegs and the 5# co2 in this fridge? I am about to buy this fridge to do the conversion and my LHBS has pinlocks for a decent price but they do not have ball locks...
 
After reading 31 pages, I don't think I saw anyone that could fit 2 commercial sixtels in this beat..

Did I miss something or can this absolutely not be done, even with door modifications?

Thanks
 
I get frost in the compact fridge while using it for bottles and cans. Switching to kegerator should reduce the moisture cause the door opens less frequently...would one of those damp rid containers eliminate the icicle problem that some are experiencing in the kegerator conversions?

Try the product Eva-Dry, I haen't gtten mine yet, but people swear by them, and they are totally renewable, you don't have to continue purchasing damprid or anything else.

FWIW, I read somewheres here that Damprid is jsut calcium chloride, or something...
 
Last edited by a moderator:
Try the product Eva-Dry, I haen't gtten mine yet, but people swear by them, and they are totally renewable, you don't have to continue purchasing damprid or anything else.

FWIW, I read somewheres here that Damprid is jsut calcium chloride, or something...

Last time I checked the fridge does not have a plug inside, much less the room for a device like this. How would this help if it was used outside the unit? doesn't make sense.

Again, Has anybody had an issue with condensation leaking out of the door gasket on the the floor outside?
 
Last edited by a moderator:
Last time I checked the fridge does not have a plug inside, much less the room for a device like this. How would this help if it was used outside the unit? doesn't make sense.

Again, Has anybody had an issue with condensation leaking out of the door gasket on the the floor outside?

They only plug in to dry out. Otherwise, they just hang up in the fridge and do their thing.
 
I have had condensation/frost trouble with my Frigidaire, but I also fabricated a cold box/collar under my bar (see my sig for link to build). I thought that it may have been a air leak somewhere, but this gives me some peace of mind that others are having the same problem. (although still doesn't solve our prolem) Water had been accumulating right at the lip where the pull out drawer would normally be. I tried a damprid container and it helped a little. I still have to sop up the water every once in a while with paper towels. I may look into that Eva dry.
 
I recently installed a Love temp controller and a fan that runs when the compressor cycles on, the fan has made a big difference in the amount of condensation and icicle formation.
 
I recently installed a Love temp controller and a fan that runs when the compressor cycles on, the fan has made a big difference in the amount of condensation and icicle formation.

Can you post pics of what you did?

I currently have the fridge plugged in and running between the #2 and #3 settings. Temp gauge in fridge has it just into the freezing food range. Cup of water has thin ice on top. I also have a little bit of condensation. I will monitor this and see if it causes a problem. I wish this would have been brought up sooner in this thread.

Yes I plan on posting some pics as soon as I have a chance, I need to clean up (re-do) my wiring, so as soon as I have the opportunity to that (I want to take photos of it) I will post a complete write-up.

I have some chest freezer work to finish first, and I'm taking some Kegs to my cousin's shop to have the tops plasma cut tomorrow. I'm also taking him to lunch (brewpub :)) for doing the work for me.

If I can get all that done, and I still have time, I might be able to re-wire the fridge and get pics up by the weekend.
 
Just picked up this fridge at the Lowes in Shakopee, MN for $99. They are sitting by the front entrance door.
 
Just picked up this fridge at the Lowes in Shakopee, MN for $99. They are sitting by the front entrance door.

Damn, I thought I did good by talking them down to 130.00.,. does it have a plug?

Anybody ever NOT re-install the light if/when the relocate the thermostat?

Do I really need a light in there?

EDIT:
I just disconnected the Light and power it up and the compressor fired up. So I guess I don't need the light.
 
sorry if this has already been covered but has anyone fit 2 pinlock kegs and the 5# co2 in this fridge? I am about to buy this fridge to do the conversion and my LHBS has pinlocks for a decent price but they do not have ball locks...

In case anyone else was wondering Pinlocks do NOT fit. One may fit if you trim the inside of the door but two will not fit side by side.
 
Damn, I thought I did good by talking them down to 130.00.,. does it have a plug?

Anybody ever NOT re-install the light if/when the relocate the thermostat?

Do I really need a light in there?

EDIT:
I just disconnected the Light and power it up and the compressor fired up. So I guess I don't need the light.

Damn, then I feel amazed by the deal I got. Two for $150! Scratch and dent at Lowes last year. One is a kegerator now (cold box extension under bar) and the other is my bottles and mixers fridge (also under bar)
 
I manged to mess up my thermostat a little bit. Any chance anyone could help me out.

I managed to pull off the blue wire, and there are 2 posts that it could go to. One is a short post that matches the other 3 where wires are hooked up. (I assume its this one) There is another post though, a longer one that is more on the outside apart from the other 4. Just want to make sure its not this one the blue wire goes to.

Also, what did you guys do with the long wire that was tethered to the inside of the fridge once you pulled it out? Its over 12" long.
 
Hope this helps.
I ALWAYS take a pic of the existing wiring BEFORE I start any job.
IMG_06292.JPG
 
Thanks for the pic.

I'm still not to sure what to do with the wire that is tethered to the thermostat. (The one that actually senses the temp) It goes into the side panel in the very front of where the thermostat is mounted so I couldn't' just flip the whole unit around. I pulled the wire out the whole way. I'm guessing I could just stick it to the wall with duct tape but think there must be a better way. I've looked through all the pics on this thread and haven't really seen a solution.
 
Well, I was going to start a new thread, but what the hell. I have the very similar Frigidaire. The one I have is the, Frigidaire FRC445GM. Well, anyone who owns one of these fridges and uses it as a kegerator should know what a tight fit it is for two corny kegs not to mention it couldn't hold a corny and a 1/6 barrel commercial sankey at the same time :mad: And in order for it to hold this 1/4 barrel of Modelo I had to prop the keg up on to a disc golf disc to avoid the bottom lip of the fridge door.

IMG_1018.jpg


IMG_1021.jpg


So the fridge door on this fridge sucks, I don't use the shelves, and it is just a pain in the @SS so I decided to take action, and luckily one of my friends let be borrow his rotary tool, so the fridge door meet its match. *YAY* :ban:

IMG_1029.jpg


Things have been working out great since the door mod, and all I need to do now is find a piece of plastic to cover it up. ;)
 
Thanks for the pic.

I'm still not to sure what to do with the wire that is tethered to the thermostat. (The one that actually senses the temp) It goes into the side panel in the very front of where the thermostat is mounted so I couldn't' just flip the whole unit around. I pulled the wire out the whole way. I'm guessing I could just stick it to the wall with duct tape but think there must be a better way. I've looked through all the pics on this thread and haven't really seen a solution.

I too pulled the whole temp lead out. I decided that function was much more important than looks so I used a tube of Dap Quick Seal bathroom adhesive to actually glue the probe around the back wall and glue the thermostat/light housing to the back wall also after extending the wires for both the light and the thermostat.

I made sure the housing was set and dried before fitting the probe around the corner and against the back wall and around the other corner. Plugged it in and compressor fires up as before and cools.

Waiting for the tower, should be here today.
 
Well, anyone who owns one of these fridges and uses it as a kegerator should know what a tight fit it is for two corny kegs not to mention it couldn't hold a corny and a 1/6 barrel commercial sankey at the same time :mad:

I was disappointed in this as well as this is exactly what I wanted to use it for. Not hard to get it to work though. A 1/6 and corny (the 8.5" one anyway) will fit with a little alteration. I used my Fein tool and cut out the sides where the freezer was. Scraped some of the foam out so it was flush with the other side rails. Now both kegs fit but the door didn't quite close. Again, chopped out a small section of the bottom most rail of the door about 8 inches wide and now it all fits like a charm.
 
I was disappointed in this as well as this is exactly what I wanted to use it for. Not hard to get it to work though. A 1/6 and corny (the 8.5" one anyway) will fit with a little alteration. I used my Fein tool and cut out the sides where the freezer was. Scraped some of the foam out so it was flush with the other side rails. Now both kegs fit but the door didn't quite close. Again, chopped out a small section of the bottom most rail of the door about 8 inches wide and now it all fits like a charm.

I have used a Fein multimaster, and that tool is awesome. That being said I just wish the price of the tool and the bits were more reasonable.
 
I have used a Fein multimaster, and that tool is awesome. That being said I just wish the price of the tool and the bits were more reasonable.

Harbor Freight's Multi tool, although not close in quality to the Fein, is what I used to trim the molded door on my Frigidaire. For 30-something bucks, can't be beat.
 
Harbor Freight's Multi tool, although not close in quality to the Fein, is what I used to trim the molded door on my Frigidaire. For 30-something bucks, can't be beat.

While I agree that the Fein tool is WAY too expensive for most DIYers and shade-tree woodworkers to afford and justify I am a firm believer of not spending the same money twice. 30 bucks vs. 400.00+ for the Fein makes other models somewhere in the middle seem more attractive. Just remember, you DO get what you pay for.

For a "One Project" tool, the 30 bucks sounds great. But I guarantee that once you own the tool, you will find more uses for it.

On a separate topic, on an earlier post it was said that the use of a roto-zip cut-out tool was used to clean out the foam where the plywood sits so it can sit flush under the top. GREAT tip.

Additionally, when you get the plastic top off, notice the "X" that is on the underside. It is a VERY subtle thicker re-enforcement for the top. Set your rot-zip for that depth + the thickness of the plywood otherwise there will be a slight rounding or bulge to the top. Also I used a router to do this. If the roto-zip kicks up as much dust as the router be warned---DO THIS OUTSIDE AND WITH A DUST MASK ON--- Not sure what the foam is made of but I am pretty sure you don't want that crap in your lungs!!! VERY fine dust all over the garage.

still waiting on the tower........ FEDEX Hurry the hell up!!!!!
 

Latest posts

Back
Top