• Please visit and share your knowledge at our sister communities:
  • If you have not, please join our official Homebrewing Facebook Group!

    Homebrewing Facebook Group

Frigidaire Model FRC445GB Mini-Fridge Kegerator Conversion

Homebrew Talk

Help Support Homebrew Talk:

This site may earn a commission from merchant affiliate links, including eBay, Amazon, and others.
Question - when you guys are moving the light... is it cutting it and rewiring it somewhere or is it simply pulling the excess wire and double sided taping it further back in the fridge? AJ in HD pulled it entirely and relocated it?

Isn't the thermostat hooked up to the same plastic unit as the light? or is it somewhere else?

I was too lazy to remove the light as Bumbler did. But the actual thermostat controls are tethered by some metal thing into the fridge. I just carefully bent the unit back just enough to fit my keg against that side. I did not remove anything other than the screws...even the cover is still there as you can see in my pic! lol
 
First things first. This is an awesome site and I love the idea of exchanging info, concepts, and ideas.

But the actual thermostat controls are tethered by some metal thing into the fridge.

The long metal thing is the temp. sensing element. It senses the temperature and sends it back to the metal box. If you are feeling adventerous you can pull it straight out. It's only about 9" long. It slips in as easy as it slips out.

Slightly :off:

This sensing element contain a small refrigerant charge that expands and contract based upon temperature. This force acts upon a small bellows attached to a switch in the metal box. When you turn the dial you are changing the amount of force needed to be applied by the sensing element to trip the switch and send power to the compressor. :drunk:

Even more:off:

If the sensing element gets broken or kinked - It is tagged and bagged. Need to get a new one.

Warning:
Stated for the obvious.
110V is dangerous.
 
It appears you found suitable spot in the side to drill a hole. Any chance you could take a picture of the side?

Sorry, for not being able to reference other posts very well yet. Still working on it.

WatereeBrew pic of side penetration.

http://i122.photobucket.com/albums/o280/willwork4fud/IMG00038-20090604-1847.jpg

see these pics for bottom penetration.

https://cdn.homebrewtalk.com/gallery/data/1/co2_tubing_inside.JPG
https://cdn.homebrewtalk.com/gallery/data/1/co2_tubing_back.JPG
 
good thing i read this before i went downstairs....the drill through the bottom idea is great. Ill be going that route.
 
I was actually thinking of running my c02 tank through the drain spout in the middle of the back shelf. Not sure if anyone has done this, but it looks like it would work great. It is definitely a tight fit to get 2 cornies, a tank, and the hoses inside of this fridge, but it is possible.
 
I was actually thinking of running my c02 tank through the drain spout in the middle of the back shelf. Not sure if anyone has done this, but it looks like it would work great. It is definitely a tight fit to get 2 cornies, a tank, and the hoses inside of this fridge, but it is possible.

I thought about running the CO2 line through the drain spout too, but I didn't want to deal with the hard plastic insert so I drilled 8" to the left. See pic.

https://cdn.homebrewtalk.com/gallery/data/1/co2_tubing_inside.JPG
 
Wow. Haven't logged in in almost 6 months and I guess my build thread has really taken off. Sorry that I never finished the build but, it looks like some people have trumped me with the top tower installations after all. My build is still half finished but, I added a tap to it. In a few weeks I will be adding the other tap. I have had no issues with the fridge at all. Maintains temperature very well. It does develop frost and condensation on the top but, this is to be expected. I just lay a towel on the bottom to absorb any unwanted moisture.

It really looks like this fridge has captured homebrewers attention with the absence of the old Sanyo model that was much more build friendly.
 
The compressor sits under the hump right? How were you sure there was nothing you were drilling into? Maybe a dumb question, but I want to be sure.

Thanks

a couple posts up he has a pic from the underside where you can double check before you drill.

co2_tubing_back.JPG

this is where i am going to put my hole as soon as i build/find a good manifold/dual regulator setup.
 
I converted mine last night, but it doesn't seem to be very cold.

I put two kegs of water in the fridge and set the thermostat to about 3 and it was cool this morning, but not cold. Certainly not cold enough to serve beer.

Could the fact that it's in a garage be an issue?
 
I converted mine last night, but it doesn't seem to be very cold.

I put two kegs of water in the fridge and set the thermostat to about 3 and it was cool this morning, but not cold. Certainly not cold enough to serve beer.

Could the fact that it's in a garage be an issue?

the higher the number the colder the fridge. My beer comes out at the serving temp that I like for a good ale...low 40s. I think it's at either 4 or 5.
 
I just tapped my first keg in this exact fridge, looks like a great idea to drill hole and run co2 line to the outside since the fridge does get a little tight with all the hoses. What size hole did you drill for the co2 line?
 
its a good choice. Keep the shelves...they come in handy if you dont have anything on tap (i know...but it happens sometimes) you can still stack a couple 6ers in there for when you go downstairs to "check on the beer"
 
Finally found the pics of this conversion. Basically, if anyone wants to convert this to a tower, but locate it towards the back, this is the way to go.
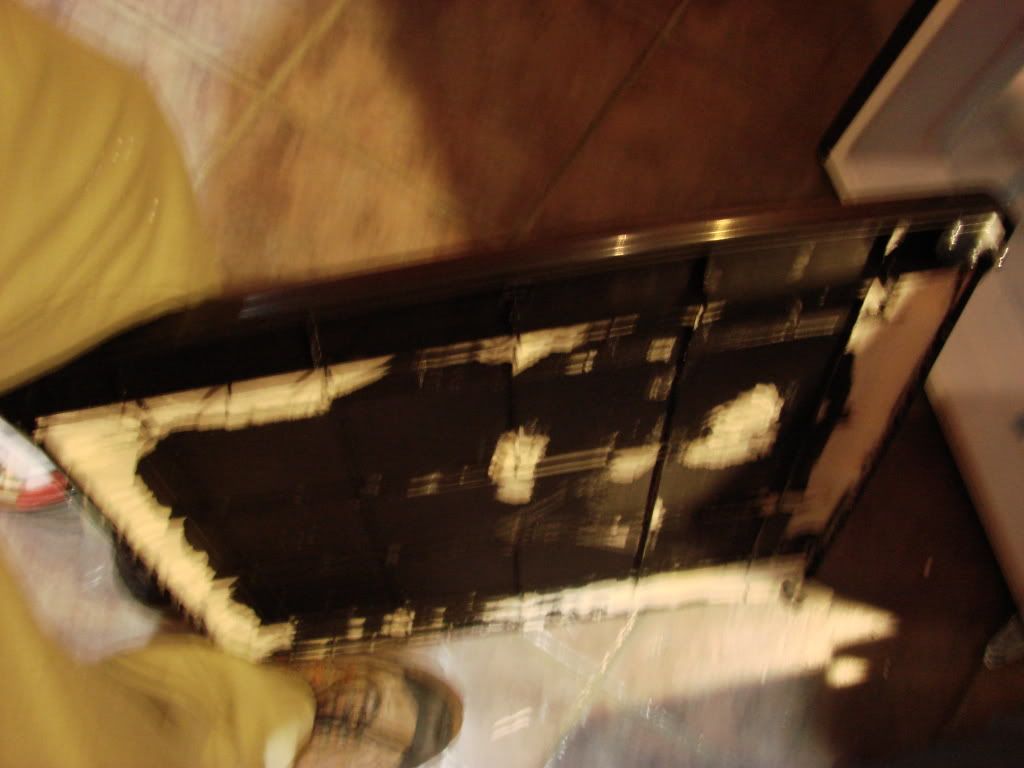
If you open the door and lift up the plastic top with minimal effort, it comes right off. You can see what the top looks like in this blurred image. just cheap plastic, and barely glued down.
DSC04038.jpg

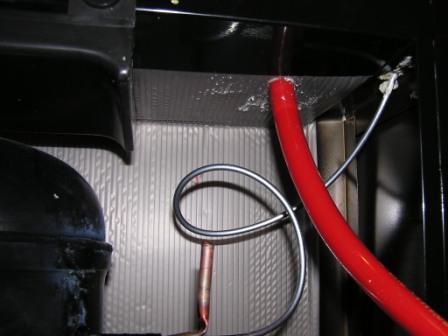
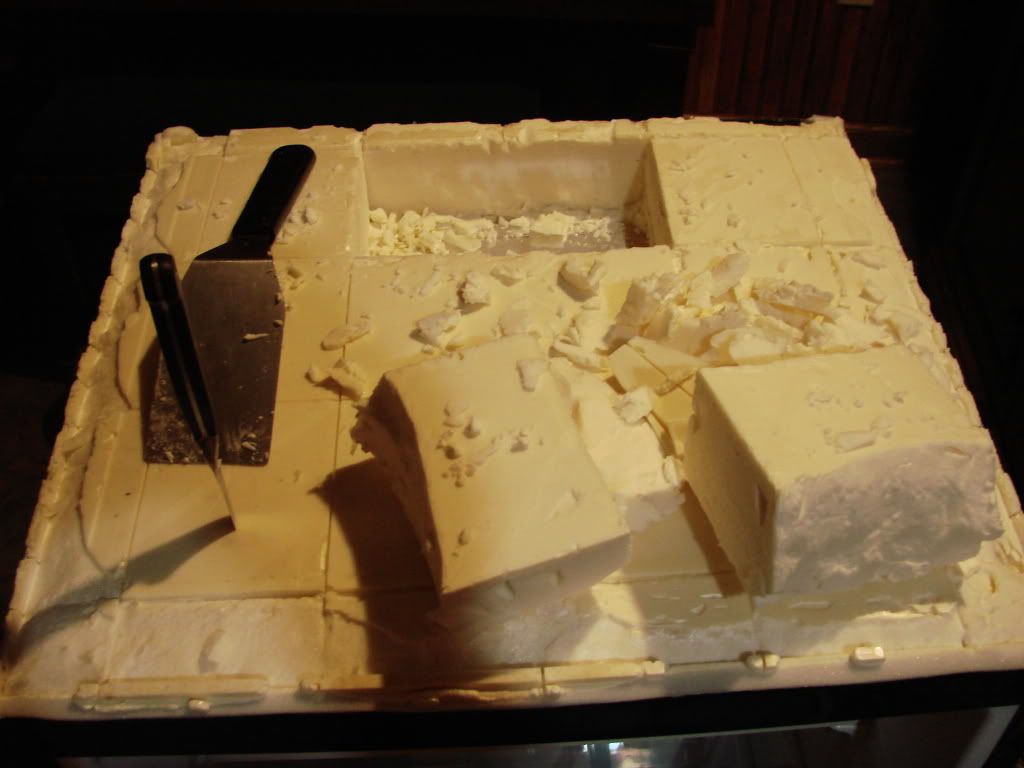
In this image you can see what you have to remove next. It is foam insulation that seems like the expandable foam type so that it is pretty well stuck to the plastic liner of the fridge. In between the foam and the inside plastic contains the coolant lines. They are wrapped around the outside of the plastic fridge liner, and secured to it with what I remember to be metal-tape. You can see them in the next pic:
DSC04036.jpg


I basically used a filet knife and a spatchula to pull out the foam where I put the tower. The foam is a good two and a half inches deep, but be very careful not to push to hard or too deep with the knife, cause if you knick a coolant line your screwed.

DSC04037.jpg


After you get all the foam out of the way, pick a spot between the coolant lines, and drill with a holesaw. Then line up the plastic top, mark and drill the top out as well. After this step, its pretty much up to you how to proceed.

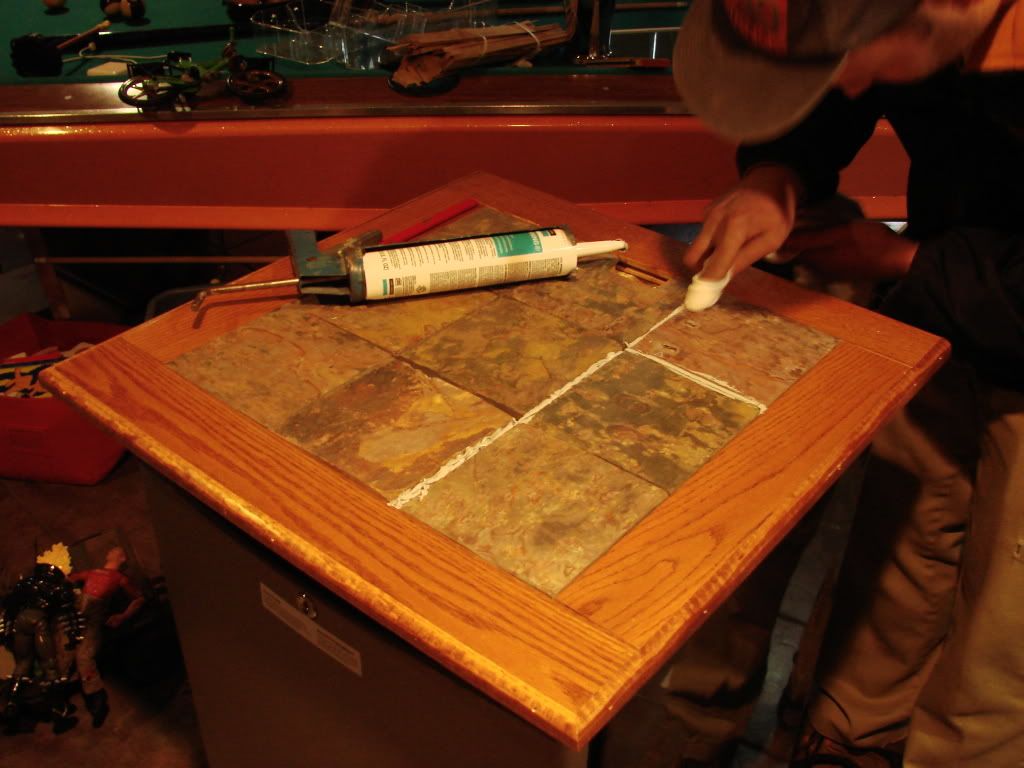
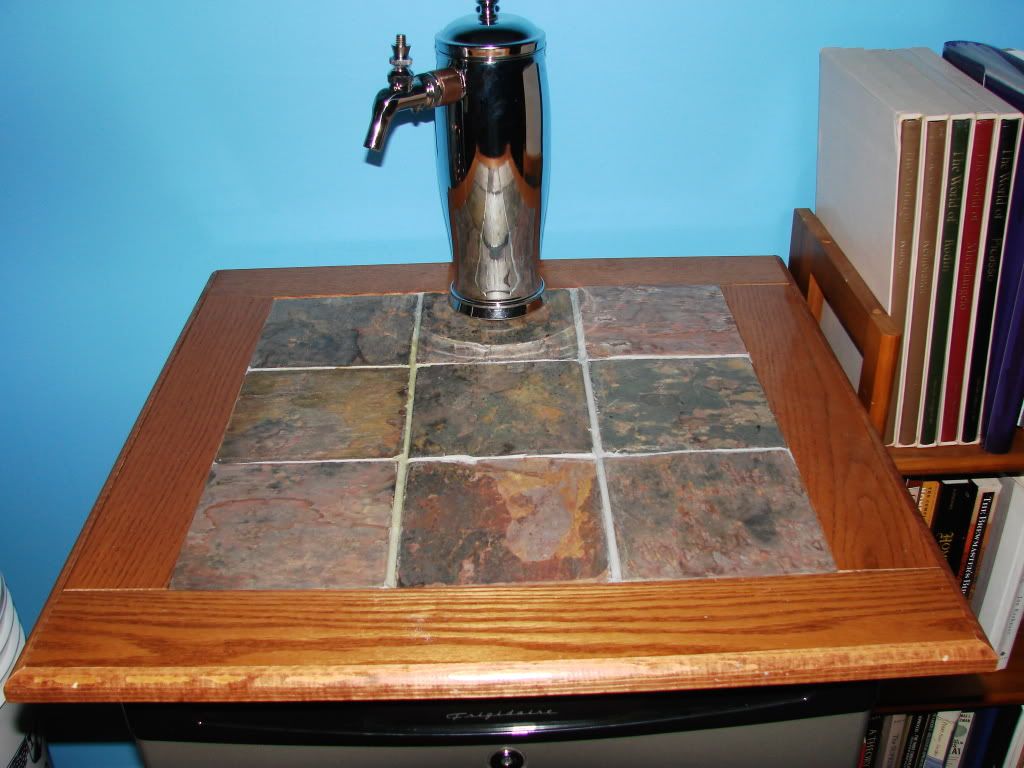
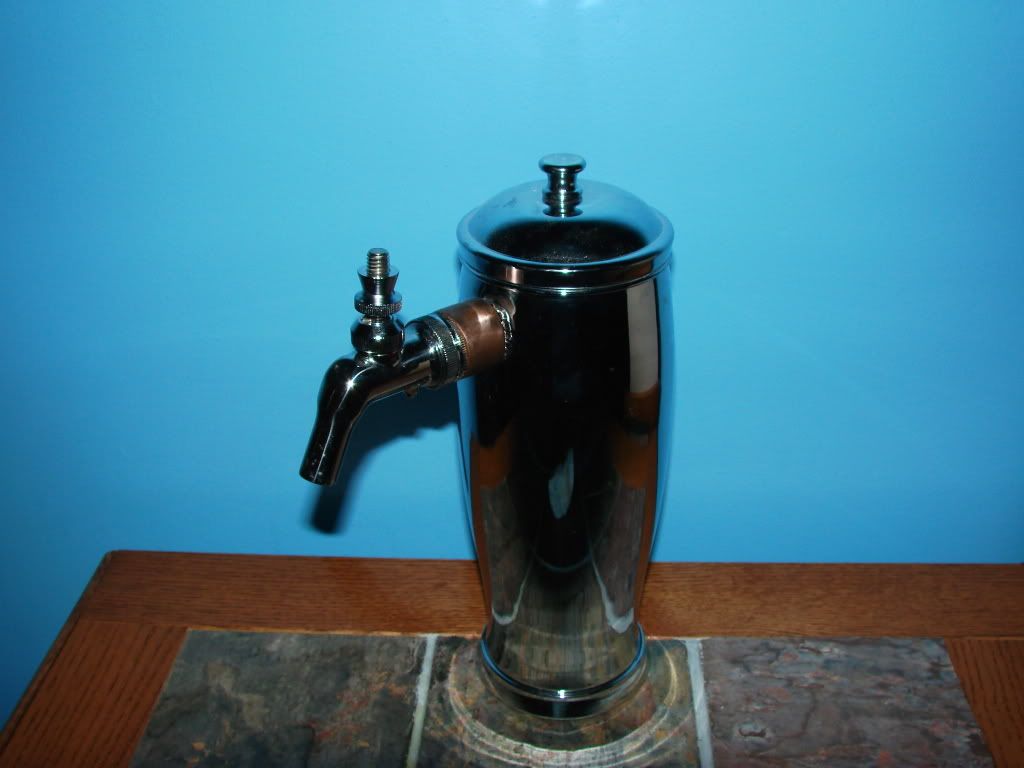
I elected to put a false top over the plastic. First I secured the plastic top back on with some heavy duty silicone. Then 5/8 plywood with the silicone. I finished up with some cultured slate tiles, oak and pine trim wrap. Custom fabbed tower screwed down to the plywood. Just have to install the second faucet next week.
DSC04039.jpg

DSC04123.jpg

DSC04129.jpg
 
Just need to clean up the finish and some of the welds. I placed my hole towards the front in the first 4" as that was the safest place to drill through. The false top fastens to the back where the stock lid screwed in. We also took off the hinge of the stock top and welded it underneath the stainless false bottom. 2 kegs fit inside (1 is inside carbing). Really simple conversion. Only thing left to do is buy some new tap handles, clean up the finger prints, and get some beer on tap!!!

Click images for larger view.

Front View with the 2 piece drip tray


2 kegs fit - 1s in the house carbing. Sadly only have water in the blue one :(


Up close view of rear panel.


Below is the rear access panel if I ever need to change lines etc...


Panel all closed up =)


Full frontal view :D

 
Very nice Kice.
You fabricated the top your self or bought it?

Good work


Thanks. The project was a joint effort between myself, my dad, and a friend of the family. It took less than a week - maybe 8 hours at most from start to finish. I'm a big fan of the brushed stainless =)
 
where the coolant lines just going back in forth on top of the fridge in a zig zag partner and is it just lines and not a coolant plate on top i would like to go in the center of the top or in the back of the top with my 3 inch and bolt bolt style tower thank u
 
made the conversion this past weekend, worked great. Followed the posted advice to dig through the insulation and find the coolant lines. I elected to use the plastic top; I just mounted a piece of plywood underneath it and used shorter bolts to attach it to the plywood. Worked like a charm, and the tower is rock solid!


Imageshack - img1267n

Good luck!
 
hey everyone just thought i would mention that this model frigidaire is on sale at Lowes right now through the first week of August for 20% off; it's around $140. i think i'll pick one up this weekend
 
I picked this up, 20% off plus my soon to be wife's employee discount :D cant complain about saving 80 bucks. I know it will fit a standard carboid if you take all the shelves out and put something in the bottom to set it up at least an inch. I have yet to see what kind of temp it maintains on the warmest setting though.
 
Well damn i just got one about 3 weeks ago for full price.
Oh well thats life. Anyway it works great and i'am happy as
a kid in a candy store when iam pouring from it. :eek:
 
Back
Top