DruBru
Member
Hey there,
So after brewing for a little over a year now I've finally got fed up with bottles and made the transition to kegging. My wife got me a chest freezer from costco for my birthday and it was the perfect candidate for my keezer. I kept it simple and made a collar out of some cedar.

I still wanted it to look somewhat nice and to provide some protection against moisture so I picked out a light stain to contrast the dark color of my freezer.


After seeing some advice on here I drilled the holes for the draft shanks on the right hand side over the compressor hump in the freezer so that getting the kegs in and out would be easier.
I attached the collar to the freezer using liquid nails and weighed it down with some full kegs and couple of beers I was fermenting.

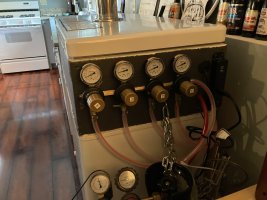
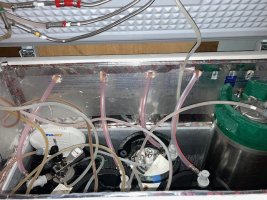
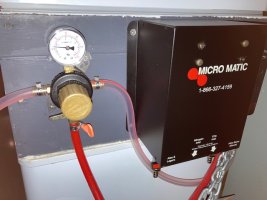
I ran into a slight problem when adding the secondary regulator. I needed a bump out because the freezer has a little ledge inward that wasn't allowing me to attach gas lines to the regulators when directly attached to the collar wall. I still am thinking about moving this to a different location in the future, but it works for now. I also glued some foam insulation to the inside of the collar to help keep temp and reduce how often the freezer needs to cycle.

Being a newbie, I didn't think too much about shank size and I went with ones that are way too long for what I needed.

I can fit 5 kegs in it, its a little less cramped with pepsi ball lock kegs, but most of my kegs are former pin lock ones that I converted to ball lock so the fit can be a bit tight. I even found a neat little PC fan that hooks up with an AC adapter so it can click on when the inkbird turns the freezer on. All the tubing is EVABarrier with Duotight connectors.

Simple inkbird controller setup, I have the thermometer sitting in a beer bottle with some vodka in it so it reads a liquid temp and not ambient temp. I was thinking about mounting the 10 pound co2 tank to the collar but I think it does just fine on the ground next to it. I went with a dual regulator here so that I have a spare line outside of the freezer that I can use to force carb in a pinch or to hookup to my counter pressure filler to purge bottles before filling them with beer. The markers on the side are for a piece of whiteboard that magnets to the lid that I use to write down whats on each tap.


All the taps are perlick with 4 of them being flow control but flow control isn't really needed with the evabarrier lines and good line length, but I got the taps on craigslist for a good deal so I figured why not. The drip tray solution sucks, my magnets I got aren't strong enough and this drip tray is a cheap one I got off amazon, this is the first upgrade I want to make to the keezer, I just need to find a better solution for the drop tray.


All in all I'm really happy with how it turned out and it works well. It was a super fun weekend project and it's an awesome feeling being able to pull a cold pint of something you've brewed yourself.

So after brewing for a little over a year now I've finally got fed up with bottles and made the transition to kegging. My wife got me a chest freezer from costco for my birthday and it was the perfect candidate for my keezer. I kept it simple and made a collar out of some cedar.
I still wanted it to look somewhat nice and to provide some protection against moisture so I picked out a light stain to contrast the dark color of my freezer.
After seeing some advice on here I drilled the holes for the draft shanks on the right hand side over the compressor hump in the freezer so that getting the kegs in and out would be easier.
I attached the collar to the freezer using liquid nails and weighed it down with some full kegs and couple of beers I was fermenting.
I ran into a slight problem when adding the secondary regulator. I needed a bump out because the freezer has a little ledge inward that wasn't allowing me to attach gas lines to the regulators when directly attached to the collar wall. I still am thinking about moving this to a different location in the future, but it works for now. I also glued some foam insulation to the inside of the collar to help keep temp and reduce how often the freezer needs to cycle.
Being a newbie, I didn't think too much about shank size and I went with ones that are way too long for what I needed.
I can fit 5 kegs in it, its a little less cramped with pepsi ball lock kegs, but most of my kegs are former pin lock ones that I converted to ball lock so the fit can be a bit tight. I even found a neat little PC fan that hooks up with an AC adapter so it can click on when the inkbird turns the freezer on. All the tubing is EVABarrier with Duotight connectors.
Simple inkbird controller setup, I have the thermometer sitting in a beer bottle with some vodka in it so it reads a liquid temp and not ambient temp. I was thinking about mounting the 10 pound co2 tank to the collar but I think it does just fine on the ground next to it. I went with a dual regulator here so that I have a spare line outside of the freezer that I can use to force carb in a pinch or to hookup to my counter pressure filler to purge bottles before filling them with beer. The markers on the side are for a piece of whiteboard that magnets to the lid that I use to write down whats on each tap.
All the taps are perlick with 4 of them being flow control but flow control isn't really needed with the evabarrier lines and good line length, but I got the taps on craigslist for a good deal so I figured why not. The drip tray solution sucks, my magnets I got aren't strong enough and this drip tray is a cheap one I got off amazon, this is the first upgrade I want to make to the keezer, I just need to find a better solution for the drop tray.
All in all I'm really happy with how it turned out and it works well. It was a super fun weekend project and it's an awesome feeling being able to pull a cold pint of something you've brewed yourself.


![Craft A Brew - Safale BE-256 Yeast - Fermentis - Belgian Ale Dry Yeast - For Belgian & Strong Ales - Ingredients for Home Brewing - Beer Making Supplies - [3 Pack]](https://m.media-amazon.com/images/I/51bcKEwQmWL._SL500_.jpg)


