Fermzilla and dry hopping

Homebrew Talk - Beer, Wine, Mead, & Cider Brewing Discussion Forum

Help Support Homebrew Talk - Beer, Wine, Mead, & Cider Brewing Discussion Forum:

This site may earn a commission from merchant affiliate links, including eBay, Amazon, and others.

Shawn Maerz

Scott
Joined
Nov 22, 2019
Messages
6
Reaction score
0
I’m fermenting a NEIPA and it calls for first addition of dry hops in two days. I am concerned about adding the hops through the bottom because of all settled trub, or should I do a trub dump? If I do a trub dump so early will it effect the fermentation by dumping all the yeast within the trub?
 
I understand I can do that but what about introducing oxygen? It is suggested to add the pellets through the cup on the bottom and to purge the pellets with CO2. I’ve had some problems with oxygen in my NEIPAs due to dry hopping
 
If you are using an "ale" yeast it is top fermenting. No worries.
Close the valve on the fermenter.
Vent out the pressure in the collection chamber. I will hope you have a carb cap on at least one of the threaded fittings. Use a cobra tap to release the pressure.
Remove the collection chamber and dump the trub.
Clean and sanitize the collection chamber.
Add hops to the chamber.
Thread it back onto the Fermzilla.
Add CO2 pressure into the collection chamber.
Vent out the pressure.
Repeat adding the CO@ and vent at least twice more.
Bring pressure up to slightly above Fermzilla pressure.
Open butterfly valve.
 
Thanks. That helps a lot. I wasn’t sure if a two day trub dump would mess up the fermentation
 
Do you guys run into issues picking up hop particulate without a screen on the floating dip tube?

I recently purchased the fermzilla all rounder, but haven't used it yet.

I've had success keg hopping (commando style no bag) with the clear beer draught system and filter screen. Was thinking I would use this assembly in the fermzilla when dry hopping in the FV.

However if you guys freeball it in the fermzilla without a screen with success then I'd rather just use the normal fermzilla assembly

Cheers!
 
I haven’t noticed much of a problem with hop particles through the fermzilla but I also use the floating dip tube I’m my kegs. I don’t see why you can’t use the clear beer draught system in the fermzilla if you’re concerned about the particles.
 
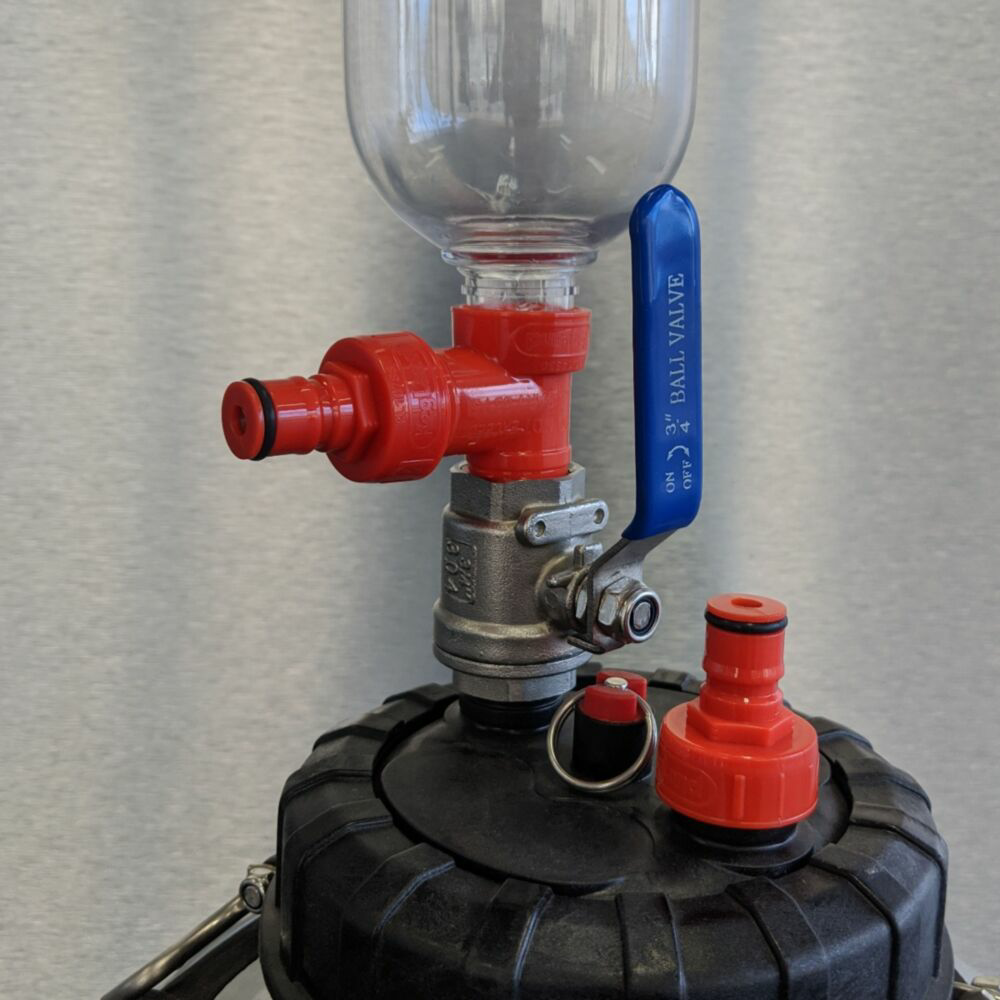
Has anyone tried putting a tee piece on one of the lid threads? Put a valve on the top and a PET bottle to that full of hops. Just dump the hops through the valve when time to dry hop and you still have a beer post on the tee piece for transfer.
I haven't tried yet but will be trying next time I brew.

Sound like a great idea! Can you post some pics of the setup when you test it out?
 
IMAG1881.jpg

Worked a treat. Close the valve, unscrew PET bottle, add hops to bottle and purge with CO2 from a Sodastream. Quickly tipped it upside down and screwed it in and then opened the valve again. Needed a few hits to the side of the bottle to get them to all drop in and it was done.
 
View attachment 704017
Worked a treat. Close the valve, unscrew PET bottle, add hops to bottle and purge with CO2 from a Sodastream. Quickly tipped it upside down and screwed it in and then opened the valve again. Needed a few hits to the side of the bottle to get them to all drop in and it was done.
Not sure what’s going on here but this set up was already on this website.

https://www.kegland.com.au/pco1881-x-pco1881-female-ball-balve-dry-hop-device-for-fermzilla.html
I saw it there last week. You affiliated?
 
If I was affiliated wouldn't I mention where to buy it? Are you affiliated?
Not at all. Just thought it was strange as I saw this last week as one of their new products, then just now stumble onto this thread where you describe the identical setup. I’m not saying you copied the idea, if anything it was the other way around based on the date of your first post...
 
No I purchased it from kegland, I went hunting for a valve to fit a PET thread and this was it. Already on the market when I thought of it.
 
It would be a good idea to drop the initial trub at this point. You may lose some yeast, but at this point its not doing much. The yeast did use some trub in growth, but its good to get rid of now if you have the capability, which you do.
 
this might be a stupid question.... but how do you purge the O2 from the coke bottle after adding the dry hops and before connecting to the fermzilla?

thinking before you screw on the contraption to the fermzilla you attach a CO2 QD to the post (keeping ball valve closed). Use a pretty high PSI (30 or so), pressurize the bottle, and gently unscrew it to let the pressurized air & CO2 escape. Do this a few times. Then screw the contraption onto the fermzilla.

Guess it won't be 100% O2 free since its not a full purge (like filling up a keg with sanitizer and dispending), but definitely way better than opening a lid an dumping hops inside. And seems like you could reattach a spunding valve directly to the contraption after the dump.

Cool stuff... thanks for putting this together! Always amazed at the creativity and innovation of homebrewers
 
Last edited:
My quick solution was to blast CO2 into the bottle and then very quickly tip it and attach it. Definitely not 100% O2 free but good enough I think. I opened the valve very slowly to keep turbulence down.
Perhaps also pressurising to the same psi as the fermenter before opening the valve would be better than this.
 
this might be a stupid question.... but how do you purge the O2 from the coke bottle after adding the dry hops and before connecting to the fermzilla?

thinking before you screw on the contraption to the fermzilla you attach a CO2 QD to the post (keeping ball valve closed). Use a pretty high PSI (30 or so), pressurize the bottle, and gently unscrew it to let the pressurized air & CO2 escape. Do this a few times. Then screw the contraption onto the fermzilla.

Guess it won't be 100% O2 free since its not a full purge (like filling up a keg with sanitizer and dispending), but definitely way better than opening a lid an dumping hops inside. And seems like you could reattach a spunding valve directly to the contraption after the dump.

Cool stuff... thanks for putting this together! Always amazed at the creativity and innovation of homebrewers
Reading the Aussie brewing forum it seems the intent was to do the following:
1. put the closed ball valve on fermenter gas post thread before fermentation
2. when ready to dry hop, fill the bottle and tee piece with the hops and somehow flip it upside down and thread it onto the closed ball valve
3. Charge the bottle with CO2 using the gas post on the tee piece
4. Release pressure by lightly unscrewing the bottle
5. Repeat as many times as you’d like to dilute the O2 out of the bottle

The pressure purging/diluting is not a great way to flush any volume of O2. It would be better if the bottle had a second gas release point at the other end. That way you could actually use the flow of gas to flush the O2 out. Maybe some special double ended bottle exists somewhere??

OK...so now who is gonna rig a double ended bottle for us? Let's complete the masterpiece!
 
Hi, I'm dying to purchase this set up in the US. I have looked everywhere and no luck. I even contacted Kegland directly. I can get carb cap and T from morebeer.com but cant fi d the valve anywhere. If some one could help point me in the right direction I would be so thankful!!!
 
I did see an exact answer to your question before this thread turned into a different topic. My apologies if I missed it.

Do you guys run into issues picking up hop particulate without a screen on the floating dip tube?

I recently purchased the fermzilla all rounder, but haven't used it yet.

I purchased the all rounder a couple months ago and did my first dry hop two weeks ago. I had no issues at all. I will add that it was not a NEIPA so I used gelatin to clarify before transfer.
 
Reading the Aussie brewing forum it seems the intent was to do the following:
1. put the closed ball valve on fermenter gas post thread before fermentation
2. when ready to dry hop, fill the bottle and tee piece with the hops and somehow flip it upside down and thread it onto the closed ball valve
3. Charge the bottle with CO2 using the gas post on the tee piece
4. Release pressure by lightly unscrewing the bottle
5. Repeat as many times as you’d like to dilute the O2 out of the bottle

The pressure purging/diluting is not a great way to flush any volume of O2. It would be better if the bottle had a second gas release point at the other end. That way you could actually use the flow of gas to flush the O2 out. Maybe some special double ended bottle exists somewhere??

Think I understand the process when dry hopping with this device..

But does anyone know how it’s intended to use the spunding valve for releasing the pressure during the fermentation if the PET ball valve is mounted on the Gas side from the beginning? I mean I guess it would not be a good idea to attach the spund to the beer carbonation cap? ☺

Why would not it be? Just use a T piece, on top a PET, on side a spunding valve. You can decide on the ball valve position, before the T or after the T.

1606562993274.png
 
I have owned and used a FermZilla since they were first introduced and think it’s a great product. Dry hopping using a CO2 purged collection container works with an ounce or so of hops. The problem is that brews requiring large amounts of dry hopping can’t be done in a FermZilla while relying on the small container.

Many of the solutions discussed in this thread to dry hopping when using the FermZilla are good ones. Unfortunately, they seem to add additional layers to the brew process allowing more steps for errors to happen. This is especially true when brewing a NEIPA that as we all know is fragile and extremely susceptible to oxidation.

Dry hoping a NEIPA involves the introduction of a large amount of hops at the tail end of fermentation. In using a FermZilla this normally involves opening the FermZilla in some way to get these hops into the beer by the methods discussed. Some of these methods create clogging problems when it comes time to keg the beer.

Allow me to share the dry hopping process I use when brewing a NEIPA in the FermZilla while keeping the brew continuously under pressure:

When the wort is first put into the FermZilla, my dry hops go in just before I close the lid. No, it’s not what you think...I don’t simply throw them in. I fill 3 or 4 small fine mesh hop bags with the hops needed for dry hopping. Into each bag goes an epoxy coated steel disk. I put the filled bags inside the FermZilla and suspend them in the airspace above the wort using 1” diameter rare earth magnets (a.k.a. neodymium magnets) placed on the outside of the FermZilla. Leave them there while the normal process of fermentation takes place. During this time, any oxygen that is present in the bags will be used by the yeast as they begin their job of fermentation. Don’t worry if the krausen touches the bags. As long as the hops are not in the wort you’re OK.

When it comes time for the hop additions to be put into the brew, slide the magnets down the outside wall and drag the bags into the wort. Doing it this way (rather than pulling the magnets off and letting the bags drop) allows the magnets to keep the bags submerged. When the time comes to remove the hops (usually in 4 or 5 days,) simply slide the magnets and bags back above the fermented beer to drain. At this point because of the added weight of the bags you will be happy that you used rare earth magnets because those suckers are strong.

As you can see, the FermZilla is never opened during this process and using a fine mesh hop bag keeps the hop solids from clogging your transfer lines. But when raising the hops, you will need to position them so that the FermZilla’s dip tube doesn’t get tangled in them allowing the tube to operate as intended.

This method requires nothing special to be assembled or large cash outlays. Neodymium magnets are available on eBay and Amazon and you probably have the bags. I do recommend that you try this with a water filled FermZilla before the first time you use it on a brew day. It will save others from having to listen to your “garage words” when learning the process for the first time.

My NEIPAs come out bright, fresh, and without the slightest hint of oxidation. And, because my NEIPAs are brewed and then transferred under pressure to my purged keg, there is no need for forced carbonation. I get a brew that is refreshing and it lasts quite a bit longer than many other NEIPAs.
 
Last edited:
I have owned and used a FermZilla since they were first introduced and think it’s a great product. Dry hopping using a CO2 purged collection container works with an ounce or so of hops. The problem is that brews requiring large amounts of dry hopping can’t be done in a FermZilla while relying on the small container.

Many of the solutions discussed in this thread to dry hopping when using the FermZilla are good ones. Unfortunately, they seem to add additional layers to the brew process allowing more steps for errors to happen. This is especially true when brewing a NEIPA that as we all know is fragile and extremely susceptible to oxydation.

Dry hoping a NEIPA involves the introduction of a large amount of hops at the tail end of fermentation. In using a FermZilla this normally involves opening the FermZilla in some way to get these hops into the beer by the methods discussed. Some of these methods create clogging problems when it comes time to keg the beer.

Allow me to share the dry hopping process I use when brewing a NEIPA in the FermZilla while keeping the brew continuously under pressure:

When the wort is first put into the FermZilla, my dry hops go in just before I close the lid. No, it’s not what you think..,.I don’t simply throw them in. I fill 3 or 4 small fine mesh hop bags with the hops needed for dry hopping. Into each bag goes an epoxy coated steel disk. I put the filled bags inside the FermZilla and suspend them in the airspace above the wort using 1” diameter rare earth magnets (a.k.a. neodymium magnets) placed on the outside of the FermZilla. Leave them there while the normal process of fermentation takes place. During this time, any oxygen that is present in the bags will be used by to yeast as they begin their job of fermentation. Don’t worry if the krausen touches the bags. As long as the hops are not in the wort you’re OK.

When it comes time for the hop additions to be put into the brew, slide the magnets down the outside wall and drag the bags into the wort. Doing it this way (rather than pulling the magnets off and letting the bags drop) allows the magnets to keep the bags submerged. When the time comes to remove the hops (usually in 4 or 5 days,) simply slide the magnets and bags back above the fermented beer to drain. At this point because of the added weight of the bags you will be happy that you used rare earth magnets because those suckers are strong.

As you can see, the FermZilla is never opened during this process and using a fine mesh hop bag keeps the hop solids from clogging your transfer lines. But when raising the hops, you will need to position them so that the FermZilla’s dip tube doesn’t get tangled in them allowing the tube to operate as intended.

This method requires nothing special to be assembled or large cash outlays. Neodymium magnets are available on eBay and Amazon and you probably have the bags. I do recommend that you try this with a water filled FermZilla before the first time you use it on a brew day. It will save others from having to listen to your “garage words” when learning the process.

My NEIPAs come out bright, fresh, and without the slightest hint of oxidation. And, because my NEIPAs are brewed and then transferred under pressure to my purged keg, there is no need for forced carbonation. I get a brew that is refreshing and it lasts quite a bit longer than other NEIPAs.

I use the same trick but magnets both inside and outside the fermzilla. The magnet on the inside is vacuum sealed in a food saver bag cut to just fit the magnet so I don’t have to worry about the magnet introducing any weird tastes.
 
I like the idea of using magnets. Thank you for the information. I will try it on my next NEIPA
 
I did a similar thing with my bucket fermenters for my last few NEIPA brews. Going to try this with my first go with the all rounder. This is the best way to go by far than all these crazy setups and chances to oxidize goes way up. Best part is no mess and no stress.

Sous Vide magnet link for inside the fermenter in a small bag with hops. No need for vacuum sealing them. Comes with 2 magnets for a DDH beer.
Amazon.com: KORE Sous Vide Weighted Magnets | Keep Food Bags Fully Submerged | Prevent Floating Bags & Undercooked Food Risks | Heavier & Better than Regular Magnets, Clips, Racks and Other Sous Vide Accessories : Home & Kitchen

Used these cheaper magnets link for outside the fermenter
Super Strong Neodymium Disc Magnets with Double-sided Adhesive, Powerful Permanent Rare Earth Magnets. Fridge, DIY, Building, Scientific, Craft, and Office Magnets, 1.26 inch D x 1/8 inch H - 12 Packs: Amazon.com: Industrial & Scientific
 
Just FYI - kegLAND (edit, and cringe...) now makes a hop-bong that fits on a 2inch TC on a new lid configuration for the fermzilla. Its a simple and inexpensive solution like all their gear. Solves the above issues.
Skip to the 20 minute mark. Vid here: Fermzilla Tri-Conical
 
Last edited:
Just FYI - kegking now makes a hop-bong that fits on a 2inch TC on a new lid configuration for the fermzilla. Its a simple and inexpensive solution like all their gear. Solves the above issues.
Skip to the 20 minute mark. Vid here: Fermzilla Tri-Conical
I’ve already put out feelers to one of my homebrew stores to let me know when the triclamp lid and accessories will be available here in Canada. Just a note, it's kegland not keg king …
 
I have owned and used a FermZilla since they were first introduced and think it’s a great product. Dry hopping using a CO2 purged collection container works with an ounce or so of hops. The problem is that brews requiring large amounts of dry hopping can’t be done in a FermZilla while relying on the small container.

Many of the solutions discussed in this thread to dry hopping when using the FermZilla are good ones. Unfortunately, they seem to add additional layers to the brew process allowing more steps for errors to happen. This is especially true when brewing a NEIPA that as we all know is fragile and extremely susceptible to oxidation.

Dry hoping a NEIPA involves the introduction of a large amount of hops at the tail end of fermentation. In using a FermZilla this normally involves opening the FermZilla in some way to get these hops into the beer by the methods discussed. Some of these methods create clogging problems when it comes time to keg the beer.

Allow me to share the dry hopping process I use when brewing a NEIPA in the FermZilla while keeping the brew continuously under pressure:

When the wort is first put into the FermZilla, my dry hops go in just before I close the lid. No, it’s not what you think...I don’t simply throw them in. I fill 3 or 4 small fine mesh hop bags with the hops needed for dry hopping. Into each bag goes an epoxy coated steel disk. I put the filled bags inside the FermZilla and suspend them in the airspace above the wort using 1” diameter rare earth magnets (a.k.a. neodymium magnets) placed on the outside of the FermZilla. Leave them there while the normal process of fermentation takes place. During this time, any oxygen that is present in the bags will be used by the yeast as they begin their job of fermentation. Don’t worry if the krausen touches the bags. As long as the hops are not in the wort you’re OK.

When it comes time for the hop additions to be put into the brew, slide the magnets down the outside wall and drag the bags into the wort. Doing it this way (rather than pulling the magnets off and letting the bags drop) allows the magnets to keep the bags submerged. When the time comes to remove the hops (usually in 4 or 5 days,) simply slide the magnets and bags back above the fermented beer to drain. At this point because of the added weight of the bags you will be happy that you used rare earth magnets because those suckers are strong.

As you can see, the FermZilla is never opened during this process and using a fine mesh hop bag keeps the hop solids from clogging your transfer lines. But when raising the hops, you will need to position them so that the FermZilla’s dip tube doesn’t get tangled in them allowing the tube to operate as intended.

This method requires nothing special to be assembled or large cash outlays. Neodymium magnets are available on eBay and Amazon and you probably have the bags. I do recommend that you try this with a water filled FermZilla before the first time you use it on a brew day. It will save others from having to listen to your “garage words” when learning the process for the first time.

My NEIPAs come out bright, fresh, and without the slightest hint of oxidation. And, because my NEIPAs are brewed and then transferred under pressure to my purged keg, there is no need for forced carbonation. I get a brew that is refreshing and it lasts quite a bit longer than many other NEIPAs.


I do the same with sous vide magnets. Where did you get the epoxy disks? How do you know they're food safe?
 
Back
Top