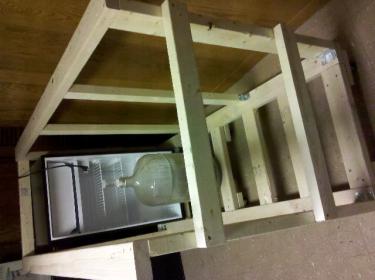
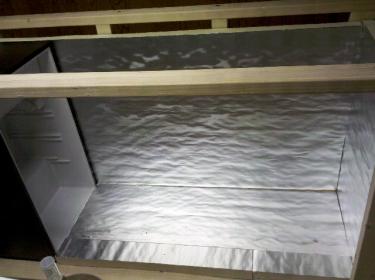
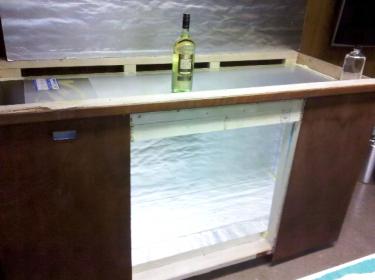
The wires are tied in with the fridge (the normally open contacts). So when the normally open contacts close, which will now turn on the fridge and the fan. Once it hits it set point it opens the contacts and deenergizes the fridge and fan.
You are using an out of date browser. It may not display this or other websites correctly.
You should upgrade or use an alternative browser.
You should upgrade or use an alternative browser.
fermentation chamber build. in progress!
- Thread starter Bucks-04
- Start date

Help Support Homebrew Talk:
This site may earn a commission from merchant affiliate
links, including eBay, Amazon, and others.
stratslinger
Well-Known Member
I like the design a lot - looks very similar, if slightly smaller, than the one I just started building. Also - I love the idea of the plastic lining. Definitely going to have to try to steal that idea. Is the stuff difficult to rough cut down to size? I'd hate to drag my trailer all the way down to HD just for a thin sheet of plastic...
Also, one other question, as I'm a little unsure how crazy to go with my chamber: how much did you insulate the top? My plan calls for 1" of rigid foam inside the 2x4 frame and then another 1" of foam inside that - but I can already tell it's going to be a bear to get inside to mount that inside chunk of foam on the top of the chamber...
Also, one other question, as I'm a little unsure how crazy to go with my chamber: how much did you insulate the top? My plan calls for 1" of rigid foam inside the 2x4 frame and then another 1" of foam inside that - but I can already tell it's going to be a bear to get inside to mount that inside chunk of foam on the top of the chamber...
Chuginator
Well-Known Member
- Joined
- Feb 14, 2011
- Messages
- 477
- Reaction score
- 61
Nice! Good work!
I like the design a lot - looks very similar, if slightly smaller, than the one I just started building. Also - I love the idea of the plastic lining. Definitely going to have to try to steal that idea. Is the stuff difficult to rough cut down to size? I'd hate to drag my trailer all the way down to HD just for a thin sheet of plastic...
Also, one other question, as I'm a little unsure how crazy to go with my chamber: how much did you insulate the top? My plan calls for 1" of rigid foam inside the 2x4 frame and then another 1" of foam inside that - but I can already tell it's going to be a bear to get inside to mount that inside chunk of foam on the top of the chamber...
The plastic wasnt hard. Used a utility knife, a straight edge to hold the utility knife against to get a nice straight cut, and scrap wood underneath the plastic to prevent the blade from hitting the concrete and dulling it.
I have an 1.5" of insulation all around and it seems to work pretty good. The more insulation the less the compressor has to work. It was hard putting in the insulation, tedious trying to get straight pieces and a good fit. The better fit the less you will have to fill the voids.
The wires are tied in with the fridge (the normally open contacts). So when the normally open contacts close, which will now turn on the fridge and the fan. Once it hits it set point it opens the contacts and deenergizes the fridge and fan.
I have no experience with building one of these, but would that be sending 120v to a 12v fan? (I assume not... so help me understand) I ask because I will be building one of these in the near future.. Thanks.
I have no experience with building one of these, but would that be sending 120v to a 12v fan? (I assume not... so help me understand) I ask because I will be building one of these in the near future.. Thanks.
I went to radio shack and bought a 120v AC fane for 20$. Some people us a DC fan but it requires more things to be plugged in and I wanted a clean look with wiring.
The love controller (temperature controller) is powered by 120V AC which pretty much acts like a light switch. All the love controller is doing is cyclying the power on and off to the fridge when it reaches the set points. The same wires that go to the refrigerator from the love controller I put jumper wires and also fed it to the fan. So whenever the fridge gets the power to turn on so does the fan.
I hope that helps with the idea of how it works. There are a lot of threads on here on how to wire which is the same thing I did except for putting in the additional jumpers to thr fan.

$10.99 ($31.16 / Ounce)
Hornindal Kveik Yeast for Homebrewing - Mead, Cider, Wine, Beer - 10g Packet - Saccharomyces Cerevisiae - Sold by Shadowhive.com
Shadowhive

$44.99
$49.95
Craft A Brew - Mead Making Kit – Reusable Make Your Own Mead Kit – Yields 1 Gallon of Mead
Craft a Brew

$159.50 ($26.58 / Count)
3M High Flow Series System BREW120-MS, 5616001, For Brewed Coffee and Hot Tea, Valve-in-Head Design
Amazon.com

$58.16
HUIZHUGS Brewing Equipment Keg Ball Lock Faucet 30cm Reinforced Silicone Hose Secondary Fermentation Homebrew Kegging Brewing Equipment
xiangshuizhenzhanglingfengshop

$28.98
Five Star - 6022b_ - Star San - 32 Ounce - High Foaming Sanitizer
Great Fermentations of Indiana

$20.94
$29.99
The Brew Your Own Big Book of Clone Recipes: Featuring 300 Homebrew Recipes from Your Favorite Breweries
Amazon.com

$76.92 ($2,179.04 / Ounce)
Brewing accessories 1.5" Tri Clamp to Ball Lock Post Liquid Gas Homebrew Kegging Fermentation Parts Brewer Hardware SUS304 Brewing accessories(Gas Hose Barb)
chuhanhandianzishangwu

$479.00
$559.00
EdgeStar KC1000SS Craft Brew Kegerator for 1/6 Barrel and Cornelius Kegs
Amazon.com

$176.97
1pc Commercial Keg Manifold 2" Tri Clamp,Ball Lock Tapping Head,Pressure Gauge/Adjustable PRV for Kegging,Fermentation Control
hanhanbaihuoxiaoshoudian

$53.24
1pc Hose Barb/MFL 1.5" Tri Clamp to Ball Lock Post Liquid Gas Homebrew Kegging Fermentation Parts Brewer Hardware SUS304(Liquid Hose Barb)
Guangshui Weilu You Trading Co., Ltd

$719.00
$799.00
EdgeStar KC2000TWIN Full Size Dual Tap Kegerator & Draft Beer Dispenser - Black
Amazon.com

$7.79 ($7.79 / Count)
Craft A Brew - LalBrew Voss™ - Kveik Ale Yeast - For Craft Lagers - Ingredients for Home Brewing - Beer Making Supplies - (1 Pack)
Craft a Brew

$53.24
1pc Hose Barb/MFL 1.5" Tri Clamp to Ball Lock Post Liquid Gas Homebrew Kegging Fermentation Parts Brewer Hardware SUS304(Liquid Hose Barb)
yunchengshiyanhuqucuichendianzishangwuyouxiangongsi

$22.00 ($623.23 / Ounce)
AMZLMPKNTW Ball Lock Sample Faucet 30cm Reinforced Silicone Hose Secondary Fermentation Homebrew Kegging joyful
无为中南商贸有限公司

$33.99 ($17.00 / Count)
$41.99 ($21.00 / Count)
2 Pack 1 Gallon Large Fermentation Jars with 3 Airlocks and 2 SCREW Lids(100% Airtight Heavy Duty Lid w Silicone) - Wide Mouth Glass Jars w Scale Mark - Pickle Jars for Sauerkraut, Sourdough Starter
Qianfenie Direct
Ok, so it was a 120v fan... i must of misread previously. Thanks!
Someone earlier said 12v, which I did say DC fans and then changed my mind during the build and put in an AC fan.
stratslinger
Well-Known Member
Another question occurs to me: what tool did you use to cut the rigid insulation down to size? Hacksaw with a fine blade, or something else entirely?
Another question occurs to me: what tool did you use to cut the rigid insulation down to size? Hacksaw with a fine blade, or something else entirely?
I used an utility knife. I don't know if it is the same insulation that you are using but I used RMax insulation. I got it at home depot. If you don't use the plastic sheet to cover the insulation I was told to have the shiny side in to reflect back into the chamber.
Hey bucks. What love controller did you get? Just picked up a mini fridge today on cl and going to try building this weekend. Thanks.
http://www.amazon.com/dp/B003NV8BKY/?tag=skimlinks_replacement-20
This is what I got and where I got it. I also got the 5' temperature probe to go with it.
Last edited by a moderator:
Bucks-04 said:Video Link: http://www.amazon.com/Temperature-Controller-Thermistor-110V-deg/dp/B003NV8BKY/ref=sr_1_11?ie=UTF8&qid=1309301284&sr=8-11
This is what I got and where I got it. I also got the 5' temperature probe to go with it.
Great thanks.
Last edited by a moderator:
Looks awesome! Are you putting one door one it? Door was fun figuring out how to insulate it with the hinges on the inside and having to insulatearound them.
If mine was bigger I was debating on putting a sliding shelf on the inside so that I could load a carby on it and then push it in the bag. I thought it was going to be hard to push a full car boy around. Then I went small so I didn't have to worry about it.
Also a note on the love controller, to have patience. At least mine too a couple of minutes to figure out the temp and turn on the fridge and fan. At first I thought it was broke.
Cant wait to see the progress.
Bucks-04 said:Looks awesome! Are you putting one door one it? Door was fun figuring out how to insulate it with the hinges on the inside and having to insulatearound them.
If mine was bigger I was debating on putting a sliding shelf on the inside so that I could load a carby on it and then push it in the bag. I thought it was going to be hard to push a full car boy around. Then I went small so I didn't have to worry about it.
Also a note on the love controller, to have patience. At least mine too a couple of minutes to figure out the temp and turn on the fridge and fan. At first I thought it was broke.
Cant wait to see the progress.
Haven't figured the door out yet. A little drunk and pain killers are kicking in.
Sliding thingy sounds cool.
Yeah door is going to be tricky.
Thanks for the info on the controller.
Thanks again.
Hey bucks. What do think about this. I'll make a door on the opposite side of the fridge. The door would swing up. I'll make a track system so I can pull out the carboys as needed. See any problems with this idea? Thanks.
Hey bucks. What do think about this. I'll make a door on the opposite side of the fridge. The door would swing up. I'll make a track system so I can pull out the carboys as needed. See any problems with this idea? Thanks.
Sounds like an idea that would work. You would just put the ones that would finish fermenting towards the front. I love the sliding shelf idea, mine was to small and no need.
If you went track system I would make sure it would be able to handle all the weight. The last thing you would want is like a year down the road and the track system failed. Now you would have to crawl inside it and then jimmy it out.
Also think about where you are going to pace the fermentation chamber. You wouldn't be able to put it in the corner because you wouldn't be able to cover the back of the fridge and you would need to get in it. So that is something to think about.
The door thing would work. How were you thinking of propping it up?
Also would the shelf slide out or just bring the carboy from the back to front? I would suggest just back to front because then you wouldn't have to worry about supporting the shelf when it comes out of the fermentor.
Still haven't figured the door or track system yet but figured I had to do something.
Looks nice and clean. Can't wait to see your ideas and how your going to incorperate them.
The wife just gave me the green light for a kegerator and wine rack bar but that won't happen for a while. I'm really thinking about trying out wine making.
stratslinger
Well-Known Member
In the military eh? What branch?
Also, thanks for your service, in addition to the ideas you gave me for my chamber!
Also, thanks for your service, in addition to the ideas you gave me for my chamber!
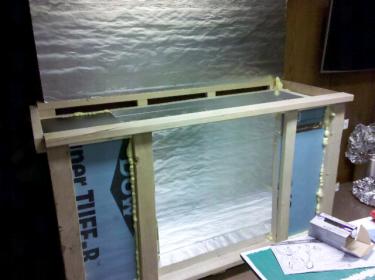
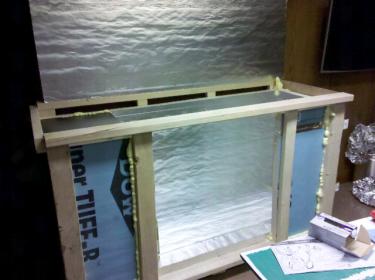
A little progress. Went crazy with that yellow foaming stuff. Just need another acrylic sheet for the top and then I can close it up. However still stuck on door? Swing out from center two doors, 1 big door, swing up, or swing down? Choices choices.


In the military eh? What branch?
Also, thanks for your service, in addition to the ideas you gave me for my chamber!
I'm in the Navy.
Your welcome. This site is awesome for ideas, a lot of useful resources.
A little progress. Went crazy with that yellow foaming stuff. Just need another acrylic sheet for the top and then I can close it up. However still stuck on door? Swing out from center two doors, 1 big door, swing up, or swing down? Choices choices.
Looks good. I think my biggest decision was with the door and how to insulate. The door was my biggest weak point but now I think it is pretty strong with the insertt i built for it. I like the air gap you put in from insulation. I read on someones build how that is better and provides more insulation. Wish I would of done it.
mikeysab
Well-Known Member
Wow, I wish mine looked like that. No wood on mine and my door is just a piece of styro held in place with magnets. I'd be ashamed to post pics of it. But it gets the job done fo sho
Similar threads
- Replies
- 17
- Views
- 1K


![Craft A Brew - Safale BE-256 Yeast - Fermentis - Belgian Ale Dry Yeast - For Belgian & Strong Ales - Ingredients for Home Brewing - Beer Making Supplies - [3 Pack]](https://m.media-amazon.com/images/I/51bcKEwQmWL._SL500_.jpg)


