FastFerment conical fermenter??????

Homebrew Talk - Beer, Wine, Mead, & Cider Brewing Discussion Forum

Help Support Homebrew Talk - Beer, Wine, Mead, & Cider Brewing Discussion Forum:

This site may earn a commission from merchant affiliate links, including eBay, Amazon, and others.
You were right, SG said it was done. Thanks, saved me from doing a ton of doing the wrong thing.

I am glad to help you. I learned the hard way. When I was still using buckets, I would panic and do anything from shaking the bucket to needlessly repitching. Then I researched it and it all made sense. I had to learn to trust my yeasty minions.
 
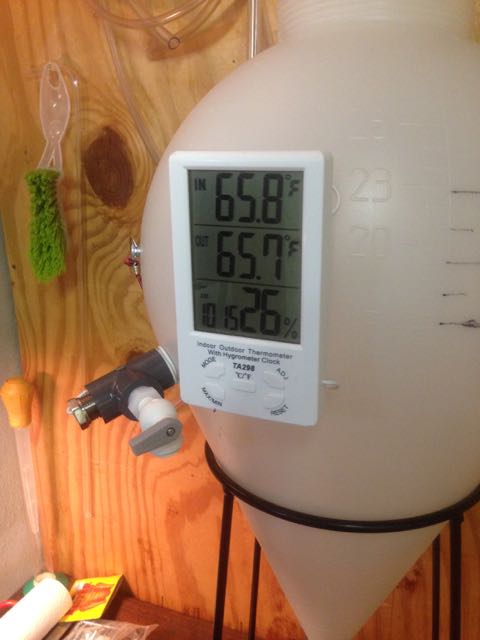
As far as the thermometer goes, would you guys recommend just buying the one that's made for the FF? Or would it be a better to buy a wire/probe one and just stick it in the thermal-well? Sadly I don't have a fermentation chamber, so it'll be going in the second bathroom shower we don't use lol Living in Southern California, the weather has been 75 ish outside most of the week, so lucky us. I know fermentation is pretty much the end up be all most important thing about making beer, so I want to get it right
 
As far as the thermometer goes, would you guys recommend just buying the one that's made for the FF? Or would it be a better to buy a wire/probe one and just stick it in the thermal-well? Sadly I don't have a fermentation chamber, so it'll be going in the second bathroom shower we don't use lol Living in Southern California, the weather has been 75 ish outside most of the week, so lucky us. I know fermentation is pretty much the end up be all most important thing about making beer, so I want to get it right

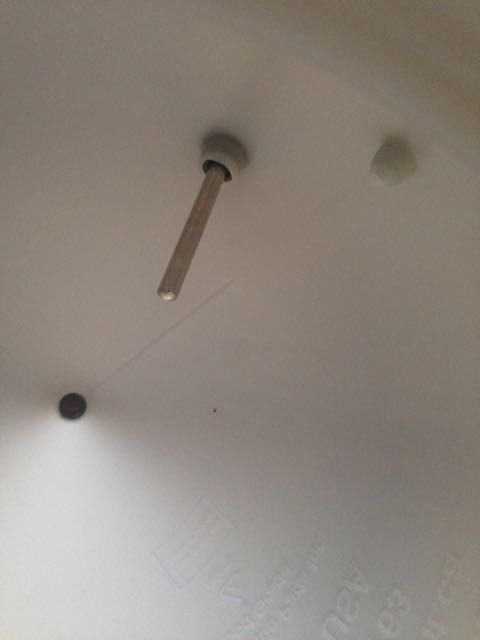
I have both one from FastFerment and a $6 aquarium one with a probe, I would suggest the following, which allows you to have both a sample port AND a thermometer both using the same port that is already drilled into the FF. I ordered some adaptors from us plastics and am about to set it up. A simple $6 aquarium thermometer will work just fine, and if you want to get fancy, you can get one with MIN/MAX to monitor the extremes.

Basically, I have a double sided 1/2 MNPT nipple that goes into the FF, a PVC 'T' fitting attached to that. A 6" stainless steel thermowell from Brewers Supply ($9) goes through the top of the T back into the FF though the port which has the probe from the aquarium thermometer in the back of it, It is also 1/2" NPT so it closes off one side of the 'T', a ball valve closes the base of the 'T' for sampling. Ill post pics as soon as I can. This saved me from drilling a second hole in the FF. ( and all parts included, are less than the $20 for a FF thermometer)
 
I was thinking about doing something like that. Yes please takes pictures, and do a step by step install if you can, that would be AWESOME and greatly appreciated. I know I'm not the only FF owner that would love to get as many good ideas as possible for this thing
 
A lot of people ask about lack of airlock activity on the FF, unless the seal is REALLY tight on the 6 " lid, the CO2 will escape around it and you will think your fermentation is over ( or not started, or stuck, etc) , always take SG readings and always crank the lid as tight as you can!

Just last night I pitched a starter of 3068 into my 7th batch of Weizen in the FF, now I have 3 of the original white foam seals AND the new silicon gasket on the lid, and just assumed this would be a tight seal, I also crank the lid pretty tight each time. Plus, my starters give off gas and I usually see some slow airlock within an hour of pitching.

This am, went to check progress, no airlock at all? Last night there was slow airlock, now, 12 hours later, none??? Thought, Crap, the starter must have been to small or I should have kept it warmer for the first 12 hours, so I open up the lid to see if there was any yeast activity and the entire head-space was FILLED with foam. I closed it up and screwed the lid on just a tiny bit more, and the airlock exploded like Mongo eating beans in Blazing Saddles.

The small amount of Star San that I spayed on right before pitching was just enough moisture to close the seal last night, hence, airlock bubbles, but that dried up over night and all the gas was creeping out around the lid, an inch more of a turn, and I have a full seal.

Just FYI!
 
O you have the new 3mm gaskets? I may order them. I planned on throwing some teflon tap on the threads (which will help greatly), and then adding some keg lube to the rim. Wish this wasnt such a pain in the butt like it seems, but hopefully that would work well
 
Really interested to see how those 3mm seals work. I just bought the FF from Northern Brewers this past weekend, should get it by Friday. Emailed up the guys at FF about trying to get a set of these seeing as I just ordered the fermenter. We'll see what they email me back with

Any luck? I think its total ******** that the FF team doesn't send EVERY one who at least asks a new seal. This is essentially a defect, a recall! Very poor customer service if they don't and I will let them know that. I hope the rest of you are on board, they get a lot of business via HBT, let's let 'em hear it. (and btw $10?? C'mon!!).
 
I wont get to try it out till next weekend. But I actually emailed them and asked them seeing as I just purchased the FF if I would be stuck having to purchase the gaskets as well. They pretty much told me I would have too sadly. I'm on the fence with wanting to return the FF... I like it but the more and more I think about, it may be more hassle then its worth
 
The apparent gasket issue you all are stressing over is not a big deal in the long run. If you follow my logic you will agree. When you set your wort to ferment and pitch your yeast, the yeast will go to work. They eat sugar, pee alcohol, and fart CO2 (OK I tried to make a funny, but you get it). The CO2 will displace the air above the wort and ultimately seep out the airlock and the possible leak from the gasket. Since CO2 is heavier than air, you should not have a contamination risk as long as fermentation is going on.
As home brewers we need to start trusting our yeast. Forget about bubbling airlocks and use you hydrometers and/or refractometers to determine whether fermentation is going on.
This is a separate issue as to whether FF did us wrong.

I agree but it is nice to be able to tell at a glance when you see an airlock bubbling.

As you said though, not worth losing sleep over.
 
The apparent gasket issue you all are stressing over is not a big deal in the long run. If you follow my logic you will agree. When you set your wort to ferment and pitch your yeast, the yeast will go to work. They eat sugar, pee alcohol, and fart CO2 (OK I tried to make a funny, but you get it). The CO2 will displace the air above the wort and ultimately seep out the airlock and the possible leak from the gasket. Since CO2 is heavier than air, you should not have a contamination risk as long as fermentation is going on.
As home brewers we need to start trusting our yeast. Forget about bubbling airlocks and use you hydrometers and/or refractometers to determine whether fermentation is going on.
This is a separate issue as to whether FF did us wrong.

Sorry but I don't agree with your cutsie attempt at logic. It's not about trusting the yeast but about trusting a product will perform as it should. And having a top on a fermenter that seals should be a reasonable expectation. Most of us have found work arounds but making light of a product flaw does not help anyone.
 
Sorry but I don't agree with your cutsie attempt at logic. It's not about trusting the yeast but about trusting a product will perform as it should. And having a top on a fermenter that seals should be a reasonable expectation. Most of us have found work arounds but making light of a product flaw does not help anyone.

Its not a cutsie attempt at anything. Its a serious attempt at addressing the incredible fascination the home brewers of this world have with bubbles, regardless of the FF problem.
 
in reference to the lid not sealing, my question is: Are you planning on using the yeast ball to capture yeast? Do you know that when you open the valve at the bottom and let the yeast fall into the ball this will remove some of the mass inside the fermentor? And guess how it gets replaced? Yup, through the airlock!

So your concern about the potential to allow a tiny bit of air into the system through the lid pales in comparison to the amount of air you will let in when you harvest yeast.

Of course there is an easy solution to the airlock problem. You could replace the airlock with a sterile filter while you harvest yeast, or you could feed Co2 into the airlock opening when harvesting. Having a good seal to begin with would be nice, of course, but it doesn't solve the question of letting air in when you harvest yeast, and harvesting yeast is really the big reason to have a conical in the first place.

The only solution I have been able to come up with to remedy the huge bubble trickling through my beer, is to use the sampling port I added to draw enough beer into the sterilized, new ball, to fill it up. This way when I open the valve very little air goes through the beer. As an additional precaution I pump CO2 in the back before I full it so only CO2 bubbles up through the beer. (Theoretically)
 
I always figured you should leave the ball and valve in the open position when filling up. Then when changing the ball just fill it with co2 if possible. If not, I'm not sure if the air bubbling through would actually do any damage as far as contamination. I've heard all the worries about it, but have yet to hear it actually coming to fruition
 
I always figured you should leave the ball and valve in the open position when filling up. Then when changing the ball just fill it with co2 if possible. If not, I'm not sure if the air bubbling through would actually do any damage as far as contamination. I've heard all the worries about it, but have yet to hear it actually coming to fruition

That's not a bad idea, but I thought people drained a little bit of the heavy stuff (hops debris, etc.) into the ball to toss away and then put the ball back to collect the good yeast after that.
 
That's not a bad idea, but I thought people drained a little bit of the heavy stuff (hops debris, etc.) into the ball to toss away and then put the ball back to collect the good yeast after that.

That is the way I did it on the first two batches....

I have read enough to support the idea that trub is harmless to beer flavor to the point where from now on - I am going to rack the beer in, aerate & pitch with the ball closed.

Once the yeast has flocc'd out, I will attach the collection ball & open the valve.

Any air that is sucked in will be on top of the CO2 that is already in the head space. I will do that until I get the good yeast.

When I get ready to rack, I will remove the cap & feed in a CO2 line to supply CO2 into the head space while I am racking the beer.

The absolute avoidance of the beer contacting the ambient air is folly in my opinion. You can greatly minimize it, sure. But do completely away with it? I don't think so..
 
That's not a bad idea, but I thought people drained a little bit of the heavy stuff (hops debris, etc.) into the ball to toss away and then put the ball back to collect the good yeast after that.

This is what I have been doing, I'll wait several hour before pitching the yeast.
 
So if you weren't concerned about collecting yeast could you forgo the collection ball and just dump trub and yeast out before racking into a keg
 
So if you weren't concerned about collecting yeast could you forgo the collection ball and just dump trub and yeast out before racking into a keg

Sure... Just crack open slowly with a bucket underneath it. Let it flow til clear & shut it down. Add a barb and hose to rack to bottle or keg.
 
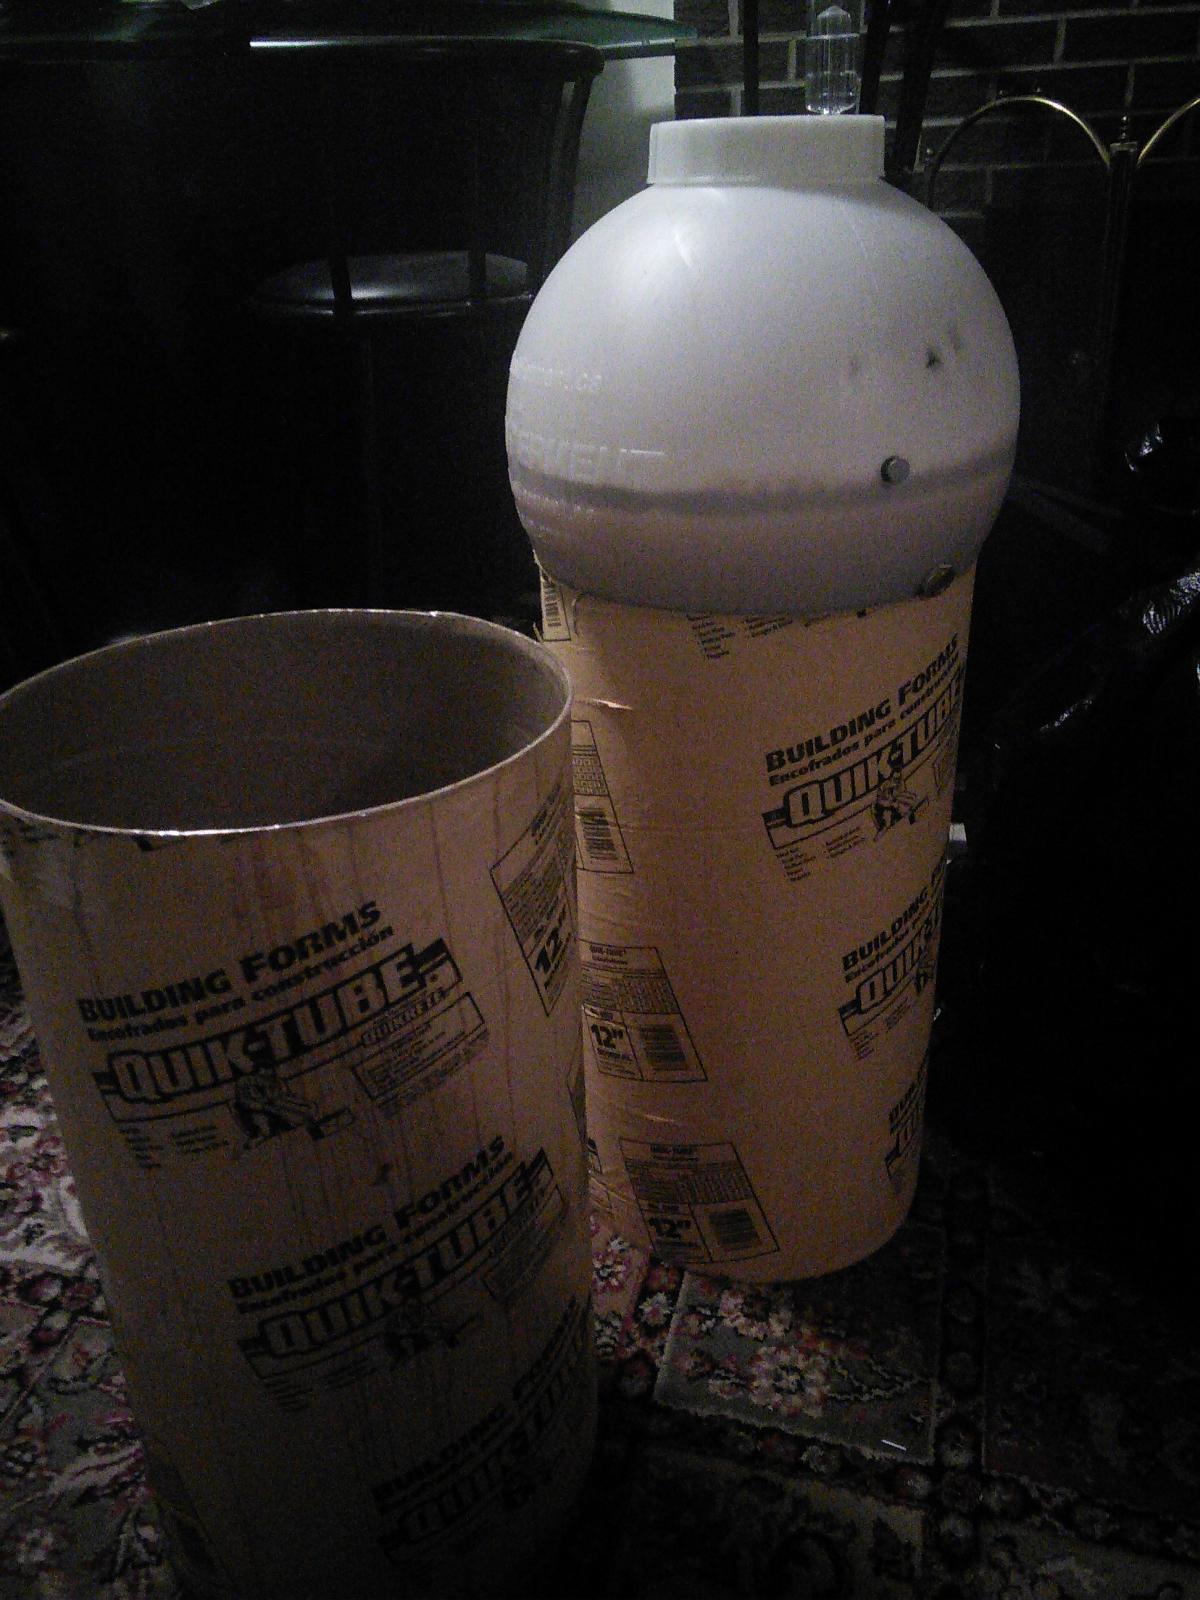
Here is a pic

IMG_20150309_201855.jpg
 
So if you weren't concerned about collecting yeast could you forgo the collection ball and just dump trub and yeast out before racking into a keg

Sure you can do that, but then why are you using a FastFerment? You wouldn't be doing a two stage fermentation, just a long primary. Your beer would be sitting on trub and dead yeast for the whole time. At that point save your money and stick to buckets.
The purpose of the FF is to be able to do primary and secondary fermentation in one vessel. Before FF I would ferment in a bucket for the first week (primary), then rack to a carboy and finish (secondary) in that vessel. Now I do it in one vessel with no fuss.
 
What I was thinking was dumping twice actually. Once after primary and then again after secondary. Forgot to clarify. I'm gonna do the Westy 12 clone and its recommended to not reuse the yeast.
 
I'm going to pick up a FF today. Looks like it will work for me. Do you take SG readings or do you just wait for a specific time?
 
Sure you can do that, but then why are you using a FastFerment? You wouldn't be doing a two stage fermentation, just a long primary. Your beer would be sitting on trub and dead yeast for the whole time. At that point save your money and stick to buckets.
The purpose of the FF is to be able to do primary and secondary fermentation in one vessel. Before FF I would ferment in a bucket for the first week (primary), then rack to a carboy and finish (secondary) in that vessel. Now I do it in one vessel with no fuss.

I move the FF to its home on the wall before swapping the collection ball or draining into the bottling bucket. I can't hang it on the wall during fermentation because the garage gets too cold and my fermentation chamber is not built.
 
I move the FF to its home on the wall before swapping the collection ball or draining into the bottling bucket. I can't hang it on the wall during fermentation because the garage gets too cold and my fermentation chamber is not built.

I have an idea for you then. A weekend project to save you some heavy lifting and a possible hernia. Make this stand and put it on caters. http://bit.ly/1xcQWGw
This way you can bottle, ferment, and swap without having to loft 50 pounds of awkwardness.

If you go to rebelhill's response on this thread you will see his build of the picture I attached. I would add wheels to the back and casters to the front.
Wheels http://www.harborfreight.com/6-inch-semi-solid-wheel-98950.html
Casters http://www.harborfreight.com/1-5-8-eighth-inch-x-7-8-eighth-inch-light-duty-swivel-caster-41519.html
Probably less than $30 total
 
Here is a pic

That's not a bad setup. Good idea with the concrete forms. However, I would worry about the thermowell. It looks like it is laying on the edge of the form. I fear any pressure on it will ultimately cause a failure at that point and it might start leaking there. You might want to make sure it is not on that edge, or making a small cut out to accommodate the thermowell.
 
Just wrap you arms around it & pick the thing up...


Yup lol. The strap doesn't help me get it to the hangers - unless I use my small step ladder. So I just hung the friggin thing while my ole lady helps me hang them on their hooks. Ales and wine only, as they won't fit the lagering fridge :-(
 
I was thinking about doing something like that. Yes please takes pictures, and do a step by step install if you can, that would be AWESOME and greatly appreciated. I know I'm not the only FF owner that would love to get as many good ideas as possible for this thing

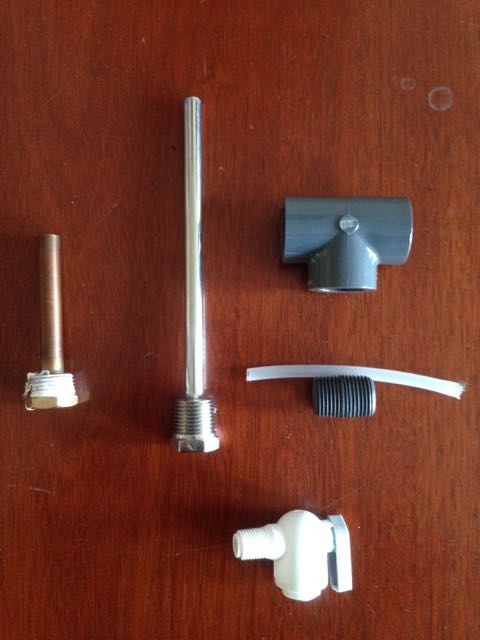
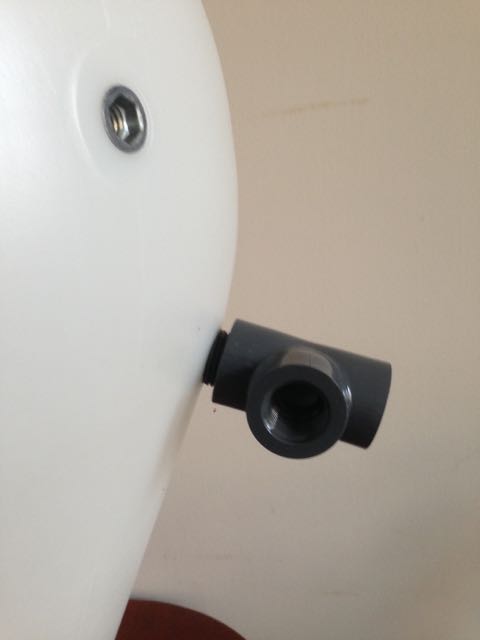
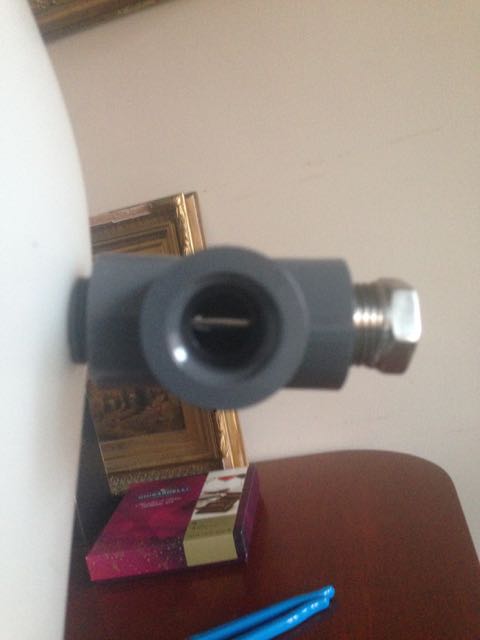
OK, all the parts finally arrived, here are pics and step by step how I used the existing port for the thermowell and made it accommodate both a thermometer and a sample port

Ball valves, reducing gasket, threaded nipple and PVC 'T' section are all from US Plastics. The thermowell is from Brewers Hardware and the Min/Max thermometer id from Amazon, make sure you get one with a probe that is no larger than 1/4 " in diameter or it will not slide into the end of the thermowell. Its nice to have the min/max as well, and its an indoor, outdoor, so you can see the difference between the inside temp of the fermentor and the ambient air around it.

No leaks, and wort samples come out just fine, I will probably replace the thermometer with a smaller one as soon as I have time to order one

IMG_8261.jpg


IMG_8271.jpg


IMG_8272.jpg


IMG_8276.jpg


IMG_8277.jpg


IMG_8280.jpg


IMG_8274.jpg


IMG_8284.jpg
 
OK, all the parts finally arrived, here are pics and step by step how I used the existing port for the thermowell and made it accommodate both a thermometer and a sample port


Ball valves, reducing gasket, threaded nipple and PVC 'T' section are all from US Plastics. The thermowell is from Brewers Hardware and the Min/Max thermometer id from Amazon, make sure you get one with a probe that is no larger than 1/4 " in diameter or it will not slide into the end of the thermowell. Its nice to have the min/max as well, and its an indoor, outdoor, so you can see the difference between the inside temp of the fermentor and the ambient air around it.


No leaks, and wort samples come out just fine, I will probably replace the thermometer with a smaller one as soon as I have time to order one


Awesome! Would you mind sharing the dimensions of the plastics?
 
Awesome! Would you mind sharing the dimensions of the plastics?

Sorry, I meant to do that!

Everything is 1/2 inch M-NPT or F-NPT with the exception of the ball valve which is 1/4 inch.

I will dig through my emails to US plastics and get all the part numbers and link, but right now my wort is waiting :)
 
49.gif
I previously did some research on the V-vessel. Do a search on youtube for the v-vessel and there are a couple of nice videos.
It sounds like they made some improvments to the orginal design.
62.gif
 
That's not a bad setup. Good idea with the concrete forms. However, I would worry about the thermowell. It looks like it is laying on the edge of the form. I fear any pressure on it will ultimately cause a failure at that point and it might start leaking there. You might want to make sure it is not on that edge, or making a small cut out to accommodate the thermowell.

It is actually about a inch above. I do have to be careful when setting it in. I don't want the thermowell to be sitting on the edge and taking all that weight.
 
Hi folks,
I've been following this forum for a while, and finally got around to joining. A noob here, but not quite a noob at brewing....been doing it a few years. Just got a FF - arriving today, with the stand and thermometer. I've read a lot about making sure the flash is cleared away, and tips to seal the lid properly...all good stuff that I plan to implement. And bembel, what a great setup! I plan to replicate that as well.
But I have one, admittedly silly, question. The thermowell looks to point upwards into the wort. it also looks to be below the liquid level of a typical 5 gallon batch. Why isn't wort draining all over the floor? I'm sure there's a simple answer to this, but I'm just not seeing it.
I also have a suggestion for guys like me who brew in the kitchen, and bottle. Huffing the carboys around to fill them from the kettle, and then over to where I set them to ferment is a pain. Then I bring them over to the sink to rack to secondary (yeah, I do secondary), and then back to sit for a few weeks until I huff it back over to bottle. Not so bad now, but as I get older, it's gonna suck. I expect it'll be the same for the FF. so I had an idea. I just got one of those hydraulic lift tables from Harbor Freight. Holds 500 lbs, and is big enough for the FF and a carboy too. Locking casters, and only cost $159. So I can roll it over and raise the proper height to fill the fementer from the kettle, roll it back to ferment. Roll it over and raise to the right height for racking, or bottling, and then start the next batch. I don't have a fermenting chamber...I keep the house at 65 and do things in the kitchen. this wouldn't work well for a temp chamber (unless you had a walk-in...oh to dream!), but I think it'll really help with the FF. ... Ideas?
 
I previously did some research on the V-vessel. Do a search on youtube for the v-vessel and there are a couple of nice videos.
62.gif
49.gif
 
Back
Top