Well here is mine not saying how i made it (but y can probably guess) do not want people killing themselves..... As to the temperatures
Looks good but I think you'll find you need 2 for a good boil.

Well here is mine not saying how i made it (but y can probably guess) do not want people killing themselves..... As to the temperatures
I have a 120V 1500W element in my HLT and I use it to heat my strike water, HERMS water and sparge water. It works fine, takes about 90 mins to heat up, then is just runs. I am looking at running 220V in my garage and upgrading my element. I dont HAVE to, but it would be nice, and it would be cheap since my neighbor can do it for me.
Question abt wiring ..
In starting out, I will probably go for a 220 circuit.
Assuming a 4500W element for the BK, that comes out to abt 20 amps. What wire to use ? 10 gauge ? length of run wld be no more than 20 ft.
I think the HLT could get bu just fine with a $40 1000W bucket heater ..
The High Gravity system seems so expensive ($1,500 if you include the BK) ..It requires 220

![Craft A Brew - Safale S-04 Dry Yeast - Fermentis - English Ale Dry Yeast - For English and American Ales and Hard Apple Ciders - Ingredients for Home Brewing - Beer Making Supplies - [1 Pack]](https://m.media-amazon.com/images/I/41fVGNh6JfL._SL500_.jpg)


I just installed a new circuit in my garage and it was simple. Two pole 30A breaker, #10 AWG wire (4 wires) to a 50A (4 wire) range outlet. This will then feel 2 hots, one neutral and one gorund into my control box for various electrical components 220 AND 120v. It was a little under $20... and looks sweet.
Since my garage is finished, I installed the oulet about a foot below my existing breaker box to make the install easier. It also happnes to be within 6' of where I set up my brew rig when I brew, so it is perfect.
I still need to upgrade my kettle to electric and get my control panel built, I should be brewing again by February(ish) The circuit was cheap, the kettle upgrade to electric will be cheap, the control panel however with PID, SSR, heat sink, switches and distribution blocks etc... will be much more $$$$$
If it was cheap I take it the two pole 30A breaker is not a GFI breaker? It should be mentioned here that for safety reasons anyone doing this really SHOULD be using a GFI breaker and not a regular breaker. A lot of people choose not to use a GFI breaker because they're a lot more expensive.
If someone chooses to bypass safety to save a few bucks then so be it, but you should make sure to point this out to others so that the newbies know that this was a conscious choice on your part to go against possible safety codes in your area.
Kal
I've been asked for info but I am reluctant because water and electricity can kill.
Plus UK electrics are different to US electrics.
I just installed a new circuit in my garage and it was simple. Two pole 30A breaker, #10 AWG wire (4 wires) to a 50A (4 wire) range outlet.
You wouldnt do this? Can you explain to me why YOU wouldnt do this? Did you even read my post?What your doing I would not touch at all do to liability.
has anyone tried bending the element away from the original shape? Issues?
A big oops there on my part Pol, I (my mind) read it as #10 from a 50 amp receptacle instead of #10 "to a 50 amp receptacle", me bad it was a 2:00 AM reply. Another all nighter without sleep again. I'm up 30 to 45 hour at a time without sleep. In that reply I have seen it done the wrong unsafe way picking up range power with a gas stove installed vs electric.
I do find it odd that you have a "range outlet" as ranges are usually hard wired, 240 volt electric dryers with recptacles as plug ins.
I'm here to make you tear your hair out.
Orfy,
Did you catch the plastic on fire because you let the element run dry?

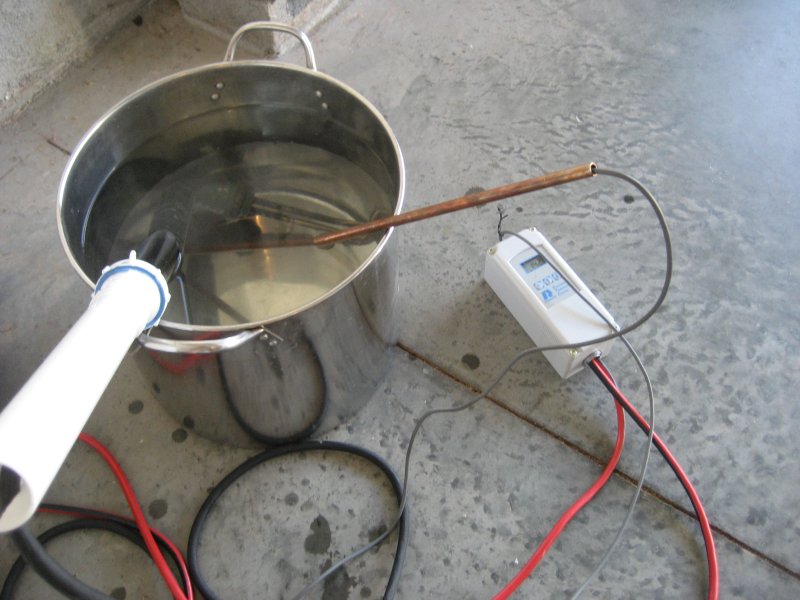
Here's my eHLT. It's just a 4 gallon pot with a 1500w water heater element attached to a plumbing drain. I plug that into the temperature controller (the same one I use when fermenting) and run the sensor into a piece of 3/8 soft copper tubing with a cap on the end. It fits perfectly, btw. I've sense insulated it and it works pretty good. If I start with hot water, I can get to sparge temps in about 45 minutes, which is good enough.
It doesn't get much simpler than that, I guess
I guess that would be a heat stick .. easy to build ?
1500W - can the ranco handle that much ? (I know it can cause you are using it ..!)
I am curious what the limits for the ranco are ...
POL,
I am thinking of converting my 10 Gal rubbermaid cooler to a Electric HLT like you did. Other than using a 2000w element what would you do different.
Do you have details of how you put the element in the cooler and sealed it from leaks. I am kind of nervous of drilling a big hole in my brand new cooler.
thanks
Scott


