• Please visit and share your knowledge at our sister communities:
  • If you have not, please join our official Homebrewing Facebook Group!

    Homebrewing Facebook Group

Electric Heating Element for RIMs/eHERMS

Homebrew Talk

Help Support Homebrew Talk:

This site may earn a commission from merchant affiliate links, including eBay, Amazon, and others.
Today I brewed a English ale, 6.25lbs, mashed with 1.75 qt/lb water to grist.

The following ramp are observed (using 2 elements) in 54 degree F ambient air temp.

10:46am 116F
10:47am 117F
10:48am 118F
10:49am 119F
10:59am 132F
---- Working fine, so I stopped recording.

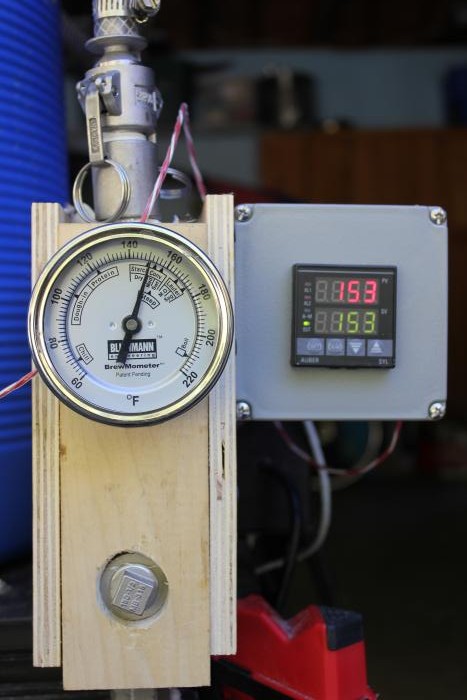
The attached photos are
1) the system in operation, with the mashtun exit temp and the temp on the exit of the heater
2) the clean in place. After I dump the grains, I use PBW and cycle water through the system. Since I am going to brew in the next couple of days, I will let it soak for a bit, cycle clean water and let it drain before I mash again.

let me know if there are any photos you would like to see.

Joel

IMG_1594r.jpg


IMG_1596r.jpg
 
As I move to an electric brew kettle, I am going to add two more tubes to this for an external electric Calandria which can bring the wort to a boil, for 5 and 10 gallon batches. I will need to use two separate 110VAC circuits, but I should save on the pump.
 
How will this save on the pump?

I didn't see a picture of the spring in the tube. Does it rest against the sides of the tube or is it held in the middle by the rod?
 
How will this save on the pump?

I didn't see a picture of the spring in the tube. Does it rest against the sides of the tube or is it held in the middle by the rod?

The rod is put through the spring and the spring is held in the middle of the tube by the rod as you suggest.

If I add two more tubes to the rims setup to be able to bring the wort to a boil in the copper, then I only need one pump, since I can re-direct the flow to mash, boil and cool.

It turns out some has done this with a conventional RIMS tube.
 
Can you post a link to where someone is boiling wort in a RIMS tube please?

I would like to boil without a propane burner or a heat stick. I do BIAB but I don't think that makes any difference in how the RIMS works.
 
Can you post a link to where someone is boiling wort in a RIMS tube please?

I would like to boil without a propane burner or a heat stick. I do BIAB but I don't think that makes any difference in how the RIMS works.

Here is one reference:
[ame]http://youtu.be/_l0v5dmHN3k[/ame]

There are concerns when pumping the "boiling" wort through the external calandria.

Cavitation will occur if you don't get the flow and pressure right through the pump.

I want the tube to fail safe, meaning, if the flow stops, the tube should simply shut down. I have used thermal fuses to trip if the temp outside the tube reaches a given temp. I selected these based on mashing temps, I need to recalculate them if I am going to use the tube to boil.

Also, I want to make sure there is no way for steam to build up and stop the flow through the pump, so I am studying the designs used by brewers and looking at the safetys.

I am still looking for the link I had found, the builder had a >3kw rims tube with an internal element, attached horizontally to the outflow of a pump mounted below the copper.
 
Thanks for that link.
He talks like the whole pot doesn't have to boil at once, but I gather that the whole pot has to be boiled even if a little at a time to drive off the "stinky" parts.
I hope you can find the link to the 3kw internal element builder.
 
Is there a reason you went with stainless steel over copper for the heating tube?
 
Is there a reason you went with stainless steel over copper for the heating tube?

When I was testing I used Copper, and I still have one unit. It works fine and would be a good way to go to reduce the cost. You can move the heat tape to stainless tubes later if you want too. If you go with copper you might want to watch for electrolysis if the plan is to mix metals.

I went with stainless since I think it holds up a little better.
 
I was actually thinking more of the better heat conductivity of copper rather than the cost. Can you explain more detail on the electrolysis issue?
 
I was actually thinking more of the better heat conductivity of copper rather than the cost. Can you explain more detail on the electrolysis issue?

If you insulate the tubes well, the heat should transfer even in a stainless steel tube. The major issue is laminar flow, that is why a spring is used to introduce turbulence into the heating pipe to help with heat transfer.

For the corrosion issue here is a great reference, depends greatly on the type of metal.

http://www.copper.org/applications/architecture/arch_dhb/fundamentals/arch_considerations.html
 
Hey, am thinking of putting something like this together. I'd like to put it in a toolbox or something similar. Assuming I used the same materials as you, do you think there is any chance I could get away with the heating pipes in the same small enclosure (thinking a 24"x9"x9" aluminium box) as the PID controller and the SSR? Or does the system, even well insulated, still just put out too much heat to operate in an enclosure with temperature sensitive electronics?

Thanks for the thread.

When the mash is circulating, the tubes remain roughly at the temp of the exiting liquid, and significantly lower that than the temp of the exiting liquid on the outside of the insulation (I can put my hand on the outside of the insulation for as long as I like).

However, once the liquid stops circulating the temp rises quickly and the carry over heating can be significant. I am controlling the system by measuring the temp of the mash exiting the mash tun. If a sensor is placed at the entry of the tubes it might keep the over shoot in check.

You could put a reset-able thermal breaker in the case, one which would trip if the enclosure gets above the working temp of the PID.

I have thermal fuses in the box to make sure it never gets hot enough to cause a fire.

Joel
 
Finally had to replace the plastic in the cooler.... major distortion. I put in a 44 quart stainless Bayou classic.

Decided to do a Utah Bio Diesel stainless basket (12x13) to allow removal of the grains so 5 gallon boils using a 1500 watt heat stick to occur in the mash tun.

Since I have the pump, I plan to use ice and water in a separate cooler and make a recirculating wort cooler.

Pictures will be added soon.

Joel
 
1 lb Ice to 1lb of 32 degree water requires 144 BTUs. Plan is to run roughly 10 ft 1/2 inch copper in bottom of cooler and throw ice on it. With losses might be roughly one to one, 5 gallons of ice for 5 gallons of 200 degrees wort. Parts on order.
 
An initial fill with 5 gallons of 50 degrees water will reduce the required ice significantly. The trade off is time.
 
Filled the Gott cooler with the 44 qt Bayou pot insert with 6 gallons of 71 degree water. Dropped in a 1500 Watt 110V brew stick with a 15AMP Compact Right angle Plug In GFCI (Leviton) and got the following rough heating profile. Ambient temp was 80 degrees.

Went up 69 degrees in 60 minutes. The standard online calculator predicted a 1.62 degrees per minute rise for an insulated vessel. I got 1.15.

The Leviton GFCI read 120 degrees after an hour of use. The ambient at the plug read 82 degrees.

I have a second 1500 Watt brew stick which I can put on a second 20 amp 110 circuit and should nearly double the rate.

Since this is a brew in a basket system, I need to heat to from mashout (170) and maintain the boil (212+) which means I need to gain 42 degrees after pulling out the grains. Should take about 40 minutes using a single heat stick, or 20 minutes with both.

I also have another 1500 watts on in the RIMS tube, so I could circulate and use that to speed up the time to boil.... means another circuit, and pump cavitation will start near boiling. More testing and photos to follow. (Still waiting on the stainless steel mash basket).

--Joel
 
DIY heat-stick. Better solutions exist, but I had the parts. High temp wire, high temp (Dow) food grade potting compound, High temp glass cloth electrical tape and GFCI shown in the photo.

Note: There are risks with these, always test the GFCI and make sure to provide a margin to derate the wire for the ambient temp, and that the wire is enclosed in the pipe with a second one. I also like to ground the heat-stick to the pot as well.

The hotrod solution from brewhardware reduces the number of gaskets to one, and no threads to leak.... I plan to move to two of these once the chair of the house appropriations committee gives her approval.

View attachment 1441742962119.jpg
 
Last edited:
Picked up a 44qt cooler at year end sale. Should fit about 24 linear feet of 1/2 inch copper pipe. Cleanouts on the ends of each linear section. Photos of build coming.
 

Latest posts

Back
Top