• Please visit and share your knowledge at our sister communities:
  • If you have not, please join our official Homebrewing Facebook Group!

    Homebrewing Facebook Group

Electric Heating Element for RIMs/eHERMS

Homebrew Talk

Help Support Homebrew Talk:

This site may earn a commission from merchant affiliate links, including eBay, Amazon, and others.
Great concept but I wonder about the excessive use of tees. I think I understand that you wanted to be able to remove the plugs to clean out the interior of the pipe, but that's also a lot of extra inside threads that are harder to clean. You can't don't have access to the bridging pipe between the two assemblies.

If it were me, I'd go with a 36" length of 5/8" OD thinwall stainless tubing. On one end you can just clamp your silicone tubing. The other end, if you wanted a tee for temp probe insertion could go to a compression fitting and then one tee.

I'm not knocking your choices, just food for thought.

Good idea. Thanks.

I have yet to pull the plugs and run a wirebrush down the tubes... Typically, I simply fill up the mash tun after I dump the grains and run some PBW through the system... and then flush with clean water...

I think you could go with a completely enclosed system, or as you suggest.

Joel
 
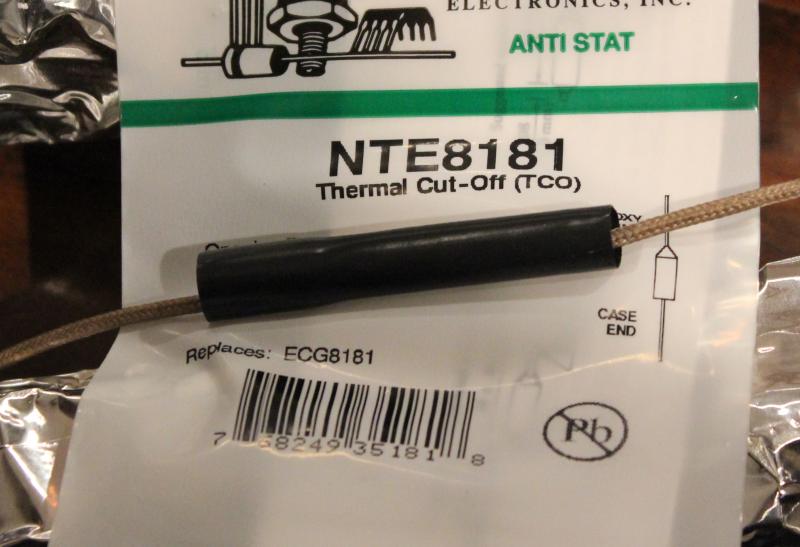
I will mount the thermal fuses this weekend, and maybe put the mess in the box.

Too many projects.

1) Heater needs to be finished
2) Wifi and RF temp. build starting (see thread)
3) Beer in the bag needs to be finished... still rather good :mug:
 
cool idea, looking forward to seeing how it works out.

Thanks for the interest.

It works really well, I have been using it for 3+ years and many 5 and 10 gallon batches. This thread is to document the build process. I decided to make the system a little more refined.

Joel
 
I am mounting the thermal fuses in the middle of the pipes (outside of the insulation).

The photos show how to attach. Use crimp connectors, and you will need high temp insulation (I selected high temp heat shrink, but you could use an appropriate insulating sleeve).

The fuse will be installed on the "hot" side of the pipe heater.

Next step, enclose it in a box.

ThermalInstall1.jpg


ThermalInstall2.jpg
 
Boxed it up.


Finishing steps.

1) Drill a hole of side of the box, bring the wires out to the Solid State Relay
2) Mount the box for the SSR on the side of the heater
3) Mount the PID on the heater.

I will post the the final pictures this weekend. I will log and post the temp response of the system when I test my brewmeter(s).

Joel

Boxed.jpg
 
This is awesome to see, and now that I've completed a whopping ONE all-grain batch, I will start planning on a similar set-up.

Thanks!

-Mac
 
This is awesome to see, and now that I've completed a whopping ONE all-grain batch, I will start planning on a similar set-up.

Thanks!

-Mac

Send any questions. I will be posting some final pictures of the current build.

Joel
 
This weekend I am testing with a 10 gallon mash of a Dale-Pale Ale clone, and another 5 gallon batch. I will put up the results.
 
So how did the beer turn out?

I've kept this as a plan, but for now I figure I better just work on brewing in general (all-grain is still new, batch #2 coming up with an IPA).

I will switch to a RIMS system, the question is whether it will be RIMS or HERMS, well technically they are all HERMS right?

My question for this system will involve something with a very stepped mash,
like a good oatmeal stout, or wheat beer. How do the steps go, and how are the results? I've read the recommended 2°F/min, does this perform faster or slower?

-Mac

I had 24.5 lbs of grains and 7.5 gallons of water and I ending up filling up the 10 gallon Gott cooler to the top.

I mashed in at 122F and then set the PID target to 153F. Once it reached 153F, I held it at 153Ffor an hour (just let it run), and then I set the PID to 167F and once it it hit 167F, I held it at 167F for 15 minutes. I then batched sparged, by alternating the draining of some of the wort into the copper and replenishing with hot water. I closed the dump valve until I see the circulating mash running clear after the water addition. I repeated this until I collected 12 gallons for the boil.

I achieved 0.5 F degree rise per minute running with pump wide open (max flow), opposed to the 1.8F/minute reported to be used for programmed infusion mashing for some Belgians in Brewing:science and Practice woodhouse. They also use a 1F/minute in some of the tests on yield.

I will switch to a RIMS system, the question is whether it will be RIMS or HERMS, well technically they are all HERMS right?
All of them recirculate, but the HERMS applies heat indirectly to the pipe rather than putting the heating element in the flow of the mash.

The Heat tape approach outlined in this thread is similar to the HERMS in that the heat is applied to the outside of the pipe rather than putting the heating element in the flow.

You could go with more heating tape or more elements, but I was shooting for < 80% of a 15 amp circuit for the whole system to make sure it is safe.

My current plan is to change out the PID I have for a PID with Ramp-Soak so I can set my schedule and walk away.

The weekend brew sessions went well, with 10 gallons of a Dale-Pale-Ale clone and 5 gallons of an IPA being cycled through the system. The 5 gallon batch heat rise rate was about the same.

So far I have put > 10 Five gallon batches through the various versions of the system, and 2 ten gallons batches.

I plan to adjust flow rate/turbulence in the heaters (insert a coil of wire to break up laminar flow to see if I can improve the heat gain).

I have been having really good luck with it, and I think I have been making more consistent beers.

Please let me know if you have any more questions or if I can be clearing on any of the build details.

As always use a GFCI

Joel
 
This weekend I am running two batches through the system.

I am putting in the following (see below) to introduce turbulence into the flow and increase heat transfer. I will try the stainless steel rod in the center of the pipe on one five gallon batch and record the rate of temp increase, and repeat with the spring only and the spring + rod.

89535K26 Multipurpose Stainless Steel (Type 304/304L), 5/16" Diameter, 6' Length
9663K78 302 Stainless Steel Cut-to-Length Compression Spring, 20" Length, .500" OD, .035" Wire Diameter
 
I put a length of stainless steel rod and a spring over the rod in the lower heating pipe and I am currently mashing 12 lbs of grains, with 1.25 qts/lb.

The ambient (outside) temp is 41 degrees Fahrenheit and with the modifications in one of the heating pipes I am getting >1 degree/minute rise. Preheated water and added grains and the system brought 140 degree mash to 153 in 13 minutes.

The system runs on 1 15Amp 110V circuit.

I may add a length of rod and spring to the upper heater, but this one has the brewmeter in it and I suspect I broke up the laminar flow in the lower heater and this introduced turbulence in the upper tube as well.

I don't think I will do any additional mods.

I will post final pictures soon.

Joel
 
Finished two the mashes today, 12# and 13# of grains. System did between 1 degree F/minute and 1.25 degrees a minute. Outside temp started at 41F and at the end 50F.

1 to 1.5 degrees/min.

System ramps from mashing to mashout in < 15minutes. I must admit, once the mashing is done, I set the system for the mashout temp and forget it (deal with the getting the other batch into the fermenter).

I will post updates on reliability of the system.

Joel
 
All,

I chatted with someone who is majoring in bio-chem, and I don't understand why we want > 1 degree F per minute increase
in the mash temp. Everything I have been reading seems to indicate that it is the temp*time rather than the time which is important.

Joel
 
Due to the thermal mass in the tun, temp rise requires the wort coming out of the heat exchanger to be some delta higher than the desired new temp. To ramp faster than 1-2F per minute would require that temp to be something close to boiling and the very top of the tun and grain bed could be overheated.
 
Due to the thermal mass in the tun, temp rise requires the wort coming out of the heat exchanger to be some delta higher than the desired new temp. To ramp faster than 1-2F per minute would require that temp to be something close to boiling and the very top of the tun and grain bed could be overheated.

Thanks. That is what I thought as well.
 
How much additional temp control did you get by using the rod & spring? It would be one less thing to clean if I were to leave it out.

(not sure if you clean in place, but I was thinking of using tri-clamps to connect everything so I can easily disassemble for scrubbing)
 
How much additional temp control did you get by using the rod & spring? It would be one less thing to clean if I were to leave it out.

(not sure if you clean in place, but I was thinking of using tri-clamps to connect everything so I can easily disassemble for scrubbing)

Sorry, work has been getting in the way. I do have to adjust my priorities :)

It increased the ramp, by about 1/2 to 1 degree. It is a bit hard to judge, because the losses in the system depends on the surrounding temp. But, the rate of increase by adding the spring was significant!! I think you could also narrow the tube but, the heated surface area would decrease, and you might still have laminar flow, which reduces heat transfer. Anyway, I am keeping the spring.

After the mashing is done,
1) Dump the grains
2) I fill with cold water, cycle a minute or two which I put the wort on to boil
3) Dump the water. Refill with water, and cycle some PBW though the system.
4) Drain.

I pulled and inspected the spring after 3 batches, and with the above proceedure it was like new.
Before a batch, I simply rinse (fill with a little water, and cycle for a minute) to make sure all of the connections are tight etc... And dump the water.

Then I put in the mash water for the desired thickness, wait till it hits temp. Then I add the grain, while the system is cycling. This prevents dough balls and I have yet to clog the system even when I am mashing for 10 gallons (22lbs of grain, but, it is really full).

I think it is a great little system (I am biased). Sorry for the delay.
-Joel
 
So am I understanding correctly that you are actually running 2 of these pipes concurrently to achieve that 1*/minute temperature rise?

I love this idea. A lot. I just want to make sure I know exactly what's going on before I commit.

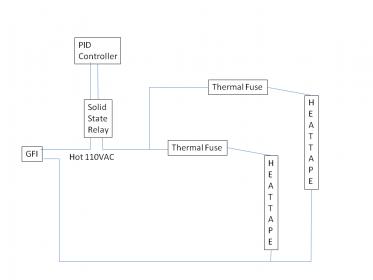
Also, do you have a wiring diagram for your setup?

Thanks for all the hard work. People whose minds think in this way amaze me.

All the parts and build photos are a few posts back.

The heater is wired in just like the RIMS tube, with a Solid State Relay controlling the power the heat tape. I put a thermal fuse in the box with the heaters just to be safe, these go inline with the power.

I will post a diagram in a bit.

Joel
 
Thanks for the diagram.

I saw the build and understand how it works, I was just wondering if the desired effect could be achieved with 1 of those units instead of two, and if the drop off in performance was significant with 1 as opposed to two.

You said you'd been running the system for a couple of years. Were you only running 1 unit up until recently? If so, what did you observe to be the efficiency difference in maintaining/controlling temperature?

Thanks again.

I was running with two units for most of the time. In the beginning, over two years ago, I did use only one pipe, but observed < 0.25 degree rise per minute. I then added the second tube and insulated.

I think insulation made a huge difference, and you might be able to get away with only one unit, especially if you add hot water to do the step rises and batch sparge at the end.

I wanted to ramp to mash out in a reasonable time at the end, so I like the two pipe setup.


Joel
 
I was thinking about using heat tape for lagering in a 15 gallon SS Blichmann conical during the winter (keeping it outside in a box made from insulation board). Any thoughts on how much heat tape I'd need and at what strength? This seems more feasable than something like fermwrap because of the shape of the conical and all of the fittings.

I'm hoping that I could use a lower wattage tape to keep the costs down some, but it's been a looooong time since high school physycs and I wouldn't know where to start with trying to figure it out. I can say that I'd probably use 2" insulation board to form the box, and the winters in DC can be anywhere from 0-50 degrees, depending.

Here is a heat loss calculator:
http://www.thermalinc.com/math/aitkenform.htm

I did a 5'x5'x5' cube, and 0 outside temp. with a design temp of 50 degrees and came up with about 50 watts being required to maintain temp. For example a light bulb.

It really depends on fast you want to raise the temp, to maintain temp, a simple solution with a large of amount insulation and a simple heater should work.

You will still need a thermostat since even a 50watt lightbulb in a highly insulated box will, over a long time, ramp to a high temp. If not regulated

Joel
 
Just a post to bring up this link.

There are a number of threads of people discussing issues with RIMS and HERMS, so I thought people might want to follow this thread. It works, and for 5 to 10 gallons in a well insulated system, it works very well.

I hope to post the step by step for a couple of batches I am doing the weekend. Any suggestions I will work into the system.

Joel
 
I will mount the thermal fuses this weekend, and maybe put the mess in the box.

Too many projects.

1) Heater needs to be finished
2) Wifi and RF temp. build starting (see thread)
3) Beer in the bag needs to be finished... still rather good :mug:

Is there a link to the thread for the Wifi and RF temp build? I would like to take a look at this.
 

Latest posts

Back
Top