sdgenxr
Well-Known Member
raouliii: Yes, there is a jumper in there that is as low profile as I could get. Nice catch!! The link you have is the exact one that I have.

")
Looks like you're using two wire lamp cord. I'd recommend using a cord with a ground, attached to the receptacle. The fridge/freezer should then get a good ground from the house wiring.raouliii: Yes, there is a jumper in there that is as low profile as I could get. Nice catch!! The link you have is the exact one that I have.
Looks like you're using two wire lamp cord. I'd recommend using a cord with a ground, attached to the receptacle. The fridge/freezer should then get a good ground from the house wiring.
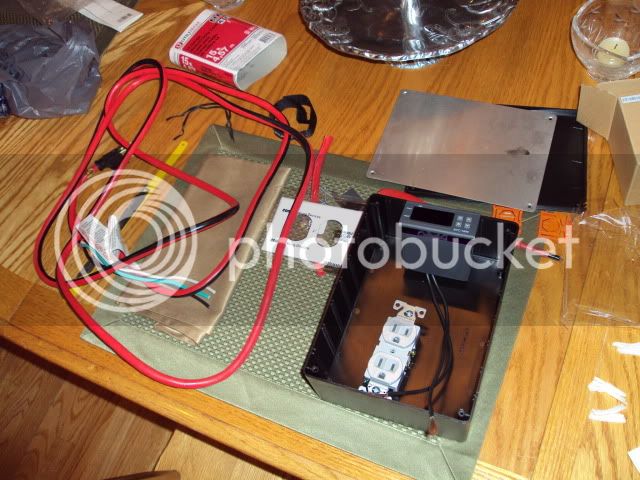
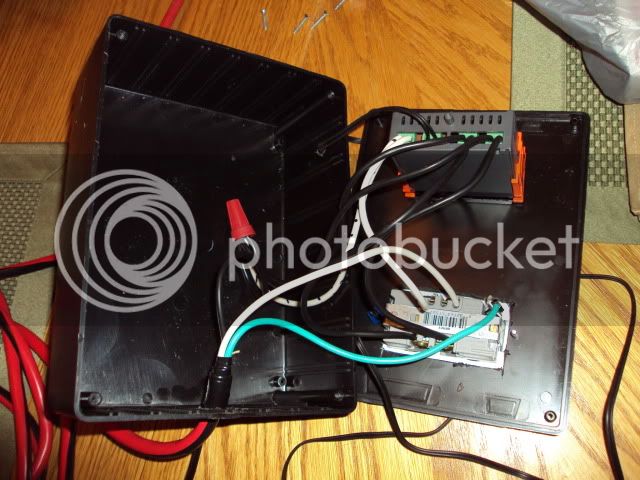
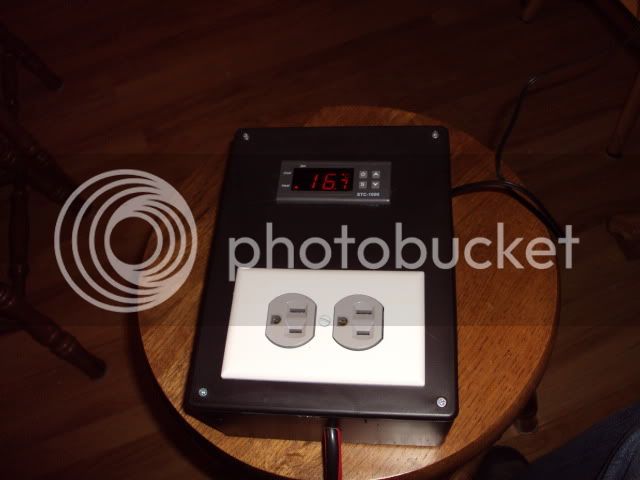
Just thought I would add my temp controller build to the list. I was looking for something as small as possible yet still allow for an outlet. Digging around the local big orange home supply center, I found a plastic box that measures 4x4x2. So of to work I went cramming everything inside and here are my results.

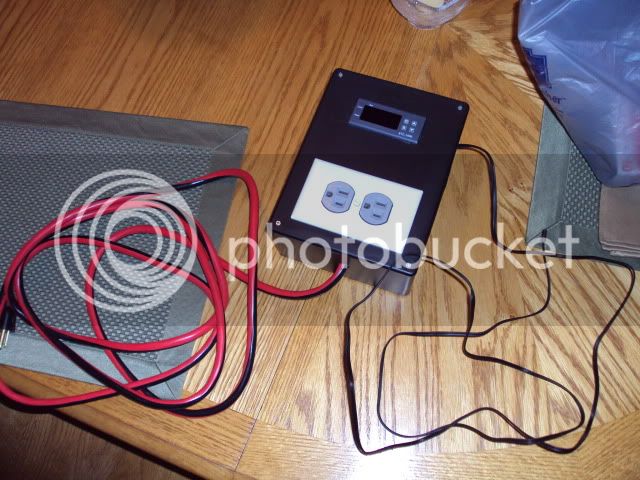
And all closed up ready to be put to use:

I think the only change I would make is to place the controller about 1/8-3/16th of an inch lower in the box. As it is right now, the outlet pushes on the controller a bit, but too much. Ready to control the heating and cooling for my fermentation chamber year round! Time to brew up some Lager!
I used the same size box, and put the outlet in the back. Plenty of room that way.


![Craft A Brew - Safale S-04 Dry Yeast - Fermentis - English Ale Dry Yeast - For English and American Ales and Hard Apple Ciders - Ingredients for Home Brewing - Beer Making Supplies - [1 Pack]](https://m.media-amazon.com/images/I/41fVGNh6JfL._SL500_.jpg)


Hey I am trying to convert my wine fridge into a fermentation chamber.
The problem I am having is the fridge defaults to its factory settings every time the power is turned off. I would like to bypass this feature if I could.
I have looked all through the 4000+ posts for this issue but could not find any info on this. I am presently building the dual controller with the STC-1000 to use in this project.
I will be plugging the fridge and a small heater in to the dual controller.
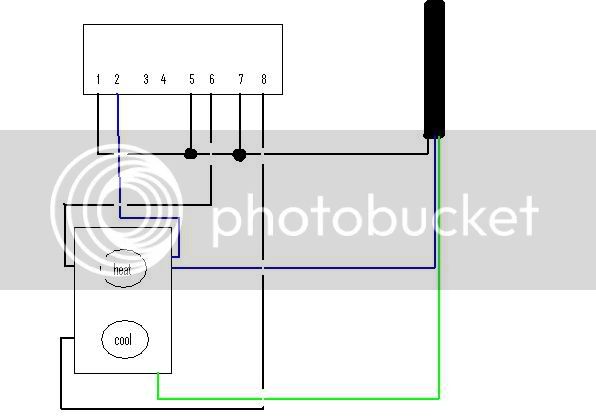
I have included a couple pics of the wiring diagram, circuit board and the temp probe.
I have tried just unplugging the temp probe but the alarm sounds and the fridge doesn't work. Also tried unplugging the connectors from the circuit board.
I can wire and build projects but my electrical knowledge is very weak. I would appreciate any help or direction to another thread.
I'm sure there are other ways to skin this cat.Couldn't you simply open the inside thermostat (behind the Min-Max temp dial) and jumper the two wires together? This would cause the compressor to always run, then just plug in the fridge power thru your STC-1000 to control the temp? This way no permanent modification is done to your fridge.
Robert
I followed your diagram/photographs and it works like a champ. Though I did make one error in that I cut both connections between the outlet sockets and had to make a jumper........i was excited about the prospect of this temp controller, so i got one from ebay and put the whole thing in a project box from radio shack. one plug is switched for heating and the other for cooling. i have yet to build up my fermentation chamber that i'll use this on, but preliminary tests confirmed that the unit worked great. there is a 0.3 deg C differential on this thing, so it is pretty accurate and easy to set. i used a 14 gauge extension cord for all the wires. it does read in celcius, but that's OK by me.
all of the parts:
did some sloppy cut outs and wired it up:
power cord and sensor gives plenty of slack:
close up of the temp controller:
powered up:
my wiring diagram (sloppy also). i only used one wire nut to join the hot wires as you can see in one of the pics above. also, very important to break off the jumper tab on the hot side so you can control each outlet independently.


It will only run when the external controller provides power to it. Without the red wire from the control board connected, the control board no longer has any control over the compressor operation.Hey thanks for the feedback. I did what Rauoliii had said to do.
I cut the red and attached to the black and then capped the red to the board.
The fridge runs. But if I unplug the fridge and plug back in the default setting returns to the digital panel.
So if this is correct, even though the digital default resets back to 11C, the fridge will continue to run on forever?
I included a couple pics as asked for. It shows the wires unconnected but I have connected those up.
I have it running now to see what happens. Thanks for helping guys...
Plugged it into what? An STC1000 controller/receptacle build? A wall receptacle?OK ya I plugged it in and monitored it. It went on and below its regular set point. Which is excellent!....
The only thing the wiring modification has done to the fridge is disconnected the HOT wire from the compressor. All other functionality will remain the same, but the internal control board will not control operation of the compressor....Then I unplugged and then plugged back in. The digital preset to its factory reset of 10C and the compressor did not resume running….
It won't matter what the fridge thermostat is set to since it doesn't control anything. The external STC1000 controller has all of the control. Is there some other residual use of the thermostat that you were expecting? Would you rather the internal control board not even power up?....This should not have happened right? Not sure now if it will be of any use if every time the dual controller stops and starts the fridge will reset to 10C…
What do you think?


So... looks like I might have bought the wrong controller? Anyone recognize this unit? It appears to be missing some connection ports. What should I do?
You can get a Fahrenheit that controls heating and cooling one over here:
https://www.homebrewtalk.com/f51/eb...roller-build-163849/index405.html#post6024764
You got a single stage. It can only run heating or cooling, not both.
Sent from my iPhone using Home Brew
Send it back or hire a electrician, look for the plug in type with no harness from beverage factory $79 simply drill hole for temp sensor and plug it in
The hot wire was easy to find; it has a pigtail that feeds the light. And fortunately, everything's connected with standard-sized spade connectors. So all I have to do is unplug existing wires and plug new ones in.Assuming you start with the hot-side wire to the thermostat, I think your proposal should work just fine...
Cheers!
I didn't run a new wire to the compressor.@troy2000 It sounds like you're on the right track. To make your life simpler, try and disconnect the existing temperature controller completely. Pull both sides of the existing temperature controller and place your new controller in it's place as described. This way you don't have to run a new wire to the compressor.
Although, it sounds like you've got this under control! Good luck and post pictures if you get stuck.


Guys, I read through a ton of this thread until my eyes hurt, so sorry if I missed this, but what gauge wire is everyone using to hook everything up... controller, lights, plug, etc.
Sent from my SCH-I535 using Home Brew mobile app


