• Please visit and share your knowledge at our sister communities:
  • If you have not, please join our official Homebrewing Facebook Group!

    Homebrewing Facebook Group

ebay aquarium temp controller build

Homebrew Talk

Help Support Homebrew Talk:

This site may earn a commission from merchant affiliate links, including eBay, Amazon, and others.
I would remove the probe wires, retwist them, and reinstall. Make very sure there are no stray strands that could cause a problem and are securely tightened. The other wiring needs to be modified as outlined above - move the green ground wire to the green screw on the outlet. That wiring will not cause an EE error. Only the probe should do that. If you are concerned, remove the wires from 5, 6, 7, and 8 that go to the outlet.

It is possible you have a defective (shorted) probe. If so it would be the first I have heard of. I am building my 6th controller and have never had a problem.
 
Thanks guys, I got it working properly now. Ran it through several cycles using hot and cold water connected to lamps. My only problem is now, the heating pad that I planed doesn't come back on when power is restored...you have to press a button. So I need a new heating source...or should cut the cord and bypass the switch? Is that safe?
 
Cutting the cord can work fine, but you do need to be careful when you put it back together. I stagger my cuts so that one side is longer than the other, then strip and wrap the wires around each other, then tape each side carefully with electrical tape. Then I wrap both together with more tape. If you are going to be moving it around some, you might want to solder them after you wrap the wires together so it has more strength.

Of course, if you can return it, there are other items you can use - anything that gets warm will work. I use an old 40W soldering iron in an old holder. Others use lightbulbs in ceramic holders. A 60W bulb should do fine. You can wrap aluminum foil around the bulb to keep the light away from the beer. You should use a fan to circulate the air around the fermentation chamber to keep temps fairly even inside of it. Make sure you tape the probe to the fermentation vessel, and insulate it from the air. It is the wort you want to keep at the temp you have set, not the air around it.
 
I made the heating pad work by simply putting a zip-tie around the on-button keeping it depressed.

I have the probe in a 1 gallon jug of water/bleach mixture.

I do not have a fan of any kind, but the heating pad is on the bottom(heat rises) I was hoping convection would circulate the air a little. Anyone else not use any kind of fan? Problems?
 
I made the heating pad work by simply putting a zip-tie around the on-button keeping it depressed.

That sounds like it should work just fine.

I have the probe in a 1 gallon jug of water/bleach mixture.

The is a problem with that. The fermentation process is exothermic - it generates heat. So the wort heats itself as it ferments, slowly heating the air, and eventually you gallon jug. You want to keep the wort at a stable temperature. Taping the probe to the center of the fermentation vessel, and insulating that from the surrounding air does a good job of that. There are a couple of very long discussions of this earlier in this monster of a thread.

I do not have a fan of any kind, but the heating pad is on the bottom(heat rises) I was hoping convection would circulate the air a little. Anyone else not use any kind of fan? Problems?

Most of us use a computer cooling fan (12 V DC generally) powered by an old phone charger wall wart. I have an always-on outlet on my controller. Cheap, simple, very low power, and effective.
 
How long did this contrller last. Without a relay or contactor it seems to me that a refigerator would draw to much current for the contacts on the controller. I have to redlion that im trying to dwngrade. If these hold up. Prolly would b agood candidate
 
The relays are rated for 15 amps at 110V. I have been using one for a month now with no problem on my Kenmore fridge that I use as a fermenting chamber.
 
For those of you adding lamps or LEDs to signify cooling/heating, where in the circuit are you adding them? Parallel or in series? Before or after the receptacle? Thanks! Almost done with my STC-1000 build. Will share pics upon completion.
 
For those of you adding lamps or LEDs to signify cooling/heating, where in the circuit are you adding them? Parallel or in series? Before or after the receptacle?

In an AC circuit like this, the lamp gets wired in parallel. I expect that most people that put in an indicator wire it before the receptacle so that it shows what the control box is doing regardless to anything plugged into the receptacle.
 
For those of you adding lamps or LEDs to signify cooling/heating, where in the circuit are you adding them? Parallel or in series? Before or after the receptacle? Thanks! Almost done with my STC-1000 build. Will share pics upon completion.

You have to add them in parallel. I actually attached mine right to the receptacle screws.
 
For those of you adding lamps or LEDs to signify cooling/heating, where in the circuit are you adding them? Parallel or in series? Before or after the receptacle? Thanks! Almost done with my STC-1000 build. Will share pics upon completion.

May have been mentioned already, but there is leds built into the display.
 
You have to add them in parallel. I actually attached mine right to the receptacle screws.

So you have two wires in port 6 and two wires in port 8 (on your controller)? And then two wires on each of the receptacle screws as well?
 
Yeah they're just hard to see from across the garage. I added one red and one green so I can see easily if it is running and on what circuit.

Yeah, I put in a red and a green like other folks. Makes it very easy to see what the controller is doing. I wired mine in parallel before the outlets.
 
So you have two wires in port 6 and two wires in port 8 (on your controller)? And then two wires on each of the receptacle screws as well?

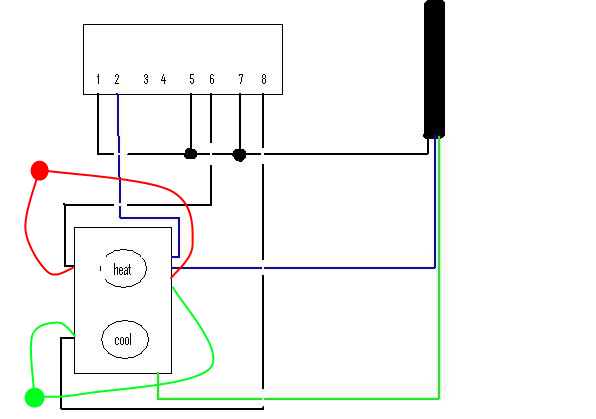
No. One switched wire from the controller (say port 6) and the black wire from the red LED go to the receptacle screw together and the switched wire from port 8 and the hot wire for the green LED go to the other screw (tab broken).

Since I didn't break the tab on the neutral side, I put the neutral in from the extension cord on one screw with the neutral from one LED and the neutral out to port 2 on the controller on the other screw with the other LED neutral. You could theoretically connect them all to the same screw, it just was easier to connect two wires to each screw.

Thank you for the feedback. I think I've illustrated what you're describing below. Care to review?

STC-1000_LED_Circuit.png
 
Yep, that's what I did. Works great for me.

Excellent! I finished building my box last night and wired the LEDs wrong, so that was the only thing holding me back from 100% completing it. I'll re-wire those lights tonight!

Thanks again for all the help, all! :ban:
 
FWIW, I thought about the indicator lights, but did not put them in my build. I do not miss them at all. I really don't need to see, minute by minute, what is going on in my fermentation chamber. I just look at the temperature display and note that it is in range, and maybe notice if it is in heat or cool mode. These things just work. I am about to build the 7th one for my homebrew club. No complaints so far, and no one has opted for lights. YMMV.
 
FWIW, I thought about the indicator lights, but did not put them in my build. I do not miss them at all. I really don't need to see, minute by minute, what is going on in my fermentation chamber. I just look at the temperature display and note that it is in range, and maybe notice if it is in heat or cool mode. These things just work. I am about to build the 7th one for my homebrew club. No complaints so far, and no one has opted for lights. YMMV.

Understandable. I just wanted a little extra bling factor to my build and felt, why not?! I'm used to a single-stage controller, so wanted to get the most out of this build and it's 100% what I want/need for my ferm chamber. Super stoked to use it this weekend.
 
The insides aren't too pretty, but the thing works great! Basically a similar design to most people's controllers with 2x receptacles each for heating and cooling. Since the cords for my cooling devices take up space below the receptacle, I made the two bottom ones the cooling outlets and the two upper ones the heating outlets.

Also, my ferm chamber is made out of sheets of foam, and i don't want the probe's wire to go through the door, so I made a disconnect on the box out of an RJ12 voice jack. I crimped an RJ12 voice plug onto the probe as well. I've also put a short jumper through my ferm chamber's wall with jacks on either side. I can now plug my probe directly into my controller box, or plug the jumper into the box and have the probe connected to the jumper inside my ferm chamber.

I'm very happy with this build and would like to thank the OP again for making it super easy to make. I'd also like to thank pabloj13, reynolds5520, mrklueber for the help with wiring the LEDs.

TC07.jpg


TC12.jpg


TC06.jpg


TC08.jpg
 
After waiting for delivery for a month only to find I ordered the wrong part (220 vs 110) I finally have the right part and wired it all up tonight. I am excited to have temperature controll. Looking forward to my next brew to see how much it helps.
 
I built mine this AM and hooked the freezer up to it. However, it is cycling pretty often. My guess is that the keg of warm beer I just put in along with the warm 10lb co2 tank are getting it pretty warm in there. I have it set for 1 degree difference, 5min delay, 4.4 degrees C. I am considering increasing the delay and temperature difference until the keg/tank start to cool down. After that I assume it is smooth sailing.
 
I built mine this AM and hooked the freezer up to it. However, it is cycling pretty often. My guess is that the keg of warm beer I just put in along with the warm 10lb co2 tank are getting it pretty warm in there. I have it set for 1 degree difference, 5min delay, 4.4 degrees C. I am considering increasing the delay and temperature difference until the keg/tank start to cool down. After that I assume it is smooth sailing.

Where is the probe?
 
Back
Top