DIY Submersible Temperature Probe

Homebrew Talk - Beer, Wine, Mead, & Cider Brewing Discussion Forum

Help Support Homebrew Talk - Beer, Wine, Mead, & Cider Brewing Discussion Forum:

This site may earn a commission from merchant affiliate links, including eBay, Amazon, and others.
Joined
Jul 24, 2006
Messages
14,260
Reaction score
786
Location
Southwest
Finally...Yuri posts a project that anyone can do!

Tools list:
Soldering iron/solder (and the ability to use it)
Hacksaw

Parts list:
Small stainless tube (I used a spare keg dip tube. Stainless brake line would work and is pretty easy to get).
22 ga wire
Heat shrink tubing or electrical tape
Temperature sensor of your choice
Epoxy (J-B Weld or similar - able to withstand up to ~212 degrees F)

Total cost:
Under $10.

How to:
Solder the wire to each pin or output of the temperature sensor. Insulate your work with electrical tape or shrink tubing. Cut a suitable length of stainless tube. Make sure everything fits the way you want it. Mix the epoxy. Put the sensor assembly in the tube, and fill it with epoxy. You can be a little messy - it's easy to sand the excess off after it cures. I found that with J-B Weld, you can wait until it no longer sags under its own weight (about an hour), then put it into boiling water for 10 minutes or so. It hardens right up! No 16 hour wait for cure time.

Notes:
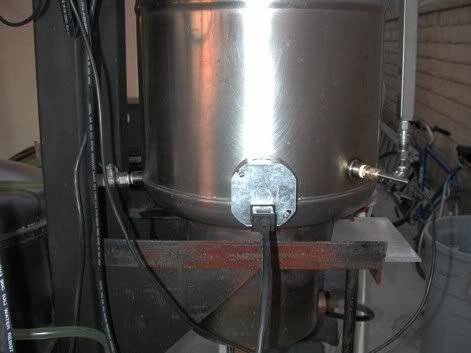
I used an LM34 digital temperature sensor (shown in the middle of the picture) to make a probe for my Mash Monitor project. However, you could use a thermistor, thermocouple, or even an existing non-submersible probe (like the Ranco temp controllers come with).

4688-tempprobe.JPG
 
It's a bit slower than my digital probe thermometer, but it's really not all that bad. I intended to time it, but forgot. Something less than 10 seconds from boiling to freezing and vice versa. J-B Weld is ok as a thermal conductor, but it is an electrical insulator - not bad for this job.
 
If you are using a ranco type probe I made thermowells with SS tubing and JB weld.

Some aluminun foil plugs
dscn3026.jpg


annd JB weld...
dscn3032.jpg


the probes slip in the side...
dscn3041.jpg
 
I'm really impressed with the dedication and innovation on this board. Its great to see the <strike>hobby</strike> profession move forward like this.
 
Has anyone located a thermistor equivalent for the probe used on the Love controls temperature switches. Would like to locate a source of thermistors to install in 1/4" SS probes for insertion into fermentors for temperature control.
 
Looks good Yuri. Now for the dumb question of the day. If I get something like that put together, what do I need to get a read out from it? I guess I mean...could I simply rig up a plug to fit any digital thermometer unit and get accurate results?

Clearly, when it comes to some stuff like this, I'm out of my league a bit, but I like the idea and might try it if I can figure out how to make it work for me.
 
JeepGuy said:
Looks good Yuri. Now for the dumb question of the day. If I get something like that put together, what do I need to get a read out from it? I guess I mean...could I simply rig up a plug to fit any digital thermometer unit and get accurate results?
I was waiting for this question. You can't necessarily just connect any old sensor to any old digital thermometer - you have to know what kind of sensor was used in the first place (and there are lots of kinds). However, I do have a two answers for you, one simple, and one rather complex.

First, the simple answer:
If you have a digital thermometer that doesn't have a submersible probe, you can just encase the probe in some epoxy and stainless tube. That's what I was getting at with the "anyone can do this project" comment.

Now, the complex answer:
If you want to make a new probe for an old thermometer, some reverse engineering is in order. You can probably determine if a thermistor is the sensor of choice, because there will probably only be two wires on the probe output. Connect a multimeter and read the resistance value across those wires at several temperatures. That should give you an idea of the type of thermistor inside it. Here's a page from the Jameco catalog that may help (as you can see, thermistors are cheap!).

4688-jamecothermistors.JPG


If you've got three or more wires coming from the probe, it's probably a digital sensor like the LM34 that I used. Trying to reverse engineer one of those will likely fry it if you connect it backwards or apply too much voltage. In general, they operate at about 5VDC, red=positive, black=negative, green=ground, and other wire colors are likely to be sensor output. The sensor output will be something less than the input voltage. Jameco sells LM34 sensors for less than $5.00 a piece. I use the probe I made to feed my computer digital temperature information via an Arduino microcontroller (in short, I made my computer into a big digital thermometer).

Does that help?
 
LM34s put out 10mV per degree F and can be powered by 5V. So if you have a digital multimeter around that reads mV, that would work pretty well. You would have to hook up a battery to power the sensor. You might be able to use the battery in the multimeter.

70F would output 700mV or 0.7V
150F would output 1500 mV or 1.5V.

www.digikey.com Search on LM34. Follow the links to the datasheet.
 
I just got the Ranco controller. I don't have the probe in front of me and want to drop by the hobby store to get some stainless tubing. What inside diameter tubing should I get?

Tim
 
seyahmit said:
I just got the Ranco controller. I don't have the probe in front of me and want to drop by the hobby store to get some stainless tubing. What inside diameter tubing should I get?

Tim
The stock Ranco probe is 1/4" in diameter. 1/4" ID tubing might work with a tight fit, but you'd want to take the probe with you just to make sure.
 
Thanks Yuri! I will pick up 1/4 and the next size up. The probe is currently keeping my beer from freezing. :D
 
bumping old thread for worthy cause,

wiring up my lm34's is producing varying results.
taping together all 3 leads results in a voltage varying enough to fluctuate Farenheit temps about 10-15 degrees.

when I have all 3 leads loose, temps are spot on.
leads length doesn't seem to be a factor, just proximity to each other.
I've tried different styles of leads too, even cat 5 to try and cancel out crosstalk.

any suggestions?
I really don't want 12 feet of flying leads from microcontroller to temp probes
 
bumping old thread for worthy cause,

wiring up my lm34's is producing varying results.
taping together all 3 leads results in a voltage varying enough to fluctuate Farenheit temps about 10-15 degrees.
You do have all 3 seperated right? not just soldered, then taped up? If using tape, wrap each solder connection independently then once covered, you can wrap them together. If using shrink, Use the tiny stuff to shrink each connection independently, then a bigger size to bring them all togehter.

Sorry if this seems obvious, but Obvious is usually the overlooked.:mug:
 
Yuri -
When using these with your Arduino, what did you use for an adjustment (like tempread * .488) ?

Did you find differences between different probes ?
 
sorry if this sounds ignorant but this stuff is foreign to me.

Ok so here is the question. If i found out what thermistor my digital therm uses, could i make multiple probes from that using 3.5 mm jacks off of old headphones?

Would this work?

Thanks,

Joe
 
just so i understand- the SS tube is open on both ends (like a straw)? so the only thing sealing both ends is hte epoxy that has filled the tube, correct?

i would like to use this idea to waterproof a love temp probe for fermentation control.
 
Before I saw this thread, I was doing the same thing, but with a bit of brass tubing from the hobby store. Epoxy both ends, sand smooth - brass was easy to find and does well with temperature transmission too. In my case, it never touches beer, it's sitting in a fermentation water bath.
 
If you were to do this with an existing Ranco probe would you heat shrink wrap the wire probe also ( or the portion you would submerse)?
I can buy 1/4" copper tubing at local hardware store. Has anyone successfully got the probe in 1/4" tubing? I noticed JB weld has a water weld product is their any reason not to use that as opposed to the "regular" version you mix? Lastly if you wanted to remove the probe eventually would you just methodically pick at the epoxy or is it pretty much a permanent mod?
 
Shouldn't have to shrink-wrap the tube, as the probe itself is buried in the tubing, and the epoxy is sealing both ends -

not sure about Question #2 - 1/4" tubing, but they have many sizes with 1/32 or even 1/64 ranges at the hobby shop...

I think regular JB is waterproof -

I consider it permanent. If I wanted to replace the probe, I'd go back up the line to the controller box and replace it.
 
I keep seeing the mention of "hobby shop", what exactly is that? The only "hobby shops " around me are usually for radio control devices. I do remember hobby shops in the 70's. Where and when do you guys live that you have hobby shops? I really cant think of anywhere else I can get metal tubing other than the hardware store. Is there someone online you know of that would sell different diameter tubing?
 
ah...
I didn't... the insulation is waterproof - but the probe is deep enough into the sleeve that the epoxy effectively seals against the insulation, and acts as a bit of a strain relief between the probe and the wire.
 
i just bought a few LM35 sensors and a netduinio. I'm gonna need to build probes at some point and was wondering what your thoughts on using just 1/2" OD copper tubing and soldering a cap on the end of it. Do you think this will work? Don't know where to get the SS tubing otherwise.
 
I think 1/2" od copper might provide too much air space between the sensor and what it's measuring. Air can be an insulator...

yellow pages "hobby" in your area, and look for a display like this...(possibly an Ace hwde-type store as well)


_wsb_375x336_1005I.JPG
 
Ok cool thanks for the pic. Super excited to get this setup. couple of questions, I see you list 22 gauge wire, but I have a bunch of cat 5 laying around ~500' is that heavy enough? what do you use to termunate the lines ot did you feed them directly to your audriuno?
 
Sorry for necro'ing this post, but I am in doubt about how this is made.

Is the temp sensor incased in the epoxy inside the tube? Or is it "free floating" in the tube, with only epoxy sealing the ends?
 
Mine is free-floating, although the fit is plenty snug. I cut to size and plugged the end of my tube with epoxy, let it dry, slid the sensor inside, and dabbed epoxy over the wires and tube on the other end. Voila, sealed temp sensor.
 
Mine is free-floating, although the fit is plenty snug. I cut to size and plugged the end of my tube with epoxy, let it dry, slid the sensor inside, and dabbed epoxy over the wires and tube on the other end. Voila, sealed temp sensor.

Excellent, thank you!
 
Back
Top