You are using an out of date browser. It may not display this or other websites correctly.
You should upgrade or use an alternative browser.
You should upgrade or use an alternative browser.
DIY glycol chilled plastic conical fermenters
- Thread starter packet
- Start date

Help Support Homebrew Talk:
This site may earn a commission from merchant affiliate
links, including eBay, Amazon, and others.
Gotcha. That's worth the trouble, I suppose. I just use a whole house carbon filter, but it's not nearly as good as RO. I'll sit back and continue to enjoy your build.
For water, I have a inline house water filter and water softener setup. Then on my sink, I have a dual filter setup. So days before brewing, I fill up a bunch of 2 1/2 gallon water jugs and put them in the garage. Or if I'm going to the store, I bring them with me, I think it's $0.39 / gallon to fill them.
ClaudiusB
Well-Known Member
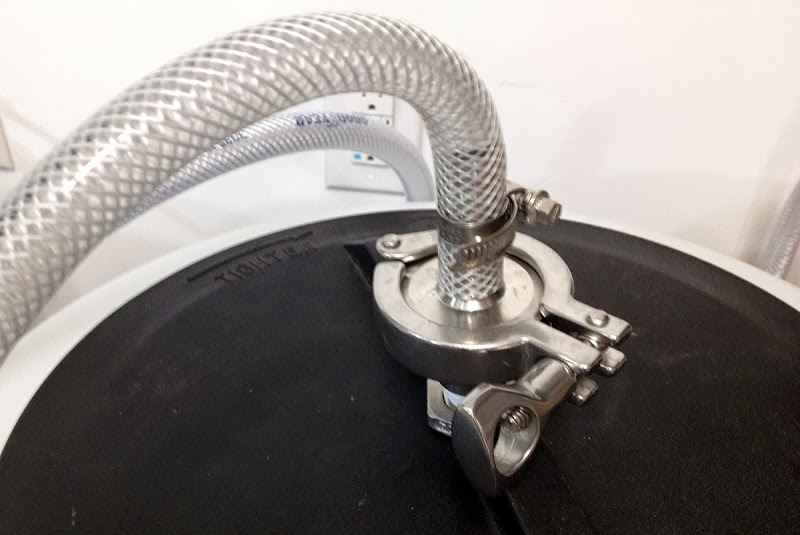
And the remaining conical fittings are done:
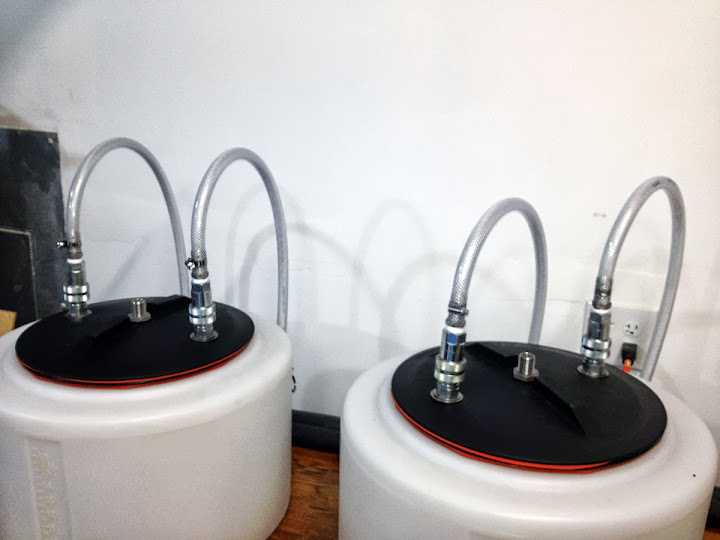
Now all that's left is the tri-clover blowoff valve fittings and the replacement ball valves. Thankfully the ball valves were shipped from China yesterday. So, hopefully the boat gets here fast.
Looking great!
I hope you won't have condensation problems with your metal connectors.
Cheers,
ClaudiusB
I hope you won't have condensation problems with your metal connectors.
Nothing some foam pipe insulation won't fix if I need to.
StMarcos
Well-Known Member
At some point I recommend rigging up some sort of temporary way to measure temperature of the beer at both the very top and bottom of the fermenter. I did this when using the brewhemoth chiller for the first few times, and found SIGNIFICANT (10+degF) differences after the ferment was done, when there was no more fermentation to stir things up. Especially when holding at lager temps in a 75degF room, there was a lot of condensation that dripped over the bottom port and grew mildew in short order. Just some things to consider....
At some point I recommend rigging up some sort of temporary way to measure temperature of the beer at both the very top and bottom of the fermenter. I did this when using the brewhemoth chiller for the first few times, and found SIGNIFICANT (10+degF) differences after the ferment was done, when there was no more fermentation to stir things up. Especially when holding at lager temps in a 75degF room, there was a lot of condensation that dripped over the bottom port and grew mildew in short order. Just some things to consider....
What was your solution to fix the temperature difference?
![Craft A Brew - Safale S-04 Dry Yeast - Fermentis - English Ale Dry Yeast - For English and American Ales and Hard Apple Ciders - Ingredients for Home Brewing - Beer Making Supplies - [1 Pack]](https://m.media-amazon.com/images/I/41fVGNh6JfL._SL500_.jpg)
$6.95 ($17.38 / Ounce)
$7.47 ($18.68 / Ounce)
Craft A Brew - Safale S-04 Dry Yeast - Fermentis - English Ale Dry Yeast - For English and American Ales and Hard Apple Ciders - Ingredients for Home Brewing - Beer Making Supplies - [1 Pack]
Hobby Homebrew


$53.24
1pc Hose Barb/MFL 1.5" Tri Clamp to Ball Lock Post Liquid Gas Homebrew Kegging Fermentation Parts Brewer Hardware SUS304(Gas MFL)
yunchengshiyanhuqucuichendianzishangwuyouxiangongsi

$33.99 ($17.00 / Count)
$41.99 ($21.00 / Count)
2 Pack 1 Gallon Large Fermentation Jars with 3 Airlocks and 2 SCREW Lids(100% Airtight Heavy Duty Lid w Silicone) - Wide Mouth Glass Jars w Scale Mark - Pickle Jars for Sauerkraut, Sourdough Starter
Qianfenie Direct

$172.35
2 Inch Tri Clamp Keg Manifold With Ball Lock Posts, Pressure Gauge, PRV (0-30 PSI) – Homebrew, Fermentation, Kegging System
wuhanshijiayangzhiyimaoyiyouxiangongsi


$7.79 ($7.79 / Count)
Craft A Brew - LalBrew Voss™ - Kveik Ale Yeast - For Craft Lagers - Ingredients for Home Brewing - Beer Making Supplies - (1 Pack)
Craft a Brew

$176.97
1pc Commercial Keg Manifold 2" Tri Clamp,Ball Lock Tapping Head,Pressure Gauge/Adjustable PRV for Kegging,Fermentation Control
hanhanbaihuoxiaoshoudian


$28.98
Five Star - 6022b_ - Star San - 32 Ounce - High Foaming Sanitizer
Great Fermentations of Indiana

$10.99 ($31.16 / Ounce)
Hornindal Kveik Yeast for Homebrewing - Mead, Cider, Wine, Beer - 10g Packet - Saccharomyces Cerevisiae - Sold by Shadowhive.com
Shadowhive


$479.00
$559.00
EdgeStar KC1000SS Craft Brew Kegerator for 1/6 Barrel and Cornelius Kegs
Amazon.com


$58.16
HUIZHUGS Brewing Equipment Keg Ball Lock Faucet 30cm Reinforced Silicone Hose Secondary Fermentation Homebrew Kegging Brewing Equipment
xiangshuizhenzhanglingfengshop

$22.00 ($623.23 / Ounce)
AMZLMPKNTW Ball Lock Sample Faucet 30cm Reinforced Silicone Hose Secondary Fermentation Homebrew Kegging joyful
无为中南商贸有限公司


$53.24
1pc Hose Barb/MFL 1.5" Tri Clamp to Ball Lock Post Liquid Gas Homebrew Kegging Fermentation Parts Brewer Hardware SUS304(Gas MFL)
Guangshui Weilu You Trading Co., Ltd


$39.22 ($39.22 / Count)
Brewer's Best Home Brew Beer Ingredient Kit - 5 Gallon (Mexican Cerveza)
Amazon.com


$20.94
$29.99
The Brew Your Own Big Book of Clone Recipes: Featuring 300 Homebrew Recipes from Your Favorite Breweries
Amazon.com


kchomebrew
Well-Known Member
- Joined
- Jan 11, 2011
- Messages
- 635
- Reaction score
- 74
Very cool! Well done. I'll enjoy checking back on this one to see progress.
StMarcos
Well-Known Member
What was your solution to fix the temperature difference?
Sold the immersion chiller and put the whole thing in a temp controlled box with a fan to circulate air inside. If I had to use an immersion chiller I would make sure it had an even amount of coil area from top to bottom. Also, a room that was close to the ferm temp would help a lot. I had first thought about just chucking a big foam box over the whole thing, then figured I should have some air circulation, and once there, figured I would just heat/chill the box directly.
I had also tried putting an old thick canvas sleeping bag over it, which helped to be able to drop temps lower and/or use less power, but condensation was still a problem and the bag would eventually get wet around the bottom. Really didn't like the mildew on my fancy triclover butterflies!
I still hope to see this chiller project with a couple of probes during the chilling period when the ferment is over. Seems like a better spread of coil than I had.
New ball valve is in place as well as the new driver board.
Unfortunately it looks like the o-rings aren't going to keep the attachment for the lid air tight. So, I siliconed that in place and am now waiting for everything to dry. Hopefully tomorrow I'll be able to do the trial run.
Unfortunately it looks like the o-rings aren't going to keep the attachment for the lid air tight. So, I siliconed that in place and am now waiting for everything to dry. Hopefully tomorrow I'll be able to do the trial run.
Well, the chiller actually works. First run through of the chiller and it's actually cooling the water I'm using for the test. The ball valves also work too. Once the water is at temp I'll start testing the pump.
- Joined
- May 6, 2013
- Messages
- 14,033
- Reaction score
- 3,378

well, the chiller actually works. First run through of the chiller and it's actually cooling the water i'm using for the test. The ball valves also work too. Once the water is at temp i'll start testing the pump.
amazing!
Got the spray ball working today too.
Here's the pump doing its magic:
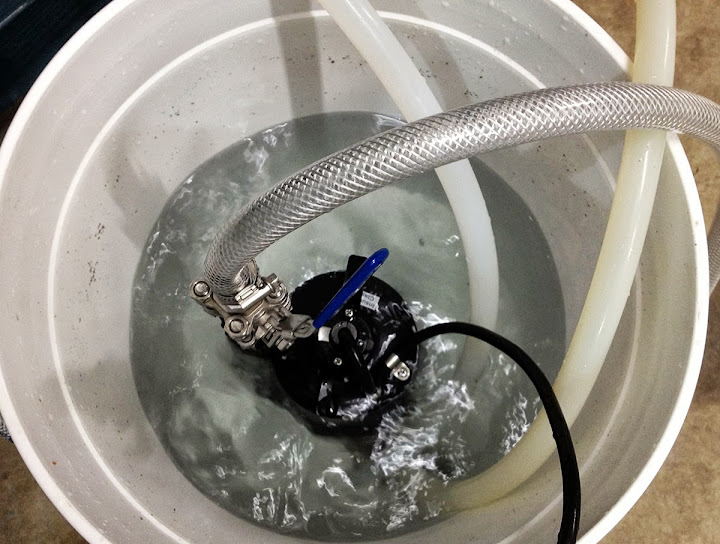
It takes a little bit to adjust the flow to the point that it doesn't pump all the cleaner out of the bucket, but it works well
Spray ball in action:
From a quick look, it looks like it covers everything quite well.
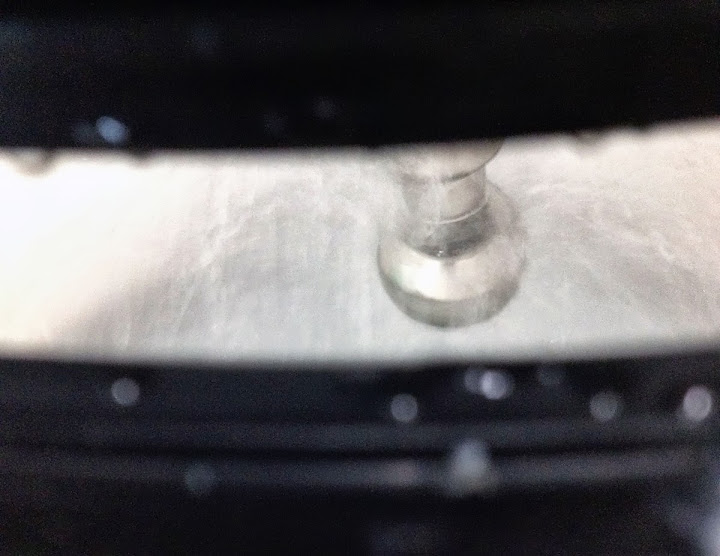
Tri-clover connection on the lid:
Here's the pump doing its magic:
It takes a little bit to adjust the flow to the point that it doesn't pump all the cleaner out of the bucket, but it works well
Spray ball in action:
From a quick look, it looks like it covers everything quite well.
Tri-clover connection on the lid:
starman
Well-Known Member
Is she up to cruising altitude yet? How often do the zones and main reservoir ac kick on?
Is she up to cruising altitude yet? How often do the zones and main reservoir ac kick on?
Just got a smaller water pump today. If the silicone has finally dried I should be using it on a batch this weekend.
bulldogbrewhaus
Well-Known Member
This is a badass build. I have not seen anything quite like that before.
I'm starting to feel a bit like Goldilocks here. The 1/4 HP pump was way too much, the 400GPH pump was way too little. Thankfully the 1/6 HP pump appears to be just right. One more leak to fix on one of the chillers and a problem with the ball valve on ferm 3 (again) and I should be good to go.
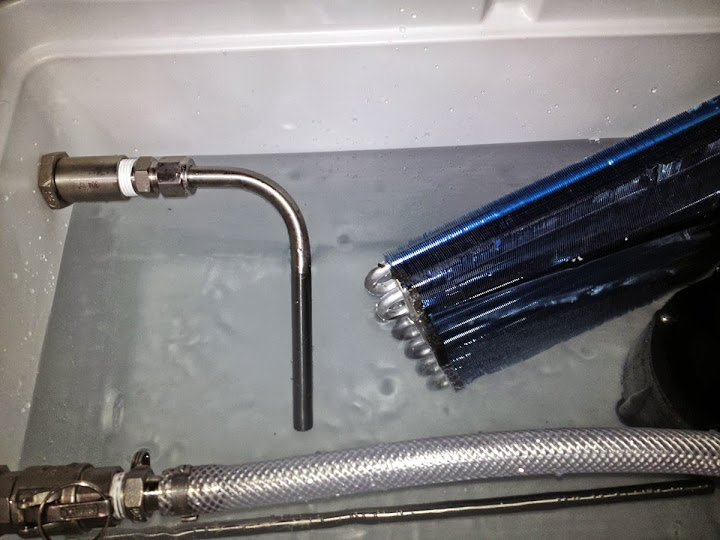
Test run of the chiller using water works great. Here's a rather bad phone photo of the chiller at work:
And a screenshot after the water came to temp:
Looks like I should be all set for a first ferment tomorrow.
And a screenshot after the water came to temp:
Looks like I should be all set for a first ferment tomorrow.
ClaudiusB
Well-Known Member
I hope the 1/6 HP pump will work for you.I'm starting to feel a bit like Goldilocks here. The 1/4 HP pump was way too much, the 400GPH pump was way too little. Thankfully the 1/6 HP pump appears to be just right.
My cleaning setup requires a 3/4 HP pump to remove wall deposits after fermentation or boiling.
Some hitting force is required to remove the stubborn deposits in my equipment.
Cheers,
ClaudiusB
I hope the 1/6 HP pump will work for you.
My cleaning setup requires a 3/4 HP pump to remove wall deposits after fermentation or boiling.
Some hitting force is required to remove the stubborn deposits in my equipment.
Cheers,
ClaudiusB
Hey Cladius, you mind point me towards what pump you are using for CIP? And if you're so inclined, post it over in my CIP pump thread?
https://www.homebrewtalk.com/f11/definitive-cip-pump-thread-398895/
I hope the 1/6 HP pump will work for you.
My cleaning setup requires a 3/4 HP pump to remove wall deposits after fermentation or boiling.
Some hitting force is required to remove the stubborn deposits in my equipment.
Cheers,
ClaudiusB
I'm using the 1/6 HP pump for pumping glycol through the system.
The 1/4 HP pump is going to be used for the spray ball. The main problem I have now is that the 1/4 HP pump fills the conical faster than it drains. I might have to remove the tubing entirely and drain the conical directly in to the bucket I'm using.
bellinmi88
Well-Known Member
Have you sketched out your system as built, that would be interesting to see.
Here's what I'm basing the plumbing for the glycol lines on:
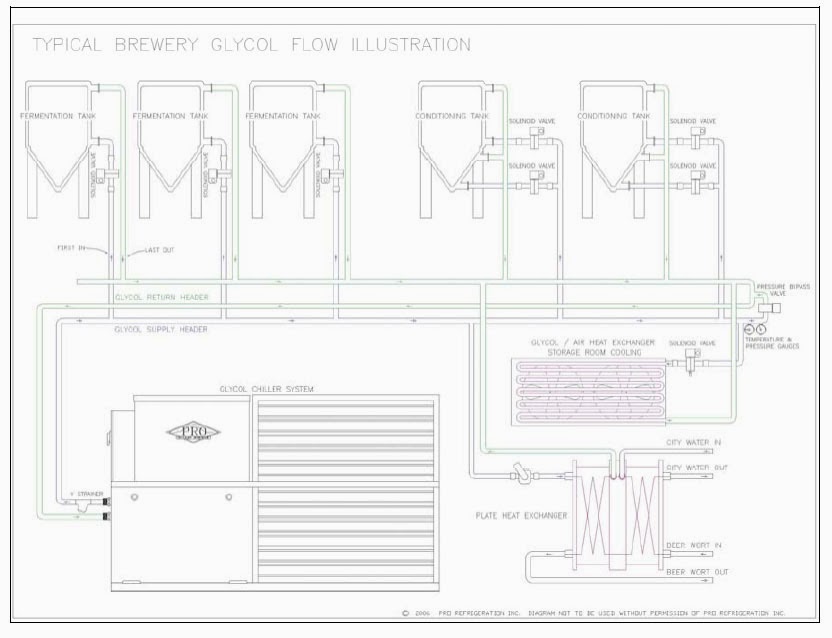
Obviously without the plate cooler or cold room.
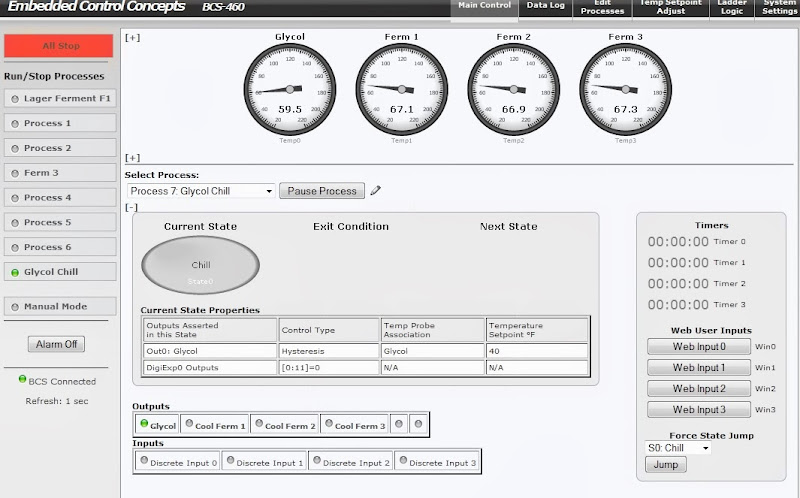
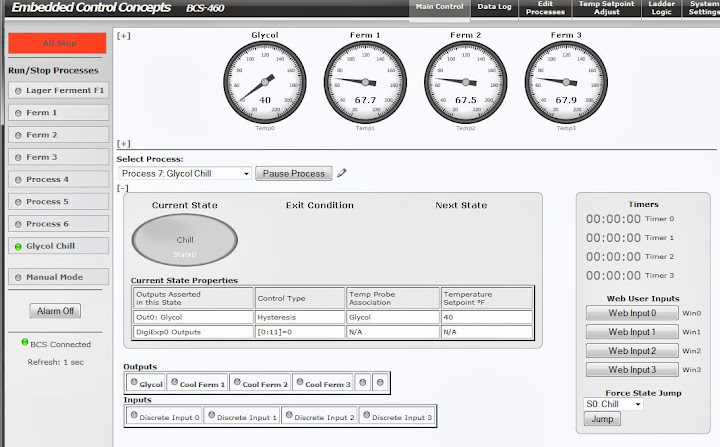
Well, it's finally up and running. The first batch is in one of the conicals.
Here's a temp graph:
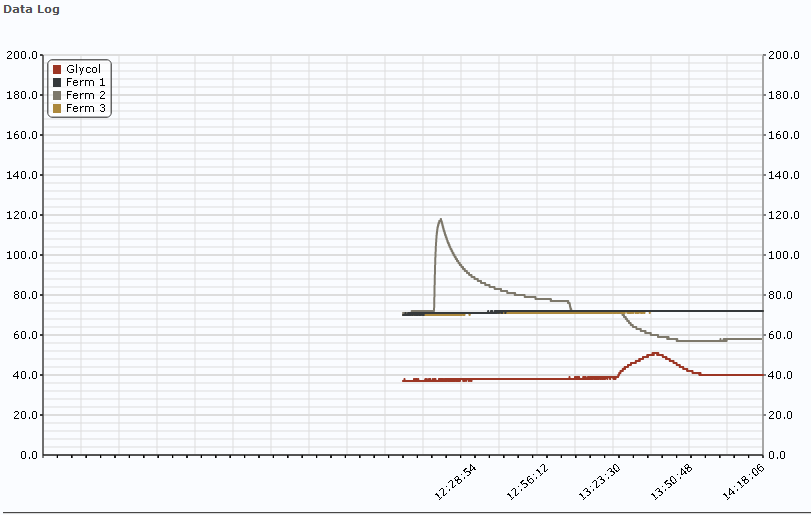
I'm currently running water through the system as a trial run. So, the water is set to 40 deg. F. The A/C unit will kick on once the water reaches 50 and cool it back down to 40.
It also looks like we're due for a heat wave in the next couple days with ambient temps reaching ~95. So, we'll see how it keeps up.
Here's a temp graph:
I'm currently running water through the system as a trial run. So, the water is set to 40 deg. F. The A/C unit will kick on once the water reaches 50 and cool it back down to 40.
It also looks like we're due for a heat wave in the next couple days with ambient temps reaching ~95. So, we'll see how it keeps up.
Have you sketched out your system as built, that would be interesting to see.
I haven't as of yet, but will if I get some time and find some appropriate visio icons for it.
In the mean time, take out the cool room, storage tanks and the like and that's how it's plumbed.
I'm using the 1/6 HP pump for pumping glycol through the system.
The 1/4 HP pump is going to be used for the spray ball. The main problem I have now is that the 1/4 HP pump fills the conical faster than it drains. I might have to remove the tubing entirely and drain the conical directly in to the bucket I'm using.
Your problem may be your return hose. I use 1.5" on mine to keep up. I also have a hose on the racking valve too.
Your problem may be your return hose. I use 1.5" on mine to keep up. I also have a hose on the racking valve too.
Yeah, I'll bet it is. I'll have to order some new fittings next time I get some.
Maybe we will be the only ones to run into issue, but when we cleaned our conicals without using ~180 degree water, we ended up with about 10 batches of molded beer. Just my two cents. Just concerns me to see that you are pumping unheated water though the CIP heads.
Similar threads
- Replies
- 9
- Views
- 2K
- Replies
- 2
- Views
- 1K
