DIY glycol chilled plastic conical fermenters

Homebrew Talk - Beer, Wine, Mead, & Cider Brewing Discussion Forum

Help Support Homebrew Talk - Beer, Wine, Mead, & Cider Brewing Discussion Forum:

This site may earn a commission from merchant affiliate links, including eBay, Amazon, and others.
Awesome build, and equally, if not more impressive write up!

I am thinking about doing this quite seriously. I am not a good carpenter and thought about doing the stand out of metal, perhaps using the frames available for the conicals. I was also thinking about possibly condensing the stand, and the side cart into one assembly, or optionally, just put casters on the individual conical frames and skip the stand, mounting plumbing on a wall.

I have several questions if you please. .

At the height your racking arms are, I assume that is above the level of a standard ball lock keg?
Also, can you fit a standard 5 gal pail beneath the dump valve at the height the conicals rest in the stand?
These two questions are probably the most critical. I don't know how the height would be for these, if I used the metal stands instead, if the heights would be correct as-is. Are you happy with the height of the top of the conicals for working with the lids, etc? If I modify, it seems going higher might facilitate combining the two carts into one, but only if the working height doesn't become to difficult.

Do you notice any issues of rolling the cart with all the casters? If I wanted to roll my stand from a walkout basement onto a patio for some reason, there is a 1" lip of concrete and also smaller metal threshold that I might have difficulty with.

How are you filling the fermenters? I would need a VERY long piece of silicone hose to pump from the brew stand directly through chiller and into the conical, depending on where I put the conical stand. (What is the combined length and width of the two carts ?) I might need to use a pail as an intermediary. I don't know if the march pump could pull off a long run of say 25 -35 feet.

Where do you rest or store the chiller coils when opening the fermenter without loosening the air tight fittings ? Do they stand upright on the base coil? Haven't read the web page on these yet, but was wondering if its covered in there about how to adjust the depth of how far into the wort they will extend.

I think you touched on this already, but could you elaborate please. If doing ales and lagers simultaneously, how has the performance been in terms of temp regulation without overshoot/undershoot?

Do you know what the max temp the plastic conicals can tolerate? 140°? I've been having issues with my plate chiller, and seems it'd be easier to just chill it to what I can manage then use the glycol fermenter to handle the rest.

How easy is it to control flow, such as for dumping yeast, from those butterfly valves, without going full blast. Do these work like a ball valve except with a plate instead? What is the benefit over a standard ball valve?

Thanks!

TD
 
PIDs are made to frequently cycle in order to not overshoot a set temperature. While this is great for heating elements, it's not so great for the lifespan of your pump and ball valves.

Is this really an issue though? Is the temp of the big glycol cooler tub going to fluctuate beyond an acceptable range often?
 
Had another question:


Has anyone else built this yet? Is the 48 qt cooler capacity a must? Looking to see if the AC could potentially be positioned in a different orientation from the cooler to save space.

TD
 
packet said:
Glad to hear it's useful. Between grad school and work I haven't had a ton of time to work on the website lately. I just finished the first part of the controller page though. Hopefully, I'll get some time to draw up wiring diagrams in the near future.

What are you studying I grad school?
 
Is this really an issue though? Is the temp of the big glycol cooler tub going to fluctuate beyond an acceptable range often?
The main issue is that as say the glycol chills, a PID will turn on and off the A/C unit 20-50 times before it gets down to the set temp. That many cycles is a problem for an A/C unit. The same problem exists with the motorized ball valves. They're rated for ~50k cycles from what I remember. Not such a problem if they turn on 20 times a day (you'd have to replace a ball valve once every 7 years or so), but a problem if they're cycling 200 times a day.

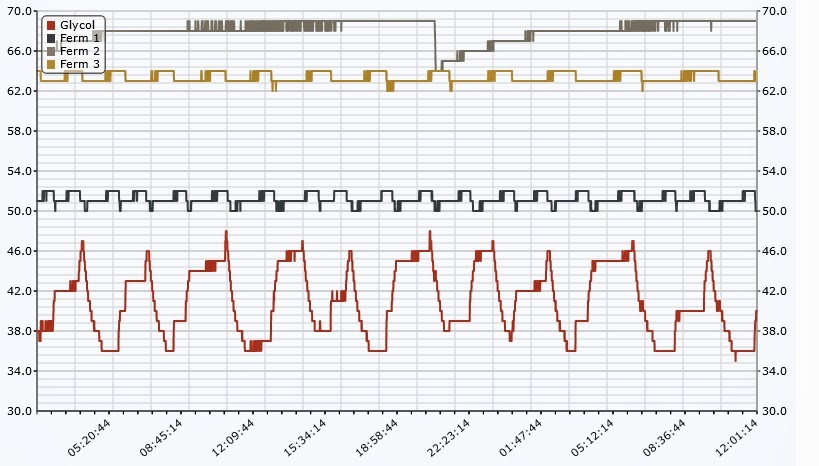
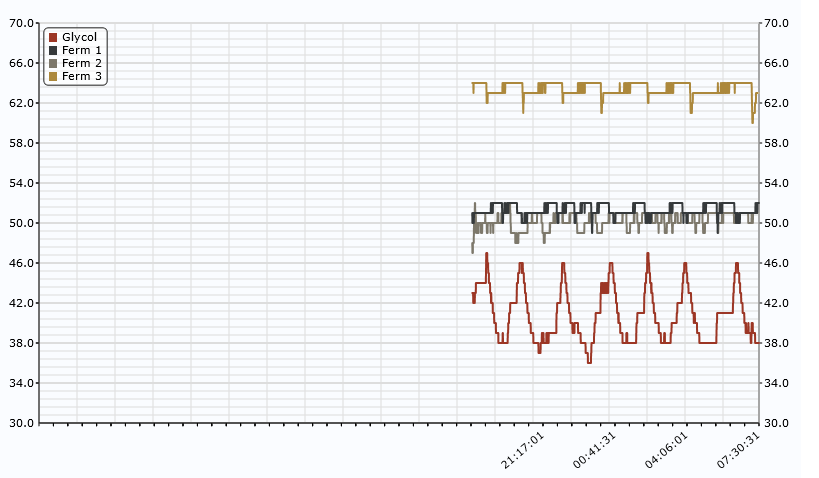
Also, with all 3 conicals going at once, the A/C unit will cycle roughly every two hours or so.
 
Had another question:


Has anyone else built this yet? Is the 48 qt cooler capacity a must? Looking to see if the AC could potentially be positioned in a different orientation from the cooler to save space.

TD

You can use whatever cooler you want. I have an electric brewery just to the right of the glycol chiller. So, the extra counter space was a welcome addition.

The only caveat I'd say is that you need to have a decent sized reservoir of glycol. Otherwise you're going to start cycling the A/C unit more frequently than it really should be cycled.
 
Awesome build, and equally, if not more impressive write up!

I am thinking about doing this quite seriously. I am not a good carpenter and thought about doing the stand out of metal, perhaps using the frames available for the conicals. I was also thinking about possibly condensing the stand, and the side cart into one assembly, or optionally, just put casters on the individual conical frames and skip the stand, mounting plumbing on a wall.

The cart is pretty easy to make actually. The worst part is the countertops, but I used those because that's what I have in the rest of the garage.

Other than that, it's all 2x4s held together with kreg screws. The only tools you'd need is a miter saw (circular saw works in a pinch), kreg jig, and a drill/driver combo. Add in a jig saw for the counter and you're good to go.

I put the stand on a second cart as otherwise I'd need longer than an 8ft 2x4 which wouldn't fit in the car, and I'd have to figure something else out for the counters. MDF would work pretty well though.

I have several questions if you please. .

At the height your racking arms are, I assume that is above the level of a standard ball lock keg?
Also, can you fit a standard 5 gal pail beneath the dump valve at the height the conicals rest in the stand?

I use pin lock kegs, and the racking arm is above that. I'll have to check with one of my old ball locks later on. I usually just attach a silicone hose with a camlock on one end to the racking arm and enough hose to reach the bottom of the keg. Open it up and rack off the beer.

To dump all the trub after I rack the beer off, I put a 5 gallon bucket from lowes/home depot under the dump valve and open it. works great.

These two questions are probably the most critical. I don't know how the height would be for these, if I used the metal stands instead, if the heights would be correct as-is. Are you happy with the height of the top of the conicals for working with the lids, etc? If I modify, it seems going higher might facilitate combining the two carts into one, but only if the working height doesn't become to difficult.

The height actually works out pretty well. It's high enough to facilitate dumping in to regular buckets and racking off to kegs, but low enough that I can look in to the conical to check if it's been cleaned. The counter itself is roughly at regular kitchen countertop height.

Do you notice any issues of rolling the cart with all the casters? If I wanted to roll my stand from a walkout basement onto a patio for some reason, there is a 1" lip of concrete and also smaller metal threshold that I might have difficulty with.

I haven't had to move it much since I put it in place, but it's pretty easy to roll around. If you have to go over a lip, you might want to make a small ramp just to make it easier on yourself (you're talking about lifting 30 gallons of liquid after all), but pushing it around shouldn't be an issue.

How are you filling the fermenters? I would need a VERY long piece of silicone hose to pump from the brew stand directly through chiller and into the conical, depending on where I put the conical stand. (What is the combined length and width of the two carts ?) I might need to use a pail as an intermediary. I don't know if the march pump could pull off a long run of say 25 -35 feet.

At the moment I've been using a carboy that I just dump in to the fermenter. I need to move one of the pumps to facilitate pumping directly in to them. I do already have the tri-clover fittings on the lid for that to work though.

My long term plans are to get it so the beer never touches outside air once it has been cooled. Been working on other projects at the moment though. I've been planning on hooking up a triclover air stone to the bottom of the conical for oxygenation, and pumping the wort directly in via the lid. The only other thing I need to work on is getting the yeast in to the conical. I was thinking of using a tri-clover reducer as a funnel that I could hook up to the lid once the wort has been transferred and oxygenated, but again, that's a project for a later date.

Where do you rest or store the chiller coils when opening the fermenter without loosening the air tight fittings ? Do they stand upright on the base coil? Haven't read the web page on these yet, but was wondering if its covered in there about how to adjust the depth of how far into the wort they will extend.

The coils are permanently attached to the lid. So, they come out with the lid when you remove it. There's a picture on the website if you want to take a look. They're at a depth that you should be able to ferment a 5 gallon batch without any trouble. They come within an inch or two of the racking arm.

I think you touched on this already, but could you elaborate please. If doing ales and lagers simultaneously, how has the performance been in terms of temp regulation without overshoot/undershoot?

So far, so good actually. Once I figured out the driver board issue, they've been within a degree or so of the set point. You can adjust the hysteresis however high you want for a temp swing. Right now I'm actually out of kegerator space. So, I've been lagering in a couple of the conicals while I wait for free space to show up. At the moment I have a vienna lager at ~40 degrees, an alt that's fermenting at 60 degrees, and an oktoberfest fermenting at ~50 degrees. No problems as of yet.

Do you know what the max temp the plastic conicals can tolerate? 140°? I've been having issues with my plate chiller, and seems it'd be easier to just chill it to what I can manage then use the glycol fermenter to handle the rest.

Not 100% sure, but it's MDPE. There should be some info on it out there. I run hot tap water + pbw through it to clean regularly though. So, in the 120s I haven't seen any issues.

I'd definitely run the wort through a chiller first before transferring to the conicals though. That's a ton of heat to take out and you risk raising the temp of the glycol much higher than normal. For the glycol, that's not a huge issue, but if you have another conical need to be cooled at the same time, you could end up heating your wort, which wouldn't be a good thing.

Normally though, I chill my wort to somewhere in the 80s and transfer it to the conicals. I'll oxygenate and turn on the chill cycle set to pitch temp. 5-10 minutes later it'll be in the mid 40s for a lager. So, pitch the yeast and set the conical to fermentation temp. Then you're good to go.

How easy is it to control flow, such as for dumping yeast, from those butterfly valves, without going full blast. Do these work like a ball valve except with a plate instead? What is the benefit over a standard ball valve?

The reason I went with a ball valve for the racking port is that it's a lot easier to control flow. The downside is you need to take it apart to clean it. Butterfly valves are CIP though. So, that's what I used for the dump valve. The 1.5" dump valve can dump a ton of liquid quickly. So, if you're using that to harvest yeast, you can either use the sight glass method that others use in the main plastic conical thread, or just hook a 1/2" hose up to it when you're dumping. The hose has enough restriction on it that you can control the flow pretty easily.
 
Hey YOU ARE THE MAN!!!

I am a ADHD kinda guy (never diagnosed) but I ask a TON of rambling questions and you answered them ALL!

Thanks tons.

You can bet I'm building this, but out of metal instead of wood with 4 casters instead of the 8. I am going to love brewing once I have control on my cold side like I do on the hot side.

it might take a while to do since I'm on a different budget than you grad studs are.... crazy....

Anyways, thanks tons for the inspiration and the awesome writeup, plus sources linked in the website. If you're ever in my neighborhood, stop over for all you can drink homebrew...

Rick

oh, and I'm sure there might be one or at the most two questions during the build (;P)

TD

If I had bothered to get my MIG welder set up, I probably would have gone with metal instead of wood.

Glad to help, let me know if you need anything else.
 
I just scribbled out the rough draft for doing the stand in metal with 22" squares for top frame, and flush welded plates with 18.8" holes with reinforced bracket below the plates supporting the corners. The bottom frame is going to be same length, but wider by about 8" off the back where I will rest the cooler and AC unit.
I'm going to do it out of aluminum, and then sandwich on top a single piece of diamond plate or maybe even thin stainless.

Going to start in September to coincide with q3 bonus.

Can you tell me, because its hard to see, what kind of clearance there is for putting a cooler off set on the back side, half on the 8" extender I was talking about, and half on the side encroaching upon the conical base? That's going to be the hardest to plan. I might add a couple inches to the overall height to get some margin here.

Anybody know a cheapo poor mans CAD type software that's easy to use?

TD

Are you thinking about putting the cooler to the right of the conicals? You could move the conicals closer together to save yourself some space and you might gain a foot or so without encroaching on the space below the conicals. A lot of my spacing was due to the thickness of 2x4s. If you're going with aluminum, you have a lot more space to place with.

Double check your conicals for the hole size though. I remember mine being 18.5-18.6" across.

As for cheap CAD, I like Sketchup. It's certainly not AutoCAD, but it gets the job done for DIY stuff.
 
packet said:
Are you thinking about putting the cooler to the right of the conicals? You could move the conicals closer together to save yourself some space and you might gain a foot or so without encroaching on the space below the conicals. A lot of my spacing was due to the thickness of 2x4s. If you're going with aluminum, you have a lot more space to place with.

Double check your conicals for the hole size though. I remember mine being 18.5-18.6" across.

As for cheap CAD, I like Sketchup. It's certainly not AutoCAD, but it gets the job done for DIY stuff.

Ill check into that. How in the heck do you measure the hole size? Measure circumference and then calculate? How true to round were your conicals or is that not a concern?

I was thinking about putting the cooler behind the conicals, since the cone part only occupies a portion of the space below the tabletop I thought if I made the base of the cart wider, or deeper rather, front to back, that I could make a small shelf for the cooler and AC unit combined. Planning to mount the enclosure to either right or left side of the cart, possibly below the rail, flush, but depends on the wiring and such. First I need the cart though.

Planning to use two inch square aluminum tubing for the cart frame. I want something strong but I don't want to use steel due to weight and cost.

Ill post up my sketch up as soon as I make one. Big concern I have is the feasibility of cramming the cooler and AC onto the bottom frame. I don't want to make the cart any bigger than it needs to be. Are the 22" squares the smallest size for the conicals, hate to use an odd number, and 20" seems it'd be tedious.

TD
 
Ill check into that. How in the heck do you measure the hole size? Measure circumference and then calculate? How true to round were your conicals or is that not a concern?

Wrap a string around the part that goes through the hole, measure how long it is, and divide the result by Pi. That's the diameter of the circle you need to cut. Not really a concern about how close to a perfect circle they are. It'll work.

My main concern with cutting the holes is you have the entire weight of the wort being supported on that ledge. So, try not to cut too much out if you don't have to. Mine are plenty sturdy though and I've never had any issues.

I was thinking about putting the cooler behind the conicals, since the cone part only occupies a portion of the space below the tabletop I thought if I made the base of the cart wider, or deeper rather, front to back, that I could make a small shelf for the cooler and AC unit combined. Planning to mount the enclosure to either right or left side of the cart, possibly below the rail, flush, but depends on the wiring and such. First I need the cart though.

Planning to use two inch square aluminum tubing for the cart frame. I want something strong but I don't want to use steel due to weight and cost.

Ill post up my sketch up as soon as I make one. Big concern I have is the feasibility of cramming the cooler and AC onto the bottom frame. I don't want to make the cart any bigger than it needs to be. Are the 22" squares the smallest size for the conicals, hate to use an odd number, and 20" seems it'd be tedious.

TD

I picked 22" squares as it fit perfectly with a 6 ft countertop with some overhang and enough space in the back for plumbing. There's not a whole lot of space behind as most of that is used for the plumbing. If you're moving the chiller under the counter, you may impact the ability to put a 5 gal bucket under the conicals to dump trub.

If you can find a taller insulated cooler and move the conicals closer together you might be able to get away with an 8ft length though.
 
Thanks for the tips.


I asked a friend, who is an architect, if he'd whip up a print for me to give to the welder. Maybe he will do it for free. (Edit- yes he will!)

I agree on the holes. That's the only tricky part. We could probably cut a mock up out of cardboard and then use as a template to make sure we don't screw it up. I might try to locate the holes off center toward the front of the stand to increase the available space in the back. I also might mock up the cooler and conicals to see what kind of space ill have for stowing the cooler and AC there. My thought was initially sort of like one of the handicap scooter carriers that people have small platforms for mounted to the trailer hitch, sort of a shelf behind the the main cart, and if I could tuck it under a bit to lessen the footprint... I may consider making legs taller in order to do this.

As far as the plumbing, I was thinking of perhaps putting a piece of diamond plate steel on the back side of the cart like a large backsplash, and use that to mount the plumbing, and possibly even the control panel. Could maybe even route the plumbing through the plate and put some cool brewery graphic or something on the front side, with the plumbing hidden behind. That would somewhat get it out of the way for the cooler and AC.

One thing I am not sure about is positioning of the AC and the cooler and if they could be stacked with cooler above and AC below. I don't imagine there is a lot of flex to the coils. I suppose if I really want to, I could get an HVAC guy to customize the coil for repositioning or whatever. Had a guy repair my old kegerator when I hit a line drilling the side. He fixed the hole and added a refill fitting. Reasonable cost. That might offer some flexibility, but with added cost.

TD
 
That's what I did for mine I used a big piece of cardboard to make a template that fit around the conical.
 
One thing I am not sure about is positioning of the AC and the cooler and if they could be stacked with cooler above and AC below. I don't imagine there is a lot of flex to the coils. I suppose if I really want to, I could get an HVAC guy to customize the coil for repositioning or whatever. Had a guy repair my old kegerator when I hit a line drilling the side. He fixed the hole and added a refill fitting. Reasonable cost. That might offer some flexibility, but with added cost.

TD

Stock, you're not going to have enough slack to move the coil that far down. They're not exactly built for this purpose.
 
So I've been moking up the system in SketchUp (Thanks! This is a really cool app!) There are several pre-made models you can add in for free from Google, like the actual Conical themselves! Exactly what I needed to check on the clearance questions I have about the cooler and AC unit. I have them along the back rail, but they will ALSO fit in between the conicals, though I suspect it would be more difficult to do this way because of the coil orientation.

here are some pics. The big red thing is the Igloo 48qt Cooler, dims from Walmart. The Black thing is the AC unit, dims from Lowe's.

I need to see if I can get a cut-sheet out of the SketchUp app.

I will probably add some extra Tee's of the aluminum tubing for the cooler and the A/C unit so they will not simply be resting on a single rail.

TD

Cooler 1.jpg


cooler 2.jpg


cooler 3.jpg
 
Looks like it might work. Just double check that you have enough space for a bucket under the dump valve, otherwise it'll be a bit of a pain in the ass to dump the trub.
 
I'm sure there is a 5 gal bucket in the 3D models. I'll check on that. I can always inch the cooler/AC over a bit. I'm thinking I might need to counterweight the front of the frame to balance out the weight.

Thanks for the great idea.
For now, I need to wait for the welder, which is a side project for him. Before he can get started, my architect friend needs to get him prints, but he might be able to go off the SketchUp 3D model if I add dims, which is super easy. Once its built, I will need to order the tanks and cut the plates to fit. He has plasma cutter, so should be easy. I'll have them do template out of cardboard or something for each individually.

I was thinking about maybe adding a large backsplash out of some thin sheet metal, through which, and to which I can mount the plumbing.

I am thinking that the control panel can go on the side, but that will be the last thing I do.

I'll check in when I have some progress to report or some other questions.

TD

I'll be back here once I have the stand done. Then comes the fun part.
 
Since you don't have the frame built yet, why don't you just add 6 to 10 inches to the back and that way you don't have to worry bout anything
 
I'm sure there is a 5 gal bucket in the 3D models. I'll check on that. I can always inch the cooler/AC over a bit. I'm thinking I might need to counterweight the front of the frame to balance out the weight.

Just extend the frame however far back you need to fit the chiller under it. This also means you won't need the backsplash for the plumbing as it'll fit in the extra space.
 
Just a quick note on starting a process automatically with the BCS, there is a setting to start any process when the BCS is powered up. This is how I had my fermenter setup running a chest freezer. I believe the setting is hidden away under the system settings area.
 
Just a quick note on starting a process automatically with the BCS, there is a setting to start any process when the BCS is powered up. This is how I had my fermenter setup running a chest freezer. I believe the setting is hidden away under the system settings area.

Just took a look at this. Here's a screenshot of the system settings page.

It's under misc system settings > ProcX Force Run at Powerup

Supposedly this was broken in the 3.3 firmware, but works as of 3.4.

I'm going to set mine to run all four processes at start up. The downside is it could be trying to chill an empty fermenter (hah, like that happens for more than a day or two) should the power end up failing, but it's better than a bad batch.
 
packet said:
Just extend the frame however far back you need to fit the chiller under it. This also means you won't need the backsplash for the plumbing as it'll fit in the extra space.

Yep I think that's a good plan. It'll be extended 8" for overall 34" of depth, 74" length and 29" tall not counting the casters (3-4").

Architect is working on the draft for me to give to welder.

TD
 
Are you able to get the lines cold enough to Cold Crash your beer if you wanted to in the fermentor?

That's what I normally do for ales. After it's done fermenting, drop the temp to ~40 degrees. Come back a day later, open the racking valve until it starts running clear and then keg the beer.

This keeps the bulk of the yeast out of the keg and I normally don't bother with gelatin anymore. Whirlfloc and cold crashing prior to kegging keeps the beer pretty clear.

Lately I've been lagering in the conicals too. I dump off the trub, drop the temp, and then come back a few weeks later once I have free space in the kegerator. Works great.
 
packet said:
That's what I normally do for ales. After it's done fermenting, drop the temp to ~40 degrees. Come back a day later, open the racking valve until it starts running clear and then keg the beer.

This keeps the bulk of the yeast out of the keg and I normally don't bother with gelatin anymore. Whirlfloc and cold crashing prior to kegging keeps the beer pretty clear.

Lately I've been lagering in the conicals too. I dump off the trub, drop the temp, and then come back a few weeks later once I have free space in the kegerator. Works great.

This is exactly where I want to be.

I have a bottleneck right now in my temp controlled freezer ( 1.101 OG dopplebock inching toward its FG) fermentation space. I had initially thought I could conduct fermentations in the walkout basement in FL, which worked fine in spring, but summer is a no go, even with the AC cranked.

The other bottleneck is keg space and cooler space. Brewing once a month with some lagers in the mix now has been fun, but I can't really do the big lagers without a second controlled fermentation space.

By the way, how low can you get the temps in this manner? What was the highest temp of hot wort you can pump into the conicals from the brew pot? Seems I recall 140°F?

Thanks again.

TD
 
By the way, how low can you get the temps in this manner? What was the highest temp of hot wort you can pump into the conicals from the brew pot? Seems I recall 140°F?

I've only gone down to 40F. You can go lower if you want to. At most, you'd need to add more glycol to the mixture if you start getting ice forming. The A/C unit has more than enough power to chill all three conicals to any temperature you want. Your main restriction is the potential of freezing the beer.

I wouldn't run hot wort directly from your boil kettle. I'm not sure how high the plastic is rated, although I run PBW through it at ~120F. However, the real issue is the potential of inadvertently heating fermenting beer in other conicals. If you put a ton of heat in to one of the conicals, it's going to heat up the glycol mixture and there's a potential that it could recirculate through another conical if it needs to be chilled at the same time. You could probably program the BCS to protect from this happening, but it's something to think about.
 
Good point.

I currently use a plate chiller. I think there is debris inside it, as the performance isn't what it is capable of. I was thinking of running through my trub filter first, once I get it mounted to the brew stand, then runoff full blast and directly into the conicals, possibly using a bucket full of ice in the chilling water in the Brutus fashion, but without recirculating. This should knock below 80 for sure, but I suspect that using regular ground water I could be above 100 if going full blast.

Thanks.

TD
 
I use a counterflow chiller from morebeer. In the summer, tap water is in the low 70s here. I generally can get the wort in the low 80s with it, which the glycol will take down to 45 for pitching lagers or low 60s for ales. In the winter, the wort will be in the low 60s before it gets to the conicals anyways.

What I'd really like to find is a large plate chiller that I can take apart and clean. Pretty much this, but with a smaller price tag:

https://brewmagic.com/products/components/plate-pro-sanitary-plate-heat-exchanger
 
packet said:
I use a counterflow chiller from morebeer. In the summer, tap water is in the low 70s here. I generally can get the wort in the low 80s with it, which the glycol will take down to 45 for pitching lagers or low 60s for ales. In the winter, the wort will be in the low 60s before it gets to the conicals anyways.

What I'd really like to find is a large plate chiller that I can take apart and clean. Pretty much this, but with a smaller price tag:

https://brewmagic.com/products/components/plate-pro-sanitary-plate-heat-exchanger

That's on my bucket list now. I was thinking about getting another Chillzilla type convoluted copper counter flow chiller to do recirculated cooling, combined with a home built immersion chiller, but that was before I found your DIY thread here. Going to stick with the therminator and maybe I can clean it out for better performance.

On hold waiting for prints from architect friend.

TD
 
Going to stick with the therminator and maybe I can clean it out for better performance.

I'd probably throw it in an oven for a bit to kill off whatever may be in there, let it cool down, and then circulate PBW through it the opposite direction of wort flow for an hour or two. Should clean pretty much everything out of it.
 
packet said:
I'd probably throw it in an oven for a bit to kill off whatever may be in there, let it cool down, and then circulate PBW through it the opposite direction of wort flow for an hour or two. Should clean pretty much everything out of it.

I'm not getting any infections, but rather poor cooling performance. I think I need to provide some restriction on the outlet side to ensure full contact with all of the plates. JB says recirculate hot PBW for 1 hour in each direction. Haven't had a chance to try that yet.

TD
 
I'm not getting any infections, but rather poor cooling performance. I think I need to provide some restriction on the outlet side to ensure full contact with all of the plates. JB says recirculate hot PBW for 1 hour in each direction. Haven't had a chance to try that yet.

TD

Oh, are you pumping full speed through the plate chiller? That's probably why then. I have a ball valve on the output of the pump that I use to control the flow. I can generally chill ~1 gpm down to 70-80 degrees.
 
No. I restrict flow at pump outlet. I worry that the lack of back pressure results in suboptimal or incomplete contact with all plate surfaces. I'm adding a ball valve to restrict the flow.

Question about the bcs used for this system. Can you program it to drop or rise 1° per day if you wanted or would you need to make those adjustments manually each day?

Might not have enough surface area then. Plate chillers are supposed to be more efficient than counterflow chillers and I can't say I've had any huge issues with my counterflow chiller. I just wish I could take it apart to clean.

For the BCS, you can set a start and end temperature along with a time to reach that temp. The BCS will then take care of the math and drop it over time automatically.
 
Packet, I have a few window AC units lying around. I'm pretty sure they are much bigger than 5k BTU. At the time (6 or 7 years ago) they were the biggest units you could get that still ran off 120v.

Do you think a glycol system could be arranged to cool boiling wort to pitching temperature quickly? How long is it taking you to drop yours from 80 to 60 in the conicals?

How long does it take to get your glycol system from ambient down to operating temp?

Just wondering if I could build a glycol system and run the chilled glycol through my immersion chiller. It would keep me from having to buy ice and waste so much water.

Also, do you expect the glycol/water solution to remain pure over time or is it something mold will take to?

Thanks. I know this is a divergence from the original (awesome) thread. I can create a new thread if needed.
 
Packet, I have a few window AC units lying around. I'm pretty sure they are much bigger than 5k BTU. At the time (6 or 7 years ago) they were the biggest units you could get that still ran off 120v.

Do you think a glycol system could be arranged to cool boiling wort to pitching temperature quickly? How long is it taking you to drop yours from 80 to 60 in the conicals?

I haven't timed it, but 5-10 minutes or there about. Keep in mind I have a reservoir of 35 degree glycol for the initial chilling before the A/C unit kicks in. So, initially at least, it would cool quicker. I will say though, that even while chilling all 3 conicals at once, it is quite quick. Certainly a lot faster than the keezer I had been using prior to this for fermenting.

How long does it take to get your glycol system from ambient down to operating temp?

Again, I haven't timed it. However, it's quick enough that I never really noticed. It's been on since I built it. So, I haven't really had the chance to go from ambient down to operating temp all that often.

Just wondering if I could build a glycol system and run the chilled glycol through my immersion chiller. It would keep me from having to buy ice and waste so much water.

You could probably rig something up to work, especially with an A/C unit >5k BTU. I'd probably just make sure you chilled the glycol solution prior to needing it for cooling wort.

Also, do you expect the glycol/water solution to remain pure over time or is it something mold will take to?

The glycol will break down over time and cause rust on non-stainless steel metals. I haven't heard of any issues with mold though. I've been looking for a rust inhibitor for it off and on but haven't found anything that I'd consider food safe. Dow chemical makes a food safe glycol with rust inhibitors already in it, but it's a pain to get ahold of in the tiny quantities we'd need. I actually got my glycol from a vet supply store online.

Thanks. I know this is a divergence from the original (awesome) thread. I can create a new thread if needed.

No worries, glad to help. Probably wouldn't have seen your question if you had made another thread anyways.
 
Back
Top