• Please visit and share your knowledge at our sister communities:
  • If you have not, please join our official Homebrewing Facebook Group!

    Homebrewing Facebook Group

Designing kettle.

Homebrew Talk

Help Support Homebrew Talk:

This site may earn a commission from merchant affiliate links, including eBay, Amazon, and others.

Ridenour64

Well-Known Member
Joined
Sep 29, 2012
Messages
603
Reaction score
249
Hey everyone. I’ve been reading on these forums a lot trying to learn the process. I have history in making wine, cider, mead ETC. and I have recently made a few 1 gallon beer kits just to try and learn the process. I want to start doing 5 gallon all grain batches.

After reading on the forums, it sounds like a 15 gallon kettle is the way to go. I’ve decided on a custom spike TC kettle. I’m trying to figure out how many ports, and where exactly I should place them.

I do know that I want to put an element in the kettle so I can brew inside. I’ve read that my stove more than likely won’t be efficient. I’m thinking a TC at 12 o clock for the element. A TC at 6 o clock for the valve, and maybe a another TC at 6 but a few inches up for a thermometer.

Can you guys think of anything I’m missing, or not considering? I really don’t want to run any pumps or whirl pool or anything like that. I’d really like to keep this process simple. At least for now.

Im also open to any other advice for making BIAB easier on a 15 gal spike kettle. Baskets for holding the bag. Is a raise false bottom necessary when running an element ETC.

Thanks in advance!
 
I think 15gal is a good call. That's what I use and it has worked out well.

Some people with kettle mounted thermometers have torn their bags on the probe when lifting out the bag. This could be avoided by being very careful, but all it takes is one forgetful moment.

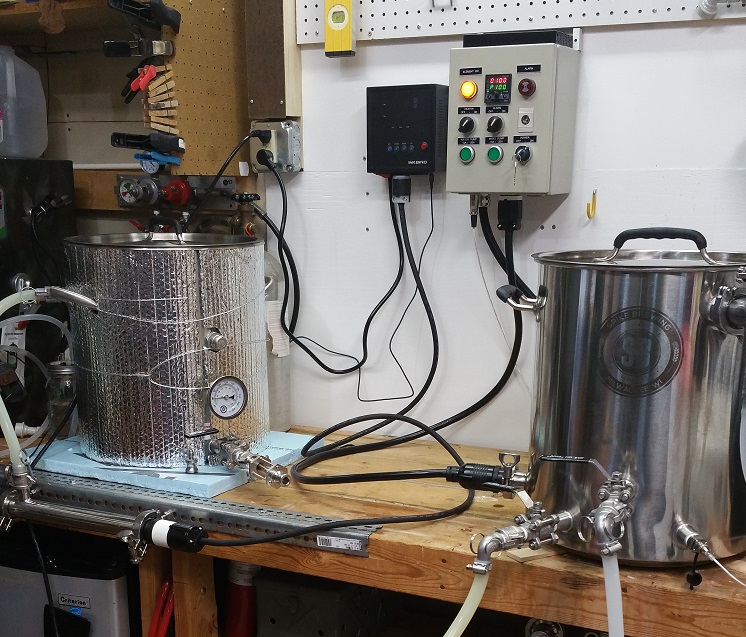
I use a thermometer with a remote probe, which goes over the top of the kettle rim. That arrangement also has the benefit of monitoring temps without removing kettle insulation during the mash.

IMG_20180209_165836_517.jpg
 
I think 15gal is a good call. That's what I use and it has worked out well.

Some people with kettle mounted thermometers have torn their bags on the probe when lifting out the bag. This could be avoided by being very careful, but all it takes is one forgetful moment.

I use a thermometer with a remote probe, which goes over the top of the kettle rim. That arrangement also has the benefit of monitoring temps without removing kettle insulation during the mash.

View attachment 596580

That’s a good point. The thermometer just hangs over the side and floats? You really only need it for the mash. And to check pitching temp. So you just have a port for a valve then, nothing else?
 
... The thermometer just hangs over the side and floats?

No it's not a floating probe. Look at the photo in my post above, the probe hangs from an aluminum bracket that goes over the edge of the kettle. I made the bracket from a piece of aluminum flashing, all it took was tin snips, a drill, and pliers.

You really only need it for the mash. And to check pitching temp.

The thermometer I use has hi/lo temp alarms, so that increases its usefulness. I use the alarms to beep me when water is at strike temp, if the mash temp drops too far, when the wort is almost boiling, and when the wort has been chilled to pitching temp. I find the alarms make me more time efficient. I don't have to monitor the temperature, the thermometer will do that and beep me when my targets are reached -- I am freed to do other things. It also has a timer function, I use that for my mash and boil times.

So you just have a port for a valve then, nothing else?

Correct, just a drain valve.
 
Agree with above, I had to plug my original thermometer hole since it to my bag. Don't make my mistake! I replaced my thermometer below a false bottom now.
 
Agree with above, I had to plug my original thermometer hole since it to my bag. Don't make my mistake! I replaced my thermometer below a false bottom now.

Can you tell me more about your false bottom? Are you using one for covering an element? Most BIAB users don’t use a false bottom right? Because the bag should catch whatever a false bottom would?
 
Can you tell me more about your false bottom? Are you using one for covering an element? Most BIAB users don’t use a false bottom right? Because the bag should catch whatever a false bottom would?
I am running an recirculation electric setup, so I need to keep the grain bag off the element, so I have the following false bottom:

https://www.brewhardware.com/product_p/biabbottom15.htm

I use 2" standoffs as I placed my element very low in my kettle. To avoid is too much dead space in my kettle.
 
Last edited:
Hey everyone. I’ve been reading on these forums a lot trying to learn the process. I have history in making wine, cider, mead ETC. and I have recently made a few 1 gallon beer kits just to try and learn the process. I want to start doing 5 gallon all grain batches.

After reading on the forums, it sounds like a 15 gallon kettle is the way to go. I’ve decided on a custom spike TC kettle. I’m trying to figure out how many ports, and where exactly I should place them.

I do know that I want to put an element in the kettle so I can brew inside. I’ve read that my stove more than likely won’t be efficient. I’m thinking a TC at 12 o clock for the element. A TC at 6 o clock for the valve, and maybe a another TC at 6 but a few inches up for a thermometer.

Can you guys think of anything I’m missing, or not considering? I really don’t want to run any pumps or whirl pool or anything like that. I’d really like to keep this process simple. At least for now.

Im also open to any other advice for making BIAB easier on a 15 gal spike kettle. Baskets for holding the bag. Is a raise false bottom necessary when running an element ETC.

Thanks in advance!
if you're getting a custom triclanp kettle just have the TC ferrule welded on anyways. It won't cost you much and if you change your mind in the future you have it ready to go.
 
I may end up getting that False bottom as well. My original plan was not to get one, just because any time that I have my bag in the kettle, I plan to have the heating element turned off.

And to get a 3rd port is an extra $50.00. I don’t mind spending an extra $50 on a kettle that should last forever, but it seems like it may be easier to get a thermometer that goes through the rim anyways.
 
One thing to think on is how you'll clean that kettle. When I had a TC port added to my Spike kettle, originally they wanted to put it in the 12:00 position. In my setup, that's against the wall, so plugging and unplugging would be difficult. Further, I wanted to be able to lay that kettle down on its side while I spray it out after using it, and that position would have made it more difficult.

I ended up with it at the 9:00 position, which is perfect for my setup.

So--think about ease of connecting/disconnecting, and cleaning.

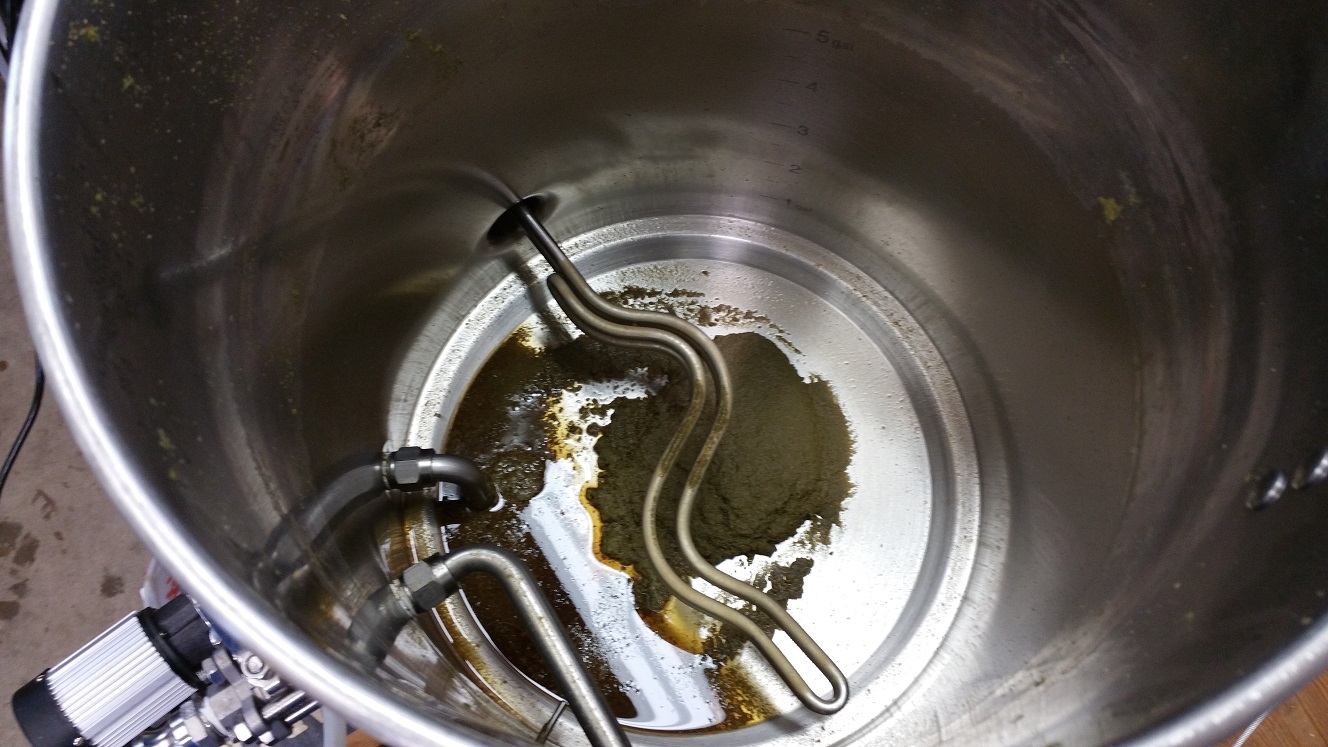
Here's a pic that shows the 9:00 position of the element port, and you can see how it's easier in my setup to have it there instead of at the back.

newsetup9.jpg
 
Just out of curiosity, any reason you didn't choose say, 10:30 for the element? You'd still be able to lay the kettle down, it wouldn't be much harder to plug/unplug the element, and have that 2 feet to the left of the kettle free in case you ever want to use that part of the bench for something.

Not criticizing, just trying to figure out all the intricacies.

I didn't take it as criticizing.

If you look at the front of the kettle, you'll see where the temp probe goes in on the lower right. A 9:00 position ensures I clear that. I didn't want the element next to the temp probe. Further, from the pic below, you can see the whirlpool arm, and I didn't want the element below that. Some of this was flying blind--I'd never done it before, so it just made sense that I'd keep the element away from that stuff.

I know it looks like the cord is maybe somewhat in the way, but it's not.

Here's a pic; at the time, I didn't have all the parts so I was hedging my bets a bit, as if I'd had them maybe i could have measured and dry fit and moved it.

trubcone2.jpg
 
Thanks for all the help guys. I have decided on a valve port at 6, and a element port at 3 or 9 per your recommendation. I agree that would work better. Now I’m just torn on whether or not I should put a 3rd port or not.
 
Thanks for all the help guys. I have decided on a valve port at 6, and a element port at 3 or 9 per your recommendation. I agree that would work better. Now I’m just torn on whether or not I should put a 3rd port or not.

I'll help you. The answer is...yes. You're going to spend a lot to have it added later on, if you decide to do that. So close your eyes, grab your wallet, and get what you think you'll want/need.

*********

The NPT ports are cheaper; I wouldn't change what's on the front of mine. The temp probe fits without issues; to use that with TC you'd need a TC connection which is the cost of the connection, the clamp, and the gasket. On mine, there's none of that, it just plugs in (and unplugs just as easily).

Same with whirlpool port and racking port; I can't see any advantage to using TC for those over what I have.

For the element? Yeah. For the steam slayer at the top? Yeah. But otherwise, no.

************

Depending on your setup, you might use a standard NPT kettle, and then have them add whatever TC ports you need, at the time.

If you're going to this extent, I'm thinking you'll want the racking port, the whirlpool port, the temp port, and the element port. If you think the steam slayer is also a possibility, then that too. Getting the standard NPT kettle and having them add a TC port may be significantly cheaper, both with the higher price of the ports, and the cost of connections.

Just a thought. And FWIW, I have TC ports obviously on the kettle as well as my Spike CF10.
 
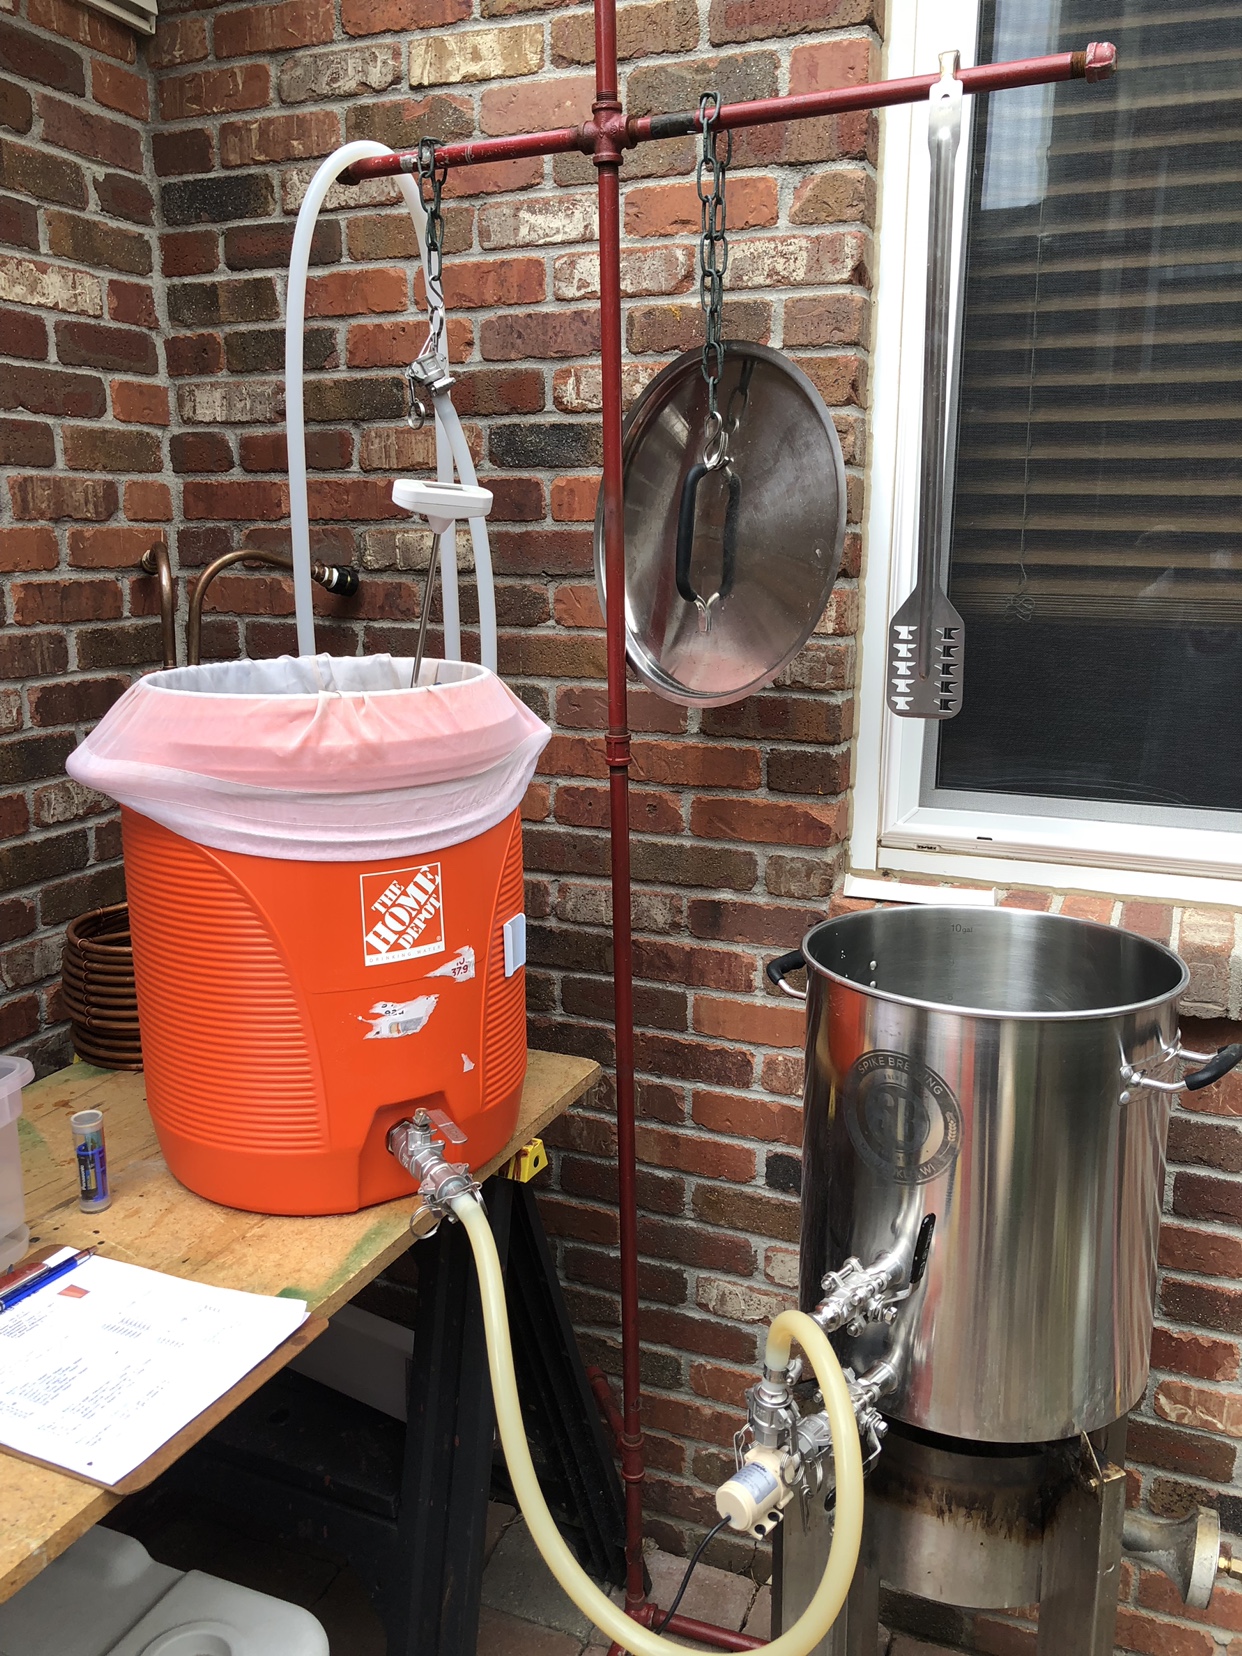
Perhaps you could use a 3rd port for whirlpool? I have a two port Spike - one port on top of the other. The top port was originally used for a thermometer but I now use it as a whirlpool port.

I connect a small pump to the bottom port (ball valve) and run a hose to the top port, which has another ball valve. I run the whirlpool when I add my IC.

This picture doesn’t show the whirlpool hooked up but you can see the pump and configuration

IMG_4298.JPG
 
Ok, I am going with a 3rd port. Makes sense to get it now, and just close it if I don’t use. But have the opportunity to use it down the road once I learn more.

What is a steam slayer though? Have not heard of that before
 
I just looked it up too. Tempting. But I hate to waste a ton of water in the interest of being green. 6 G/hr isn’t too bad though.
 
Last edited:
Go 9 gph. Don't cheap out on it.

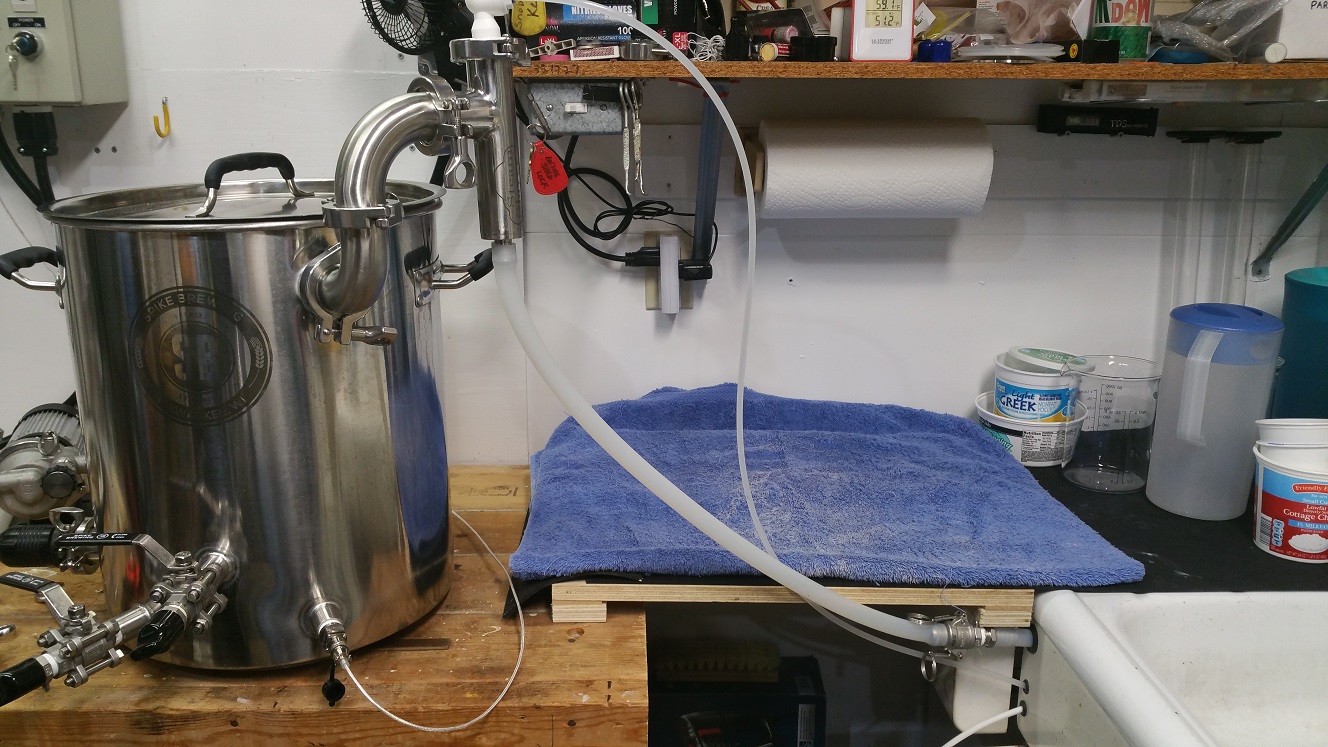
I just got a Steam Slayer a couple months ago. I've used it a couple times, and what it does is this: I can brew in the garage in the winter with the doors closed. Instead of dumping 1/2 to 1 gallon of water/steam into the air, it condenses it and collects it in a bucket (or in my case, I can send it down a drain, too).

It's sold by Brewhardware.com. It's so much better than a vent hood or a fan in a window, having to provide cold makeup air to feed the fan, something to warm the garage up....

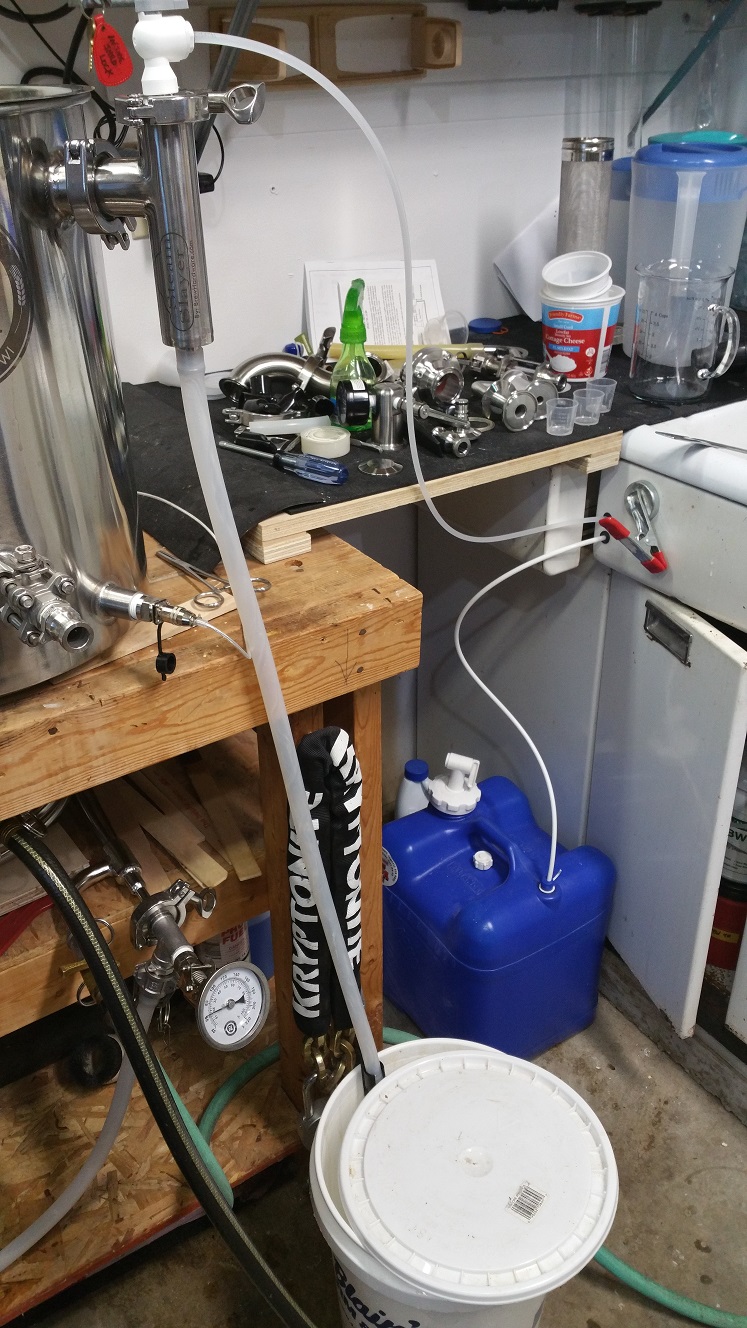
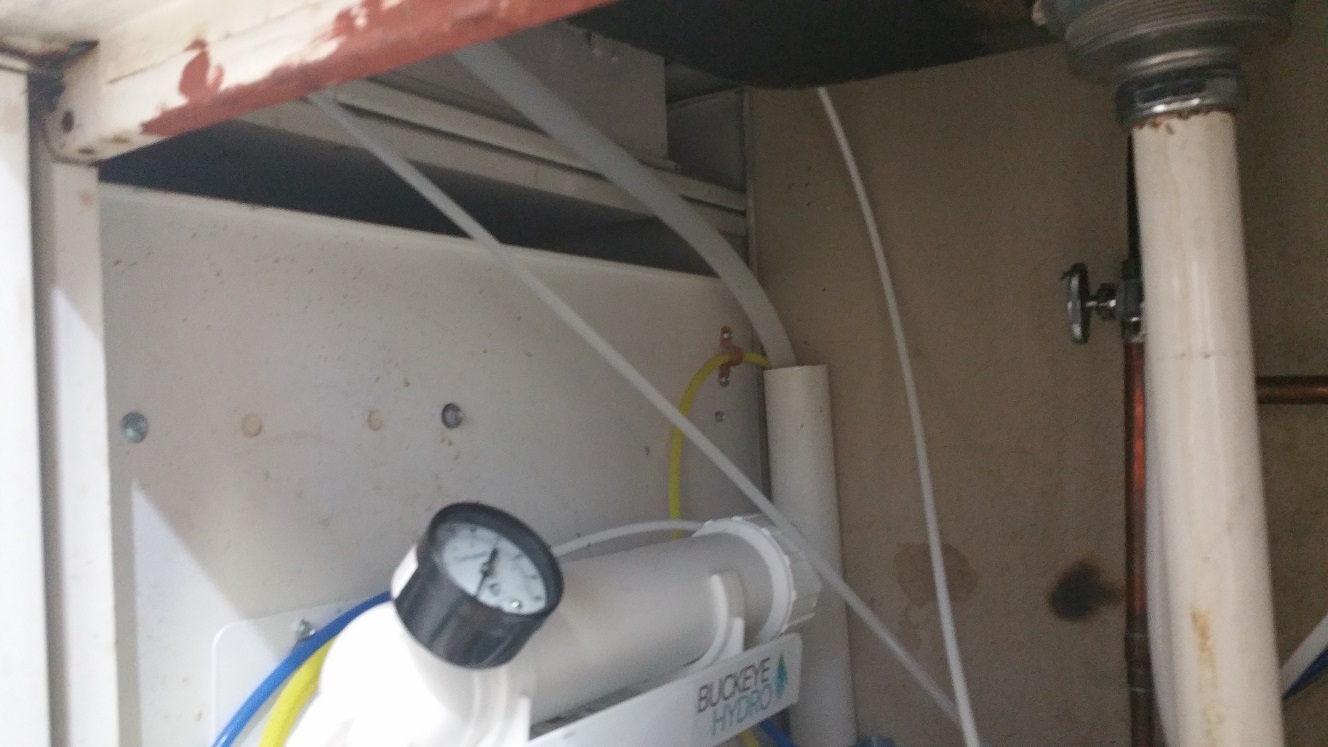
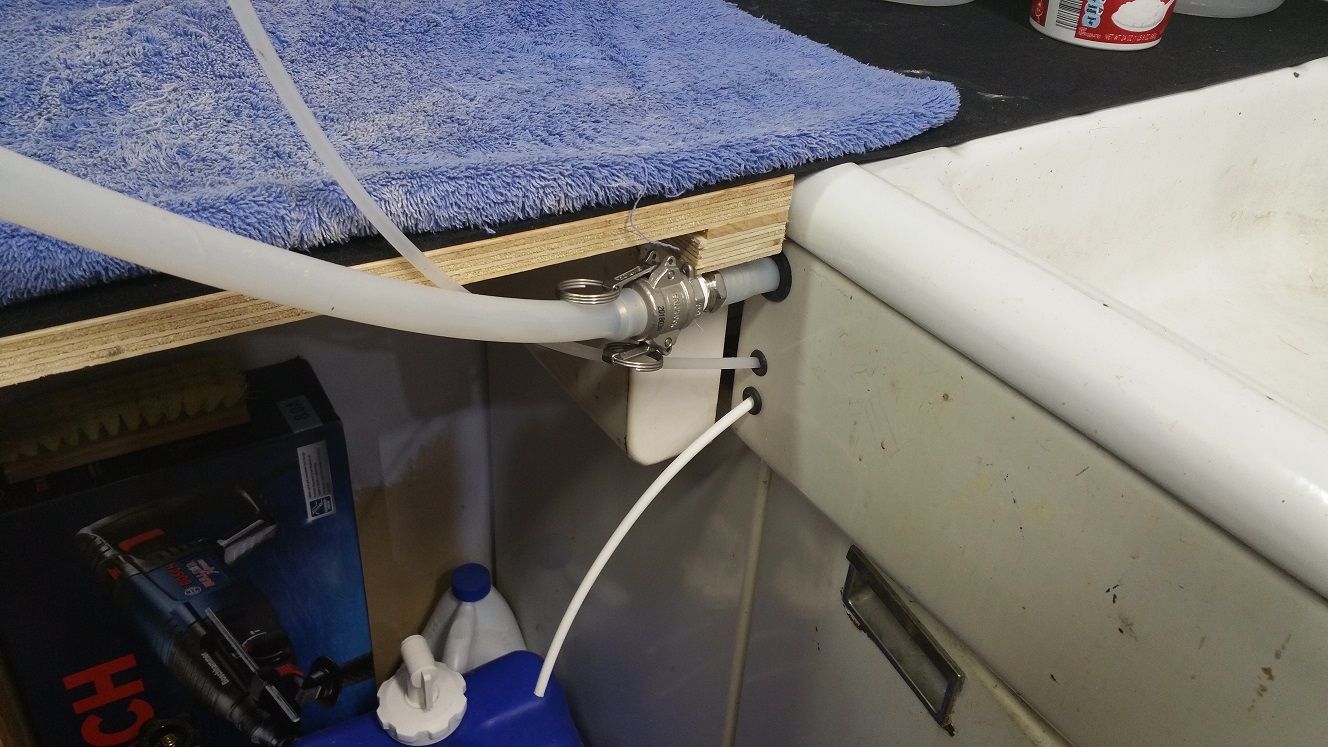
It comes with a connector that you can connect to a garden hose, sink faucet w/ a garden hose converter, whatever. I have a hose bib under my sink and that's what the tubing is connected to.


steamslayerwater.jpg


I've since set it up so I can run the wastewater through to a drain trap under the sink. I can also set it up to collect in a bucket and use that water for cleaning.

This really is a cool solution. You need a TC port high on the kettle, and a water source. I used it on my last brew day about 11 days ago, and I collected almost exactly 10 gallons from it. Compared to the cost of running a propane heater to keep the garage tolerable while the fan sucks the warm air out and it's replaced by cold air...it's no worse, and I suspect quite a bit better. Depends on what 10 gallons of water costs. :)

Couple more pics. I use the double 90-degree elbows to get it high enough that I won't get any boilup in the steam slayer and to get me enough drop to the drain. But it works just fine also with the bucket.

slayer3.jpg
slayer4.jpg
slayer5.jpg
 
Am I the only one that doesn't like these steam condensing solutions?
I like watching the boil and smelling the smells. A hood works just fine. This seems like the solution that nobody knew they needed. Am I crazy?
 
Am I the only one that doesn't like these steam condensing solutions?
I like watching the boil and smelling the smells. A hood works just fine. This seems like the solution that nobody knew they needed. Am I crazy?

You're not crazy, but I do wonder: why the hostility?

I live in Wisconsin. Gets cold here in winter. The steam slayer is the perfect solution for my set of circumstances. It may or may not be for you, especially if you need to look at boiling wort. I don't have that need, I've seen it all before. But it's ok if that's an important part of your brew day. I won't judge, because it's your brew day, not mine.

And, yeah, a hood works just fine, assuming you want to spend the extra money, and that you don't have the same circumstances I do.
 
Am I the only one that doesn't like these steam condensing solutions?
I like watching the boil and smelling the smells. A hood works just fine. This seems like the solution that nobody knew they needed. Am I crazy?

Speak for yourself. A hood works just fine when the outside air that you have to replace all that exhaust with is 60F with low humidity. And that's of course assuming installing a hood in your garage won't cost more than your entire brewing rig.

In places that actually get seasons, setting up a garage to exhaust steam when it's -10F outside is not my idea of a good time. And when you have to pay for two wall penetrations and a roof penetration just to get the sheer joy of that frigid air racing across your body, alternative solutions become attractive pretty damn quick.

Without a steam condenser, brewing indoors is not a viable option for a lot of people.
 
Yeah I live in Ohio. I’d like to brew in my basement to have some space. Condenser seems like a reasonable option. If I did it in my kitchen I would just crack a window. I don’t think 1 gallon of water throughout the house (upstairs, not in the basement) is an issue anyways in the winter because my house is super dry in the winter.

I agree though. I love the smell.
 
Yes sorry, I need to proof read better. Thanks for all your help.
 
I’d really like to keep this process simple. At least for now.
!

You would like to keep it simple, yet also want to "design" a kettle? Simple in my opinion is a kettle, bag and a heat source. Everything else is pretty much optional gingerbread...
 
Well, there are levels to simple. The items I’ve mentioned in this post thus far I deem simple.

Having a valve in the front of my kettle for ease of getting wort into a carboy = simple.

Lifting a 15 gal capacity kettle holding 5+ gallons of liquid and trying to dump through a funnel = not simple.

Building a controller, RIMs, Herms. These were what I was referring to as not simple.

I’m all for simple solutions to making a brew day easier.
 
The reason I made this post was because I want to order a kettle 1 time. I would love to just have a basic kettle right now just to do a few batches. But I know I’ll want more in a few months, and will spend more money in the long run if I don’t address it now and get it right the first time. I do plan to grow in the hobby though and take more on later.
 
Simple sometimes also means limited. BIAB is relatively simple, but it doesn't allow easily for control of mash temp like a RIMS does.

It also doesn't allow for tight LODO techniques. If I'm trying to get O2 out of the process, simple as in BIAB isn't useful.

Same with control of steam with a steam slayer.
 
Am I the only one that doesn't like these steam condensing solutions?
I like watching the boil and smelling the smells. A hood works just fine. This seems like the solution that nobody knew they needed. Am I crazy?

You know who doesn't like the smells? The potential next buyer of your house. I started brewing in my shop about 4 years ago and did very little to evacuate the steam except for turning the bathroom fart fan on and cracking a window. Afterall, there was 1600 sqft of air and only a gallon and a half of moisture. All the strange volatiles in wort, like DMS, end up condensing on all the cold surfaces of the room and eventually it gets nasty almost like a smoker's house.

If you want to brew inside in the winter, you have to figure this out one way or another.
 
Having a valve in the front of my kettle for ease of getting wort into a carboy = simple.

Lifting a 15 gal capacity kettle holding 5+ gallons of liquid and trying to dump through a funnel = not simple.

.

Perhaps showing my age a bit, I’m certainly not suggesting trying to pick up a kettle and pour out the contents.

The racking cane and tubing was once and still is a valuable essential tool for home brewing, but lately all you see are posts like “my auto siphon isn’t working....help”

Ok using a racking cane takes a couple minutes extra, but you never have to post “my kettle valve was filthy...infected batch?”
 
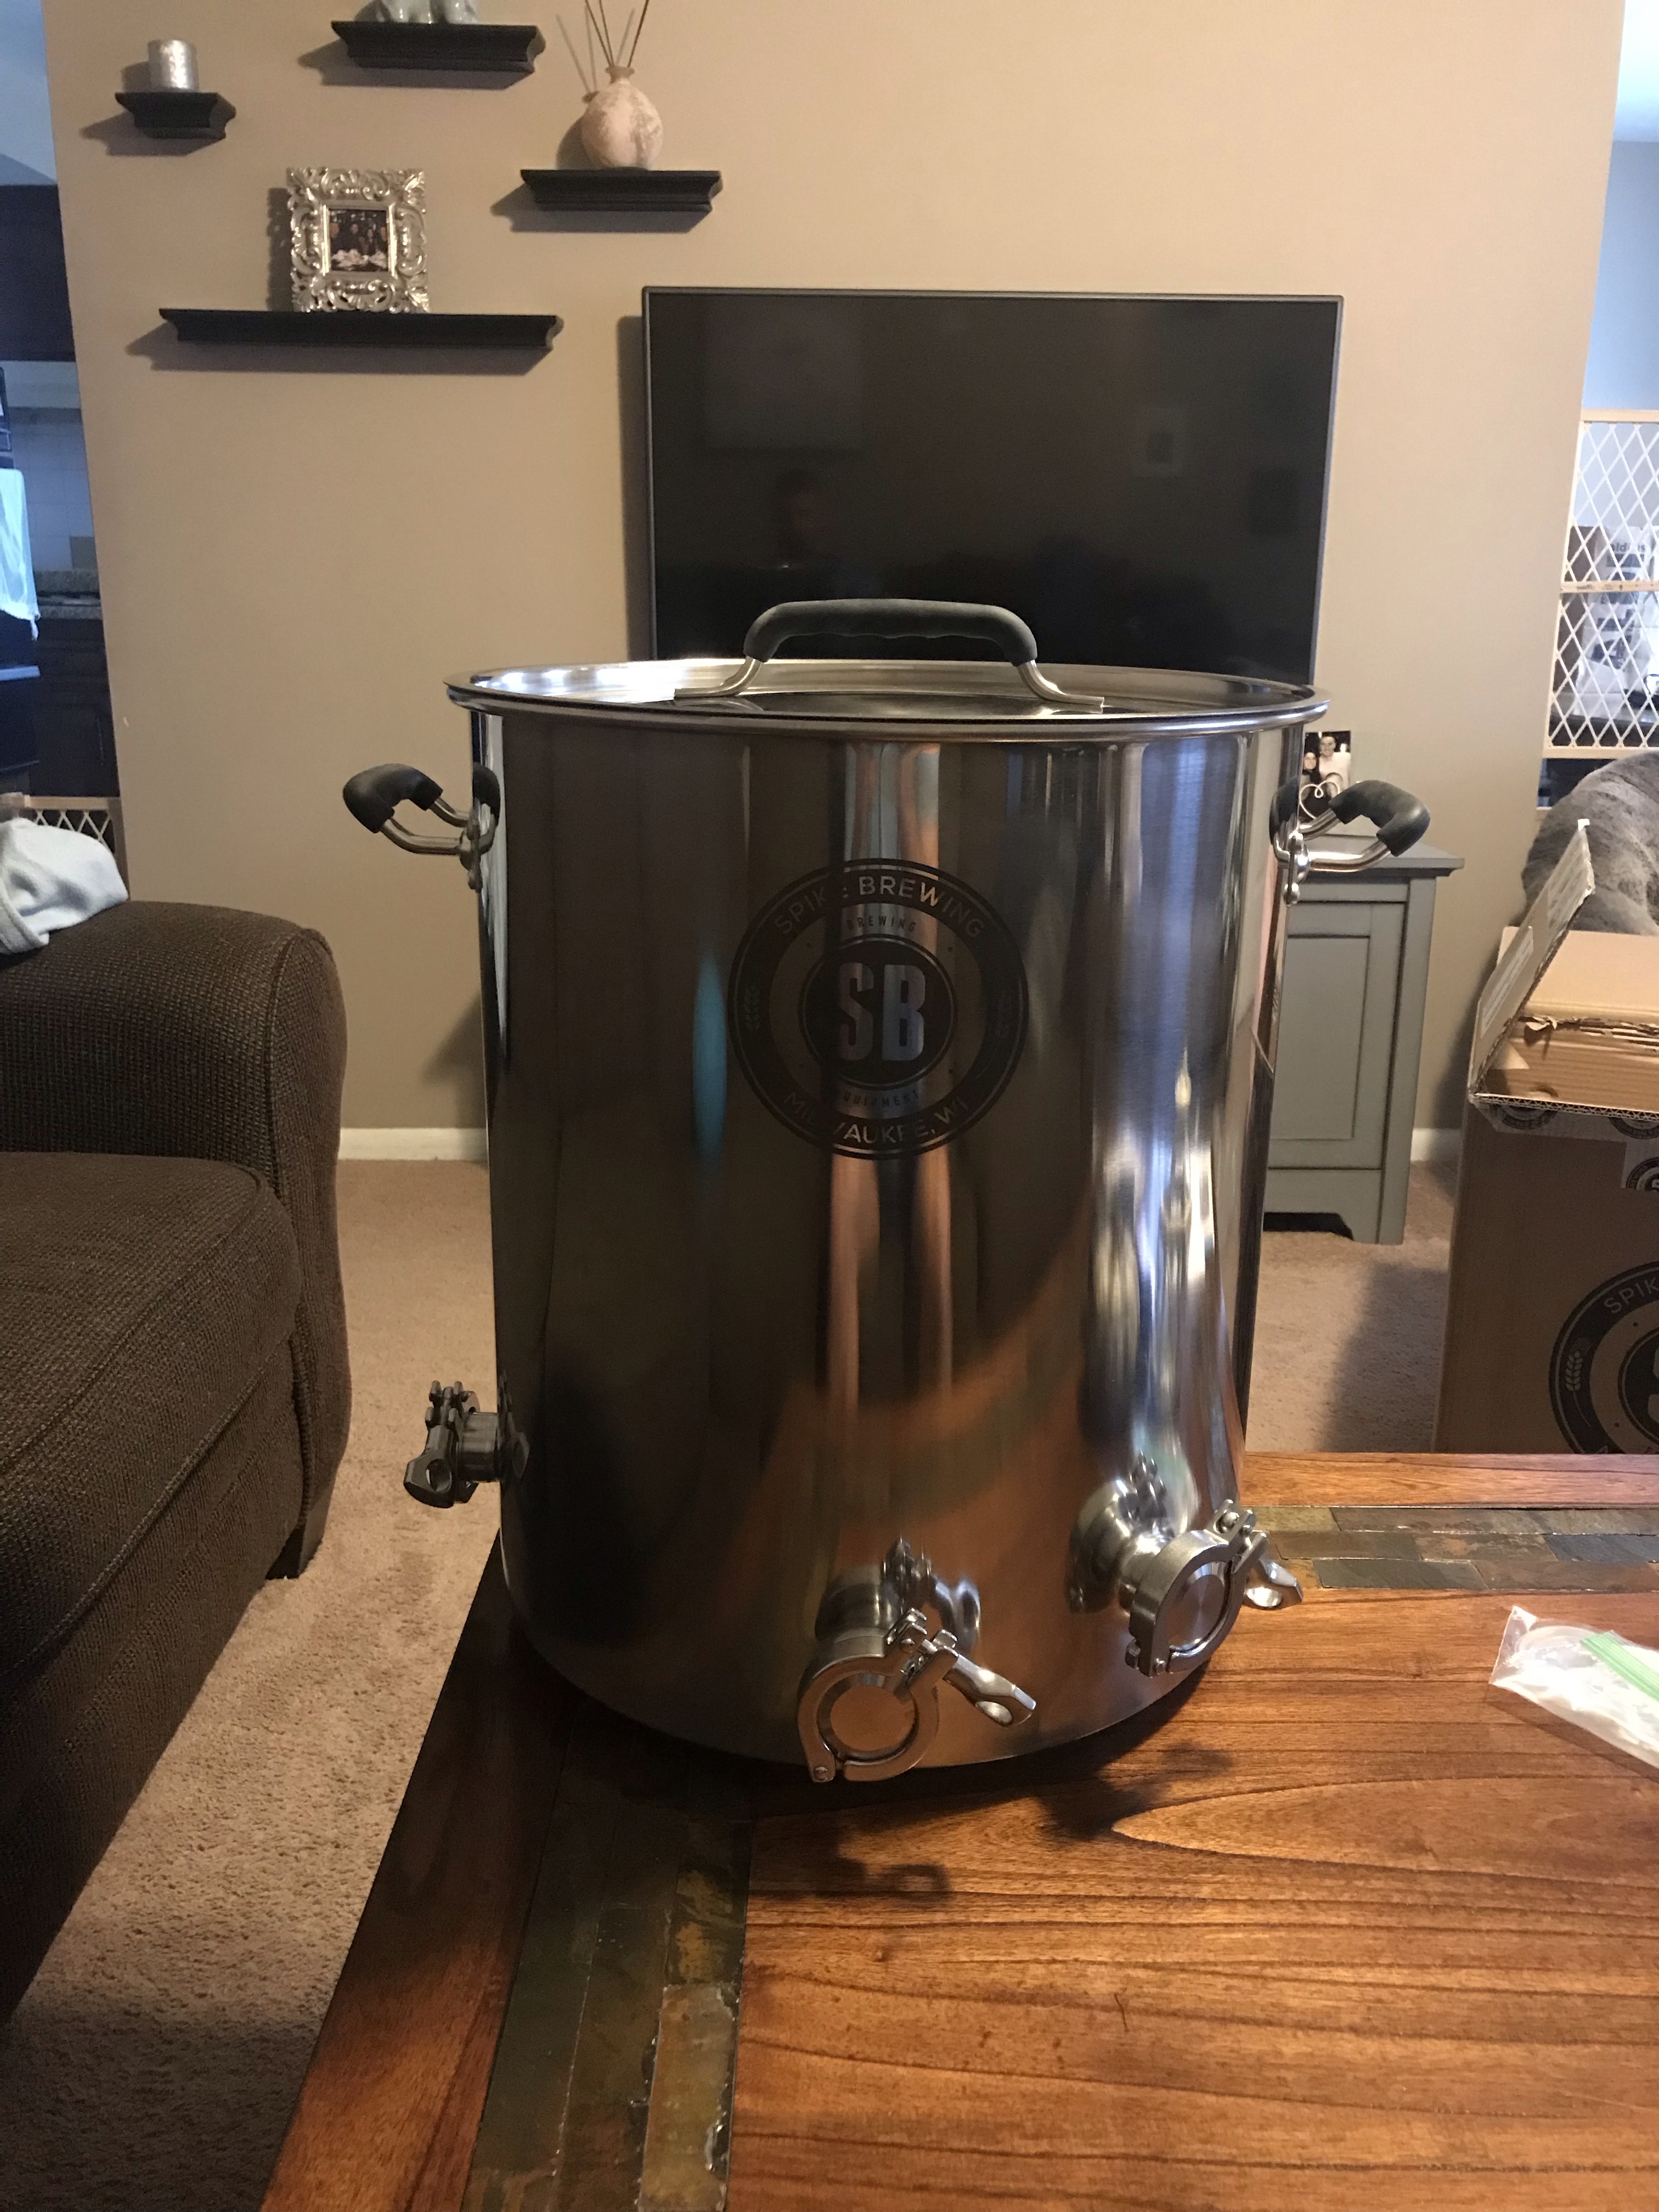
This thing is a lot more heavy duty than I expected. It’s not shown, but there’s another TC on the back for either a steam slayer or recirculating. I’m definitely happy with it. Like I said, I’m impressed with the quality here. The welds are good.

Side note, I put 7.5 gallons of water in it and put it on the stove. It’s big enough to fit over two burners (10K BTU each). I used hot tap water, and on the stove for over an hour, the best I could do is a weak simmer. I will be going with a 5500 W element here soon.

Edit: after draining the kettle I noticed a few freckles of rust. Probably not a concern but I didn’t expect to see that the same day I received it.
 
Last edited:

Latest posts

Back
Top